Allen + Roth WSWS-CS1C Manual De Usario
Ocultar thumbs
Ver también para WSWS-CS1C:
- Manual de instrucciones (69 páginas) ,
- Manual del usuario (22 páginas)
Tabla de contenido
Publicidad
Idiomas disponibles
Idiomas disponibles
Enlaces rápidos
welcoming • sophisticated • inspiring
allen + roth
is a registered trademark
®
of LF, LLC. All Rights Reserved.
ATTACH YOUR RECEIPT HERE
Serial Number
Purchase Date
Questions, problems, missing parts? Before returning to your retailer, call our customer
service department at 1-866-439-9800, 8 a.m. - 8 p.m., EST, Monday - Friday.
EB1425
ITEM #0339203, 0339204, 0339205, 0339206, 0810374
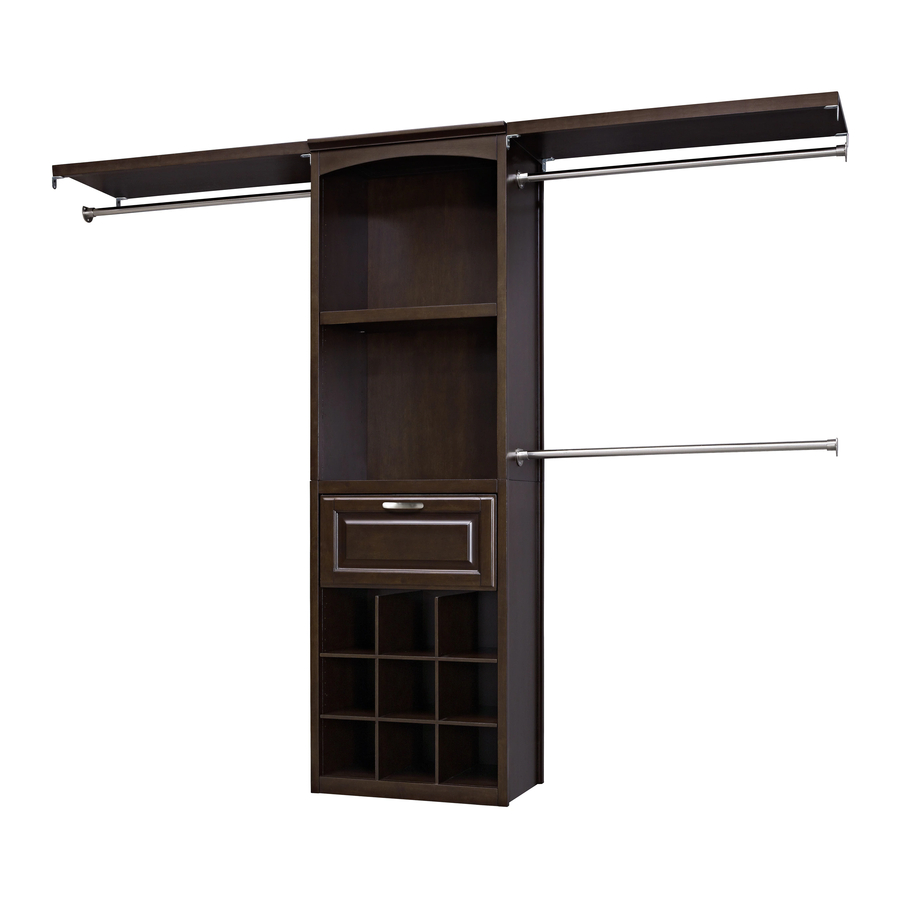
COMPLETE CLOSET KIT
MODEL #WSWS-CS1C, WSWS-CS1W
WSWS-CS1P, WSWS-CS1S, WSWS-CS1G
Français p. 22
Español p. 43
Lowes.com/allenandroth
Date: 2016-07-27 Rev. 0001-A
1
Publicidad
Capítulos
Tabla de contenido
Solución de problemas

Manuales relacionados para Allen + Roth WSWS-CS1C


Resumen de contenidos para Allen + Roth WSWS-CS1C
- Página 1 ITEM #0339203, 0339204, 0339205, 0339206, 0810374 allen + roth is a registered trademark ® of LF, LLC. All Rights Reserved. COMPLETE CLOSET KIT MODEL #WSWS-CS1C, WSWS-CS1W WSWS-CS1P, WSWS-CS1S, WSWS-CS1G Français p. 22 ATTACH YOUR RECEIPT HERE Español p. 43 Serial Number...
-
Página 2: Tabla De Contenido
TABLE OF CONTENTS PACKAGE CONTENTS Camlock System Operation....................2 Package Contents....................... 3 Hardware Contents.......................4 Safety Information....................... 6 Preparation ......................... 6 Assembly Instructions......................7 Care and Maintenance ....................... 17 Troubleshooting........................17 Warranty..........................19 Replacement Parts List ...................... 19 CAM LOCK SYSTEM OPERATION DETAIL A DETAIL B CAM LOCK... -
Página 3: Hardware Contents
HARDWARE CONTENTS (shown not actual size) HARDWARE CONTENTS (shown not actual size) 1/4 x 1-1/4 in. Lock Flat Large Medium Large Drawer Handle L - Bracket Barrel Nut Bolt Washer Washer Cam Lock Cam Bolt Cam Bolt Qty. 1 Qty. 8 Qty. -
Página 4: Safety Information
ASSEMBLY INSTRUCTIONS SAFETY INFORMATION Base Assembly Please read and understand this entire manual before attempting to assemble, operate or install the product. 1. Press the release lever on slides (U) and remove the slide runner. • Do not allow children to climb or play in or around this product. Release Lever •... - Página 5 ASSEMBLY INSTRUCTIONS ASSEMBLY INSTRUCTIONS 4. Attach base panel right (I) to assembly using large 7. Attach base panel left (H) to assembly using large wood dowels (HH) and large cam locks (DD). wood dowels (HH) and large cam locks (DD). Note: Make sure previously inserted medium cam bolts Note: Make sure previously inserted medium cam bolts (EE) are completely seated.
- Página 6 ASSEMBLY INSTRUCTIONS ASSEMBLY INSTRUCTIONS 10. Attach hutch panel left (A) and hutch panel right (B) to 12. Carefully rest hutch assembly on its side. Insert hutch panel back (D) and either front curved stretcher (E) barrel nuts (VV) and large cam bolts (UU) into the or front straight stretcher (F) -- depending on which fi...
-
Página 7: Assembly Instructions
ASSEMBLY INSTRUCTIONS ASSEMBLY INSTRUCTIONS 15. Insert drawer bottom panel (T) into drawer left 18. Insert the drawer into the assembly by pressing Hutch panel (R), drawer right panel (Q) and drawer back down the release levers on the slide runners and panel (S). - Página 8 ASSEMBLY INSTRUCTIONS ASSEMBLY INSTRUCTIONS Long Shelf Installation Wall Hanging Installation Note: If long shelf (V) needs cut to fi t inside your closet 21. Using a stud fi nder, locate the edges of the wood studs. Find the center line of each stud and draw a 16 in.
-
Página 9: Care And Maintenance
ASSEMBLY INSTRUCTIONS CARE AND MAINTENANCE Pole Installation • Periodically check to make certain all components are properly positioned, free from damage and fi rmly connected. 25. Insert 22 mm metal poles (X) into 25 mm metal • Use a soft, clean cloth that will not scratch the surface when dusting. poles (Y). -
Página 10: Warranty
Reinstall the wall hanging cleats and PART DESCRIPTION PART # level. ensure they are level. Hutch Panel Left *WSWS-CS1C/W/P/S/G-1-HPL Hutch Panel Right *WSWS-CS1C/W/P/S/G-2-HPR Hutch Panel Top *WSWS-CS1C/W/P/S/G-3-HPT Closet tower can not The mounting hole locations are Reinstall wall hanging cleats; make... - Página 11 *WSWS-CS1C/W/P/S/G-46-M4AW Touch-up Pen *WSWS-CS1C/W/S/G-50-TUP Open Pole Holder *WSWS-CS1C/W/P/S/G-48-OPH Closed Pole Holder *WSWS-CS1C/W/P/S/G-49-CPH M4 x 15 mm Self-tapping Screw *WSWS-CS1C/W/P/S/G-47-15SS Complete Hardware *WSWS-CS1C/W/P/S/G-48-CH Printed in Vietnam allen + roth® is a registered trademark of LF, LLC. All Rights Reserved. Lowes.com/allenandroth Lowes.com/allenandroth...
- Página 12 • sophisticated • inspiring ARTICLE #0339203, 0339204, 0339205, 0339206, 0810374 allen + roth® est une marque de commerce déposée de LF, LLC. Tous droits réservés. ENSEMBLE COMPLET POUR LE PLACARD MODÈLE #WSWS-CS1C, WSWS-CS1W WSWS-CS1P, WSWS-CS1S, WSWS-CS1G JOIGNEZ VOTRE REÇU ICI Numéro de série...
- Página 13 TABLE DES MATIÈRES CONTENU DE L’EMBALLAGE Fonctionnement du système Camloc ................23 Contenu de l’emballage..................... 24 Quincaillerie incluse......................25 Consignes de sécurité....................... 27 Préparation ........................27 Instructions pour l’assemblage..................28 Entretien ........................... 38 Dépannage........................38 Garantie..........................40 Liste des pièces de rechange.................... 40 FONCTIONNEMENT DU SYSTÈME CAMLOC DÉTAIL A DÉTAIL B...
-
Página 14: Quincaillerie Incluse
QUINCAILLERIE INCLUSE (non illustrée à la grandeur réelle) QUINCAILLERIE INCLUSE (non illustrée à la grandeur réelle) Écrou à portée Boulon de 1/4 Rondelle de Rondelle Grande attache Vis Camloc Grande vis Poignée de tiroir Support en L cylindrique po x 1 1/4 po blocage plate Camloc... -
Página 15: Consignes De Sécurité
INSTRUCTIONS POUR L’ASSEMBLAGE CONSIGNES DE SÉCURITÉ Assemblage de la base Assurez-vous de lire et de comprendre l’intégralité du présent manuel avant de tenter 1. Appuyez sur le levier de dégagement sur les d’assembler, d’utiliser ou d’installer le produit. Levier de glissières (U) et retirez la pièce coulissante. - Página 16 INSTRUCTIONS POUR L’ASSEMBLAGE INSTRUCTIONS POUR L’ASSEMBLAGE 4. Fixez le panneau droit de la base (I) à l’ensemble 7. Fixez le panneau gauche de la base (H) à l’ensemble à l’aide de goujons de bois longs (HH) et de grandes à l’aide de goujons de bois longs (HH) et de grandes attaches Camloc (DD).
- Página 17 INSTRUCTIONS POUR L’ASSEMBLAGE INSTRUCTIONS POUR L’ASSEMBLAGE 10. Fixez le panneau gauche de l’étagère (A) et le panneau droit de l’étagère (B) au panneau arrière (D), ainsi que 12. Déposez soigneusement l’ensemble de l’étagère l’entretoise avant courbée ou droite (selon le style de sur le côté.
- Página 18 INSTRUCTIONS POUR L’ASSEMBLAGE INSTRUCTIONS POUR L’ASSEMBLAGE 15. Insérez le fond du tiroir (T) dans le panneau 18. Insérez le tiroir dans l’ensemble en appuyant Étagère gauche du tiroir (R), le panneau droit du tiroir (Q) et sur les leviers de dégagement des glissières et en le panneau arrière du tiroir (S).
- Página 19 INSTRUCTIONS POUR L’ASSEMBLAGE INSTRUCTIONS POUR L’ASSEMBLAGE Installation de la tablette longue Installation au mur Remarque : Si la tablette longue (V) doit être coupée pour 21. À l’aide d’un détecteur de montants, repérez les bordures des montants. Trouvez le centre de chaque tenir à...
-
Página 20: Entretien
INSTRUCTIONS POUR L’ASSEMBLAGE ENTRETIEN • Vérifi ez périodiquement si les composants sont bien positionnés, en bon état et fermement Installation des tringles montés. 25. Insérez les tringles métalliques de 22 mm (X) dans les • Utilisez un linge doux et propre qui n’égratignera pas la surface lorsque vous époussetterez tringles métalliques de 25 mm (Y). -
Página 21: Garantie
DE PIÈCE de niveau. Panneau gauche de l’étagère *WSWS-CS1C/W/P/S/G-1-HPL Panneau droit de l’étagère *WSWS-CS1C/W/P/S/G-2-HPR Panneau supérieur de l’étagère *WSWS-CS1C/W/P/S/G-3-HPT La tour de rangement Les emplacements des trous de Réinstallez les traverses de fi xation Panneau arrière de l’étagère *WSWS-CS1C/W/P/S/G-4-HPB ne s’installe pas au montage ne sont pas corrects. -
Página 22: Tringle Métallique De
Support à tringle ouvert *WSWS-CS1C/W/P/S/G-48-OPH Support à tringle fermé *WSWS-CS1C/W/P/S/G-49-CPH Vis autotaraudeuse M4 de 15 mm *WSWS-CS1C/W/P/S/G-47-15SS Quincaillerie complète *WSWS-CS1C/W/P/S/G-48-CH Imprimé au Vietnam allen + roth® est une marque de commerce déposée de LF, LLC. Tous droits réservés. Lowes.com/allenandroth Lowes.com/allenandroth... -
Página 23: Kit De Armario Completo
• sophisticated • inspiring ARTÍCULOS #0339203, 0339204, 0339205, 0339206, 0810374 allen + roth® es una marca registrada de LF, LLC. Todos los derechos reservados. KIT DE ARMARIO COMPLETO MODELOS #WSWS-CS1C, WSWS-CS1W WSWS-CS1P, WSWS-CS1S, WSWS-CS1G ADJUNTE SU RECIBO AQUÍ Número de serie Fecha de compra ¿Preguntas, problemas, piezas faltantes? Antes de volver a la tienda, llame a nuestro Departamento... - Página 24 ÍNDICE CONTENIDO DEL PAQUETE Funcionamiento del sistema de cerrojo de leva..............44 Contenido del paquete......................45 Aditamentos.........................46 Información de seguridad....................48 Preparación........................48 Instrucciones de ensamblaje..................... 49 Cuidado y mantenimiento ....................59 Solución de problemas...................... 59 Garantía..........................61 Lista de piezas de repuesto ....................61 FUNCIONAMIENTO DEL SISTEMA DE CERROJO DE LEVA DETALLE A DETALLE B...
- Página 25 ADITAMENTOS (no se muestran en tamaño real) ADITAMENTOS (no se muestran en tamaño real) Perno de Arandela de Arandela Cerrojo de Perno de leva Manija de la gaveta Abrazadera en L Perno de leva grande Tuerca cilíndrica 1/4 x 1-1/4 pulg seguridad plana leva grande...
-
Página 26: Información De Seguridad
INSTRUCCIONES DE ENSAMBLAJE INFORMACIÓN DE SEGURIDAD Ensamblaje de la base Lea y comprenda completamente este manual antes de intentar ensamblar, usar o instalar el producto. 1. Presione la palanca de liberación en los Palanca de deslizadores (U) y retire el riel de deslizamiento. •... - Página 27 INSTRUCCIONES DE ENSAMBLAJE INSTRUCCIONES DE ENSAMBLAJE 4. Fije el panel de base derecho (I) al ensamblaje con las 7. Fije el panel de base izquierdo (H) al ensamblaje con espigas grandes de madera (HH) y los cerrojos de leva las espigas grandes de madera (HH) y los cerrojos de leva grandes (DD).
- Página 28 INSTRUCCIONES DE ENSAMBLAJE INSTRUCCIONES DE ENSAMBLAJE 10. Fije el panel de repisa izquierdo (A) y el panel de 12. Cuidadosamente, apoye el ensamblaje de la repisa repisa derecho (B) al panel de repisa posterior (D) y al de costado. Inserte las tuercas cilíndricas (VV) y los extensor curvo frontal (E) o al extensor recto frontal (F) pernos de leva grandes (UU) en la parte inferior del (según cuál de estos se adapte al estilo de su armario)
- Página 29 INSTRUCCIONES DE ENSAMBLAJE INSTRUCCIONES DE ENSAMBLAJE 15. Coloque el panel inferior de la gaveta (T) en el 18. Para colocar la gaveta en el ensamblaje, Repisa panel izquierdo de la gaveta (R), el panel derecho presione hacia abajo las palancas de liberación en de la gaveta (Q) y el panel posterior de la gaveta los rieles de deslizamiento y deslice la gaveta en (S).
- Página 30 INSTRUCCIONES DE ENSAMBLAJE INSTRUCCIONES DE ENSAMBLAJE Instalación de los estantes largos Instalación colgante para pared Nota: si necesita cortar el estante largo (V) para 21. Con un detector de vigas, localice los bordes de las vigas de madera. Localice la línea central de cada viga y adaptarlo al espacio del armario, solo corte un lado del estante.
-
Página 31: Cuidado Y Mantenimiento
INSTRUCCIONES DE ENSAMBLAJE CUIDADO Y MANTENIMIENTO Instalación de las varillas • Revise periódicamente para asegurarse de que todos los componentes estén ubicados de forma 25. Inserte las varillas de metal de 22 mm (X) en las varillas correcta, no presenten daños y de que estén fi rmemente conectados. de metal de 25 mm (Y). -
Página 32: Garantía
No puede colgar la Las ubicaciones de los orifi cios Vuelva a instalar los listones de Panel de repisa izquierdo *WSWS-CS1C/W/P/S/G-1-HPL torre del armario en la de montaje no son las correctas. colgante para pared; asegúrese de Panel de repisa derecho *WSWS-CS1C/W/P/S/G-2-HPR pared. - Página 33 Soporte de varilla abierto *WSWS-CS1C/W/P/S/G-48-OPH Soporte de varilla cerrado *WSWS-CS1C/W/P/S/G-49-CPH Tornillo autorroscante M4 x 15 mm *WSWS-CS1C/W/P/S/G-47-15SS Todos los aditamentos *WSWS-CS1C/W/P/S/G-48-CH Impreso en Vietnam allen + roth® es una marca registrada de LF, LLC. Todos los derechos reservados. Lowes.com/allenandroth Lowes.com/allenandroth...