Bticino 363911 Manual De Instalación
Ocultar thumbs
Ver también para 363911:
- Manual del usuario (8 páginas) ,
- Manual de instalación (64 páginas)
Tabla de contenido
Publicidad
Enlaces rápidos
Publicidad
Tabla de contenido

Manuales relacionados para Bticino 363911


Resumen de contenidos para Bticino 363911
- Página 1 363911 Video Kit Manuale installatore • Installation manual...
- Página 2 Attenzione: Le operazioni di installazione, configurazione, messa in servizio e manutenzione devono essere effettuate da personale qualificato. Caution: Installation, configuration, starting-up and maintenance must be performed by qualified personnel Attention: Les opérations d’installation, de configuration, de mise en service et d’entretien doivent être confiées à...
- Página 3 Video Kit BUS TK BUS PI BUS TK BUS PI 0322 06 0322 06 230 Vac 12 V 230 Vac 12 V 3 4 6 0 0 0 3 4 6 0 0 0 PRI 230V~ 50 - 60Hz 260mA PRI 230V~ 50 - 60Hz 260mA 346830 346830...
- Página 4 • Câbles et distances (mm • Cabos e distâncias (mm • Kabeln und Abstände (mm 346000 CEBEC PRI 230 V~ 50 - 60 Hz 260 mA IP30 1,2A 2 - 1 BTicino BTicino BTicino One PTT OneSYT OneSYT GIGA TW One SYT Cable...
- Página 5 Video Kit • Schema monofamiliare • Esquema monofamiliar • One-family diagram • Schema eensgezins • Schéma mono-familial • Esquema monofamiliar • Schema Einfamilienhaus = – = – = – = – = – BUS TK BUS PI = – 346830 346000 CEBEC PRI 230 V~ 50 - 60 Hz 260 mA...
- Página 6 • Schema bifamiliare 1 • Esquema bifamiliar 1 • Two-family diagram 1 • Schema tweegezins 1 • Schéma bi-familiale 1 • Esquema bifamiliar 1 • Schema Zweifamilienhaus 1 = – = – = – = *1 = – = – = –...
- Página 7 Video Kit • Schema bifamiliare 2 • Esquema bifamiliar 2 • Two-family diagram 2 • Schema tweegezins 2 • Schéma bi-familiale 2 • Esquema bifamiliar 2 • Schema Zweifamilienhaus 2 = – = *1 * • Il secondo posto interno ed il configuratore 3501/1 devono essere acquistati separatemente. = –...
- Página 8 • Opzione serratura a relè • Opción cerradura de relé • Relay door lock option • Optie relaisslot • Option serrure à relais • Opção trinco de relê • Option Relais-Schloss P = – – N = – = – S+S- T = –...
-
Página 9: Dati Dimensionali
Video Kit • Dati dimensionali • Datos dimensionales • Dimensional data • Formaatgegevens • Données dimensionnelles • Dados dimensionais • Maße 25 mm 194 mm 100 mm 26 mm • Altezza consigliata salvo diversa normativa vigente. • Recommended height, unless different regulations are specified. •... - Página 10 • Posto esterno • Placa exterior • Entrance panel • Externe plaats • Poste extérieur • Unidade externa • Türstation Telecamera LED illuminazione campo di ripresa Morsetti di collegamento Pulsanti di chiamata Posizione antenna lettore badge LED connessione attiva LED indicazione porta aperta Microfono Regolazione microfono 10 -...
- Página 11 Video Kit Kamera Camera LED Beleuchtung des Aufnahmefelds Led verlichting camerabereik Anschlussklemmen Aansluitklemmen Ruftasten Oproepknoppen Position der Antenne Badge-Lesegerät Positie antenne badgelezer LED Verbindung aktiv LED verbinding geactiveerd LED Anzeige Tür offen LED aanduiding deur geopend Mikrophon Microfoon Einstellung des Mikrophons Regeling microfoon 10 - 10 -...
-
Página 12: Posto Interno
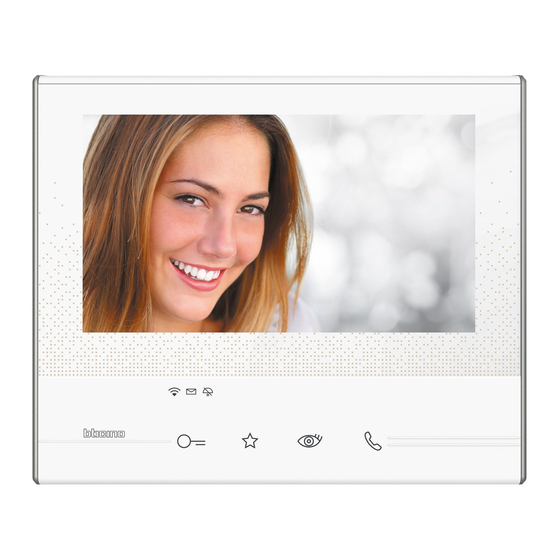
• Posto interno... - Página 13 Video Kit L’immagine rappresenta il dispositivo con tutte le funzioni abilitate. Verifica sul manuale installatore come abilitare le funzioni. I manuali completi sono disponibili sul sito: www.bticino.com 18 - Display 7” (Touch screen) Stato presenza note: Tasto spegnimento Led rosso lampeggiante = nuova/e note non lette...
- Página 14 • Video Internal unit...
- Página 15 Video Kit The image shows the device with all its functions enabled. Check on the Installer Manual how to enable the functions. The complete manuals are available on the website: www.bticino.com 18 - 7” (Touch screen) display Message status: OFF key...
-
Página 16: Poste Interne
• Poste interne... - Página 17 Video Kit L’image représente le dispositif avec toutes les fonctions activées. Vérifier dans le Manuel Installateur le mode d’activation des fonctions. Les manuels complets sont disponibles sur le site: www.bticino.com 18 - Écran 7” (Écran Tactile État présence notes : Touche d’extinction...
- Página 18 • Hausstation...
- Página 19 Video Kit Das Bild stellt eine Vorrichtung mit allen aktivierten Funktionen dar. Sehen Sie im Installationshandbuch nach, wie die Funktionen aktiviert werden. Die vollständigen Handbücher können von dieser Webseite herunter geladen werden: www.bticino.com 18 - Display 7” (Touchscreen) Status Nachrichten vorhanden:...
-
Página 20: Unidad Interior
• Unidad interior... - Página 21 Video Kit La imagen representa el dispositivo con todas las funciones habilitadas. Busque en el manual del instalador cómo habilitar las funciones. Los manuales completos están disponibles en la web: www.bticino.com 18 - Pantalla 7” (Pantalla Táctil) Estado presencia notas: Tecla apagado Led rojo parpadeante = nueva/s nota/s no leída/s o...
- Página 22 • Intern punt...
- Página 23 Video Kit De afbeelding toont het apparaat met ingeschakelde functies. Raadpleeg de installatiehandleiding voor de inschakeling van de functies. De complete handleidingen zijn verkrijgbaar op de website: www.bticino.com 17 - Display 7” (Touchscreen) Status notities aanwezig: Uitschakeltoets Rode led knippert = ongelezen nieuwe bericht(en) of...
-
Página 24: Unidade Interna
• Unidade interna... - Página 25 Video Kit A imagem representa o dispositivo com todas as funções ativadas. Verifique no manual do instalador como ativar as funções Os manuais completos estão disponíveis no sítio: www.bticino.com 18 - Ecrã 7” (Touch screen) Estado de presença de notas: Botão de desligar...
-
Página 26: Installazione Posto Esterno
• Installazione posto esterno • Instalación de la placa exterior • Entrance panel installation • Installatie externe plaats • Installation du poste extérieur • Instalação da unidade externa • Installation der Türstation A - Prima dell’installazione assicurarsi che la vite sia completamente avvitata. A - Before installing make sure that the screw is completely tightened. - Página 27 Video Kit...
- Página 28 • La telecamera non deve essere installata di fronte a grandi sorgenti luminose, oppure in luoghi dove il soggetto ripreso rimanga molto in controluce. • Le telecamere a colori presentano, in condizioni di scarsa luminosità, una sensibilità inferiore rispetto alle telecamere in bianco/nero.
- Página 29 Video Kit • Se si manifestasse il disturbo del fischio, (effetto Larsen), ridurre prima la potenza del microfono , agen- do con un cacciavite sul potenziometro corrispondente, fino ad un livello accettabile. Qualora il fenomeno persista, agire sul potenziometro dell’altoparlante in modo da eliminare l’inconveniente.
- Página 30 • Configurazione posto esterno • Configuración placa exterior • Entrance panel configuration • Configuratie externe plaats • Configuration poste extérieur • Configuração unidade externa • Konfiguration Türstation • P - Possono non essere configurati. - Brauchen nicht konfiguriert zu werden. - Kunnen niet worden geconfigureerd.
- Página 31 Video Kit - Tutte le volte che si modifica la configurazione è necessario togliere e ridare l’alimentazione all’impianto, attendendo circa 1 minuto. - Every time the configuration is altered the system must be switched off and back on again, waiting for about 1 minute.
- Página 32 • Programmazione Badge • Programación de credenciales • Badge programming • Badge Programmeren • Programmation des badges • Programação do Crachá • Badge programmieren • Nuovo badge gestore impianto Das Vorlegen eines nicht erkennbaren Badges oder ein Per motivi di sicurezza è previsto un badge “Gestore“ Programmierungsfehler, unterbricht die Prozedur und programmato direttamente dall’installatore.
- Página 33 Video Kit Programmazione badge gestore impianto Programación de la credencial del administrador del sistema System management key card programming Programmering beheerdersbadge Programmation badge administrateur installation Programação do crachá gestor da instalação. Programmierung des Badges Anlagenverwalter 1 beep 1 beep 1 beep 1 Piepton 1 bip 1 beep...
-
Página 34: Credencial Maestra De Administrador
2 beep 2 beeps 2 beep 2 Pieptöne 2 bips 2 beep 2 beep Gestore impianto Credencial maestra de administrador Manager master Master beheerder Master de gestion Master gestor Master Verwaltung Avvicinare al lettore il badge gestore impianto da memorizzare e attendere l’accensione del LED Serratura e doppio tono di conferma. - Página 35 Video Kit 1 beep lungo 1 extended beep 1 bip prolongé 1 langer Piepton 1 bip largo 1 lange pieptoon 1 beep longo Se la memorizzazione non va a buon fine, si accendono contemporaneamente i LED Serratura e Connessione e il dispositivo emette un beep lungo.
- Página 36 Cancellazione badge gestore impianto Cancelación de una credencial maestra de administrador Deleting the manager master badge Master beheerder badge wissen Élimination badge master de gestion Cancelamento de crachá master gestor Master-Verwaltungs-Badge löschen 1 beep 1 beep 1 beep 1 Piepton 1 bip 1 beep 1 beep...
- Página 37 Video Kit 2 beep 2 beeps 2 beep 2 Pieptöne 2 bips 2 beep 2 beep ≥ 10s Ripremere il pulsante di programmazione per 10 secondi. Quando la cancellazione è avvenuta si accende il LED Serratura e il dispositivo emette 2 beep. Press the programming pushbutton again for 10 seconds.
- Página 38 Programmazione badge residente Programación de la credencial del residente System management key card programming Programmering inwonersbadge Programmation badge résident Programação de crachá residente Programmierung des Badges Bewohner 1 beep 1 beep 1 beep 1 Piepton 1 bip 1 beep 1 beep Gestore impianto Credencial maestra de administrador...
- Página 39 Video Kit 2 beep 2 beeps 2 beep 2 Pieptöne 2 bips 2 beep 2 beep Badge residente Credencial residente Resident badge Inwonerbadge Badge résident Crechá residente Bewohner-Badge Avvicinare al lettore il badge residente da memorizzare, fino all’accensione del LED Serratura e tono di conferma. Per programmare altri badge residenti, avvicinarli al lettore entro 30 secondi dal precedente.
- Página 40 1 beep lungo 1 extended beep 1 bip prolongé 1 langer Piepton 1 bip largo 1 lange pieptoon 1 beep longo · Se la memorizzazione non va a buon fine, si accendono contemporaneamente i LED Serratura e Connessione e il dispositivo emette un beep lungo.
- Página 41 Video Kit Cancellazione di tutti i badge residenti in memoria Cancelación de todas las credenciales residentes memorizadas Cancellation of all the residents badges saved in the memory Alle inwonerbadges uit het geheugen wissen Effacement de tous les badges résidents mémorisés Cancelamento de todos os crachás residentes na memória Alle gespeicherten Badges der Bewohner löschen 1 beep...
- Página 42 2 beep 2 beeps 2 beep 2 Pieptöne 2 bips 2 beep 2 beep 2 volte Gestore impianto 2 veces Credencial maestra de administrador Twice Manager master 2 maal Master beheerder 2 fois Master de gestion 2 vezes Master gestor 2 Mal Master Verwaltung Riavvicinare per 2 volte consecutive il badge gestore impianto.
- Página 43 Video Kit • Reset • Reset Nel caso si avesse la necessità di cancellare tutti i En caso de que fuera necesario cancelar todas las badge (gestore impianto e residenti) precedentemente credenciales memorizadas(administrador del sistema y memorizzati è possibile resettare il posto esterno. residentes), es posible restablecer la placa exterior.
- Página 44 • Installazione del posto interno • Instalación de la unidad interior • Handset installation • Installatie van het intern punt • Installation du poste interne • Instalação da unidade interna • Installation der Hausstation...
- Página 45 Video Kit • Attenzione: il citofono deve rispettare le seguenti regole installative: - deve essere installato solo in ambienti interni - non deve essere esposto a stillicidio o a spruzzi d’acqua - non ostruire le aperture di ventilazione - deve essere usato unicamente all’interno del Kit in cui è venduto - evitare di fissare la staffa su superfici non piane o irregolari e di effettuare un eccessivo serraggio delle viti, al fine di evitare deformazioni della staffa che potrebbero compromettere la corretta installazione del dispositivo.
- Página 46 • Let op: Bij de installatie van de telefoon moet men de volgende voorschriften in acht nemen: - binnenshuis installeren - niet aan waterdruppels en -stralen blootstellen - de ventilatieopeningen niet versperren - mag uitsluitend in de kit waarmee die verkocht is gebruikt worden - de beugel niet bevestigen aan niet-vlakke of onregelmatige oppervlakken, de schroeven niet te veel aandraaien om de vervorming van de beugel te voorkomen, waardoor de inrichting niet langer correct kan worden geïnstalleerd.
- Página 47 Video Kit • Installazione Wi-Fi • Instalación Wi-Fi • Wi-Fi Installation • WiFi-installatie • Installation Wi-Fi • Instalação Wi-Fi • Installation Wi-Fi Verificare sempre il segnale Wi-Fi sul display del dispositivo, prima dell’installazione definitiva degli oggetti. Always check the Wi-Fi signal on the device display before final installation of the objects.
- Página 48 – Pareti divisorie in muratura – Pareti in cemento armato – Pareti portanti – Pareti in legno – Pareti in pietra – Pareti metalliche – Pareti in cartongesso – Partition masonry walls – Walls in reinforced concrete – Load-bearing walls –...
- Página 49 Video Kit Verifica la qualità del segnale Wi-Fi dal display del dispositivo (vedi Manuale Installatore), se è bassa o inesistente, assicurati che: – il dispositivo non sia installato vicino a grossi oggetti metallici o dispositivi elettrici che possono generare campo elettromagnetico;...
- Página 50 • Configurazione posto interno • Configuración de la unidad interior • Internal unit configuration • Het interne punt configureren • Configuration poste interne • Configuração da unidade interna • Konfiguration einer Hausstation J1 J2 J1 = Estrai se è presente l’alimentazione J1 = Extraiga con presencia de la alimentación supplementare (morsetto 1 &...
- Página 51 Video Kit • Configurazione fisica • Configuración física • Physical configuration • Fysieke configuratie • Configuration physique • Configuração física • Physische Konfiguration • Le funzioni che puoi attribure al tasto Preferiti ( ) in modo fisico (tramite configuratore inserito nella sede MM-(unità)) sono le seguenti: •...
- Página 52 346210 346210 MOD=9 Autoaccensione diretta del P+2 Autoencendido directo del P+2 MOD=9 P+2 direct auto-switching on Directe automatische P+2 MM = Auto-allumage direct du P+2 Autoacendimento direto do P+2 Direkte Selbstschaltung der P+2 346210 346210 MOD=9 MOD=9 Autoaccensione diretta del P+3 Autoencendido directo del P+3 P+3 direct auto-switching on Directe automatische P+3...
- Página 53 Video Kit –+ –+ MOD=9 MOD=9 –+ MOD=9 –+ –+ MOD=9 –+ MOD=9 IT - Legenda EN - Legend FR - Légende MOD=9 –+ Attivazione del PE (configu- Activating the EP (configured Activation du PE (con fi guré rato con P+1) in mo do di ret- with P+1) directly without avec P+1) en mode direct MOD=9...
- Página 54 DE - Erläuterung ES - Leyenda NL - Legende PT - Legenda Aktivierung der Türstation Activación del PE (confi- Rechtstreekse activering van Ligação da UE (con figurada (mit P+1 konfiguriert) auf gurado con P+1) en modo het deur station (als P+1 ge- com P+1) de maneira direc- direkte Weise ohne Ruf oder directo sin lla ma da o ac-...
- Página 55 Video Kit IT - Legenda EN - Legend FR - Légende Intercom tra appartamenti in Intercommunicability be- Intercommunication entre impianti con interfaccia da tween apartments in systems appartements sur installa- appartamento art. 346850. with tions avec interface d’appar- apartment interface item tement réf.
- Página 56 DE - Erläuterung ES - Leyenda NL - Legende PT - Legenda Gegenseitige Kommunika- Intercomunicación entre Intercom tussen apparte- Intercom entre apartamen- tion zwischen Wohnungen apartamentos en instalacio- menten in installaties met tos em instalações com für Anlagen mit Wohnungs- nes con interfaz de departa- interface van appartement interface de apartamento...
- Página 57 Video Kit In caso di riconfigurazione dell’apparecchio attendere un minuto prima di riconnetterlo all’impianto. When configuring the device, wait one minute before connecting it to the system again. En cas de nouvelle configuration de l’appareil, laisser s’ é couler une minute avant de le rebrancher à l’installation. Falls das Gerät neu konfiguriert werden soll, eine Minute warten bevor es an die Anlage geschlossen wird.
- Página 58 En caso de reconfiguración del aparato, espere un minuto antes de volverlo a conectar a la instalación. In geval van een herconfiguratie van het toestel een minuut wachten voordat men het terug aansluit op de installatie. Se o aparelho for configurado novamente esperar um minuto antes de conectá-lo de novo com o sistema. MOD = MM 346210 346210...
- Página 59 Video Kit • Prima accensione • Primer encendido • First switching on • Eerste inschakeling • Premier allumage • Primeira ligação • Erstmaliges Einschalten • Dopo aver configurato fisicamente e collegato il dispositivo devi eseguire le personalizzazioni tramite menù. Attendi che i led terminino di lampeggiare e tocca il display per accenderlo. •...
- Página 60 Scelta della lingua Selección del idioma. Selecting the language Taalkeuze Choix de la langue. Selecção da língua. Wahl der Sprache Languages Next English Français Italiano Español Deutsch Néerlandais Português Tocca l’icona relativa alla lingua da impostare. Touch the icon for the desired language. Toucher l’icône correspondante à...
-
Página 61: Time And Date
Video Kit Impostazione Data e Ora Ajuste de Fecha y Hora Date and Time setting Instelling Datum en Tijd Réglage Date et Heure Configuração de Hora e Data Datum und Uhrzeit einstellen Time and date Back Next 2013 Tocca l’icona relativa al parametro da impostare. Touch the icon for the parameter to set. - Página 62 Nel caso in cui uno di questi 3 elementi non sia conforme alle specifiche richieste per il funzionamento del prodotto, BTicino è esente da qualsiasi responsabilità per eventuali malfunzionamenti.
- Página 63 The product in fact supports a VoIP streaming system. You must therefore check with your smartphone data network contract that it does not block it. We would like to inform you that the service provided by BTicino by means of remote use via the APP involves the use of data. The cost linked to data usage depends on the type of contract which the customer has with his ISP (Internet Service Provider) and is solely the customer’s responsibility.
- Página 64 Asimismo, se informa que el servicio ofrecido por BTicino mediante el uso a distancia con la APP comporta el uso de datos; por consiguiente, el gasto relacionado con el consumo de ellos depende de la tipología de contrato que el cliente ha firmado con un ISP (Internet Service Provider) y corre a su cargo.
- Página 65 Video Kit Impostazione Wi–Fi Ajuste del Wi-Fi Wi-Fi Setting WiFi-instelling Réglage Wi–Fi Configuração Wi-Fi Wi-Fi-Einstellung 10:36 Tuesday, 22 April Download Door Entry App Quick Actions Pager Camera 1 Lock 1 Answering machine Memo Settings Lock 2 Settings Back Generals Wi-Fi Ringtones Associated accounts Display...
- Página 66 Back Wi-Fi Wi-Fi Activate the Wi-Fi for connection to the network Back Wi-Fi Wi-Fi Select the Wi-Fi network to which you want to connect Wi-Fi Home Wi-Fi 1 Wi-Fi 2 Wi-Fi 3...
- Página 67 • Voor meer informatie over de instellingen van het apparaat kunt u de complete technische documentatie downloaden van de website: • Para informações mais detalhadas sobre as configurações do dispositivo, poderá baixar a documentação técnica completa do sítio: www.bticino.com...
- Página 69 Video Kit • Funzione Stato porta • Función Estado puerta • Door state function • Staat deur • Fonction État porte • Função Estado porta • Funktion Türzustand • Questa funzione segnala lo stato della serratura (solo se l’impianto è predisposto mediante apposito attuatore).
- Página 70 • Funzione Studio Professionale • Función Oficina Profesional • Office function • Functie professionele studio • Fonction Bureau • Função Escritório profissional • Funktion Büro • La funzione Studio Professionale ti permette di impostare l’apertura automatica della serratura in caso di chiamata dal Posto Esterno, non puoi attivarla contemporaneamente alla funzione Stato Porta.
- Página 71 Video Kit • Funzione Cerca persone • Función buscapersonas • Paging function • Functie buzzer • Fonction cherche-personnes • Função de procura pessoas • Funktion Personensuche • Questa funzione ti permette di diffondere un messaggio vocale, dettato al microfono del dispositivo, tramite gli altoparlanti dell’impianto Diffusione sonora.
- Página 72 • Commuta l’apparecchio acustico in posizione T • Switch the acoustic device to the T position • Commuter l’appareil acoustique sur la position T • Umschalten des akustischen Geräts auf Position T • Conmuta el aparato acústico a la posición T •...
- Página 73 Video Kit • Comando luci scale • Mando luces escaleras • Staircase light control • Bediening lichten trapzaal • Commande lumières escaliers • Comando das luzes da escada • Treppenlichtsteuerung = – = – = – = – = – = –...
-
Página 74: Suoneria Supplementare
• Suoneria supplementare • Timbre adicional • Additional bell • Supplementaire beltoon • Sonnerie supplémentaire • Toque suplementar • Zusätzliche Läutwerk = – = – 336910 = – 336992 = – = – = – 336993 = – 336994 = – = –... - Página 75 Puoi scaricare i manuali completi dei dispositivi dal sito www.bticino.com The complete manuals of the devices can be downloaded from the website www.bticino.com Vous pouvez télécharger le manuel complet des dispositifs sur le site www.bticino.it Sie können die vollständigen Handbücher von der Website www.bticino.it herunterladen.
- Página 76 Timbro installatore Installer stamp BTicino SpA si riserva il diritto di variare in qualsiasi momento i contenuti illustrati nel presente stampato e di comunicare, in qualsiasi forma e modalità, i cambiamenti apportati. BTicino SpA reserves at any time the right to modify the contents of this booklet and...