Resol SP10 Montaje Conexión
Protección contra sobretensiones
Ocultar thumbs
Ver también para SP10:
- Instrucciones (4 páginas) ,
- Instrucciones de montaje y conexión (20 páginas)
Tabla de contenido
Publicidad
Enlaces rápidos
Überspannungsschutz SP10
Montage
Anschluss
Overvoltage protection SP10
Mounting
Connection
Protection contre les
surtensions SP10
Montage
Connexion
Protección contra
sobretensiones SP10
Montaje
Conexión
Protezione contro le
sovratensioni SP10
Montaggio
Allacciamento
de
Handbuch
en
Manual
fr
Manuel
es
Manual
it
Manuale
Publicidad
Tabla de contenido

Manuales relacionados para Resol SP10

Resumen de contenidos para Resol SP10
- Página 1 Überspannungsschutz SP10 Montage Anschluss Overvoltage protection SP10 Mounting Connection Protection contre les surtensions SP10 Montage Connexion Protección contra Handbuch sobretensiones SP10 Montaje Conexión Manual Protezione contro le sovratensioni SP10 Manuel Montaggio Allacciamento Manual Manuale...
-
Página 2: Ce-Konformitätserklärung
Angaben zum Gerät Sicherheitshinweise Bestimmungsgemäße Verwendung Bitte beachten Sie diese Sicherheitshinweise genau, um Der SP10 ist als Überspannungsschutz der empfindli- Gefahren und Schäden für Menschen und Sachwerte aus- chen Temperatursensoren im oder am Kollektor gegen zuschließen. fremdinduzierte Überspannungen unter Berücksichtigung der in dieser Anleitung angegebenen technischen Daten Symbolerklärung... -
Página 3: Target Group
Information about the product Thank you for buying this product. Please read this manual carefully to get the best per- Proper usage formance from this unit. This product is an overvoltage protection device used for Subject to change. Errors excepted. protecting the susceptible temperature sensors in or at the Safety advice collector against induced overvoltages in compliance with... -
Página 4: Recommandations De Sécurité
Utilisation conforme utiliser l’appareil de manière optimale. Sous réserve d’erreurs et de modifications techniques. La protection contre les surtensions SP10 sert à proteger les sondes de température placées sur ou près des capteurs Recommandations de sécurité des tensions produites, par exemple, par des éclairs dans les Veuillez lire attentivement les recommandations de sécurité... -
Página 5: Información Sobre El Producto
Por favor, lea este manual de instrucciones atentamen- Uso adecuado te antes de utilizar el producto. La caja de protección SP10 está indicada para proteger las Sujeto a cambios técnicos. Puede contener errores. sondas de temperatura sensibles instaladas sobre el cap-... -
Página 6: Dichiarazione Di Conformità Ce
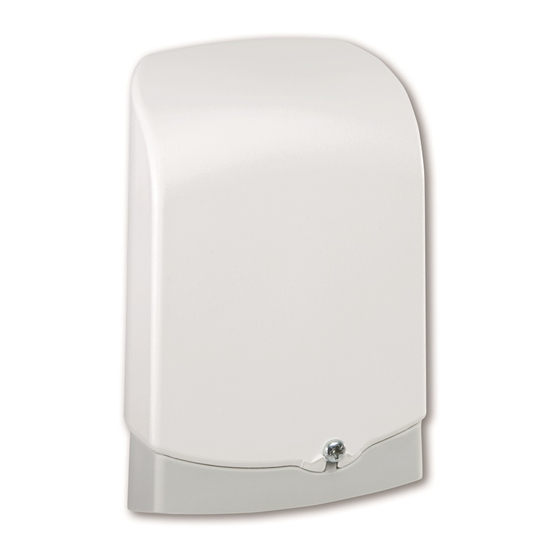
Leggere attentamente il presente manuale per poter Uso conforme allo scopo previsto utilizzare in modo ottimale l’impianto. La sonda SP10 è progettata per proteggere le sensibilissi- Con riserva di errori e modifiche tecniche. me sonde temperatura installate sul collettore o vicino a Avvertenze per la sicurezza quest’ultimo da sovratensioni indotte da scariche di cor-... - Página 7 Karilen E42D-H201 Température ambiante Partie inférieure du boîtier Temperatura ambiente Parte inferior de la caja Temperatura ambiente Parte inferiore dell’involucro Gehäuseoberteil SP10 64,07 mm Upper part of housing Luran S757R Partie supérieure du boîtier Maße Parte superior de la caja Dimensions Parte superiore dell’involucro...
- Página 8 Para garantizarle mayor protección a la sonda, procure ins- necting box close to the sensor. Because of the weather talar la SP10 lo más cerca posible de ésta. La caja de la SP10 conditions, the SP10 is designed as a robust connecting box es robusta y resiste la intemperie, por lo que está...
- Página 9 Per un’ottima protezione della sonda, montare l’involucro il più vicino possibile a quest’ultima. Il robusto involucro della SP10 è resistente alle intemperie e, con ciò, adatto per l’uso Gehäuseunterteil esterno. Tre passaggi cavi nella parte inferiore dell’involucro facilitano l’installazione della SP10.
- Página 10 Mounting Montaje Instale la protección contra sobretensiones sólo en posición For optimum protection against moisture, the sensor protection device must be fitted vertically: vertical para garantizarle mayor protección contra la humedad: Î Unscrew the housing screw and remove the upper part of the housing Î...
- Página 11 SP10 Elektrischer Anschluss Î Mit einem spitzen Gegenstand die Kabeldurchführun- Elektrischer Anschluss gen durchstoßen (fig. 1). Die Leitung einführen und Electrical connection danach wieder leicht herausziehen, so dass sich der Branchement électrique Rand nach außen stülpt und somit maximalen Schutz Conexión eléctrica...
-
Página 12: Electrical Connection
Electrical connection Branchement électrique Î Pierce the cable glands (fig. 1) with a pointed object. Î Percez les passes-câbles (fig. 1) à l’aide d’un objet poin- Insert the cables into the holes and pull them slightly tu. Introduisez-y le câble et tirez légèrement dessus back, such that the edge of the gland is slightly turned de l’extérieur afin de faire ressortir le joint pour une to the outside. - Página 13 Conexión eléctrica Allacciamento elettrico Î Pinche en el orificio de entrada del cable (fig. 1) con un Î Trapassare i passacavi (fig. 1) con un oggetto appuntito. objeto puntiagudo e introduzca el cable en su interior . Inserirci il cavo e tirarlo leggermente verso l’esterno Tire ligeramente del cable para que la junta de goma finché...
- Página 14 Wichtiger Hinweis Important note Die Texte und Zeichnungen dieser Anleitung entstanden mit The texts and drawings of this manual are correct to the best of our knowledge. As faults can never be excluded, größtmöglicher Sorgfalt und nach bestem Wissen. Da Fehler please note: nie auszuschließen sind, möchten wir auf folgendes hinweisen: Grundlage Ihrer Projekte sollten ausschließlich eigene...
- Página 15 Note importante Nota importante Les textes et les illustrations de ce manuel ont été réalisés Los textos y dibujos de este manual han sido realizados con el mayor cuidado y esmero. Como no se pueden avec le plus grand soin et les meilleures connaissances pos- sibles.
-
Página 16: Sigla Editoriale
Note Il design e le specifiche possono variare senza preavviso. Le illustrazioni possono variare leggermente rispetto al modello prodotto. RESOL – Elektronische Regelungen GmbH Heiskampstraße 10 Sigla editoriale 45527 Hattingen / Germany Queste istruzioni di uso e di montaggio sono protette dal Tel.: +49 (0) 23 24 / 96 48 - 0...