Tabla de contenido
Publicidad
Idiomas disponibles
Idiomas disponibles
Enlaces rápidos
Publicidad
Tabla de contenido

Manuales relacionados para Dyna-Glo RMC-55R7


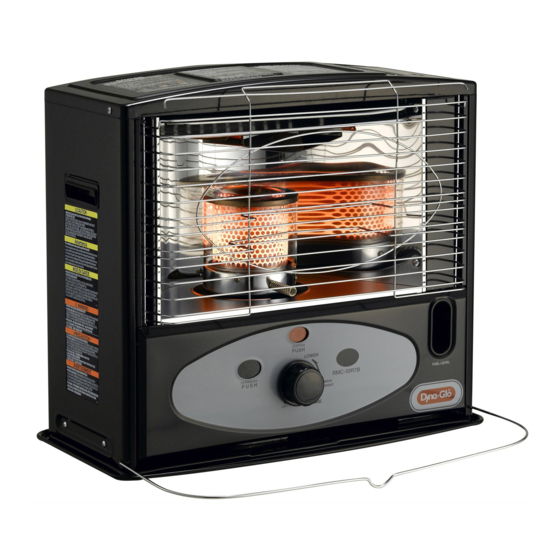
Resumen de contenidos para Dyna-Glo RMC-55R7
- Página 1 IMWK10DG-GCU...
-
Página 2: Cautions-Safety Guide
CAUTIONS - SAFETY GUIDE - WARNING!! RISK OF EXPLOSION / RISK OF FIRE to fill the fuel reservoir area. This is normal for a cartridge tank kerosene heater. NEVER use any fuel other than water-clear 1-K kerosene or red dyed 1-K kerosene. WARNING!! NEVER use fuel such as gasoline, benzene, paint FAILURE TO INSTALL, MAINTAIN, AND/OR... -
Página 3: Tabla De Contenido
CONTENTS OF OWNER'S MANUAL PAGE PAGE ITEM ITEM CAUTIONS-SAFETY GUIDE 10~12 WICK REPLACEMENT INTRODUCTION CHECKING THE IGNITION SYSTEM FEATURES WICK ADJUSTER MECHANISM KEROSENE (1-K ONLY) AUTOMATIC SAFETY SHUT-OFF DEVICE UNPACKING AND ASSEMBLING LONG TERM STORAGE OF YOUR THE HEATER HEATER FUELING YOUR HEATER SPECIAL SAFETY PRECAUTIONS AUTOMATIC IGNITION SYSTEM... -
Página 4: Kerosene (1-K Only)
KEROSENE (1- K Only) It is EXTREMELY IMPORTANT to the operation of this heater that you use the proper grade of kerosene. The proper grade of kerosene is identified as 1-K Kerosene. DO NOT OPERATE THIS HEATER WITH ANY FUEL OTHER THAN 1-K KEROSENE! 1-K Kerosene has been refined to virtually eliminate contaminants such as sulfur, which can cause a rotten egg odor during operation of the heater. -
Página 5: Unpacking And Assembling
UNPACKING AND ASSEMBLING THE HEATER 1. REMOVE THE HEATER AND ALL PACKING MATERIALS FROM THE BOX.(Fig. 2) NOTE:Save the shipping carton and packing materials for Owner’s Manual future storage. 2. Open the grille from the right hand side, by pulling up on the lower right hand corner. -
Página 6: The Heater
FUELING YOUR HEATER NOTE : See section 3, page 3 on KEROSENE for instructions on the proper grade of kerosene to use with this heater. CAUTION : NEVER REMOVE THE CARTRIDGE TANK FROM THIS HEATER WHILE THE HEATER IS OPERATING OR WHILE THE HEATER IS STILL HOT. EXTINGUISH THE HEATER AND VERIFY THAT THE HEATER IS COOL TO THE TOUCH BEFORE REFUELING THE HEATER. -
Página 7: Automatic Ignition System
AUTOMATIC IGNITION SYSTEM For safety and convenience, this heater features an automatic ignition system. 2 “D” cell batteries, included with the heater, provide the power for the igniter which lights the wick once it has been raised to its maximum height. When the heater is fueled for the first time, allow a minimum of 60 minutes after filling the heater for the wick to absorb kerosene before you attempt to light the heater. -
Página 8: Adjusting The Wick
ADJUSTING THE WICK After lighting the heater, it is important to check the heater flame within the first 5-7 minutes of operation. After 5-7 minutes of operation, you should use the wick adjuster knob to obtain the proper flame height (see Fig 8). IF THE FLAME IS TOO YELLOW, TURN THE WICK ADJUSTER KNOB DOWN SLIGHTLY UNTIL YOU GET THE YELLOW FLAME INDICATED IN FIG.8. - Página 9 NOTE : Carbon build-up on the wick may prevent the wick from completely lowering when the extinguish button is pushed. This can result In the flame not extinguishing. If this happens, continue to push the extinguish button and turn the wick adjuster knob in a counterclockwise direction (towards “OFF”) as far as it will go.
-
Página 10: Wick Maintenance
Inspect the batteries If the igniter filament does not get hot enough to ignite the wick and the igniter filament appears to be normal, replace the batteries. For best results use non-alkaline batteries only. Inspect the wick Inspect the wick before each use to see if carbon has accumulated on the wick. If it has, perform the Carbon Removal procedure described on page 9. -
Página 11: Wick Replacement 10
WICK REPLACEMENT Wick replacement should be performed on a completely cool heater after the cartridge tank has been removed and the remainder of the kerosene in the heater has been burned off. Use only genuine replacement wick. Replacement wick number : Glowick 200-B, Kero-World 20401-U, Dura Heat DH-200, Pick-A-Wick-PW27. Open the tank cover and Unscrew 5 screws, two from the Remove the cabinet. - Página 12 Replacement wick has a The black line on the outside of Replace the wick and holder the wick should match the top in the burner tank. black line. edge of the holder. Rotate 90 degrees left and Fold the new wick and slide it Then press it against the teeth right as well as up and down into the holder.
- Página 13 Reinstall the wind cover. Remove the wick adjusting knob Reinstall the cabinet. once again, if it was reinstalled before. Tighten 5 screws on the Reinstall the chimney and the Reinstall the wick adjusting cabinet cartridge tank. knob. Close the front grille. Step 25 Step 26 Step 27...
-
Página 14: Checking The Ignition System
CHECKING THE IGNITION SYSTEM If the automatic ignition system fails to operate properly, perform the following checks: - BATTERIES - 2 “D” cell batteries are located at the rear of the heater. Check for proper installation. And / or Replace with new batteries. - IGNITE R PLUG - If the automatic ignition system still doesn’t work after replacing the batteries, check the igniter plug. -
Página 15: Long Term Storage Of Your
TESTING THE AUTOMATIC SAFETY SHUT-OFF DEVICE: At least once a week during the heating season, it is important to test the safety shut-off device to be sure that it is operating properly. WITH THE HEATER TURNED OFF, raise the wick using the wick adjuster knob to the fully raised position. Grabbing the protective grille, give the heater a firm shake. -
Página 16: Special Safety Precautions
SPECIAL SAFETY PRECAUTIONS Where to use your kerosene heater - Only use a kerosene heater on a level surface. - Do not place a kerosene heater in a traffic areas such as an entrance or exit. Do not use a kerosene heater in a windy area. -
Página 17: Trouble Shooting Guide
TROUBLE SHOOTING GUIDE Heater Will Not Light ; water-clear 1-K kerosene or l l i red dyed 1-K kerosene. 2. Water present in kerosene 2. Drain tank. Remove wick assembly & replace wick. Reinstall wick assembly. Fill tank with water-clear 1-K kerosene or red dyed 1-K kerosene. -
Página 18: Parts List
BAFFLE ASS'Y VERTICAL REFLECTOR WS-CT06R BOTTOM REFLECTOR WS-CT07R CABINET HANDLE(RMC-55R7) WS-CT08R CABINET HANDLE(RMC-55R7B) WS-CT08RB CABINET(RMC-55R7) WS-CT09R CABINET(RMC-55R7B) WS-CT09RB FUEL INDICATOR WINDOW(RMC-55R7) WS-CT10R 10-1 FUEL INDICATOR WINDOW(RMC-55R7B) WS-CT10RB TOP FRONT PANEL WS-CT37R FRONT PANEL(RMC-55R7) WS-CT12R 12-1 FRONT PANEL(RMC-55R7B) WS-CT12RB WICK HOLDER GASKET... - Página 20 GHP Group, Inc. 6440 W Howard St Niles, IL 60714-3302 Tel: (877) 447-4768 www.ghpgroupinc.com...
- Página 21 Calentador de Querosén Portable “Manual de Dueño” MODELO: RMC- 55R7 / RMC- 55R7B Antes de usar el calentador, por favor lea el MANUAL de DUEÑO cuidadosamente. Este MANUAL de DUEÑO fue diseñado para enseñarle la manera correcta de armar el calentador, de mantener el calentador, de guardar el calentador, y de mas importancia, para enseñarle como usar el calentador en una manera segura yeficaz.
-
Página 22: Precauciones Guía De Seguridad
PRECAUCIONES GUÍA DE SEGURIDAD Ocasionalmente durante la operación normal del calentador usted ¡ADVERTENCIA! HAY RIESGO DE EXPLOSIÓN Y FUEGO oirá el ruido del combustible cayendo del cartucho del tanque al área de reserva del combustible para llenarla. Esto es normal en un calentador de querosén con cartucho de tanque. -
Página 23: Contenido Del Manual De Dueño
CONTENIDO DEL MANUAL DE DUEÑO ARTÍCULO PÁGINA ARTÍCULO PÁGINA PRECAUCIONES-GUÍA DE SEGURIDAD REEMPLAZO DE LA MECHA 10 ~12 INTRODUCCIÓN EXAMINANDO EL SISTEMA DE IGNICIÓN RASGOS MECANISMO DE AJUSTADOR DE MECHA QUEROSÉN (1-K SOLAMENTE) INTERRUPTOR DE SEGURIDAD DESEMPAQUE Y MONTAJE DEL AUTOM ÁTICO CALENTADOR GUARDANDO EL CALENTADOR A... -
Página 24: Querosén (1-K Solamente)
QUEROSÉN (1-K SOLAMENTE) EXTREMADAMENTE IMPORTANTE que use el grado Para que este calentador funcione correctamente es Querosén 1-K. ¡NO USE ESTE CALENTADOR CON apropiado de querosén. El grado apropriado de querosén es NINGÚN OTRO COMBUSTIBLE QUE NO SEA QUEROSÉN K-1! Querosén 1-K ha sido re nado para eliminar virtualmente contaminantes como azufre, el cual puede causar un mal olor como a huevo podrido durante el uso del calentador. - Página 25 DESEMPAQUE Y MONTAJE DEL CALENTADOR SAQUE EL CALENTADOR Y TODOS LOS OTROS MATERIALES DE EMPAQUE DE LA CAJA ( g. 2) NOTA : Manual de dueño Guarde el carton del envío y materiales de empaque para al almacenamiento futuro. Abra la verja desde el lado derecho. Quite los materiales protectivos de empaque del quemador.
- Página 26 LLENANDO SU CALENTADOR NOTA : Vea la sección 3, página 3 en QUEROSÉN para leer las instrucciones sobre el grado de querosén mas apropiado a usar con este calentador. PRECAUCIÓN: NUNCA QUITE EL CARTUCHO DEL TANQUE DE ESTE CALENTADOR MIENTRAS EL CALENTADOR ESTE PRENDIDO O ESTE CALIENTE.
-
Página 27: Sistema De Ignición Automática
SISTEMA DE IGNICIÓN AUTOMÁTICA NOTA : ANTES DE PRENDER, REVISE EL INDICADOR DE NÍVEL LOCALIZADO EN EL LADO DERECHO DEL GABINETE PARA CONFIRMAR QUE EL CALENTADOR ESTE EN UNA POSICIÓN NIVELADA. SI USTED NO OPERA EL CALENTADOR EN UNA POSICIÓN NIVELADA, PUEDE CAUSAR UNA COMBUSTIÓN IMPROPIA Y CAUSAR QUE EL INTERRUPTOR AUTOMÁTICO DE SEGURIDAD SE ACTIVE. -
Página 28: Ajustando La Mecha
AJUSTANDO LA MECHA Después de encender el calentador es importante examinar la llama del calentador durante los primeros 5-7minutos de funcionamiento. Después de 5-7minutos de funcionamiento, usted debe usar el ajustador de mecha para obtener SI LA LLAMA ESTA BIEN AMARILLA, BAJE EL AJUSTADOR DE MECHA UN la altura de llama correcta (vea Fig. - Página 29 NOTA : Si el calentador es sacudido, el interruptor automático de seguri- dad se puede activar automáticamente. ADVERTENCIA : NUNCA ajuste o trate de desmontar el interruptor automático de seguridad. Esto puede causar que el interruptor automático de seguridad no funcione correctamente en un caso de emergencia.
- Página 30 Mecha Filamento 0.5~1mm Encendedor 1/64~1/32 Fig. 10 MANTENIMIENTO DE LA MECHA / QUEMADO EN SECO El mantenimiento de la mecha es necesario para evitar la producción de hollín, poca salida de calor y problemas de funcionamien to. El carbón y el alquitrán se acumularán en la parte superior de la mecha durante el uso regular de este producto. Es necesario efectuar el mantenimiento de la mecha dentro de los primeros siete (7) días de uso del calentador, cada vez que se hayan consumido 2 tanques llenos de co mbustible...
- Página 31 REEMPLAZO DE LA MECHA El reemplazo de la mecha debe ser hecho sólo en un calentador que este completamente frío después de haber saca- do el cartucho de tanque, y después que el querosén restante en el calentador ha sido quemado. Use sólo una mecha de reemplazo auténtica.
- Página 32 La mecha de recambio tiene una La línea negra en la parte de Reemplaze la mecha y el receptáculo en el tanque del que- afuera de la mecha debe encon- linea negra.Doble la mecha mador. Gire 90 grados hacia la trar el borde superior del nueva y métala en el receptáculo.
- Página 33 Vuelva a montar la cubierta Quite la agarradura del ajus- Vuelva a instalar el gabinete. de aire. tador de mecha nueva- mente, si la habia vuelto a instalar anteriormente. Paso 22 Apriéte 3 tornillos en el gabinete. Vuelva a instalar la chimenea Vuelva a instalar la agarradura y el cartucho del tanque.
- Página 34 EXAMINANDO EL SISTEMA DE IGNICIÓN ejecute los Si el sistema de ignición automático no funciona correctamente, siguientes chequeos: -BATERIAS – "D" están localizadas el la parte trasera del 2 baterias Fig. 11 calentador. Reemplaze con baterias nuevas. -TAPÓN DE ENCEDEDOR –Si el sistema de ignición automático todavía no funciona correctamente, déspues de haber reemplazado las baterias, examine el tapón del encendedor.
- Página 35 PROBANDO EL INTERRUPTOR AUTOMÁTICO DE SEGURIDAD: Al menos una vez a la semana durante la tempora- da de frío, es importante probar el interruptor automático de seguridad para estar seguro que está funcionando cor- CON EL CALENTADOR APAGADO, suba la mecha a la posición más alta con el botón ajustador de rectamente.
- Página 36 PRECAUCIONES DE SEGURIDAD ESPECIALES Donde usar el calentador de querosén - Sólo use el calentador de querosén en una posición llana. Examine la guía de nivel en el lado del calentador para veri car que esté en una posición nivelada. - No ponga el calentador de querosén en un área de mucho trá...
-
Página 37: Guía De Problemas Comunes
GUÍA DE PROBLEMAS COMUNES ACCIÓN CORRECTIVA PROBLEMAS Calentador No Se Enciende: 1. Llene el tanque con querosén 1-K. 1. El tanque de combustible esta vacío 2. Hay agua en el querosén 2. Vacie el tanque. Quite el montaje de mecha y reemplaze la mecha. - Página 38 AGARRADURA DE GABINETE (RMC-55R7) WS-CT08RB AGARRADURA DE GABINETE (RMC-55R7B) WS-CT09R GABINETE (RMC-55R7) WS-CT09RB GABINETE (RMC-55R7B) WS-CT10R VENTANA DE INDICADOR DE COMBUSTIBLE (RMC-55R7) 10-1 WS-CT10RB VENTANA DE INDICADOR DE COMBUSTIBLE (RMC-55R7B) WS-CT37R PANEL DELANTERO DE CIMA WS-CT12R PANEL DELANTERO (RMC-55R7) 12-1...
- Página 40 GHP Group, Inc. 6440 W Howard St Niles, IL 60714-3302 Tel: (877) 447-4768 www.ghpgroupinc.com...
- Página 41 CHAUFFERETTE AU KÉROSÈNE PORTATIVE MANUEL DE L’UTILISATEUR MODÈLE : RMC- 55R7 / RMC- 55R7B Avant d’utiliser cette chaufferette pour la première fois, lisez attentivement le présent MANUEL DE ‘UTILISATEUR. CE MANUEL DE L’UTILISATEUR a été rédigé pour vous indiquer la bonne méthode d’assemblage, d’entretien et d'entreposage de la chaufferette.
- Página 42 – GUIDE D’AVERTISSEMENTS ET DE SÉCURITÉ – AVERTISSEMENT/ RISQUE D’EXPLOSION / RISQUE À l’occasion, vous entendrez le bruit du carburant se vidant de la D’INCENDIE cartouche-réservoir pour remplir le réservoir de la chaufferette. Il s’agit d’un bruit normal dans le cas d’une chaufferette à NE JAMAIS utiliser du carburant autre que du kérosène 1-K cartouche-réservoir.
- Página 43 TABLE DES MATIÈRES DU MANUEL DE L’UTILISATEUR SUJET PAGE SUJET PAGE GUIDE D’AVERTISSEMENT ET DE SÉCURITÉ VÉRIFIER LE SYSTÈME D’ALLUMAGE INTRODUCTION MÉCANISME DU DISPOSITIF DE RÉGLAGE CARACTÉRISTIQUES DE LA MÈCHE KÉROSÈNE (1-K SEULEMENT) DISPOSITIF DE SÉCURITÉ DE FERMETURE DÉBALLER ET ASSEMBLER LA CHAUFFERETTE AUTOMATIQUE APPROVISIONNEMENT DE LA CHAUFFERETTE ENTREPOSAGE À...
- Página 44 KÉROSÈNE (1-K uniquement) Il est EXTRÊMEMENT IMPORTANT pour le bon fonctionnement de la chaufferette d’utiliser la bonne qualité de kérosène. Le kérosène de la bonne qualité est le kérosène 1-K. NE FAITES PAS FONCTIONNER LA CHAUFFERETTE AVEC UN AUTRE CARBURANT QUE LE KÉROSÈNE 1-K! Le kérosène 1-K a été raffiné jusqu’au point d’éliminer virtuellement les contaminants comme le souffre, qui cause une odeur d’œufs pourris lorsque la chaufferette fonctionne.
- Página 45 DÉBALLER ET ASSEMBLER LA CHAUFFERETTE 1. RETIREZ LA CHAUFFERETTE ET TOUT LE MATÈRIEL D’EMBALLAGE DE LA BOÎTE (Fig.2). REMARQUE : Conservez la boîte et le matériel d’emballage Manuel de I’utilisateur pour entreposer votre chaufferette plus tard. 2. Ouvrez la grille du côté droit en tirant sur le coin inférieur droit intérieur.
-
Página 46: Approvisionnement De La Chaufferette
APPROVISIONNEMENT DE LA CHAUFFERETTE REMARQUE : Voir la section 3, page 3 sur le KÉROSÈNE pour obtenir de l’information sur la qualité de kérosène nécessaire à l’utilisation de cette chaufferette. ATTENTION : NE JAMAIS PETIRER LA CARTOUCHE-RÉSERVOIR DE LA CHAUFFERETTE LORSQUE CELLE-CI FONCTIONNE OU EST ENCORE CHAUDE. - Página 47 SYSTÈME D’ALLUMAGE AUTOMATIQUE Pour des raisons de commodité et de sécurité, cette chaufferette est munie d’un système d’allumage automatique. Deux piles “D”, incluses avec la chaufferette, fournissent l’énergie nécessaire pour allumer la mèche après que celle- ci a été levée à sa hauteur maximum. Lorsque la chaufferette est approvisionnée en carburant pour la premirère fois, vous devez compter une période d’attente minimum of 60 minutes pour permettre à...
- Página 48 AJUSTER LA MÈCHE Après avoir allumé la chaufferette, vous devez surveiller la flamme pendant les cinq à sept premières minutes de fonctionnement. Après 5 à 7 minutes de fonctionnement de la chaufferette, utilisez le bouton du dispositif de réglage de la mèche pour régler la hauteur de la flamme (voir la fig.8).
- Página 49 REMARQUE : Une accumulation de carbone sur la mèche à peut empêcher celle-ci de baisser complètement lorsque vous appuyez sur le bouton d’extinction la flamme peut donc ne pas d’eteindre. Le cas échéant, continuez d’appuyer sur le bouton d’extinction et tournez le bouton du dispositif de réglage de la mèche dans le sens contraire des aiguilles d’une montre (vers le réglage “OFF”) le plus loin possible.
- Página 50 Inspectez les piles Si le filament ne chauffe pas suffisamment pour allumer la mèche et qu’il ne semble pas endommagé, remplacez les piles. Inspectez les mèche Inspectez la mèche avant chaque utilisation de la chaufferette pour détecter toute accumulation de carbone. Si du carbone s’st accumulé...
- Página 51 REMPLACEMENT DE LA MÈCHE Vous devez remplacer la mèche lorque la chaufferette entièrement refroidie, après avoir enlevé la cartouche-réservoir et que le reste du kérosène se trouvant dans la chaufferette a brûlé. Utilisez seulement des mèches de remplacement d’origine. Numéro des mèches de remplacement : Glowick 200-B, Kero-World 20401-U, Dura Heat DH-200, Pick-A-Wick-PW27. Ouvrez le couvercle du réservoir du Enlevez cinq vis : deux à...
- Página 52 La mèche de remplacement a La ligne noire à l’extérieur de la Replacez la mèche et le support dans le une ligne noire. mèche doit être alignée avec le bord réservoir du brûleur. Faites pivoter la Pliez la nouvelle mèche et supérieur du support.
- Página 53 Replacez le déflecteur. Enlevez le bouton de réglage de Replacez le boîtier. la mèche si vous l’aviez réinstallé précédemment. Serrez les cinq vis tenant le boîtier. Replacez la cheminée et la Replacez le bouton de réglage de cartouche-réservoir. la méche. Fermez la grille avant. Step 25 Step 26 Step 27...
- Página 54 VÉRIFIER LE SYSTÈME D’ALLUMAGE Si le système d’allumage automatique ne fonctionne pas correctement, effectuez les vérifications suivantes : - PILES - 2 piles “D” se trouvent à l’arrière de la chaufferettte. Vérifiez qu’elles sont correctement insérées. Ou remplacez-les par des piles neuves. - Bougie d’allumage - Si le système d’allumage automatique ne fonctionne toujours pas après le remplacement des piles, vérifiez la bougie d’allumage.
- Página 55 VÉRIFIER LE DISPOSITIF DE SÉCURITÉ DE FERMETURE AUTOMATIQUE Il est important de vérifier le bon fonctionnement du dispositif de sécurité de fermeture au moins une fois par semaine durant la période d’utilisation régulière. LORSQUE LA CHAUFFERETTE EST ÉTEINTE, levez la mèche à la position maximum à l’aide du bouton du dispositif de réglage de la mèche.
- Página 56 MESURES DE SÉCURITÉ SPÉCIALES Où utiliser votre chaufferette au kérosène - Utilisez une chaufferette au kérosène uniquement sur une surface plane. - Ne placez pas une chaufferette au kérosène dans un endroit passant, comme une entrée ou une sortie. N’utilisez pas une chaufferette au kérosène dans un endroit venteux.
-
Página 57: Guide De Dépannage
GUIDE DE DÉPANNAGE È La chaufferette ne s’allume pas; 1. Remplissez le réservoir de kérosène 1-K entièrement transparent. 1. Le réservoir est vide 2. Il y a de l’eau dans le kérosène 2. Videz le réservoir. Retirez l’assemblage de la mèche et remplacez la mèche. - Página 58 DISPOSITIF DE SÉCURITÉ DE FERME TURE(RMC-55R7) SEE 24 22-1 DISPOSITIF DE SÉCURITÉ DE FERME TURE(RMC-55R7B) SEE 24-1 ASSEMBLAGE DU L’ALLUMEUR WS-CT23R-1 DISPOSITIF DE RÉGLAGE DE LA MÈCHE (RMC-55R7) 2123-0030-00 (COMPLET) 24-1 DISPOSITIF DE RÉGLAGE DE LA MÈCHE (RMC-55R7B) 2123-0031-00 (COMPLET)
- Página 60 GHP Group, Inc. 6440 W Howard St Niles, IL 60714-3302 Tél: (877) 447-4768 www.ghpgroupinc.com...