Tabla de contenido
Publicidad
Idiomas disponibles
Idiomas disponibles
Enlaces rápidos
Publicidad
Tabla de contenido

Manuales relacionados para Steren JMP-100


Resumen de contenidos para Steren JMP-100
-
Página 2: Arrancador De Emergencia
Arrancador de emergencia 5 en 1. Por favor, revíselo completamente para estar seguro de cómo utilizar apropiadamente el producto. Para apoyo, compras y todo lo nuevo que tiene Steren, visite nuestro sitio web: www.steren.com La información que se muestra en este manual sirve únicamente como referencia sobre el producto. - Página 3 IMPORTANTE • Las baterías de plomo-ácido pueden liberar gases explosivos. No seguir las instrucciones puede causar daños a la propiedad, el riesgo de explosión, o lesiones personales. • Este producto no es un juguete, manténgase fuera del alcance de los niños. •...
-
Página 4: Características
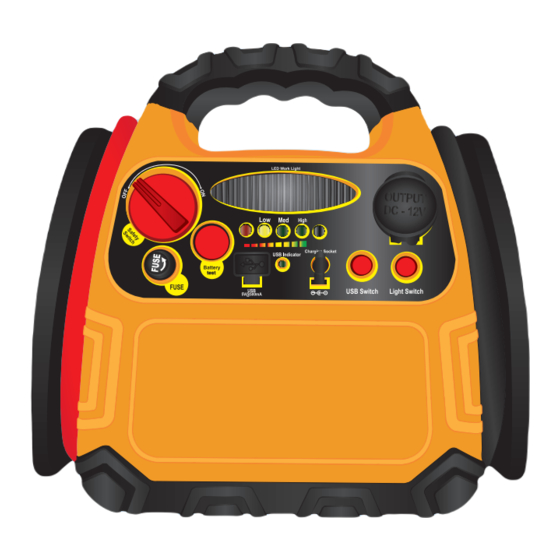
CARACTERÍSTICAS • El equipo de emergencia para automóvil es un aparato 5 en 1 ya que, además de realizar su función primordial de permitir cargar un poco la batería para que el auto pueda arrancar, también tiene un compresor de aire. •... - Página 5 PARTES 1. Interruptor de seguridad. 8. Indicador de carga. 2. Lámpara de emergencia. Botón para lámpara 3. Salida 12 V. emergencia. 4. Fusible. 10. Interruptor del USB. 5. Botón de estado de la batería. 11. Entrada de alimentación. 6. Puerto USB. 12.
- Página 6 13. Indicador de presión. 14. Interruptor de encendido del compresor de aire. 15. Manguera del compresor.
-
Página 7: Instrucciones
INSTRUCCIONES Estado de la batería Esta función proporciona el estado de carga actual de la batería interna. Revise periódicamente la carga de la batería y recarguela después de cada uso. 1. Presione el botón de estado de la batería, los LEDs indicadores de estado se encenderán y usted podrá... -
Página 8: Carga De La Estación De Energía
Carga de la estación de energía Asegúrese de que el adaptador de corriente suministrado sea alimentado por el voltaje correcto (110 V~). Utilice únicamente el adaptador de carga de CA suministrado con esta unidad. Charging Socket cator 1. Asegúrese de que todos los interruptores de la estación de energía están apagados. - Página 9 Carga de batería desde su vehículo 1. Asegúrese de que todos los interruptores de la estación de energía están apagados. Charging Socket cator 2. Abra la cubierta de polvo en la entrada de alimentación. 3. Conecte el cable del adaptador de carga en la toma correspondiente de la estación de energía y a la toma del vehículo (encendedor de cigarros).
- Página 10 Salida de 12 V La salida de 12 V está localizada al frente de la estación de energía. 1. Abra la cubierta de polvo de la salida de 12 V. Asegúrese todos interruptores de la estación de energía están apagados. 3.
-
Página 11: Uso Del Compresor De Aire
Uso del compresor de aire El indicador e interruptor de encendido del compresor de aire se encuentran en la parte trasera de la estación de energía y la manguera del compresor de aire, acomodada alrededor de la estación de carga. Nunca conecte o desconecte la boquilla con el compresor en funcionamiento. - Página 12 4. Retire la tapa de la válvula de la aguja del obturador y fije la boquilla a la aguja del obturador del neumático. 5. Mueva la palanca de la boquilla hacia abajo para asegurar la manguera a la aguja del obturador. 6.
-
Página 13: Pasar Corriente
Pasar corriente 1. Lea todas las precauciones que se encuentran al principio del manual. LED Work Light High 2. Asegúrese de que todo esté apagado Charging Socket USB Indicator en el vehículo: luces, radio, etcétera. Battery test test FUSE USB Switch Light Switch 5V@500mA 3. - Página 14 7.Coloque el interruptor de seguridad en la posición “ON”. 8. Dentro del vehículo, encienda el interruptor de encendido e intente arrancar el motor. Intente arrancar por un máximo de tres segundos. Si el motor no arranca, espere tres minutos antes del siguiente intento.
-
Página 15: Puerto De Alimentación Usb
Puerto de alimentación USB 1. Encienda el interruptor del USB; el indicador correspondiente se enciende en color verde. Charging Socket USB Indicator USB SwitchL 5V@500mA 2. Quite la tapa del puerto USB e inserte el conector USB en el puerto de alimentación. LED Work Light High Charging Socket... -
Página 16: Especificaciones
PROBLEMA SOLUCIONES • Presione el botón de estado de la batería, recargue la unidad en caso de ser necesario. • Asegúrese de que se han realizado las conexiones de los cables El arrancador no con la polaridad correcta. enciende • Verifique el estado del fusible y en caso de ser necesario reemplácelo por uno con las mismas características. -
Página 17: Póliza De Garantía
1.- Para hacer efectiva la garantía, presente esta póliza y el producto, en donde fue adquirido o en Electrónica Steren S.A. de C.V. 2.- Electrónica Steren S.A de C.V. se compromete a reparar el producto en caso de estar defectuoso sin ningún cargo al consumidor. Los gastos de transportación serán cubiertos por el proveedor. - Página 19 Steren, visit our website: www.steren.com The instructions of this manual are for reference about the product. There may be differences due to updates. Please check our website (www.steren.com) to obtain the latest version of the instruction manual.
- Página 20 IMPORTANT • Lead-acid batteries can release explosive gases. Failure to follow instructions may cause property damage, explosion hazard, or personal injury. • This product is not a toy, keep out of the reach of children. • Remove any metallic jewelry, such as rings, bracelets, necklaces and watches while working with a lead acid battery.
- Página 21 HIGHLIGHTS • The car jump starter is a 5 in 1 device that helps to charge a battery in order to start the car, also includes an air compressor. • It is ideal for car tires, sports balls, bicycles, water inflatables and more; the emergency light is very useful in garages and dark places, also incorporates an USB charger for mobile equipment and 12 V output to connect any other device that commonly connect to the cigarette lighter.
- Página 22 PARTS 1. Safety switch. 8. Charge indicator. 2. Emergency lamp. 9. Lamp button. 3. 12 V output. 10. USB switch. 4. Fuse. 11. Input. 5. Battery status button. 12. USB indicator. 6. USB port. 7. Battery LED indicators.
- Página 23 13. Pressure indicator. 14. Air compressor switch. 15. Air hose.
-
Página 24: Battery Status
INSTRUCTIONS Battery status Battery status provides the user with a current state of charge on the internal battery. It is the user’s responsibility to periodically monitor the battery charge and to recharge the battery after each use. 1. Press the battery status button. The 4-stage LED battery level indicator will display the battery status. - Página 25 Charging the power station Make sure the supplied current adapter is to be powered by the correct voltage (110 V ~). Use only the adapter supplied Charging Socket cator with this unit. 1. Make sure all power station switches are set to off.
- Página 26 Battery charging in your vehicle or boat Charging Socket 1. Make sure all power station switches are cator set off. 2. Open the dust cover on the charging jack. 3. Plug the charging adapter into the power station’s charging jack and into an accessory outlet (cigarette lighter).
- Página 27 12 V power output The 12 V power output is located in the front of the power station. 1. Remove the dust cover from the 12 V DC power output. 2. Make sure all power station switches are set off. 3.
- Página 28 Using the air compressor The air compressor gauge and power switch are located on the rear of the power station. The compressor air hose, placed around the unit. Never connect or disconnect the nozzle while the compressor is operating. Before any tire inflation, look for the recommended inflation pressure information on the sidewall of the tire.
- Página 29 4. Remove the valve cap from the valve stem and attach the nozzle to the tire’s valve stem. 5. Move the nozzle lever down to secure the nozzle to the valve stem. 6. Turn compressor switch on to “|” position. 7.
-
Página 30: Jumpstarting
Jumpstarting 1. Review the warnings at the begining of this instruction manual. LED Work Light High 2. Make sure all vehicle appliances, such Charging Socket USB Indicator Battery test test FUSE as lights, radio, etc., are turned off. USB Switch Light Switch 5V@500mA 3. - Página 31 7. Place the safety switch in the “ON” position. 8. Inside the vehicle, turn on the ignition switch and try to start the engine. Crank a maximum of three seconds. If the engine does not start, wait three minutes before the next attempt.
-
Página 32: Usb Power Port
USB power port 1. Press the USB Switch, the USB indicator lights green. Charging Socket USB Indicator USB SwitchL 5V@500mA 2. Open the dust cover from the power port and insert the USB plug. LED Work Light High Charging Socket USB Indicator Battery test... - Página 33 PROBLEM SOLUTIONS • Press the battery status button; recharge the unit if needed. • Make sure the polarity in the connections is right. The jump starter does not turns on • Check the fuse, replace it if needed replace with one of the same type.
- Página 34 Product: Car jump starter Part number: JMP-100 Brand: Steren WARRANTY This Steren product is warranted under normal usage against defects in workmanship and materials to the original purchaser for one year from the date of purchase and three months on its battery. CONDITIONS 1.
- Página 36 Este instructivo puede mejorar con su ayuda, llámenos: Help us to improve this instruction manual, call us: 01800 500 9000 Centro de Servicio a Clientes Customer Service Center www.steren.com...