Tabla de contenido
Publicidad
Idiomas disponibles
Idiomas disponibles
Publicidad
Capítulos
Tabla de contenido

Manuales relacionados para Steren SEG-150


Resumen de contenidos para Steren SEG-150
-
Página 3: Control De Acceso Numérico/Tarjeta Rfid
Control de acceso numérico/tarjeta RFID SEG-150 Gracias por la compra de este producto Steren. Este manual contiene todas las funciones de operación y solución de problemas necesarias para instalar y operar su nuevo Control de acceso numérico/tarjeta RFID Steren. Por favor revise el manual completamente para estar seguro de instalar y poder operar apropiadamente este producto. -
Página 5: Tabla De Contenido
CONTENIDO Características Advertencias Contenido Terminales de conexión Tonos y señales del sistema Diagrama de conexión Operación Modo de programación Cambiar el código maestro Grabar un NIP de administrador Guardar un NIP común Grabar o borrar tarjeta o NIP de usuario para operar la puerta Códigos de visitante Configuración de la apertura de la puerta Bloqueo de seguridad... -
Página 6: Características
Características El control de acceso está fabricado con tecnología de identificación por radiofrecuencia (RFID) que opera en la frecuencia de 125 kHz. Soporta hasta 1000 usuarios que pueden registrarse por medio del teclado numérico o tarjeta de identificación RFID. La ventaja del sistema de identificación por radiofrecuencia (RFID) es que no necesita llaves o establecer contacto físico, por lo que es un sistema cómodo, seguro y confiable. -
Página 7: Advertencias
ADVERTENCIAS 1) Prevención de interferencias El Control de Acceso Numérico / Tarjeta RFID funciona a una frecuencia de 125kHz. Se necesitan ciertas precauciones en su instalación. a) Asegúrese de que el lugar de instalación no es afectado por ondas electromagnéticas de baja frecuencia. Especialmente en el rango de 100- 200kHz. -
Página 8: Contenido
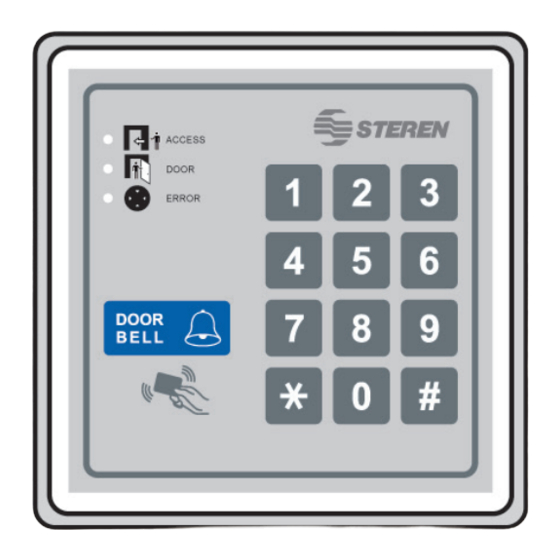
Contenido ACCESS DOOR ERROR Un control de acceso Dos tarjetas o llaveros RFID Un paquete de tornillos de montaje Un arnés de cables Un manual del usuario... -
Página 9: Terminales De Conexión
Terminales de conexión EC3E BEEP DOOR BELL ( + ) ( - ) TAMPER OUTPUT N.C. N.O. 12V DC N.C. N.O. TAMPER 12MHZ 2 3 4 P A N E L T R A S E R O 1.- Tamper (Interruptor por manipulación) Aquí... - Página 10 3.- 12V D.C. (Alimentación) Conecte aquí una fuente de alimentación de 12V CD. La terminal (-) es la tierra común del sistema. 4.- EG IN (control de acceso) Aquí podrá conectar un botón normalmente abierto de manera que al presionarlo se active la chapa eléctrica y permita abrir la puerta manualmente. El negativo del botón deberá...
- Página 11 ACCESS DOOR ERROR P A N E L F R O N T A L 6.- Access (Ámbar): parpadea en el modo de espera. Muestra el estado del sistema (al mismo tiempo que los “beeps”). Se puede apagar completamente en el modo de programación. 7.- Door (Verde): Se enciende cuando se activa la apertura de la puerta (salida).
-
Página 12: Tonos Y Señales Del Sistema
Tonos y señales del sistema El sistema muestra su estado mediante los siguientes sonidos y señales visuales: Tonos Estado Señales visuales ------ Modo de progra mación Encendido Clave aceptada 1 Tono 1 Parpadeo Código / Tarjeta acept ada 2 Tonos 2 Parpadeos 5 Tonos 5 Parpadeos... -
Página 13: Diagrama De Conexión
Diagrama de conexión... -
Página 14: Operación
Operación Para dar de alta usuarios o para programar las funciones del Control de Acceso usted deberá introducir una serie de teclas. Por ejemplo: Para desactivar el aviso de activación del relevador deberá presionar 7 + 1 + 0 + 8 + # Esto quiere decir que deberá... -
Página 15: Grabar Un Nip De Administrador
Grabar un NIP de administrador El NIP de administrador tiene dos funciones, permite operar el control de acceso mientras está bloqueado y abrir o cerrar la puerta en condiciones de bloqueo. Para establecer el NIP de administrador deberá introducir la siguiente secuencia: 02 + NIP de administrador + # Donde:... -
Página 16: Grabar O Borrar Tarjeta O Nip De Usuario Para Operar La Puerta
Donde: 03 para indicar que se va a grabar el NIP común El NIP común deberá de ser de entre 4 y 8 dígitos # para confirmar Grabar o borrar tarjeta o NIP de usuario para operar la puerta Entre al modo de programación e introduzca la siguiente secuencia: 10 + Opción de Grabación + Número de ID de usuario + Leer tarjeta o introducir NIP + # Donde: 10 para indicar que se va a grabar o borrar una tarjeta de acceso o... -
Página 17: Códigos De Visitante
Para borrar TODAS las tarjetas y NIPs del sistema, introduzca la siguiente secuencia: 10 + 0999 + # Códigos de visitante Puede establecer hasta 50 códigos de visitante en 2 modalidades de funcionamiento: para usarse una sola vez (al usarse el código se borra) o con límite de tiempo (después de cierto tiempo el código se borra). -
Página 18: Configuración De La Apertura De La Puerta
Configuración de la apertura de la puerta La apertura de la puerta se puede programar en dos modalidades: abrir y cerrar o por tiempo. En el modo abrir y cerrar la puerta se abrirá cuando se ingrese un NIP o se lea una tarjeta; y se cerrará hasta que se introduzca un NIP o se lea una tarjeta. -
Página 19: Modos De Ingreso De Nip
Donde: 60 para indicar que se va a programar el bloqueo de seguridad. 1 es el modo preestablecido. Después de 10 códigos erróneos la puerta se bloqueará por 60 segundos. 5-10 si se selecciona un número entre 5 y 10 éste será el número de intentos fallidos que se admitirán antes de bloquear la puerta por 15 minutos. -
Página 20: Encendido/Apagado De Tonos
Donde: 70 para indicar que se va a seleccionar el tipo de ingreso de NIP. 1 para el modo automático, 2 para el modo manual. # para confirmar. El modo preestablecido es el manual. Encendido/Apagado de tonos Los tonos del sistema incluyen todos los del teclado, además de los que se escuchan cuando se ingresa un NIP exitosamente (1 beep), se abre la puerta (2 beeps o 1 beep largo) y cuando se ingresa un NIP incorrecto (5 beeps). -
Página 21: Encendido/Apagado Del Tono De Operación
Encendido/Apagado del tono de operación El tono de operación se escucha cuando se ingresa un NIP o se lee una tarjeta exitosamente. Esto es particularmente útil cuando la chapa no hace ruido al abrirse. Este tono también se apaga cuando se apagan todos los tonos. Para configurar este tono se debe ingresar la siguiente secuencia: 72 + 1 ó... -
Página 22: Botón De Salida
Botón de salida Si requiere un botón de salida, puede configurarlo de distintas formas de manera que se adapte mejor a sus necesidades. Este botón abrirá la puerta sin la necesidad de introducir un código o leer una tarjeta. Para configurar el botón de salida tendrá... -
Página 23: Acceso Usando El Código Adp
Acceso usando el código ADP (Acceso Directo a Programación) Este procedimiento es para entrar al modo de programación en caso de que se pierda el código maestro. - Apague y desconecte el control de acceso. Espere 1 minuto para asegurarse de que está... -
Página 24: Especificaciones
Especificaciones Alimentación: 12V - - - 90mA Corriente máxima del relevador: 5A Tipo de Tarjeta de ID: EM Card 125 kHz El diseño del producto y las especificaciones pueden cambiar sin previo aviso. - Página 25 1.- Para hacer efectiva la garantía, presente ésta póliza y el producto, en donde fue adquirido o en Electrónica Steren S.A. de C.V. 2.- Electrónica Steren S.A de C.V. se compromete a reparar el producto en caso de estar defectuoso sin ningún cargo al consumidor. Los gastos de transportación serán cubiertos por el proveedor.
- Página 29 Steren product. This manual includes all the feature operations and troubleshooting necessary to install and operate your new Steren Numerical access control / RFID card. Please review this manual thoroughly ensure proper installation and operation of this product.
- Página 31 CONTENT Highlights Precautions Content Connection terminals System´s tones and signals Connection diagram Operation Programing mode Change the master code Record an administrator PIN Record a common PIN Record or delete user card or PIN to operate door Visitor codes Configure the door opening Security lock PIN entry modes Turn On / Off tone...
-
Página 32: Highlights
Highlights The access control is made with new radiofrequency technology identification (RFID) that operates at a 125 kHz frequency. Supports up to 1000 users that can be registered through a numeric keypad or identification RFID card. The advantage of the identification radiofrequency system (RFID) is that it doesn’t need the use of keys, or any physical contact, which makes it a comfortable, secure and reliable system. -
Página 33: Precautions
PRECAUTIONS 1) Interference prevention Numerical Access Control Card / RFID operates at 125kHz frequency. These precautions are needed at installation: a) Make sure the installation site is not affected by low frequency electromagnetic waves, especially in the 100-200kHz range. b) If there’s more than one Access Control operating in the same frequency, make sure they are separated by at least 60cm. -
Página 34: Content
Content ACCESS DOOR ERROR 1 access control 2 RFID cards or keyrings 1 package of mounting screws 1 wire harness 1 user’s manual... -
Página 35: Connection Terminals
Connection terminals EC3E BEEP TAMPER DOOR BELL ( + ) ( - ) OUTPUT N.C. N.O. 12V DC N.C. N.O. TAMPER 12MHZ 2 3 4 R E A R P A N E L 1.- Tamper You can connect to an external alarm. This alarm is activated when you remove the keyboard cover. - Página 36 3.- 12V D.C. Connect a 12V power source DC. The terminal (-) is the system’s common ground. 4 EG IN Here you can connect a normally open button so, when pressed, activates the electric lock and allow to open the door manually. The button’s negative should be connected to common ground.
- Página 37 ACCESS DOOR ERROR F R O N T P A N E L 6.- Access (Amber): flashes in standby mode. Displays the system’ status (along with “beeps”). You can completely turn off it in programming mode. 7.- Door (Green): Lights up while opening of the door. 8.- Error (Red): Lights when the output is blocked.
-
Página 38: System´s Tones And Signals
System´s tones and signals The system displays its status using the following sounds and visual cues:... -
Página 39: Connection Diagram
Connection diagram... -
Página 40: Operation
Operation To register users or to schedule Access Control functions, you must enter a series of keys. For example: To deactivate the alarm relay activation must press 7 + 1 + 0 + 8 + # This means that you must press the keys in this sequence. Programing mode Enter the programming mode by pressing: 0000 + * *... -
Página 41: Record An Administrator Pin
Record an administrator PIN The administrator PIN has two functions, it allows access control to operate while it is blocked and open or close the door block conditions. To set the administrator PIN you must enter the following sequence: 02 + Administrator PIN + # 02 indicates that will change the administrator PIN. -
Página 42: Record Or Delete User Card Or Pin To Operate Door
03 to indicate that it will record the common PIN. The common PIN must be between 4 and 8 digits. # to confirm. Record or delete user card or PIN to operate door Enter the programming mode and enter the following sequence: 10 + Record Option + Number + Read user ID card or enter PIN + # Where: 10 to indicate that it will record or delete an access card or PIN user. -
Página 43: Visitor Codes
To clear all the cards and PINs in the system, enter the following sequence: 10 + 0999 + # Visitor codes You can set up to 50 visitor codes in two operating modes: for use only once (delete code after use) or time limit (after a determined time the code is erased). -
Página 44: Configure The Door Opening
Configure the door opening The opening of the door can be programmed in two forms: open and close or time. On the open and close mode the door will open when you enter a PIN or a card read, and will be closed until you enter a PIN or a card read. In the time mode, the door will be open the indicated time. -
Página 45: Pin Entry Modes
Where: 60 to indicate that it will set the security block. 1 is the preset mode. After 10 wrong codes will lock the door for 60 seconds. 5-10 if you select a number between 5 and 10 will be the number of failed attempts that are allowed before locking the door for 15 minutes. -
Página 46: Turn On / Off Tone
Where: 70 to indicate that it will select the type of PIN entry. 1 for the automatic mode to manual mode 2. # To confirm. The preset mode is manual. Turn On / Off tone The tones of the system includes all of the keyboard, in addition to those heard when entering a PIN successfully (one beep), open the door (two beeps or one long beep) and when you enter an incorrect PIN (five beeps). -
Página 47: On / Off Button Operation Tone
On / Off button operation tone The operation tone is heard when entering a PIN or a card is read successfully. This is particularly useful when the lock does not make noise when opened. This tone also turns off when you turn off all tones. To configure this tone enter the following sequence: 72 + 1 or 0 + # Where:... -
Página 48: Exit Button
Exit Button If you need an exit button, you can configure it in different ways so that better suits your needs. This button will open the door without the need to enter a code or read a card. To set the start button you must enter the following sequence of digits: 90 + 1, 2, 4 or 5 + 0 or 1-99 + # Where:... -
Página 49: Access Using Dap Code
Access using DAP code (Direct Access to Programing) This procedure is to enter the programming mode when master the code is lost. - Turn off and unplug the access control. Wait 1 minute to ensure it is fully discharged. - Plug in and turn on the control. For a 1 minute the control is in boot mode and you can enter the following sequence: Exit Button + 8080 + ** Where:... -
Página 50: Specifications
Specifications Power input: 12V - - - 70mA Maximum relay current: 3A ID card type: EM Card 125 kHz Product design and specifications are subject to change without previous notice. - Página 51 Part number: SEG-150 Brand: Steren WARRANTY This Steren product is warranted under normal usage against defects in workmanship and materials to the original purchaser for one year from the date of purchase. CONDITIONS 1.- This warranty card with all the required information, invoice, product box or package, and product, must be presented when warranty service is required.
- Página 52 Este instructivo puede mejorar con tu ayuda, llámanos a: Help us to improve this instruction manual, call us to: 01800 500 9000 Centro de Servicio a Clientes Customer Service Center...