Publicidad
Idiomas disponibles
Idiomas disponibles
INSTALLATION INSTRUCTIONS FOR PART 99-8239B
Toyota Prius C 2012-up
KIT FEATURES
• ISO DIN head unit provision with pocket
• Painted Matte Black
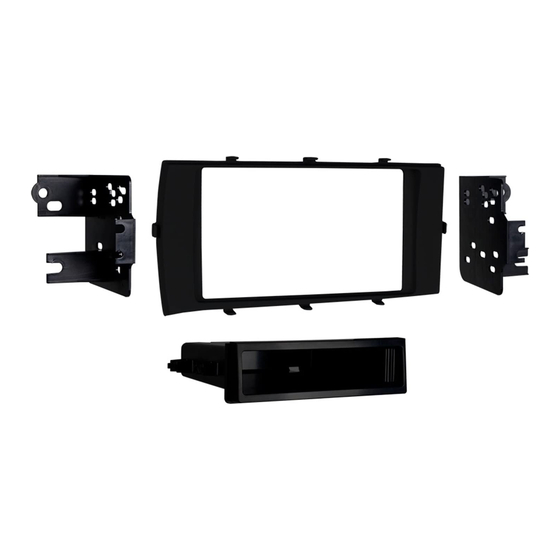
KIT COMPONENTS
• A) Radio Trim Panel • B) Radio Brackets • C) Pocket • D) (4) #8 x 3/8" Phillips Pan Head Screws
• E) (2) #8 x 3/8 Phillips Truss Head Screws
A
B
WIRING & ANTENNA CONNECTIONS (sold separately)
Wiring Harness: • 70-1761 Toyota Harness 1987-up
Antenna Adapter: • 40-LX11
TOOLS REQUIRED
• Panel removal tool • Phillips screwdriver • Socket Wrench
METRA. The World's best kits.
APPLICATIONS
99-8239B
C
D
™
1-800-221-0932
Dash Disassembly
– Toyota Prius C 2012-up ........................................ 2
Kit Assembly
– ISO DIN head unit provision .................................. 3
E
CAUTION: Metra recommends disconnecting the
negative battery terminal before beginning any
installation. All accessories, switches, and especially
air bag indicator lights must be plugged in before
reconnecting the battery or cycling the ignition.
NOTE: Refer to the instructions included with the
aftermarket radio.
metraonline.com
Table of Contents
© COPYRIGHT 2004-2011 METRA ELECTRONICS CORPORATION
Publicidad
Tabla de contenido

Manuales relacionados para Metra 99-8239B


Resumen de contenidos para Metra 99-8239B
- Página 1 INSTALLATION INSTRUCTIONS FOR PART 99-8239B APPLICATIONS Table of Contents Toyota Prius C 2012-up 99-8239B Dash Disassembly – Toyota Prius C 2012-up ........2 Kit Assembly – ISO DIN head unit provision ........3 KIT FEATURES • ISO DIN head unit provision with pocket •...
-
Página 2: Dash Disassembly
99-8239B Dash Disassembly 1. Unclip and remove the trim panel from around the radio containing the hazard switch. (Figure A) 2. Remove (4) 8 mm bolts securing the factory radio. (Figure B) Continue to kit assembly (Figure A) (Figure B) -
Página 3: Kit Assembly
4. Locate the factory wiring harness (Figure A) (Figure B) in the dash. Metra recommends using the proper mating adapter from Metra or AXXESS. Test the unit for proper operation. 5. Mount the radio/bracket/trim panel assembly into the dash. 6. Reassemble dash in reverse order... - Página 4 INSTALLATION INSTRUCTIONS FOR PART 99-8239B NOWLEDGE IS OWER Enhance your installation and fabrication skills by enrolling in the most recognized and respected mobile electronics school in our industry. Log onto www.installerinstitute.com or call 800-354-6782 for more information and take steps toward a better tomorrow.
-
Página 5: Herramientas Requeridas
INSTRUCCIONES DE INSTALACIÓN PARA LA PIEZA 99-8239B AplicAciones Indice Toyota Prius C 2012 y mas 99-8239B Desmontaje del tablero – Toyota Prius C 2012 y mas ........2 Ensamble del kit – Provisión de unidad central ISO DIN ..... 3 cArActerísticAs del kit... -
Página 6: Desmontaje Del Tablero
99-8239B Desmontaje del tablero 1. Desenganche y quite el panel de moldura que rodea el radio que contiene el interruptor de las luces intermitentes. (Figura A) 2. Retire los (4) pernos de 8 mm que sujetan el radio de fábrica. -
Página 7: Ensamble Del Kit
(Figura B) el tablero. Metra recomienda el uso de un adaptador adecuado de acoplamiento de Metra o de AXXESS. Pruebe la unidad para ver si funciona bien. 5. Monte el ensamble de radio/soporte/ panel de la moldura en el tablero. - Página 8 INSTRUCCIONES DE INSTALACIÓN PARA LA PIEZA 99-8239B EL CONOCIMIENTO ES PODER NOWLEDGE IS OWER Mejore sus habilidades de instalación y fabricación Enhance your installation and fabrication skills by inscribiéndose en la escuela de dispositivos electrónicos enrolling in the most recognized and respected mobile electronics school in our industry.