
Manuales relacionados para EAS ELECTRIC EMV70DGN


Resumen de contenidos para EAS ELECTRIC EMV70DGN
- Página 1 HORNO OVEN FOUR FORNO EMV70DGN EMV70DGW MANUAL DE INSTRUCCIONES INSTRUCTION MANUAL MANUEL D'INSTRUCCIONS MANUAL DE INSTRUÇÕES...
- Página 2 Le agradecemos la compra de nuestro producto. Esperamos que saque el máximo provecho de todas las características y funciones que ofrece. Antes de utilizar el producto, por favor, lea detenimiento y en su totalidad este Manual de Instrucciones. Conserve este manual en un lugar seguro para futuras consultas. Asegúrese asimismo de que las personas que también vayan a utilizar el producto estén familiarizadas con estas instrucciones.
- Página 3 No utilice limpiadores abrasivos o rascadores metálicos afilados para limpiar el cristal del horno, ya que podrían rallar la superficie y dañar el cristal. Evite que los niños se acerquen al horno durante su uso, sobre todo si el grill está en marcha. Asegúrese de que el horno esté...
-
Página 4: Instrucciones De Seguridad
INSTRUCCIONES DE SEGURIDAD No utilice el horno sin llevar calzado, y no toque el hor- no si tiene las manos o los pies mojados o húmedos. No abra frecuentemente la puerta del horno durante la cocción de la comida. ... -
Página 5: Instalación Del Horno En La Cocina
INSTALACIÓN DEL HORNO EN LA COCINA Coloque el horno en el espacio reservado para este electro- doméstico en la cocina. Puede colocarse debajo de una bancada o encimera, o en un armario vertical. Fije el horno en su lugar con dos tornillos utilizando los dos agujeros de fijación situados en el marco del horno. -
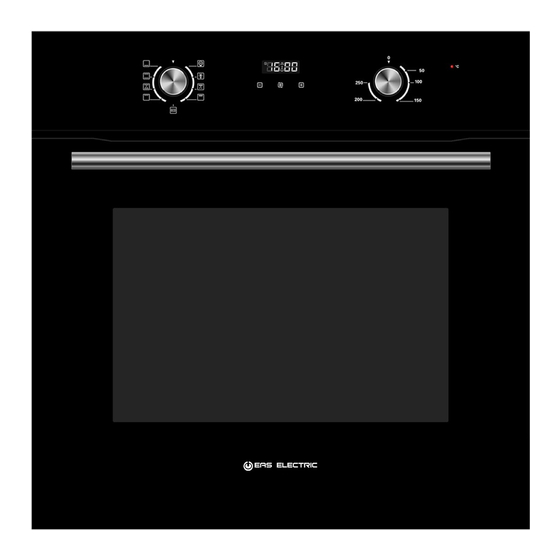
Página 6: Descripción Del Producto
DESCRIPCIÓN DEL PRODUCTO Temperatura Funciones de cocinado Aumentar Disminuir Función de reloj Símbolo Descripción de funciones Lámpara del horno: Permite al usuario observar el progreso de la cocción sin abrir la puerta. Funciona en todos los modos, salvo en la función ECO Descongelación: La circulación de aire a temperatura ambiente permite una descongelación más rápida de alimentos congelados (sin aplicar calor). - Página 7 INSTRUCCIONES DE USO Cuando el horno se conecta por primera vez a la red eléctrica, la pantalla muestra automáticamente "12.30". Sonará un pitido y el "12" y el punto (".") parpadearán. Asegúrese de que se establece la hora correcta antes de utilizar el horno. Tenga en cuenta que el reloj es de 24 horas: por ejemplo, las 2PM se muestran como 14.00.
- Página 8 Configuración del temporizador como alarma Al activar esta función, el horno emite una alarma sonora cuando el periodo de tiempo configurado finaliza. 1> Pulse el botón para seleccionar la función de alarma. El símbolo parpa- deará. 2> Use los botones "+" y "-" para ajustar la hora de alarma, siguiendo los mismos pasos que para cambiar la hora del horno.
-
Página 9: Configuración Automática
Configuración automática Esta función se utiliza para comenzar la cocción con inicio diferido, y que se realice durante un periodo de tiempo determinado. Debe colocar los alimentos que desea cocinar en el horno y ajustarlo a la función de cocción deseada, y a la temperatura requerida dependiendo del tipo de alimentos que se van a cocinar. - Página 10 ACCESORIOS Parrillas: Para gratinar platos o colocar recipientes para asar u hornear alimentos. Soporte desmontable: Este soporte se coloca sobre el lado derecho y el lado izquierdo del horno, y se pueden quitar para limpiar las paredes del horno (según modelo). Bandeja universal: Para cocinar grandes cantidades de alimentos como...
-
Página 11: Sustitución De La Bombilla
AVISO SOBRE LA COLOCACIÓN DE LAS PARRILLAS: Para un uso seguro de las parrillas, es obligatorio colocarlas siempre entre los raíles laterales del horno. Esto garantizará una correcta retirada de la parrilla y que los alimentos calientes no se deslicen ni se caigan. SUSTITUCIÓN DE LA BOMBILLA La bombilla de iluminación del horno es una bombilla especial resistente a altas temperaturas. -
Página 12: Aberturas De Ventilación
ABERTURAS DE VENTILACIÓN Una vez finalizada la cocción, o si está en modo de pausa o espera, si la tempe- ratura en el centro del horno es superior a 75ºC, la ventilación a través de las aberturas mediante el ventilador seguirá funcionando, hasta que la temperatura comience a estar por debajo de 75ºC. -
Página 13: Limpieza Y Mantenimiento
LIMPIEZA Y MANTENIMIENTO Para un buen aspecto y funcionamiento, debe de mantener el horno limpio. El diseño moderno de este horno facilita su mantenimiento y lo reduce al mínimo. Los elementos del horno que entren en contacto con los alimentos deben limpiarse regularmente. -
Página 14: Retirar La Puerta Del Horno (Opcional)
RETIRAR LA PUERTA DEL HORNO (OPCIONAL) La puerta desmontable le permite total acceso al interior del horno, para facilitar y agilizar el mantenimiento. Maneje las piezas y cristales con mucha precaución, ya que las roturas por una manipulación inadecuada no están cubiertas por la garantía. -
Página 15: Retirar La Puerta Del Horno (Opcional) Tipo
RETIRAR LA PUERTA DEL HORNO (OPCIONAL) TIPO 2 Cómo desmontar los componentes de la puerta del horno 1. Para retirar la puerta, ábrala al máximo y tire del pestillo de la bisagra hacia fuera. 2. Cierre la puerta a un ángulo de aproximadamente 30°. -
Página 16: Condiciones De La Garantía Comercial En Gama Blanca
CONDICIONES DE LA GARANTÍA COMERCIAL EN GAMA BLANCA Este aparato tiene una garantía de reparación de dos años, a partir de fecha venta, contra todo defecto funcionamiento proveniente de la fabricación, incluyendo mano de obra y piezas de recambio. Para justificar la fecha de compra será obligatorio presentar la factura o ticket de compra. - Página 17 13. Defectos o averías producidas como consecuencia de arreglos, reparaciones, modificaciones, o desarme de la instalación del aparato por el usuario o por un técnico no autorizado por el fabricante, o como resultado del incumplimiento manifiesto de las instrucciones de uso y mantenimiento del fabricante.
- Página 18 Thank you for purchasing our product. We hope you enjoy using the many features and benefits it provides. Before using this product please study this entire Instruction Manual carefully. Keep this manual in a safe place for future reference. Ensure that other people using the product are familiar with these instructions as well.
- Página 19 Do not allow children to go near the oven when it is opera- ting, especially when the grill is on. Ensure that the appliance is switched off before replacing the oven lamp to avoid the possibility of electric shock. An all-pole disconnection means must be incorporated in the fixed wiring in accordance with the wiring rules.
-
Página 20: Safety Hints
SAFETY HINTS Do not use the oven unless you are wearing something on your feet. Do not touch the oven with wet or damp hands or feet. For oven: Oven door should not be opened often during the cooking period. The appliance must be installed by an authorized ... -
Página 21: Declaration Of Compliance
FITTING THE OVEN INTO THE KITCHEN UNIT Fit the oven into the space provided in the kitchen unit; it may be fitted underneath a work top or into an upright cupboard. Fix the oven in position by screwing into place, using the two fixing holes in the frame. -
Página 22: Product Description
PRODUCT DESCRIPTION Increasing Temperature knob Cooking function control Decreasing control Time function Symbol Function description Oven Lamp: Which enables the user to observe the progress of cooking without opening the door. Oven lamp will light for all cooking functions except ECO function. Defrost: The circulation of air at room temperature enables quicker thawing of frozen food (without the use of any heat). - Página 23 OPERATION INSTRUCTIONS When the oven is first connected to the electrical supply, wait for the display automatically show " 12.30 ", a beep sound once and the " 12 " and " . " flash. Ensure the correct time of the day is set before using the oven. Please note: that is 24 hour clock, for example 2PM shown as 14.00.
- Página 24 Setting the timer as an alarm This function can be used to receive audible warning at the completion of the adjusted time period. 1> Press the " " button to select the minute minder function. The relevant " " "." symbol will flash.
- Página 25 Full automatic programming This function is used to start cooking with delayed start, and to cook for a set period of time. You must place the food to be cooked in the oven and set it to the desired cooking function and the required temperature depending on the type of food to be cooked.
- Página 26 ACCESSORIES Grates: For grilling dishes or placing containers for roasting or baking food. Removable rack: This rack is placed on the right and left side of the oven, and can be removed to clean the oven walls (depending on model). Universal tray: For cooking large quantities of food such as cakes, pastries, frozen food, etc...
-
Página 27: Bulb Replacement
SHELF PLACEMENT WARNING: To ensure the oven shelves operate safely, correct placement of the shelves between the side rail is imperative. Shelves and the pan only can be used between the first and fifth layers. The shelves should be used with the right direction, it will ensure that during careful removal of the shelf or tray, hot food items should not slide out. - Página 28 VENTILATING OPENINGS When cooking is finished or in pause state or in waiting state, if the oven's center temperature is over 75 degree, the cooling fan will continue working for 15 minutes. Or when the oven's center temperature becomes lower than 75 degree, the cooling fan will stop in advance.
-
Página 29: Cleaning And Maintenance
CLEANING AND MAINTENANCE For the sake of a good appearance and reliability, keep the unit clean. The modern design of the unit facilitates maintenance to a minimum. The parts of the unit which come into contact with food have to be cleaned regularly. ... - Página 30 REMOVING THE DOOR FROM OVEN (OPTIONAL) Removable doors allow full access to entire interior of the oven for easier and quicker maintenance. Handle parts and glass with great care, as breakage due to improper handling is not covered by the warranty. To remove the door, open the door to the maximum angle.
- Página 31 REMOVING THE DOOR FROM OVEN (OPTIONAL) TYPE-2 Disassembly of oven door components 1. To remove the door, open the door to the maximum angle.Then pull the buckle at the door hinge backward. 2. Close the door to an angle approximately 30°. Hold the door with one hand on each side.
- Página 32 COMMERCIAL GUARANTEE CONDITIONS FOR WHITE PRODUCTS This appliance has a two-year repair guarantee, from the date of sale, against all malfunctions originating from manufacturing, including labor and spare parts. To justify the purchase date, it will be mandatory to present the invoice or purchase receipt. This guarantee will only be effective in Spain.
- Página 33 13. Defects or breakdowns produced as a result of fixes, repairs, modifications, or disassembly of the installation of the device by the user or by a technician not authorized by the manufacturer, or as a result manifest non-compliance with manufacturer's instructions for use and maintenance.
- Página 34 Visítanos en: www.easelectric.es...