Capítulos
Tabla de contenido
Solución de problemas

Resumen de contenidos para Listo MP4-038 II
- Página 1 Notice d’utilisation User guide Instrucciones de uso Bedienungsanleitung Gebruiksaanwijzing Baladeur MP4 MP4 player Reproductor portátil MP4 MP4-Player MP4-speler MP4-038 II...
-
Página 2: Tabla De Contenido
TABLE DES MATIÈRES CONSIGNES DE SÉCURITÉ Précautions d’usage Avertissements de sécurité DESCRIPTION DU BALADEUR CARACTÉRISTIQUES TECHNIQUES INSERTION DE LA CARTE MÉMOIRE MICRO-SD (NON FOURNIE) BATTERIE DU BALADEUR Chargement de la batterie Connexion et chargement CONNEXION ET DÉCONNEXION Connexion du baladeur Déconnexion du baladeur MISE EN ROUTE Marche/arrêt et utilisation du menu principal... - Página 3 MENU VIDÉO Lire / mettre en pause une vidéo Lire la vidéo précédente ou suivante Avance rapide ou retour rapide Réglage du volume SOUS-MENU VIDÉO Répéter Supprimer vidéo Mettre la playlist à jour CONVERSION DE FICHIERS VIDÉO AU FORMAT .AMV MENU ENREGISTREMENT Commencer l'enregistrement Bibliothèque d’enregistrements...
-
Página 4: Consignes De Sécurité
CONSIGNES DE SÉCURITÉ Précautions d’usage • Ne posez aucune flamme nue, comme une bougie allumée, sur le produit ou à proximité de celui-ci. • Ne posez aucun objet contenant un liquide, comme un vase, sur le produit ou à proximité de celui-ci. • N’utilisez pas ou ne rangez pas ce produit dans un endroit où il est exposé à la lumière directe du soleil, une source de chaleur, une poussière excessive ou des vibrations. - Página 5 Il est recommandé de conserver l’emballage du produit pour son transport ultérieur. Si vous deviez avoir besoin de jeter le produit à un quelconque moment, veuillez noter que l’ensemble des piles et accumulateurs doit être retiré de ce produit (élimination des piles et accumulateurs usagés). AVERTISSEMENT : lorsque vous circulez dans la rue ou sur la route, le fait d’écouter un baladeur peut vous distraire des dangers potentiels, comme une voiture qui approche.
-
Página 6: Description Du Baladeur
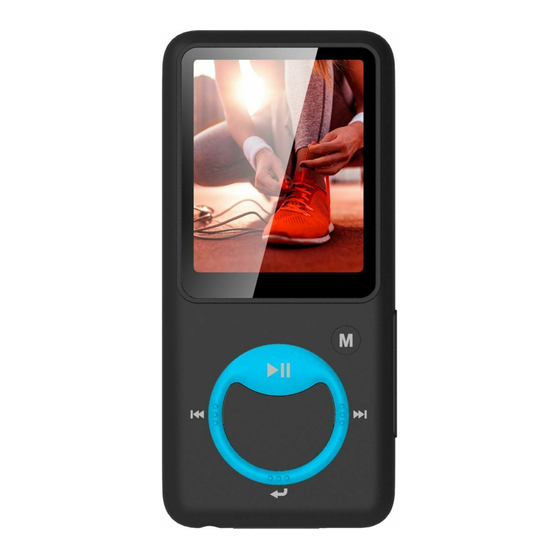
DESCRIPTION DU BALADEUR 8009091 MP4-038 II 500mA Made in P.R.C. SOURCING & CREATION Avenue de la Motte 59810 Lesquin France Lot n : YY_WW_1900027 Numéro Descriptif Orifice de réinitialisation (interrupteur de contact intégré) Écran TFT LCD Touche (Marche/Arrêt, Lecture/Pause, Accéder au menu/Confirmer) Touche (Précédent/Retour rapide) Touche (Suivant/Avance rapide) Touche (Menu précédent/Quitter) -
Página 7: Caractéristiques Techniques
CARACTÉRISTIQUES TECHNIQUES Dimensions 87 mm (H) x 41 mm (L) x 9,5 mm (P) Poids 28 g (environ) Écran LCD 1,8 pouce (4,5 cm), résolution (RGB) 128 x 160 Connexion PC USB 2.0 (haut débit) Fente pour carte mémoire Carte micro-SD (prise en charge uniquement du format FAT32 jusqu’à 32 Go, pas de prise en charge du format NTFS) Batterie Lithium 3,7 V, 170 mAh Autonomie de lecture : 8 heures pour la musique 2 heures pour les vidéos Alimentation Entrée DC : 5 V 500 mA/0,5 A... -
Página 8: Insertion De La Carte Mémoire Micro-Sd
INSERTION DE LA CARTE MÉMOIRE MICRO-SD (NON FOURNIE) Cet appareil est conçu sans mémoire interne. Avant d’utiliser le baladeur, insérez une carte mémoire micro-SD à l’intérieur. • Appuyez sur la touche « Off » (Arrêt) pour éteindre le baladeur, puis insérez la carte mémoire micro-SD dans la fente prévue à cet effet. • Vous pouvez à présent télécharger les fichiers média de votre choix à l’aide du baladeur depuis/sur votre ordinateur. • Vous pouvez également télécharger les fichiers multimédia de votre choix directement sur la carte mémoire micro-SD depuis votre ordinateur avant de l’insérer dans le baladeur. -
Página 9: Chargement De La Batterie
Chargement de la batterie Vous pouvez recharger la batterie du baladeur de deux façons : • Connectez le baladeur à votre ordinateur, ou • Utilisez un chargeur micro-USB (non fourni). Connexion et chargement • Une fois votre baladeur connecté à votre ordinateur ou au chargeur, vous verrez apparaître l’écran « Choose connection »... -
Página 10: Connexion Et Déconnexion
CONNEXION ET DÉCONNEXION Connexion du baladeur • Pour connecter le baladeur à votre ordinateur, branchez le câble USB sur un port USB libre de votre ordinateur et branchez l’autre extrémité au baladeur. • L’écran de connexion apparaît alors sur le baladeur. Si vous sélectionnez le mode « Charge & Transfer », vous pouvez transférer des fichiers multimédia entre le baladeur et votre ordinateur tout en rechargeant la batterie du baladeur. •... -
Página 11: Mise En Route
MISE EN ROUTE Marche/arrêt et utilisation du menu principal • Pour mettre en marche le baladeur, faites un appui long sur la touche pendant 3 secondes. L’écran du Menu principal apparaîtra à l’écran pour vous permettre d’accéder aux sous-menus « Music / Movie / Record / Picture / Setup / eBook » que vous pouvez voir ci-dessous. -
Página 12: Menu Réglages
MENU RÉGLAGES Vous devrez peut-être régler la date et l’heure ou modifier certains paramètres par défaut selon vos préférences dans le menu Réglages avant de commencer à utiliser le baladeur. • Pour y accéder depuis le menu principal, sélectionnez « Setup » à l’aide des touches et validez en appuyant sur la touche pour faire apparaître les sous- menus du menu « Settings ». • Pour revenir au menu précédent ou au menu principal, appuyez sur la touche depuis le menu Réglages ou un quelconque sous-menu. -
Página 13: Affichage
Affichage Vous pouvez régler l’éclairage de l’écran pendant la durée que vous souhaitez ou le régler sur « Always On » pour que l’écran reste allumé en continu à chaque fois que vous utilisez le baladeur. • Depuis le menu Réglages, sélectionnez « Display settings », puis « Backlight timer » pour faire apparaître une liste vous permettant de choisir le réglage souhaité entre les options « 10 / 20 / 30 seconds / Always On »... -
Página 14: Langue
• Les éléments à régler « YY / MM / DD » apparaissent en surbrillance, appuyez sur la touche M (Menu) pour basculer entre le jour, le mois et l’année. Puis, réglez le jour, le mois et l’année en fonction de la date souhaitée à l’aide des touches • Pour finir, appuyez sur la touche pour valider le réglage et retourner au menu précédent. Langue Ce baladeur peut utiliser plusieurs langues d’affichage à l’écran. •... -
Página 15: Menu Musique
MENU MUSIQUE Ce lecteur de musique vous permet de lire pratiquement tous les formats de codage audio de fichiers musicaux. Pour ouvrir le lecteur de musique depuis le menu principal : • Depuis le menu principal, sélectionnez « Music » à l’aide des touches validez en appuyant sur la touche pour faire apparaître la liste des menus. -
Página 16: Mettre La Playlist À Jour
Mettre la playlist à jour • Sélectionnez « Update playlist » pour mettre à jour la playlist lorsque vous trouvez qu’elle ne se déroule pas comme vous le souhaitez. Une telle situation peut se produire dans la mesure où vous avez la possibilité de supprimer manuellement certains fichiers multimédia contenus dans la mémoire du baladeur. De fait, mettez à jour la playlist en cas de besoin. -
Página 17: Réglage Du Volume
Réglage du volume • Appuyez sur le bouton + pour augmenter le volume ou sur le bouton – pour le diminuer. Une fenêtre de contrôle du volume apparaît pour visualiser le réglage. • Patientez pendant 6 secondes ou appuyez sur la touche pour revenir à l’interface audio. • Note : lors du réglage du volume, un avertissement visuel s’affiche sur l’écran si vous excédez les 85 dB. -
Página 18: Eq Réglage
EQ Réglage • Depuis le sous-menu Musique, sélectionnez « Equalizer », puis la fonction souhaitée parmi les options d’effet sonore « Normal / Rock / Funk / Hip hop / Jazz / Classique / Techno » à l’aide des touches et validez en appuyant sur la touche Ajouter à... -
Página 19: Menu Vidéo
MENU VIDÉO • Depuis le menu principal, sélectionnez « Movie » à l’aide des touches validez en appuyant sur la touche pour faire apparaître une liste de fichiers. • Sélectionnez le fichier du film dont vous souhaitez lancer la lecture dans l’interface vidéo. La lecture de la vidéo se lance automatiquement. Remarque : vous devez convertir toutes vos vidéos au format .AMV à... -
Página 20: Sous-Menu Vidéo
SOUS-MENU VIDÉO Il est possible de modifier le mode de lecture ou de supprimer des fichiers vidéo. Pour ce faire : • Depuis l’interface vidéo, appuyez sur M (Menu) pour faire apparaître une liste de sous- menus avec les fonctions « Repeat / Delete video / Update Playlist ». Répéter • Sélectionnez « Repeat », puis la fonction souhaitée parmi les options « Repeat off / Repeat 1 / Repeat all » à l’aide des touches et validez en appuyant sur la touche Supprimer vidéo •... -
Página 21: Conversion De Fichiers Vidéo Au Format .AMv
CONVERSION DE FICHIERS VIDÉO AU FORMAT .AMV • Il est indispensable de convertir vos fichiers vidéo via le logiciel « AMV Video converter » fourni pour pouvoir lire vos fichiers vidéo sur le baladeur. La conversion est effectuée sur votre ordinateur uniquement. Une fois les fichiers convertis, vous devrez les copier sur votre baladeur pour pouvoir les lire. Important : pour convertir des fichiers vidéos, vous devez installer sur votre ordinateur l’application Microsoft DirectX 9.0 ou une version supérieure. - Página 22 Remarque : ce logiciel permet de convertir des fichiers vidéo au format .AMV, le seul format pris en charge par le baladeur. • Cliquez sur l’icône pour spécifier l’endroit où le fichier converti au format .AMV sera sauvegardé, puis sur l’icône pour sélectionner le fichier à convertir. Le fichier source apparaît dans la fenêtre inférieure une fois sélectionné. • Cliquez gauche sur le fichier à convertir dans la fenêtre inférieure pour le faire apparaître en surbrillance et que l’icône grisée apparaisse en couleur .
- Página 23 • Vérifiez que la valeur du champ du type de vidéo (Video type) est « .AMV » et que la valeur du champ de dimension d’écran est « 160x120 ». Vérifiez que les valeurs indiquées par défaut dans les champs de conversion vidéo (Video convert) et de qualité d’image (Image quality) sont respectivement « ...
-
Página 24: Menu Enregistrement
MENU ENREGISTREMENT Vous pouvez utiliser le baladeur en tant que dictaphone et enregistrer des mémos vocaux à l’aide du microphone intégré. En outre, vous pouvez rechercher le ou les fichiers enregistrés et lancer leur lecture à partir de ce même menu. Pour ce faire : • Depuis le menu principal, sélectionnez « Record » à l’aide des touches validez en appuyant sur la touche pour faire apparaître une liste de sous-menus. -
Página 25: Bibliothèque D'eNregistrements
Bibliothèque d’enregistrements • À partir de la liste des sous-menus, sélectionnez « Recordings library » pour faire apparaître la liste des enregistrements. Pour supprimer l’ensemble des enregistrements de la mémoire ou du dossier de la carte micro-SD du baladeur : •... -
Página 26: Menu Photo
MENU PHOTO Vous pouvez utiliser le baladeur en tant que visionneuse de photos et d’images. Pour visionner des images : • Depuis le menu principal sélectionnez « Picture » à l’aide des touches validez en appuyant sur la touche pour faire apparaître une liste de sous-menus. Afficher une photo •... -
Página 27: Sous-Menu Photo
SOUS-MENU PHOTO Vous pouvez modifier certains paramètres pour le visionnage des photos/images. Pour modifier les paramètres : • À partir de la liste des photos/images ou de l’interface photo, appuyez sur M (Menu) pour faire apparaître le sous-menu photo et choisir la fonction souhaitée parmi les options « Slideshow settings / Delete picture / Update Playlist ». Paramètres Diaporama DURÉE PAR DIAPOSITIVE • Sélectionnez « Slideshow settings », puis « Time per slide » pour faire apparaître une barre de niveau, et sélectionnez le nombre souhaité de secondes (02 à 30) à l’aide des touches et validez en appuyant sur la touche... -
Página 28: Menu Ebook
MENU EBOOK Vous pouvez utiliser le baladeur en tant que liseuse de textes. Le baladeur ne prend en charge que les fichiers au format .TXT. Pour ce faire : • Depuis le menu principal, sélectionnez « eBook » à l’aide des touches validez en appuyant sur la touche pour faire apparaître la liste des fichiers texte. Afficher un fichier texte •... -
Página 29: Sous-Menu Ebook
SOUS-MENU EBOOK Vous pouvez modifier certains paramètres pour la lecture des textes. Pour modifier les paramètres : • À partir de la liste des fichiers texte ou de l’interface eBook, appuyez sur M (Menu) pour faire apparaître le sous-menu eBook et choisir la fonction souhaitée parmi les options « Play settings / Delete eBook / Bookmark Select / Delete bookmark / Add bookmark / Page select ». -
Página 30: Supprimer Un Signet
Supprimer un signet • Sélectionnez « Delete Bookmark » pour faire apparaître une liste de signets. • Sélectionnez le signet que vous souhaitez supprimer et faire apparaître une fenêtre de dialogue « Whether to delete? ». • Sélectionnez « Yes » pour confirmer l’action ou « No » pour l’annuler. Ajouter un signet • Depuis l’interface Ebook, sélectionnez « Add Bookmark » pour faire apparaître la fenêtre de dialogue « Whether to add? ». -
Página 31: Réinitialisation Du Baladeur
RÉINITIALISATION DU BALADEUR Dans certaines circonstances, il peut arriver que le baladeur s’arrête de fonctionner en cours d’utilisation. Pour réinitialiser le baladeur : • Utilisez une tige de 1 mm ou un objet similaire (comme un cure-dent), et introduisez-la avec précaution par le côté non pointu dans l’« Orifice de réinitialisation (1) » jusqu’à ce que vous sentiez qu’elle touche le fond. Il s’agit de la surface de l’interrupteur de contact. -
Página 32: Dépannage
DÉPANNAGE • Le baladeur ne Vérifiez si la batterie est déchargée ou faible. fonctionne pas • Aucun son ne sort Vérifiez si le volume est réglé sur « 0 » et si les du casque écouteurs sont branchés correctement au baladeur. • Vérifiez si la prise des écouteurs est propre. • Les fichiers .MP3 corrompus peuvent produire un bruit statique et entraîner une coupure du son. - Página 33 TABLE OF CONTENTS SAFETY INSTRUCTIONS Safety precautions Safety warnings DESCRIPTION OF THE MP4 PLAYER TECHNICAL FEATURES INSERTION OF THE MicroSD MEMORY CARD (NOT PROVIDED) MP4 PLAYER BATTERY Charging the battery Connecting and charging CONNECTING AND DISCONNECTING Connecting the MP4 player Disconnecting the MP4 player SWITCHING ON On / Off and use of the Main menu SETTINGS MENU Standby mode Display Date &...
- Página 34 VIDEO MENU Playback / pausing a video Playback of the previous or the next video Fast forward or fast rewind Adjusting the volume VIDEO SUB-MENU Repeating Deleting a video Updating playlists CONVERTING VIDEO FILES TO .AMV FORMAT RECORDINGS MENU Starting recordings Recordings library Setting the REC bitrate PHOTO MENU Displaying photos...
-
Página 35: Safety Instructions
SAFETY INSTRUCTIONS Safety precautions • Do not place open flames such as a lighted candle on the product or near to it. • Do not place items containing a liquid, such as a vase, on the product or near to it. • Do not use or store this product in an area where it is exposed to direct sunlight, a source of heat, excessive dust or vibrations. • Do not use this product with wet hands. • Never clean this product with water or other liquids. •... - Página 36 We recommend keeping the product packaging for future transportation. If you need to dispose of the product at any time, please note that all batteries and storage cells must be removed from the product (discarding of used batteries and storage cells). WARNING: when on roads and pavements, listening to a music player could distract you from potential danger, such as a car approaching. WARNING: in order to avoid possible damage to your hearing, do not listen at a high volume level for long periods of time. V.1.0...
-
Página 37: Description Of The Mp4 Player
DESCRIPTION OF THE MP4 PLAYER 8009091 MP4-038 II 500mA Made in P.R.C. SOURCING & CREATION Avenue de la Motte 59810 Lesquin France Lot n : YY_WW_1900027 Number Description Reset hole (Built-in contact switch) TFT LCD display screen Button (On/Off, Play/Pause, Access Menu/Confirm) Button... -
Página 38: Technical Features
TECHNICAL FEATURES Dimensions 87 mm (H) x 41 mm (L) x 9.5 mm (D) Weight 28 g (approximately) LCD screen 1.8 inch (4.5 cm), resolution (RGB) 128 x 160 PC connection USB 2.0 (high speed) Memory card slot MicroSD card (only supports FAT32 format up to 32 GB, does not support NTFS) Battery Lithium 3.7 V, 170 mAh... -
Página 39: Insertion Of The Microsd Memory Card (Not Provided)
INSERTION OF THE MicroSD MEMORY CARD (NOT PROVIDED) This device has been designed without internal memory. Before using the MP4 player, insert a microSD memory card. • Press the “Off” button to switch off the MP4 player, and then insert the microSD memory card in the special slot provided. -
Página 40: Charging The Battery
Charging the battery The MP4 player’s battery can be charged in two different ways: • Connect the MP4 player to your computer, or • Use a micro USB charger (not provided). Connecting and charging • Once your MP4 player is connected to your computer or the charger, you will see “Choose connection” appear on your screen, which will allow you to select your preferred connection mode. -
Página 41: Connecting And Disconnecting
CONNECTING AND DISCONNECTING Connecting the MP4 player • To connect the MP4 player to your computer, plug the USB cable into a free USB port on your computer and plug the other end into the MP4 player. • The connection screen then appears on the MP4 player. By selecting “Charge & Transfer” mode, you’re able to transfer multimedia files between the MP4 player and your computer while charging the MP4 player’s battery. •... -
Página 42: Switching On
SWITCHING ON On / Off and use of the Main menu • To switch on the MP4 player, press and hold the button for 3 seconds. The Main menu screen appears, allowing you to access the “Music / Movie / Record / Picture / Setup / eBook” sub-menus that you can see below. • To switch off the MP4 player, press and hold the button for 3 seconds. Main menu ƒ Music „ ƒ Videos „ ƒ Recording „ ƒ Photos „ ƒ Settings „ ƒ... -
Página 43: Settings Menu
SETTINGS MENU You might need to set the date and time or change certain default settings according to your preferences in the Settings menu before using the MP4 player for the first time. • To access it via the Main menu, select “Setup” using the buttons and confirm by pressing on the button to display the “Settings” menu’s sub-menus. • To return to the previous menu or the Main menu, press the button in the Settings menu or in any sub-menu. -
Página 44: Display
Display You can adjust screen brightness for a certain length of time, or adjust it by selecting “Always On” so that the screen remains on each time the user uses the MP4 player. • From the Settings menu, select “Display settings”, and then “Backlight timer” to display a list allowing you to select the desired settings from among the “10 / 20 / 30 seconds / Always On”... -
Página 45: Language
Language The MP4 player can display several different languages on the screen. • To set the language, select “Language”, and then select the desired language using the buttons , and confirm by pressing the button Information You can view information about the MP4 player, such as the firmware version, as well as disk memory status, the remaining memory space available and the number of media files available on the player. • From the Settings menu, select “Information” using the buttons and confirm by pressing the button to display a list of sub-menus. • Select “Player information” or “Disk space” to display the information you want to view. Factory settings •... -
Página 46: Artists
Artists • Select “Artists” to access the folder / list of folders ordered by artist name, and select the one you want to start playing from among the listed songs. Albums • Select “Albums” to access the folder / list of folders ordered by album name, and select the one you want to start playing from among the listed songs. Genres • Select “Genres” to access the folder / list of folders ordered by genre name, and select the one you want to start playing from among the listed songs. Playlists •... -
Página 47: Playback / Pausing A Song
Playback / pausing a song From the audio interface: • Press the button to “pause” the device. • Press this button again to resume playback. Next track / fast forward and previous track / fast rewind • Press the button to access the next track. •... -
Página 48: Music Sub-Menu
MUSIC SUB-MENU • From the audio interface, press M (Menu) to display a list of sub-menus with the “Play mode / Equalizer / Delete” functions. Play mode From the Music sub-menu: • Select “Play mode” to display a list of menus with the “Repeat / Shuffle” functions. • Select “Repeat”, and then the desired function from the options: “Repeat Off / Repeat 1 / Repeat all”... -
Página 49: Deleting
Deleting • From the Music sub-menu, select “Delete file” by pressing the buttons then confirm by pressing the button • The dialogue window “Song name… delete?” will appear. Select “Yes” to confirm deletion of the file concerned from the MP4 player’s memory. • The “Deleting” dialogue window appears for a few seconds. The file concerned is then deleted and the audio interface automatically starts playback of the next file. • Select “No” to cancel the action. VIDEO MENU • From the Main menu, select “Movie” using the buttons and confirm by pressing the button to display a list of files. -
Página 50: Adjusting The Volume
Adjusting the volume • From the video interface: • Press the + button to increase the volume. • Press the - button to decrease the volume. • Then press to return to the video being played. • Note: when adjusting the volume, a visual warning displays on the screen if you exceed 85 dB. Press M (Menu) if you want to confirm the setting. VIDEO SUB-MENU You have the option to modify the playback mode or to delete video files. To do this: •... -
Página 51: Converting Video Files To .AMv Format
CONVERTING VIDEO FILES TO .AMV FORMAT • You need to convert your video files using the “AMV Video converter” software provided, in order to ensure that the video files on the MP4 player can be read. Files can only be converted on your computer. Once the files have been converted, you need to copy them onto your MP4 player in order to be able to play them. Important: To convert video files, you need to install the Microsoft DirectX 9.0 app or a higher version onto your computer. - Página 52 • Click on the icon to specify where the file in converted .AMV format will be saved, and then on the icon to select the file to convert. The source file displays in the window below once selected. • Left click on the file to convert in the lower window to display it highlighted, and so that the greyed out icon appears in colour . Then click on the icon to display a settings window.
-
Página 53: Recordings Menu
• Then click on the icon to start the conversion. • Once completed, the file is automatically read in the .AMV Player. • This file is now ready to be downloaded onto your MP4 player. Please connect your MP4 player to your computer and copy this file onto the microSD card of your MP4 player. Note: The MP4 player is only able to support pixel resolutions of “160x120” . RECORDINGS MENU You can use the MP4 player as a dictaphone and record voice messages using the built-in microphone. In addition, you can search for the file(s) recorded and start playback from the same menu. -
Página 54: Recordings Library
Recording interface • From the recording interface, press the button to pause the recording. Press this button again to continue with the recording. • Press the button to end the recording. The “Save recording” dialogue window appears. Select “Yes” to save it. •... -
Página 55: Photo Menu
PHOTO MENU You can use the MP4 player as a photo / image reader. To view images: • From the main menu, select “Picture” using the buttons and then confirm by pressing the button to display a list of sub-menus. Displaying photos • Select the file to display from the list of photos / images. • Press the button to return to the list of files and choose another file as desired. -
Página 56: Photo Sub-Menu
PHOTO SUB-MENU You can change certain settings for viewing photos/images. To change settings: • From the list of photos/images or from the photo interface, press M (Menu) to display the photo sub-menu and then select the desired function from among the “Slideshow settings / Delete picture / Update Playlist” options. Slide settings DURATION PER SLIDE • Select “Play settings” and then “Time per slide” to display a level bar, and then select the desired number of seconds (from 2 to 30) using the buttons , and then confirm by pressing the button... -
Página 57: Ebook Menu
EBOOK MENU The MP4 player can be used as a text reader. The MP4 player only supports files in .TXT format. To do this: • From the Main menu, select “eBook” with the buttons and then confirm by pressing the button to display a list of text files. Displaying text files • Select the text file you would like to start reading. • Press the button to return to the list of files and choose another file as desired. Turning the pages of text files From the eBook interface: • Press the button to move to the next page. •... -
Página 58: Reading Settings
Reading settings • Select “Play settings” to display a level bar, and then select the desired number of seconds (from 2 to 30) using the buttons , and then confirm by pressing the button • The page being displayed will automatically be turned for the duration you selected, if you have activated the automatic page turning function. Deleting eBooks • Select “Delete eBook” to display the “File name.* delete?” dialogue window. Select “Yes” to confirm deletion of the selected file or the file being read from the MP4 player’s memory. -
Página 59: Page Selecting (Viewing A Particular Page With An Allocated Number)
Page selecting (viewing a particular page with an allocated number) • Select “Page Select” to display a list of page numbers. • Select the number of the page you’d like to view using the buttons confirm by pressing the button . The selected page displayed replaces the page that was open. -
Página 60: Troubleshooting
TROUBLESHOOTING • The MP4 player is not Check whether the battery is flat or low. working. • No sound is coming out Check whether the volume is set to “0” and whether of the headphones. the headphones are correctly plugged into the MP4 player. • Check that the headphone jack is clean. • Corrupt .MP3 files can produce a static noise and cause sound cut-off. Check whether the audio files may be corrupt. - Página 61 ÍNDICE MEDIDAS DE SEGURIDAD Precauciones de uso Avisos de seguridad DESCRIPCIÓN DEL REPRODUCTOR PORTÁTIL CARACTERÍSTICAS TÉCNICAS INTRODUCCIÓN DE LA TARJETA DE MEMORIA MICRO-SD (NO INCLUIDA) BATERÍA DEL REPRODUCTOR PORTÁTIL Carga de la batería Conexión y carga CONEXIÓN Y DESCONEXIÓN Conexión del reproductor portátil Desconexión del reproductor portátil PUESTA EN MARCHA Encendido/Apagado y uso del menú...
- Página 62 MENÚ VÍDEO Reproducir/pausar un vídeo Reproducir el vídeo anterior o siguiente Avance rápido o retroceso rápido Ajuste del volumen SUBMENÚ VÍDEO Repetir Eliminar vídeo Actualizar la lista de reproducción CONVERSIÓN DE ARCHIVOS DE VÍDEO AL FORMATO .AMV MENÚ GRABACIÓN Iniciar la grabación Biblioteca de grabaciones Set REC bitrate MENÚ FOTO...
-
Página 63: Medidas De Seguridad
MEDIDAS DE SEGURIDAD Precauciones de uso • No coloque ninguna llama, como una vela encendida, sobre el producto o cerca de él. • No coloque ningún objeto que contenga líquido, como un jarrón, sobre el producto o cerca de él. • No utilice ni guarde este producto en un lugar donde esté expuesto a la luz directa del sol, una fuente de calor, mucho polvo o vibraciones. • No utilice este producto con las manos mojadas. •... - Página 64 Se recomienda conservar el embalaje del producto para su transporte posterior. Si debe desechar el producto en cualquier momento, tenga en cuenta que las pilas y acumuladores deben retirarse del producto (eliminación de las pilas y acumuladores gastados). AVISO: cuando circule por la calle o la carretera, escuchar un reproductor portátil puede distraerle de los peligros potenciales, como un coche acercándose.
-
Página 65: Descripción Del Reproductor Portátil
DESCRIPCIÓN DEL REPRODUCTOR PORTÁTIL 8009091 MP4-038 II 500mA Made in P.R.C. SOURCING & CREATION Avenue de la Motte 59810 Lesquin France Lot n : YY_WW_1900027 Número Descripción Orificio de reinicialización (interruptor de contacto integrado) Pantalla TFT LCD Tecla (Encendido/Apagado, Reproducción/Pausa, Acceder al menú/Confirmar) Tecla (Anterior/Retroceso rápido) Tecla (Siguiente/Avance rápido) Tecla (Menú... -
Página 66: Características Técnicas
CARACTERÍSTICAS TÉCNICAS Dimensiones 87 mm (Al.) x 41 mm (La.) x 9,5 mm (Pr.) Peso 28 g (aproximadamente) Pantalla LCD 1,8 pulgadas (4,5 cm), resolución (RGB) 128 x 160 Conexión PC USB 2.0 (alta velocidad) Ranura para tarjeta Tarjeta micro-SD de memoria (compatible solo con el formato FAT32 hasta 32 Gb, no compatible con el formato NTFS) Batería Litio 3,7 V, 170 mAh Autonomía de reproducción: 8 horas para música 2 horas para vídeos Alimentación Entrada CC: 5 V 500 mA/0,5 A Audio... -
Página 67: Introducción De La Tarjeta De Memoria Micro-Sd
INTRODUCCIÓN DE LA TARJETA DE MEMORIA MICRO-SD (NO INCLUIDA) Este dispositivo no dispone de una memoria interna. Antes de usar el reproductor portátil, introduzca una tarjeta de memoria micro-SD. • Pulse la tecla «Off» (Parada) para apagar el reproductor portátil, introduzca la tarjeta de memoria micro-SD en la ranura prevista para ello. • Ahora puede descargar los archivos multimedia de su elección con el reproductor portátil desde/en su ordenador. -
Página 68: Carga De La Batería
Carga de la batería Puede cargar la batería del reproductor portátil de dos maneras: • Conecte el reproductor portátil a su ordenador o • Use un cargador micro-USB (no incluido). Conexión y carga • Una vez que el reproductor portátil se conecte al ordenador o al cargador, en la pantalla aparecerá «Choose connection» para que pueda elegir el modo de conexión. Pasará automáticamente al modo «Charge & Transfer» si no elige ninguna acción en un plazo de 4 a 5 segundos. -
Página 69: Conexión Y Desconexión
CONEXIÓN Y DESCONEXIÓN Conexión del reproductor portátil • Para conectar el reproductor portátil a su ordenador, conecte el cable USB a un puerto USB libre del ordenador y conecte el otro extremo al reproductor portátil. • La pantalla de conexión aparece entonces en el reproductor portátil. Si selecciona el modo «Charge & Transfer», puede transferir archivos multimedia entre el reproductor portátil y su ordenador al mismo tiempo que carga la batería. •... -
Página 70: Puesta En Marcha
PUESTA EN MARCHA Encendido/Apagado y uso del menú principal • Para encender el reproductor portátil, haga una pulsación larga de la tecla durante 3 segundos. Aparecerá la pantalla del Menú principal para que pueda acceder a los submenús «Music / Movie / Record / Picture / Setup / eBook», que puede ver a continuación. -
Página 71: Menú Ajustes
MENÚ AJUSTES Antes de empezar a usar el reproductor portátil, quizás deba ajustar la fecha y la hora o modificar ciertos parámetros por defecto según sus preferencias en el menú Ajustes. • Para acceder a él desde el menú principal, seleccione «Setup» con los botones y valide pulsando la tecla para que aparezcan los submenús del menú «Settings». -
Página 72: Pantalla
Pantalla Puede ajustar la iluminación de la pantalla durante el tiempo que desee o ajustarla en «Always On» para que la pantalla permanezca encendida de forma continua cada vez que use el reproductor portátil. • Desde el menú Ajustes, seleccione «Display settings», después «Backlight timer» para ver una lista que le permita elegir el ajuste deseado entre las opciones «10 / 20 / 30 ... -
Página 73: Idioma
Idioma Este reproductor portátil puede mostrar la pantalla en varios idiomas. • Para ajustar el idioma, seleccione «Language», después seleccione el idioma deseado con las teclas y valide pulsando la tecla Información Puede visualizar la información relativa al reproductor portátil, como la versión del firmware, así como el estado de la memoria del disco, el espacio de memoria restante disponible y el número de archivos multimedia disponibles en el reproductor portátil. • Desde el menú Ajustes, seleccione «Information» con las teclas y valide pulsando la tecla para ver una lista de submenús. -
Página 74: Carpeta Y Canciones
Carpeta y canciones • Seleccione «Folder & songs» para acceder a la carpeta y a la lista de todas las canciones contenidas en el reproductor portátil y elegir la que desee escuchar. Artistas • Seleccione «Artists» para acceder a la lista de la o las carpetas clasificadas por nombre de artista y elegir la que desee para iniciar la reproducción de una de las canciones de esa lista. -
Página 75: Reproducir/Pausar Una Canción
Interfaz de audio Reproducir/pausar una canción Desde la interfaz de audio: • Pulse la tecla para pausar. • Pulse de nuevo esta tecla para retomar la reproducción. Pista siguiente/avance rápido y pista anterior/retroceso rápido • Pulse la tecla para acceder a la pista siguiente. •... -
Página 76: Submenú Música
SUBMENÚ MÚSICA • Desde la interfaz de audio, pulse M (Menú) para ver una lista de submenús con las funciones «Play mode / Equalizer / Delete». Modo de navegación Desde el submenú Música: • Seleccione «Play mode» para ver una lista de menús con las funciones «Repeat / Shuffle». -
Página 77: Eliminar
Eliminar • Desde el submenú Música, seleccione «Delete file» mediante las teclas y valide pulsando la tecla • La ventana de diálogo «song name… delete?» aparece. Seleccione «Yes» para confirmar la eliminación del archivo en cuestión de la memoria del reproductor portátil. • La ventana de diálogo «deleting» aparece durante unos segundos. Ese archivo se elimina entonces y la interfaz de audio inicia automáticamente la reproducción del siguiente archivo. -
Página 78: Ajuste Del Volumen
Ajuste del volumen • Desde la interfaz de vídeo: • Pulse el botón + para aumentar el volumen. • Pulse el botón – para reducir el volumen. • Después, pulse para volver al vídeo que se estaba reproduciendo. • Nota: al ajustar el volumen, aparecerá un aviso visual en la pantalla si supera los 85 dB. Pulse M (Menú) si desea confirmar el ajuste. -
Página 79: Conversión De Archivos De Vídeo Al Formato .AMv
CONVERSIÓN DE ARCHIVOS DE VÍDEO AL FORMATO .AMV • Es indispensable convertir sus archivos de vídeo con el programa «AMV Video converter», incluido, para poder reproducir sus archivos de vídeo en el reproductor portátil. La conversión se realizará únicamente en su ordenador. Una vez los archivos convertidos, deberá copiarlos en el reproductor portátil para poder reproducirlos. - Página 80 • Haga clic en el icono para especificar la ubicación donde se vaya a guardar el archivo convertido al formato .AMV, después el icono para seleccionar el archivo que desee convertir. El archivo fuente aparece en la ventana inferior una vez seleccionado. • Haga un clic izquierdo en el archivo que desee convertir en la ventana inferior para que aparezca resaltado y para que el icono gris aparezca en color . Después, haga clic...
-
Página 81: Menú Grabación
Una vez terminada, el archivo se reproduce automáticamente en el reproductor .AMV Player. • El archivo está ahora listo para reproducirse en el reproductor portátil. Conecte al reproductor portátil al ordenador y copie el archivo a la tarjeta micro-SD del reproductor portátil. Nota: el reproductor portátil solo es compatible con la resolución «160x120» píxeles. -
Página 82: Biblioteca De Grabaciones
Interfaz de grabación • Desde la interfaz de grabación, pulse la tecla para pausar la grabación. Pulse de nuevo esta tecla para retomar la grabación. • Pulse la tecla para terminar la grabación. Aparece la ventana de diálogo «Save recording». Seleccione «Yes» para guardarla. •... -
Página 83: Menú Foto
MENÚ FOTO Puede usar el reproductor portátil como visor de fotos y de imágenes. Para visualizar imágenes: • Desde el menú principal, seleccione «Picture» con las teclas y valide pulsando la tecla para ver una lista de submenús. Visualizar una foto •... -
Página 84: Submenú Foto
SUBMENÚ FOTO Puede modificar ciertos parámetros para visualizar fotos/imágenes. Para modificar los parámetros: • Desde la lista de fotos/imágenes o desde la interfaz de foto, pulse M (Menú) para que aparezca el submenú foto y elegir la función deseada entre las opciones «Slideshow settings / Delete picture / Update Playlist». Parámetros del Diaporama DURACIÓN POR DIAPOSITIVA • Seleccione «Slideshow settings», después «Time per slide» para que aparezca una barra de nivel y seleccione el número de segundos deseado (2 a 30) con las teclas y valide pulsando la tecla REPETIR... -
Página 85: Menú Ebook
MENÚ EBOOK Puede usar el reproductor portátil como lector de textos. El reproductor portátil solo es compatible con los archivos en formato .TXT. Para ello: • Desde el menú principal, seleccione «eBook» con las teclas y valide pulsando la tecla para ver la lista de los archivos de texto. Mostrar un archivo de texto •... -
Página 86: Submenú Ebook
SUBMENÚ EBOOK Puede modificar ciertos parámetros para la lectura de textos. Para modificar los parámetros: • Desde la lista de archivos de texto o de la interfaz de eBook, pulse M (Menú) para que aparezca el submenú eBook y elegir la función deseada entre las opciones «Play settings / Delete eBook / Bookmark Select / Delete bookmark / Add bookmark / Page select». -
Página 87: Añadir Un Marcador
Añadir un marcador • Desde la interfaz de Ebook, seleccione «Add Bookmark» para que aparezca la ventana de diálogo «Whether to add?». • Seleccione «Yes» para confirmar la acción. La página que se esté leyendo se añadirá a los marcadores de la lista y se guardará en la memoria del reproductor portátil para que la pueda encontrar de nuevo mediante la función de selección de marcadores. •... -
Página 88: Solución De Averías
SOLUCIÓN DE AVERÍAS • El reproductor portátil Compruebe si la batería está descargada o baja. no funciona • No sale sonido de los Compruebe que el volumen esté ajustado a «0» y si auriculares los auriculares están conectados correctamente al reproductor portátil. • Compruebe que la toma de auriculares esté limpia. •... - Página 89 INHALTSVERZEICHNIS SICHERHEITSHINWEISE Vorsichtsmaßnahmen Sicherheitshinweis BESCHREIBUNG DES PLAYERS KENNDATEN EINSETZEN DER MICRO-SD-SPEICHERKARTE (NICHT MITGELIEFERT) AKKU DES PLAYERS Laden des Akkus Anschließen und Laden ANSCHLIESSEN UND TRENNEN Den Player anschließen Den Player trennen INBETRIEBNAHME Ein/Aus und Verwendung des Hauptmenüs MENÜ EINSTELLUNGEN Standby Anzeige Date & Time Sprache Information Werkseinstellungen...
- Página 90 VIDEO-MENÜ Ein Video abspielen/ unterbrechen Vorheriges oder nächstes Video abspielen Schnellvorlauf oder Schnellrücklauf Lautstärkeregler VIDEO-UNTERMENÜ Wiederholen Video löschen Playlist-Update KONVERTIEREN VON VIDEODATEIEN IN DAS .AMV-FORMAT MENÜ „AUFZEICHNUNG“ Aufzeichnung starten Bibliothek der Aufzeichnungen REC-Bitrate einstellen FOTO-MENÜ Ein Foto anzeigen Abspielen von Fotos/Bildern Slideshow UNTERMENÜ „FOTO“...
-
Página 91: Sicherheitshinweise
SICHERHEITSHINWEISE Vorsichtsmaßnahmen • Stellen Sie keine offene Flamme, z.B. eine brennende Kerze, auf das Gerät oder in seine Nähe. • Stellen Sie keine Gegenstände, die Flüssigkeiten enthalten, z.B. Vasen, auf das Gerät oder in seine Nähe. • Verwenden oder lagern Sie dieses Gerät nicht an Orten, an denen es direktem Sonnenlicht, Hitze, übermäßigem Staub oder Vibrationen ausgesetzt ist. • Verwenden Sie dieses Gerät nicht mit nassen Händen. • Reinigen Sie das Gerät nicht mit Wasser oder andere Flüssigkeiten. •... - Página 92 Es wird empfohlen, die Produktverpackung für einen späteren Transport aufzubewahren. Sollten Sie das Produkt entsorgen müssen, beachten Sie bitte, dass alle Batterien und Akkus aus dem Gerät entfernt werden müssen (Entsorgung gebrauchter Batterien und Akkus). WARNUNG: Die Verwendung eines Musikabspielgeräts auf der Straße oder im Straßenverkehr kann von potenziellen Gefahren ablenken, z.B. von einem herannahenden Fahrzeug.
-
Página 93: Beschreibung Des Players
BESCHREIBUNG DES PLAYERS 8009091 MP4-038 II 500mA Made in P.R.C. SOURCING & CREATION Avenue de la Motte 59810 Lesquin France Lot n : YY_WW_1900027 Nummer Beschreibung Reset-Öffnung (integrierter Kontaktschalter) LCD TFT-Display Taste (Ein/Aus, Wiedergabe/Pause, Menüzugang/Bestätigung) Taste (Zurück/Schnellrücklauf) Taste (Weiter/Schnellvorlauf) Taste (Menü Zurück/Schließen) Taste (Menü) Taste + (Lautstärke erhöhen) -
Página 94: Kenndaten
KENNDATEN Abmessungen 87 mm (H) x 41 mm (B) x 9,5 mm (T) Gewicht (ca.) 28 g LCD-Bildschirm 1,8 Zoll (4,5 cm), Auflösung (RGB) 128 x 160 PC-Verbindung USB 2.0 (High Speed) Steckplatz für Micro-SD-Karte Speicherkarte (unterstützt nur das FAT32-Format bis zu 32GB, keine NTFS-Unterstützung) Akku Lithium 3,7 V, 170 mAh Betriebsdauer: 8 Stunden bei Musik 2 Stunden bei Videos Stromversorgung DC Eingang: 5 V 500 mA/0,5 A Audio Kopfhörerausgang 2 mW x 2 bis 32 Ohm... -
Página 95: Einsetzen Der Micro-Sd-Speicherkarte
EINSETZEN DER MICRO-SD-SPEICHERKARTE (NICHT MITGELIEFERT) Dieses Gerät hat keinen internen Speicher. Setzen Sie vor der Verwendung des Players eine Micro-SD-Speicherkarte ein. • Drücken Sie zuerst die Taste „Off“, um den Player auszuschalten, und setzen Sie anschließend die Micro-SD-Speicherkarte in den Steckplatz ein. •... -
Página 96: Laden Des Akkus
Laden des Akkus Der Akku des Players kann auf zwei Arten geladen werden: • Schließen Sie den Player an Ihren PC an, oder • Verwenden Sie ein Micro-USB-Ladegerät (nicht mitgeliefert). Anschließen und Laden • Sobald Ihr Player an den PC oder das Ladegerät angeschlossen ist, erscheint der Bildschirm „Choose connection“, auf dem Sie den Verbindungsmodus auswählen können. -
Página 97: Anschliessen Und Trennen
ANSCHLIESSEN UND TRENNEN Den Player anschließen • Um den Player an den PC anzuschließen, stecken Sie das USB-Kabel in einen freien USB- Anschluss am Computer und schließen Sie das andere Ende an den Player an. • Auf dem Player erscheint der Verbindungsbildschirm. Bei Auswahl des Modus „Charge & Transfer“ können Sie Mediendateien zwischen dem Player und Ihrem PC übertragen, während der Akku des Players geladen wird. •... -
Página 98: Inbetriebnahme
INBETRIEBNAHME Ein/Aus und Verwendung des Hauptmenüs • Zum Einschalten des Players die Taste 3 Sekunden lang drücken. Auf dem Bildschirm erscheint das Hauptmenü, über das Sie auf die Untermenüs „Music / Movie / Record / Picture / Setup / eBook“ (siehe unten) zugreifen können. •... -
Página 99: Menü Einstellungen
MENÜ EINSTELLUNGEN Bevor Sie den Player in Betrieb nehmen, müssen Sie möglicherweise Datum und Uhrzeit einstellen oder einige der Standardeinstellungen im Menü „Einstellungen“ Ihren Wünschen anpassen. • Für den Zugriff über das Hauptmenü wählen Sie „Setup“ mit den Tasten bestätigen Sie mit der Taste , um das Untermenüs des Menüs „Settings“ anzuzeigen. • Um zum vorherigen Menü oder zum Hauptmenü zurückzukehren, drücken Sie im Menü Einstellungen oder einem beliebigen Untermenü Menü Einstellungen Standby •... -
Página 100: Anzeige
Anzeige Sie können die Displaybeleuchtung auf die gewünschte Dauer oder auf „Always On“ einstellen, damit das Display bei jeder Benutzung des Players durchgehend eingeschaltet bleibt. • Wählen Sie im Menü der Einstellungen „Display settings“, dann „Backlight timer“ um eine Liste aufzurufen, in der Sie mit den Tasten zwischen den Optionen „10 / 20 / 30 seconds / Always On“ wählen können; bestätigen Sie mit der Taste Stellen Sie die Hintergrundbeleuchtung auf „Always On“, um zu verhindern, dass sich der Bildschirm des Players ausschaltet (diese Einstellung verringert die Akkuleistung). -
Página 101: Sprache
Sprache Dieser Player unterstützt mehrere Display-Anzeigesprachen. • Um die Sprache einzustellen, wählen Sie „Language“, wählen Sie die gewünschte Sprache mit den Tasten und bestätigen Sie mit der Taste Information Sie können Informationen über den Player anzeigen, z.B. die Firmware-Version, den Speicherstatus, den verbleibenden verfügbaren Speicherplatz und die Anzahl der im Player verfügbaren Mediendateien. • Wählen Sie im Menü „Einstellungen“ mit den Tasten die Option „Information“... -
Página 102: Menü „Musik
MENÜ „MUSIK“ Dieser Musik-Player unterstützt praktisch jedes Audio-Codierungsformat von Musikdateien. Den Musik-Player aus dem Hauptmenü öffnen: • die Option „Music“ und Wählen Sie im Hauptmenü mit den Tasten bestätigen Sie mit der Taste , um eine Liste der Untermenüs anzuzeigen. • Wählen Sie die gewünschte Funktion aus den Optionen „Folder & songs / Artists / Albums / Genres / Playlists / Update Playlist“. -
Página 103: Playlist-Update
Playlist-Update • Wählen Sie „Update playlist“, um die Playliste zu aktualisieren, wenn Sie nicht wie gewünscht abgespielt wird. Dieser Fall kann eintreten, da Sie die Möglichkeit haben, bestimmte Mediendateien manuell aus dem Speicher des Players zu löschen. Aktualisieren Sie die Playliste daher bei Bedarf. Einen Titel anhören •... -
Página 104: Lautstärkeregler
Lautstärkeregler • Drücken Sie „+“, um die Lautstärke zu erhöhen, oder „-“, um sie zu reduzieren. Es erscheint ein Fenster zur Lautstärkeregelung, in dem die Einstellung angezeigt wird. • Warten Sie 6 Sekunden lang oder drücken Sie , um zur Audio-Benutzeroberfläche zurückzukehren. • Hinweis: Beim Einstellen der Lautstärke erscheint ein Warnhinweis auf dem Display, wenn Sie 85 dB überschreiten. Drücken Sie M (Menü), um die Einstellung zu bestätigen. Songtext anzeigen Der Player unterstützt Dateien im *.LRC-Format, die den Songtext während der Wiedergabe anzeigen, wenn eine solche Datei mit dem Song gespeichert wurde. -
Página 105: Eq-Einstellung
EQ-Einstellung • Wählen Sie im Untermenü „Musik“ den Menüpunkt „Equalizer“ und dann mit den Tasten aus den Klangeffekt-Optionen „Normal / Rock / Funk / Hip hop / Jazz / Classique / Techno“ den gewünschten Effekt aus; bestätigen Sie mit der Taste Zur Playliste hinzufügen • Wählen Sie im Untermenü „Musik“ den Menüpunkt „Add to playlist“, um den aktuell für die Optionen „Playlist on the gespielten Titel mit Hilfe der Tasten go(1) / Playlist on the go(2) / Playlist on the go(3)“... -
Página 106: Video-Menü
VIDEO-MENÜ • Wählen Sie im Hauptmenü mit den Tasten die Option „Movie“ und bestätigen Sie mit der Taste , um eine Liste der Dateien anzuzeigen. • Wählen Sie in der Video-Benutzeroberfläche die Videodatei aus, deren Wiedergabe Sie starten möchten. Die Videowiedergabe startet automatisch. Anmerkung: Vor einer Wiedergabe müssen alle Videos mit dem auf der CD enthaltenen Konverter in das .AMV-Format umgewandelt werden. -
Página 107: Video-Untermenü
VIDEO-UNTERMENÜ Es ist möglich, den Wiedergabemodus zu ändern oder Videodateien zu löschen. Gehen Sie dazu wie folgt vor: • Drücken Sie in der Video-Benutzeroberfläche M (Menü), um eine Liste von Untermenüs mit den Funktionen „Repeat / Delete video / Update Playlist“ aufzurufen. Wiederholen • Wählen Sie erst „Repeat“, dann mit den Tasten die gewünschte Funktion aus den Optionen „Repeat Off / Repeat 1 / Repeat all“ und bestätigen Sie mit der Taste Video löschen •... -
Página 108: Konvertieren Von Videodateien In Das .AMv-Format
KONVERTIEREN VON VIDEODATEIEN IN DAS .AMV-FORMAT • Um Videos auf dem Player abspielen zu können, müssen Video-Dateien zuvor mit der mitgelieferten Software „AMV Video converter“ konvertiert werden. Die Konvertierung der Video-Dateien muss auf dem PC durchgeführt werden. Übertragen Sie die Daten nach der Konvertierung auf den Player, um sie dort abspielen zu können. Wichtig: Zur Konvertierung von Videodateien muss Microsoft DirectX 9.0 oder höher auf Ihrem PC installiert sein. - Página 109 • Klicken Sie auf das Symbol , um den Speicherort der in das .AMV-Format konvertierten Datei anzugeben, und klicken Sie auf das Symbol , um die zu konvertierende Datei auszuwählen. Die Quelldatei erscheint nach der Auswahl im unteren Fenster. • Klicken Sie mit der linken Maustaste im unteren Fenster auf die zu konvertierende Datei, um sie zu markieren; das ausgegraute Symbol erscheint in Farbe...
-
Página 110: Menü „Aufzeichnung
• Klicken Sie auf das Symbol , um die Konvertierung zu starten. • Sobald die Datei bereit ist, wird sie automatisch im .AMV-Player wiedergegeben. • Diese Datei kann nun auf Ihren Player heruntergeladen werden. Schließen Sie Ihren Player an Ihren PC an und kopieren Sie diese Datei auf die Micro-SD-Karte Ihres Players. Hinweis: Der Player unterstützt nur die Pixelauflösung „160x120“ . MENÜ... -
Página 111: Bibliothek Der Aufzeichnungen
Bildschirm „Aufzeichnung“ • Drücken Sie im Bildschirm „Aufzeichnung“ die Taste , um die Aufzeichnung zu unterbrechen. Drücken Sie diese Taste erneut, um die Aufzeichnung fortzusetzen. • Drücken Sie die Taste , um die Aufzeichnung abzuschließen. Es erscheint das Dialogfenster „Save recording“. Wählen Sie „Yes“, um die Aufzeichnung zu speichern. • Wählen Sie „No“ aus, um den Vorgang abzubrechen. Bibliothek der Aufzeichnungen •... -
Página 112: Foto-Menü
FOTO-MENÜ Der Player kann zum Ansehen von Fotos und Bildern verwendet werden. Bilder ansehen: • die Option „Picture“ und Wählen Sie im Hauptmenü mit den Tasten bestätigen Sie mit der Taste , um eine Liste der Untermenüs anzuzeigen. Ein Foto anzeigen • Wählen Sie in der Liste der Fotos/Bilder die anzuzeigende Datei aus. •... -
Página 113: Untermenü „Foto
UNTERMENÜ „FOTO“ Bestimmte Einstellungen für die Anzeige von Fotos/Bildern können angepasst werden. Einstellungen ändern: • Drücken Sie in der Liste der Fotos/Bilder oder im Foto-Bildschirm M (Menü), um das Foto-Untermenü aufzurufen; wählen Sie dort die gewünschte Funktion unter „Slideshow settings / Delete picture / Update Playlist“. Slideshow-Einstellungen DAUER PRO SLIDE •... -
Página 114: Ebook-Menü
EBOOK-MENÜ Der Player kann zum Lesen von Texten verwendet werden. Der Player unterstützt nur .TXT-Dateien. Gehen Sie dazu wie folgt vor: • Wählen Sie im Hauptmenü mit den Tasten die Option „eBook“ und bestätigen Sie mit der Taste , um eine Liste der Textdateien anzuzeigen. Eine Textdatei anzeigen •... -
Página 115: Ebook-Untermenü
EBOOK-UNTERMENÜ Bestimmte Einstellungen für die Textanzeige können angepasst werden. Einstellungen ändern: • Drücken Sie in der Liste der Textdateien oder im eBook-Bildschirm M (Menü), um das Untermenü „eBook“ aufzurufen; wählen Sie dort die gewünschte Funktion unter „Play settings / Delete eBook / Bookmark Select / Delete bookmark / Add bookmark / Page select“. Lese-Einstellungen •... -
Página 116: Ein Lesezeichen Hinzufügen
Ein Lesezeichen hinzufügen • Wählen Sie im Ebook-Bildschirm „Add Bookmark“, um das Dialogfeld „Whether to add?“ anzuzeigen. • Wählen Sie „Yes“ aus, um den Vorgang zu bestätigen. Die gerade angezeigte Seite wird zu den Lesezeichen in der Liste hinzugefügt und im Speicher des Players abgelegt, um sie über die Lesezeichenauswahlfunktion erneut anzeigen zu können. • Wählen Sie „No“ aus, um den Vorgang abzubrechen. Page select (Anzeige einer bestimmten Seitenzahl) •... -
Página 117: Fehlerbehebung
FEHLERBEHEBUNG • Das Gerät funktioniert Überprüfen Sie, ob der Akku leer oder schwach ist. nicht • Der Kopfhörer ist stumm Prüfen Sie, ob die Lautstärke auf „0“ eingestellt und der Kopfhörer richtig an den Player angeschlossen ist. • Überprüfen Kopfhörerstecker Sauberkeit. • Beschädigte .MP3-Dateien können statisches Rauschen erzeugen und zu einer Tonabschaltung führen. Überprüfen Sie die Audiodateien auf Beschädigungen. - Página 118 INHOUDSOPGAVE VEILIGHEIDSVOORSCHRIFTEN Gebruiksvoorschriften Veiligheidswaarschuwingen BESCHRIJVING VAN DE MP4-SPELER TECHNISCHE EIGENSCHAPPEN PLAATSEN VAN DE MICRO-SD-GEHEUGENKAART (NIET INBEGREPEN) BATTERIJ VAN DE MP4-SPELER Opladen van de batterij Aansluiten en opladen AANSLUITEN EN ONTKOPPELEN De MP4-speler aansluiten De MP4-speler ontkoppelen INBEDRIJFSTELLING Aan-/uitzetten en gebruik van het hoofdmenu INSTELLINGSMENU Slaapstand Weergave...
- Página 119 VIDEOMENU Een video pauzeren/afspelen hervatten De vorige of volgende video afspelen Snel vooruit of snel terug Instelling van het volume VIDEO-SUBMENU Herhalen Video verwijderen De playlist bijwerken VIDEOBESTANDEN CONVERTEREN NAAR .AMV-FORMAAT OPNAMEMENU Opname starten Opnamebibliotheek REC-bitrate instellen FOTOMENU Een foto weergeven Door foto’s/afbeeldingen bladeren Diavoorstelling FOTO-SUBMENU Instellingen diavoorstelling Een foto verwijderen De playlist bijwerken EBOOK-MENU Een tekstbestand weergeven De bladzijden van een tekstbestand omslaan Automatisch bladzijden omslaan EBOOK-SUBMENU Leesinstellingen...
-
Página 120: Veiligheidsvoorschriften
VEILIGHEIDSVOORSCHRIFTEN Gebruiksvoorschriften • Plaats geen open vuur, zoals een brandende kaars, op of nabij het apparaat. • Plaats geen voorwerp dat vloeistof bevat, zoals een vaas, op of nabij het apparaat. • Berg dit apparaat niet op en gebruik en het niet op een plaats waar het is blootgesteld aan direct zonlicht, een warmtebron, overmatig stof of trillingen. • Gebruik dit apparaat niet met natte handen. • Reinig dit apparaat niet met water of in een andere vloeistof. •... - Página 121 We adviseren u de verpakking van het apparaat te bewaren voor het geval het opnieuw moet worden vervoerd. Als u het apparaat op enig moment moet weggooien, houd er dan rekening mee dat alle batterijen en accu’s uit het apparaat moeten worden verwijderd (afvoeren van gebruikte batterijen en accu’s). WAARSCHUWING: wanneer u op straat of onderweg bent, kan het luisteren naar een MP4-speler u afleiden van mogelijke gevaren, zoals een naderende auto.
-
Página 122: Beschrijving Van De Mp4-Speler
BESCHRIJVING VAN DE MP4-SPELER 8009091 MP4-038 II 500mA Made in P.R.C. SOURCING & CREATION Avenue de la Motte 59810 Lesquin France Lot n : YY_WW_1900027 Nummer Beschrijving Resetopening (ingebouwde contactschakelaar) Tft-lcd-scherm Toets (aan/uit, afspelen/pauzeren, naar menu/bevestigen) Toets (vorige/snel terug) Toets (volgende/snel vooruit) Toets... -
Página 123: Technische Eigenschappen
TECHNISCHE EIGENSCHAPPEN Afmetingen 87 mm (H) x 41 mm (B) x 9,5 mm (D) Gewicht 28 g (ongeveer) Lcd-scherm 1,8 inch (4,5 cm), resolutie (RGB) 128 x 160 PC-verbinding USB 2.0 (hoge snelheid) Gleuf voor geheugenkaart Micro-SD-kaart (alleen geschikt voor het FAT32-formaat tot 32 Gb, niet voor het NTFS-formaat) Accu Lithium 3,7 V, 170 mAh Gebruiksduur bij afspelen: 8 uur voor muziek 2 uur voor video Voeding DC-ingang: 5 V 500 mA/0,5 A Audio Hoofdtelefoonuitgang 2 mW x 2 tot 32 Ohm Frequentiebereik 20 tot 20.000 Hz... -
Página 124: Plaatsen Van De Micro-Sd-Geheugenkaart (Niet Inbegrepen)
PLAATSEN VAN DE MICRO-SD-GEHEUGENKAART (NIET INBEGREPEN) Dit apparaat is ontworpen zonder intern geheugen. Voordat u het apparaat gebruikt, dient u er een micro-SD-geheugenkaart in te plaatsen. • Druk op de toets ‘Off’ (uit) om de MP4-speler uit te zetten en plaats vervolgens de micro-SD-geheugenkaart in de daarvoor bestemde gleuf. • U kunt nu mediabestanden op uw MP4-speler downloaden op/vanaf uw computer. •... -
Página 125: Opladen Van De Batterij
Opladen van de batterij De batterij van de MP4-speler kan op twee manieren worden opgeladen: • De MP4-speler aansluiten op uw computer, of • Een micro-USB-oplader gebruiken (niet inbegrepen). Aansluiten en opladen • Zodra uw MP4-speler is aangesloten op uw computer of een oplader, verschijnt het scherm ‘Choose connection’... -
Página 126: Aansluiten En Ontkoppelen
AANSLUITEN EN ONTKOPPELEN De MP4-speler aansluiten • Om de MP4-speler te verbinden met uw computer, sluit u de USB-kabel aan op een vrije USB-poort van uw computer en sluit u het andere einde aan op de MP4-speler. • Op de MP4-speler verschijnt dan het verbindingsscherm. Als u de modus ‘Charge & Transfer’ kiest, kunt u multimediabestanden overbrengen tussen de MP4-speler en uw computer terwijl de batterij van de MP4-speler wordt opgeladen. -
Página 127: Inbedrijfstelling
INBEDRIJFSTELLING Aan-/uitzetten en gebruik van het hoofdmenu • Om de MP4-speler aan te zetten, drukt u 3 seconden lang op de toets . Het scherm van het hoofdmenu verschijnt, van waaruit u naar de submenu’s ‘Music / Movie / Record / Picture / Setup / eBook’ kunt gaan, hieronder te zien. • Om de MP4-speler uit te zetten, drukt u 3 seconden lang op de toets Hoofdmenu ƒ Muziek „ ƒ... -
Página 128: Instellingsmenu
INSTELLINGSMENU Voordat u uw MP4-speler gaat gebruiken, kunt u de datum en tijd instellen of enkele standaardinstellingen aanpassen in het instellingsmenu. • Om vanuit het hoofdmenu naar het instellingsmenu te gaan, selecteert u ‘Setup’ met de toetsen en bevestigt u met de toets , zodat de submenu’s van het menu ‘Settings’ verschijnen. •... -
Página 129: Date & Time
• Selecteer vanuit het instellingsmenu ‘Display settings’ en vervolgens ‘Backlight timer’ om een lijst te laten verschijnen met de opties ‘10 / 20 / 30 seconds / Always On’ voor de gewenste instelling. Kies met de toetsen en bevestig met de toets Stel de achtergrondverlichting in op ‘Always On’... -
Página 130: Informatie
Informatie Het is mogelijk om informatie over de MP4-speler weer te geven, zoals de firmwareversie, de geheugenstatus van de schijf, de resterende geheugenruimte en het aantal mediabestanden op de MP4-speler. • Kies vanuit het instellingsmenu ‘Information’ met de toetsen en bevestig met de toets om een lijst met submenu’s te laten verschijnen. • Selecteer ‘Player information’ of ‘Disk space’ om de gewenste informatie weer te geven. -
Página 131: Albums
Albums • Selecteer ‘Albums’ om naar een lijst te gaan waarin mappen zijn gerangschikt op naam van album, zodat u het gewenste album kunt kiezen om een van de nummers in de lijst van dat album af te spelen. Genres • Selecteer ‘Genres’ om naar een lijst te gaan waarin mappen zijn gerangschikt op genre, zodat u het gewenste genre kunt kiezen om een van de nummers in de lijst van dat genre af te spelen. -
Página 132: Een Nummer Pauzeren/Afspelen Hervatten
Een nummer pauzeren/afspelen hervatten Vanuit de audio-interface: • Druk op de toets om het nummer te pauzeren. • Druk nogmaals op deze toets om het afspelen te hervatten. Volgende track/snel vooruit en vorige track/snel terug • Druk op de toets om naar de volgende track te gaan. -
Página 133: Muziek-Submenu
MUZIEK-SUBMENU • Druk vanuit de audio-interface op M (Menu) om een lijst met submenu’s met de functies ‘Play mode / Equalizer / Delete’ weer te geven. Afspeelmodus Vanuit het muziek-submenu: • Selecteer ‘Play mode’ om een lijst met menu’s weer te geven met de functies ‘Repeat / Shuffle’. -
Página 134: Videomenu
• Het dialoogvenster ‘song name… delete?’ verschijnt. Selecteer ‘Yes’ om te bevestigen dat u het bestand wilt verwijderen uit het geheugen van de MP4-speler. • Het dialoogvenster ‘deleting’ verschijnt gedurende enkele seconden. Het bestand is dan verwijderd en de audio-interface begint automatisch met het afspelen van het volgende bestand. -
Página 135: Instelling Van Het Volume
Instelling van het volume • Vanuit de video-interface: • Druk op de plus-knop om het volume te verhogen. • Druk op de min-knop om het volume te verlagen. • Druk vervolgens op om terug te keren naar de video die wordt afgespeeld. •... -
Página 136: Videobestanden Converteren Naar .AMv-Formaat
VIDEOBESTANDEN CONVERTEREN NAAR .AMV-FORMAAT • Het is noodzakelijk uw videobestanden te converteren met de meegeleverde ‘AMV Video converter’-software om uw videobestanden te kunnen afspelen op de MP4- speler. De conversie kan alleen op uw computer worden uitgevoerd. Zodra de bestanden zijn geconverteerd, moet u ze naar uw MP4-speler kopiëren om ze te kunnen afspelen. - Página 137 • Klik op het pictogram om aan te geven waar het bestand in .AMV-formaat moet worden opgeslagen, en vervolgens op het pictogram om het te converteren bestand te selecteren. Het bronbestand verschijnt in het onderste venster nadat het is geselecteerd. •...
-
Página 138: Opnamemenu
• Klik vervolgens op het pictogram om de conversie uit te voeren. • Zodra de conversie is voltooid, wordt het bestand automatisch afgespeeld in de .AMV Player. • Dit bestand kan nu worden overgezet naar uw MP4-speler. Sluit de MP4-speler aan op uw computer en kopieer dit bestand op de micro-SD-kaart van uw MP4-speler. Opmerking: de MP4-speler ondersteunt alleen de pixelresolutie ‘160x120’... -
Página 139: Druk Op De Toets
Opname-interface • Druk vanuit de opname-interface op de toets om de opname te pauzeren. Druk nogmaals op deze toets om de opname te hervatten. • om de opname te beëindigen. Het dialoogvenster ‘Save Druk op de toets recording’ verschijnt. Selecteer ‘Yes’ om de opname op te slaan. •... -
Página 140: Fotomenu
FOTOMENU U kunt de MP4-speler gebruiken om foto’s en afbeeldingen weer te geven. Om afbeeldingen weer te geven: • Selecteer vanuit het hoofdmenu ‘Picture’ met de toetsen en bevestig met de toets om een lijst met submenu’s te laten verschijnen. Een foto weergeven •... -
Página 141: Foto-Submenu
FOTO-SUBMENU U kunt bepaalde instellingen voor het weergeven van foto’s/afbeeldingen wijzigen. Om de instellingen te wijzigen: • Druk vanuit de lijst met foto’s/afbeeldingen of de foto-interface op M (Menu) om het foto-submenu weer te geven en kies de gewenste functie uit de opties ‘Slideshow settings / Delete picture / Update Playlist’. -
Página 142: Ebook-Menu
EBOOK-MENU U kunt de MP4-speler gebruiken als tekstlezer. De MP4-speler ondersteunt alleen bestanden in .TXT-formaat. Dit doet u als volgt: • Selecteer vanuit het hoofdmenu ‘eBook’ met de toetsen en bevestig met de toets om de lijst met tekstbestanden te laten verschijnen. Een tekstbestand weergeven •... -
Página 143: Ebook-Submenu
EBOOK-SUBMENU U kunt bepaalde instellingen voor het lezen van teksten wijzigen. Om de instellingen te wijzigen: • Druk vanuit de lijst met tekstbestanden of de eBook-interface op M (Menu) om het eBook-submenu weer te geven en kies de gewenste functie uit de opties ‘Play settings / Delete eBook / Bookmark Select / Delete bookmark / Add bookmark / Page select’. -
Página 144: Een Bladwijzer Verwijderen
Een bladwijzer verwijderen • Selecteer ‘Delete Bookmark’ om de lijst met bladwijzers weer te geven. • Selecteer de bladwijzer die u wilt verwijderen, waarna een dialoogvenster ‘Whether to delete?’ verschijnt. • Selecteer ‘Yes’ om te bevestigen dat u dit wilt of ‘No’ om te annuleren. Een bladwijzer toevoegen •... -
Página 145: De Mp4-Speler Resetten
DE MP4-SPELER RESETTEN In sommige omstandigheden houdt de MP4-speler tijdens het gebruik op met functioneren. Om de MP4-speler te resetten: • Gebruik een staafje van 1 mm of een vergelijkbaar voorwerp (zoals een tandenstoker) en steek deze voorzichtig met de niet-puntige zijde in de ‘Resetopening (1)’ totdat u voelt dat u niet verder kunt. -
Página 146: Probleemoplossing
PROBLEEMOPLOSSING • De MP4-speler werkt niet Controleer of de batterij leeg of bijna leeg is. • Er komt geen geluid uit Controleer of het volume op ‘0’ staat en de de hoofdtelefoon hoofdtelefoon goed is aangesloten op de MP4-speler. • Controleer of de stekker van de hoofdtelefoon schoon is. - Página 147 Attention : Ce symbole apposé sur le produit signifie qu’il s’agit d’un appareil dont le traitement en tant que déchet est soumis à la réglementation relative aux déchets d’équipements électriques et électroniques (DEEE). Cet appareil ne peut donc en aucun cas être traité comme un déchet ménager, et doit faire l’objet d’une collecte spécifique à ce type de déchets. Des systèmes de reprise et de collecte sont mis à...
- Página 148 Conditions de garantie : Ce produit est garanti contre toute défaillance résultant d’un vice de fabrication ou de matériau. Cette garantie ne couvre pas les vices ou les dommages résultant d’une mauvaise installation, d’une utilisation incorrecte, ou de l’usure normale du produit. La durée de garantie est spécifiée sur la facture d’achat. Warranty conditions: This product is under warranty against any failure resulting from any manufacturing or material defects. This warranty does not cover defects or damage caused by improper set up, incorrect use, or normal wear and tear of this product. The warranty period is specified on the receipt of the purchase.