Tabla de contenido
Publicidad
Idiomas disponibles
Idiomas disponibles
Enlaces rápidos
Publicidad
Capítulos
Tabla de contenido

Manuales relacionados para Nuna TAVO next


Resumen de contenidos para Nuna TAVO next
- Página 2 Designed around your life click click...
-
Página 3: Tabla De Contenido
Product Registration Warranty Contact Child Usage Requirements Warning Parts List Product Set Up Product Use Accessory NUNA Infant Child Restraint Rain Cover Detach & Assemble Insert IMPORTANT - Cleaning and Maintenance READ CAREFULLY Français (FR) Deutsch (DE) AND KEEP FOR... -
Página 4: Product Information
Birth to 22 kg or 4 years whichever comes first. Product Registration When using the stroller frame with NUNA infant carrier, refer to the child usage requirements listed in those instruction Please fill in the above information. The model number and manuals. -
Página 5: Warning
Negotiate curbs and rough ground carefully. Any damage caused by the use of accessories not Repeated impact could cause damage to the supplied by Nuna will not be covered in terms of stroller. warranty. NEVER allow children to stand on the stroller. - Página 6 Overloading, incorrect folding, and the use of accessories e.g. child seats, bag hooks, rain covers, buggy boards, etc… other than those approved by Nuna may damage or make the stroller unsafe. Rubber tires may leave black scuff marks on smooth surfaces such as parquet, laminate and linoleum.
-
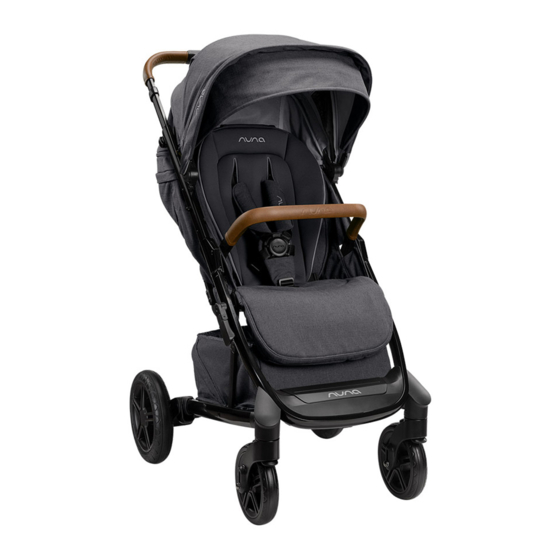
Página 7: Parts List
Parts List Make sure all parts are available before assembly. If any part is missing, please contact Nuna. No tools are required for assembly. Choking Hazard: Remove and immediately discard protective end caps from each wheel and wheel hub axle. -
Página 8: Product Set Up
(5) Check that the wheels are securely attached by pulling on them. - To remove the rear wheel, press the release button (6)-1 and detach the rear wheel from the rear leg (6)-2. TAVO next instructions TAVO next instructions... -
Página 9: Product Use
- To open the canopy, pull the canopy toward the front of the seat, and to close the canopy, push it back. (16) - For extra shade, open the zipper on the canopy. (17) - For added ventilation, flip the canopy window cover up. (18) TAVO next instructions TAVO next instructions... -
Página 10: Accessory
- To lock the rear wheels, step down on the red area on the NOT all accessories are included on some models. brake lever. (25) NUNA Infant Child Restraint - To unlock the rear wheels, step down on the green area on the brake lever. (26) For infant carrier assembly and usage, please refer to the infant carrier instruction manual. -
Página 11: Detach & Assemble Insert
For reasons of safety, only use original Nuna parts. Check regularly if everything functions properly. If any parts are torn, broken, or missing, stop using this product. NUNA International B.V. Nuna and all associated logos are trademarks. TAVO next instructions TAVO next instructions... - Página 12 A LIRE ATTENTIVEMENT Avertissement Liste des pièces ET À CONSERVER POUR Installation du produit RÉFÉRENCE ULTÉRIEURE Utilisation du produit Accessoires Dispositif de retenue pour enfants NUNA Housse de pluie Détacher et assembler l’insert Nettoyage et maintenance Instructions TAVO next Instructions TAVO next...
-
Página 13: Informations Sur Le Produit
étiquette En cas d'utilisation du cadre de la poussette avec un siège sur le cadre de la poussette. bébé NUNA, consultez les exigences d'utilisation indiquées Pour enregistrer votre produit, veuillez vous rendre sur le site dans les modes d'emploi correspondants. -
Página 14: Avertissement
Négociez les virages et les terrains délicats Tout dommage causé par l’utilisation d’accessoires avec prudence. Les chocs répétés peuvent non fournis par Nuna ne seront pas couverts en endommager la poussette. termes de garantie. NE LAISSEZ JAMAIS des enfants se tenir sur la Les charges attachées à... - Página 15 Nuna peuvent endommager ou compromettre la sécurité de la poussette. Les pneus en caoutchouc peuvent laisser des marques d’éraflures noires sur les surfaces lisses telles que le parquet, les sols stratifiés et le...
-
Página 16: Liste Des Pièces
Assurez-vous que toutes les pièces sont présentes avant le montage. Si une pièce est manquante, veuillez contacter Nuna. Le montage ne nécessite aucun outil. Risque d'étouffement : Retirez et jetez immédiatement les capuchons de protection de chaque roue et axe de moyeu de roue. -
Página 17: Installation Du Produit
Assurez-vous que les roues sont correctement attachées en Barre de sécurité fermement fixée tirant dessus. - Pour enlever la roue arrière, appuyez sur le bouton de déverrouillage (6)-1 et détachez la roue arrière du piètement arrière (6)-2. Instructions TAVO next Instructions TAVO next... -
Página 18: Utilisation Du Produit
NE croisez PAS les ceintures pour épaules. Ceci appliquerait abaisser le repose-mollets, appuyez sur le bouton une pression sur le cou de l'enfant. d'ajustement au centre du repose-mollets (22)-1, puis pressez vers le bas (22)-2. Instructions TAVO next Instructions TAVO next... -
Página 19: Accessoires
Les accessoires ne sont pas tous inclus selon le modèle. - Pour déverrouiller les roues arrière, appuyez sur la zone verte sur le levier de frein. (26) Dispositif de retenue pour enfants NUNA Enclenchez toujours le frein lorsque la poussette est Pour l'assemblage et l'utilisation du porte-bébé, veuillez arrêtée. -
Página 20: Housse De Pluie
- Ensuite faites passer les harnais d’épaules et de taille dans leurs fentes respectives d’insertion, puis retirez l’insert. (40). Pour réassembler l’insert, suivez les étapes ci-dessus dans l’ordre inverse. NUNA International B.V. Nuna et tous les logos associés sont des marques déposées. Instructions TAVO next Instructions TAVO next... - Página 21 Garantie Kontakt SORGFÄLTIG LESEN Anforderungen an die Nutzung mit Kind Warnung UND ZUM KÜNFTIGEN Teileliste NACHSCHLAGEN Produkt aufbauen Produkt verwenden AUFBEWAHREN Zubehör Kinderrückhaltesystem NUNA Regenschutz Einsatz anbringen und entfernen Reinigung und Wartung Anleitung zu TAVO next Anleitung zu TAVO next...
-
Página 22: Produktdaten
Geburt bis 22 kg oder 4 Jahre, je nachdem, was zuerst eintritt Bitte tragen Sie die obigen Informationen ein. Modellnummer und Fertigungsdatum befindet sich auf einem Schild am Wenn Sie das Kinderwagengestell mit einer NUNA- Kinderwagengestell. Babyschale verwenden, beachten Sie die in den Anleitungen gelisteten Nutzungsanforderungen. -
Página 23: Warnung
WARNUNG Jegliche durch den Einsatz von Zubehörteilen, die nicht von Nuna bereitgestellt wurden, Nichtbeachtung dieser Warnungen und verursachten Schäden werden nicht durch die Anweisungen könnte zu schweren Verletzungen Garantie abgedeckt. oder zum Tode führen. Jegliche am Griff und/oder an der Rückseite Verwenden Sie immer das Rückhaltesystem. - Página 24 Nutzen Sie die Feststellbremse, wenn Sie das Kind hineinlegen oder herausnehmen. Überlastung, falsches Aufklappen und der Einsatz von Zubehörteilen wie Kindersitzen, Taschenhaken, Regenschutzabdeckungen, Buggyhalterungen etc., die nicht von Nuna zugelassen sind, können den Kinderwagen beschädigen und Gefahren verursachen. Anleitung zu TAVO next Anleitung zu TAVO next...
-
Página 25: Teileliste
Teileliste Überprüfen Sie vor der Montage, ob alle Teile vorhanden sind. Falls etwas fehlen sollte, wenden Sie sich an Nuna. Für die Montage werden keine Werkzeuge benötigt. Verschluckungsgefahr: Entfernen und entsorgen Sie umgehend alle Abschlussschutzkappen von Rädern und Radachse. Vorderrad (x2) -
Página 26: Produkt Aufbauen
Prüfen Sie durch Ziehen nach außen, ob die Räder sicher Armlehne ist sicher angebracht befestigt sind. - Drücken Sie zum Entfernen des Hinterrads den Freigabeknopf (6)-1 und lösen Sie das Hinterrad vom hinteren Bein (6)-2. Anleitung zu TAVO next Anleitung zu TAVO next... -
Página 27: Produkt Verwenden
- Drücken Sie die Wadenstütze zum Anheben nach Druck im Nacken des Kindes erzeugt. oben. Senken Sie die Wadenstütze ab, indem Sie den Einstellknopf in die Mitte der Wadenstütze (22)-1 drücken und nach unten drücken (22)-2. Anleitung zu TAVO next Anleitung zu TAVO next... -
Página 28: Zubehör
- Integrieren Sie den Ablagekorb zu einem Teil, indem Sie Babyschalenverriegelung. (33) die Trennwand nach unten drücken. (28) Stellen Sie durch Ziehen an der Babyschale sicher, dass sie richtig am Kinderwagen verriegel ist. Entfernen Sie die Babyschale vor dem Zusammenklappen. Anleitung zu TAVO next Anleitung zu TAVO next... -
Página 29: Regenschutz
Schlitze am Einsatz und nehmen Sie den Einsatz heraus. (40). Bringen Sie den Einsatz wieder an, indem Sie die obigen Schritte in umgekehrter Reihenfolge befolgen. NUNA International B.V. Nuna und alle zugehörigen Logos sind Marken. Anleitung zu TAVO next Anleitung zu TAVO next... - Página 30 Inhoud Productinformatie Productregistratie BELANGRIJK! Garantie Contact ZORGVULDIG LEZEN Vereisten kindergebruik Waarschuwing EN BEWAREN VOOR Onderdelenlijst Installeren product RAADPLEGING IN Gebruik product DE TOEKOMST Accessoire NUNA-babyzitje Regenkap Inzetstuk los - en vastmaken Reiniging en onderhoud Instructies TAVO next Instructies TAVO next...
-
Página 31: Productinformatie
Fabricagedatum: ______________________________________ Geboorte tot 22 kg of 4 jaar, als dat zich eerder voordoet. Productregistratie Bij gebruik van het kinderwagenframe met het NUNA- babyzitje moet u de vereisten voor kindergebruik in deze Vul de bovenstaande informatie in. Het model en de handleidingen volgen. -
Página 32: Waarschuwing
Alle schade als gevolg van het gebruik van Wees voorzichtig bij stoepranden en accessoires die niet door Nuna zijn geleverd, ongelijkmatige grond. Herhaalde schokken kunnen wordt niet gedekt door de garantie. de wandelwagen beschadigen. - Página 33 Overbelasten, onjuist opvouwen, en het gebruik van accessoires zoals kinderzitjes, tashaken, regenkappen, meerijdplankjes, enz. anders dan goedgekeurd door Nuna, kunnen de wandelwagen beschadigen of onveilig maken. Rubberbanden kunnen zwarte strepen achterlaten op gladde oppervlakken zoals parket, laminaat en linoleum.
-
Página 34: Onderdelenlijst
Onderdelenlijst Zorg dat alle onderdelen voor het opslaan droog zijn. Als er items ontbreken of beschadigd zijn, kunt u contact opnemen met Nuna. Voor de montage is geen gereedschap nodig. Gevaar voor verstikking: Beschermende einddoppen direct van elk wiel en wielnaaf verwijderen en weggooien. -
Página 35: Installeren Product
Controleer of de wielen goed vastzitten door eraan te De armsteun is stevig bevestigd trekken. - Om het achterwiel te verwijderen: druk op de ontgrendelknop (6)-1 en maak het achterwiel los van de achterpoot (6)-2. Instructies TAVO next Instructies TAVO next... -
Página 36: Gebruik Product
De schouderriemen NIET kruisen. Dat veroorzaakt druk op Druk op de instelknoppen in het midden van de kuitsteun de nek van het kind. (22)-1 om de steun omlaag te brengen en druk de steun omlaag (22)-2. Instructies TAVO next Instructies TAVO next... -
Página 37: Accessoire
Trek het babyzitje omhoog om te controleren of het goed - Om de opbergmand in één deel te integreren, drukt u de vast zit in de wandelwagen. scheider van de opbergmand omlaag. (28) Verwijder het babyzitje voor het opvouwen. Instructies TAVO next Instructies TAVO next... -
Página 38: Regenkap
(40). Om het inzetstuk weer te bevestigen, volgt u de stappen hierboven in omgekeerde volgorde. NUNA International B.V. Nuna en alle bijbehorende logo's zijn handelsmerken. Instructies TAVO next Instructies TAVO next... - Página 39 Requisiti di utilizzo da parte del bambino LEGGERE ATTENTAMENTE Avvertenza E CONSERVARE PER Elenco parti Configurazione del prodotto RIFERIMENTO FUTURO Uso del prodotto Accessorio Sistema di ritenuta per bambini NUNA Copertura antipioggia Distacco e montaggio dell’inserto Pulizia e manutenzione Istruzioni TAVO next Istruzioni TAVO next...
-
Página 40: Informazioni Sul Prodotto
Prodotto in (data) si trovano su un’etichetta del telaio del Quando si utilizza il telaio del passeggino con la culla passeggino. portatile NUNA, fare riferimento ai requisiti di utilizzo da parte del bambino elencati nei manuali di istruzioni. Per registrare il prodotto, visitare il sito: www.nunababy.com... -
Página 41: Avvertenza
Eventuali danni causati dall’uso di accessori non Affrontare cordoli di marciapiedi e pavimentazioni forniti da Nuna non saranno coperti dalla garanzia. sconnesse con molta attenzione. Gli urti ripetuti Qualsiasi carico sulla maniglia, sul retro dello potrebbero causare danni al passeggino. - Página 42 Nuna possono danneggiare il passeggino. Le ruote in gomma possono lasciare dei segni neri su superfici lisce, come il parquet, il laminato e il linoleum.
-
Página 43: Elenco Parti
Elenco parti Assicurarsi che tutti i pezzi siano disponibili prima dell'assemblaggio. Se manca qualche pezzo, contattare Nuna. Per l'assemblaggio non è necessario nessun attrezzo. Pericolo di soffocamento: Rimuovere e gettare immediatamente i cappucci di protezione di ogni ruota e asse del mozzo della ruota. -
Página 44: Configurazione Del Prodotto
Bracciolo fissato saldamente Verificare che le ruote siano saldamente fissate cercando di estrarle. - Per rimuovere la ruota posteriore, premere il pulsante di rilascio (6)-1 e staccare la ruota posteriore alla gamba posteriore (6)-2. Istruzioni TAVO next Istruzioni TAVO next... -
Página 45: Uso Del Prodotto
- Per sollevare il supporto per la gamba, sollevarlo. Per pressione sul collo del bambino. abbassare il supporto per la gamba, premere il pulsante di regolazione al centro del supporto per la gamba (22)-1 e spingerlo verso il basso (22)-2. Istruzioni TAVO next Istruzioni TAVO next... -
Página 46: Accessorio
- Per sbloccare le ruote posteriori, abbassare l'area verde nella leva del freno. (26) Sistema di ritenuta per bambini NUNA Applicare sempre il freno quando si arresta il passeggino. Per il montaggio e l’uso del sistema di ritenuta per bambini,... -
Página 47: Copertura Antipioggia
- Quindi, infilare le cinture per le spalle e inguinali attraverso le relative fessure dell’inserto, quindi estrarre l’inserto. (40). Per rimontare l’inserto, invertire le procedure di cui sopra. NUNA International B.V. Nuna e tutti i logo associati sono marchi di fabbrica. Istruzioni TAVO next Istruzioni TAVO next... - Página 48 Advertencia Lista de piezas Y CONSERVAR PARA Montaje del producto FUTURAS CONSULTAS Uso del producto Accesorios Dispositivo de sujeción para niños NUNA Capota impermeable Desmontaje y montaje del acolchado Limpieza y mantenimiento Instrucciones para TAVO next Instrucciones para TAVO next...
-
Página 49: Información Del Producto
Cuando utilice la estructura del cochecito con el portabebés su familia. Como respaldamos nuestros productos, nuestros NUNA, consulte los requisitos de los niños para su uso que artículos están cubiertos por una garantía a medida para se indican en sus respectivos manuales de instrucciones. -
Página 50: Advertencia
Mantenga las piezas pequeñas fuera del alcance Cualquier daño causado por el uso de accesorios de los niños, ya que existe el riesgo de asfixia. no suministrados por Nuna no estará cubierto por Cuando pase por bordillos y suelos irregulares, la garantía. - Página 51 Buggy Board, etc. que no estén aprobados por Nuna, podría dañar el cochecito o provocar que este ya no sea seguro. Las gomas de las ruedas pueden dejar marcas en superficies lisas como el parqué, el suelo laminado...
-
Página 52: Lista De Piezas
Lista de piezas Asegúrese de que están disponibles todas las piezas antes de montar el producto. Si falta alguna pieza, póngase en contacto con Nuna. No se necesita ninguna herramienta para el montaje. Riesgo de asfixia: Quite y deseche inmediatamente los tapones protectores de cada rueda y del eje del buje de cada rueda. -
Página 53: Montaje Del Producto
Compruebe que las ruedas están acopladas de forma segura tirando de ellas. El reposabrazos está fijado de forma segura - Para quitar la rueda trasera, presione el botón de desbloqueo (6)-1 y desmóntela de la pata trasera (6)-2. Instrucciones para TAVO next Instrucciones para TAVO next... -
Página 54: Uso Del Producto
Para bajar el soporte para los gemelos, presionar el cuello del niño. pulse el botón de ajuste ubicado en el centro de dicho soporte (22)-1 y empújelo hacia abajo (22)-2. Instrucciones para TAVO next Instrucciones para TAVO next... -
Página 55: Accesorios
(26) Aplique siempre el freno cuando el cochecito esté Dispositivo de sujeción para niños NUNA parado. Para utilizar y montar el dispositivo de sujeción para niños, Empuje el cochecito ligeramente para asegurarse de que consulte el manual de instrucciones del dispositivo de el freno está... -
Página 56: Capota Impermeable
NO pliegue el cochecito después de montar la cubierta impermeable. NO coloque al niño en el cochecito con la capota impermeable montada si la temperatura es cálida. Instrucciones para TAVO next Instrucciones para TAVO next... -
Página 57: Limpieza Y Mantenimiento
Compruebe periódicamente que todo funciona correctamente. Si falta alguna pieza o si alguna de ellas está rota o desgastada, deje de utilizar este producto. NUNA International B.V. Nuna y todos los logotipos asociados son marcas comerciales. Instrucciones para TAVO next Instrucciones para TAVO next... - Página 58 Avisos E GUARDE PARA Lista de componentes Montagem do produto FUTURA REFERÊNCIA Utilização do produto Acessório Dispositivo de retenção para crianças NUNA Capa impermeável Retirar e colocar o redutor Limpeza e manutenção Instruções para TAVO next Instruções para TAVO next...
-
Página 59: Informações Sobre O Produto
Até 22 kg ou 4 anos, o que ocorrer primeiro. Registo do produto Sempre que utilizar a estrutura do carrinho o transportador NUNA, consulte os requisitos de utilização nos respetivos Preencha as informações acima. O número de modelo manuais de instruções. -
Página 60: Avisos
Os danos causados pela utilização de acessórios Mantenha as peças pequenas fora do alcance das não fornecidos pela Nuna não estão cobertos pela crianças, pois representam um risco de asfixia. garantia. Seja cuidadoso ao atravessar pisos irregulares e subir passeios. - Página 61 A sobrecarga, fecho incorreto e utilização de acessórios como cadeiras para criança, ganchos para sacos, capas impermeáveis, plataformas, etc., que não sejam aprovados pela Nuna podem danificar ou tornar este carrinho de bebé inseguro. Os pneus de borracha podem deixar marcas pretas em superfícies lisas como parquet, pavimento...
-
Página 62: Lista De Componentes
Certifique-se de que todas as peças estão disponíveis antes da montagem. Se alguma peça estiver em falta, contacte a Nuna. Não são necessárias ferramentas para a montagem. Perigo de asfixia: Remova e descarte de imediato as tampas de proteção de cada roda e do eixo do cubo da roda. -
Página 63: Montagem Do Produto
O cesto está devidamente encaixado - Para remover a roda traseira, pressione o botão de A barra de proteção frontal está devidamente desbloqueio (6)-1 e desencaixe a roda traseira da perna encaixada traseira (6)-2. Instruções para TAVO next Instruções para TAVO next... -
Página 64: Utilização Do Produto
(23) para fechar a cobertura, empurre-a para trás. (16) - Pressione o bloqueio giratório para baixo para - Para ter mais sombra, abra o fecho da cobertura. (17) desbloquear. (24) Instruções para TAVO next Instruções para TAVO next... -
Página 65: Cesto De Armazenamento
(25) incluídos. - Para desbloquear as rodas traseiras, pise a zona verde Dispositivo de retenção para crianças NUNA da alavanca do travão. (26) Acione o travão sempre que parar o carrinho. Para montagem e utilização no transportador, consulte o Empurre ligeiramente o carrinho de bebé... -
Página 66: Capa Impermeável
(40). Para voltar a colocar o Redutor, execute os passos indicados acima na ordem inversa. NUNA International B.V. Nuna e todos os logótipos associados são marcas comerciais. Instruções para TAVO next Instruções para TAVO next... - Página 67 Wymagania dotyczące używania przez dzieci Ostrzeżenie WAŻNE INFORMACJE Lista części INSTRUKCJĄ I Konfiguracja produktu Korzystanie z produktu ZACHOWAĆ JĄ NA Akcesoria Fotelik dla niemowlęcia NUNA PRZYSZŁY UŻYTEK. Folia przeciwdeszczowa Wkładka CZYTAJ UWAŻNIE. Czyszczenie i konserwacja Instrukcja TAVO next Instrukcja TAVO next...
-
Página 68: Informacje O Produkcie
W celu uzyskania informacji na temat gwarancji, odwiedź naszą stronę internetową: www.nunababy.com Kliknij łącze „Gwarancja” na stronie domowej. Instrukcja TAVO next Instrukcja TAVO next... -
Página 69: Ostrzeżenie
Zaprzestań korzystania z produktu, jeśli jakaś Akcesoria, które nie zostały zatwierdzone przez część jest uszkodzona lub zepsuta. firmę Nuna nie powinny być używane. Używaj tylko części zamiennych rekomendowanych przez Wózek używany wraz z fotelikiem nie stanowi firmę Nuna. zamiennika dla łóżka. Jeżeli Twoje dziecko potrzebuje snu, powinno zostać... - Página 70 Przeładowania, nieprawidłowe składanie oraz używanie akcesoriów, takich jak fotelik dziecięcy, haki na torbę, ochrona przeciwdeszczowa, itp... inne niż te zatwierdzone przez firmę Nuna mogą spowodować zagrożenie i sprawić, że wózek nie będzie bezpieczny. Gumowe opony mogą pozastawiać czarne ślady na gładkich powierzchniach takich jak parkiety,...
-
Página 71: Lista Części
18 Blokada nosidełka dla Poduszka fotelika niemowlęcia 19 Przycisk regulacji Pałąk odchylenia oparcia Podparcie łydek 20 Koszyk Koło przednie 21 Dźwignia hamulca 10 Koło tylne 22 Folia przeciwdeszczowa Klamra 12 Nakładki na pasy Instrukcja TAVO next Instrukcja TAVO next... -
Página 72: Konfiguracja Produktu
Kosz jest bezpiecznie zamontowany Sprawdź, czy koła zostały poprawnie zamocowane poprzez Pałąk jest bezpiecznie zamontowany pociągnięcie ich w dół. - Aby zdemontować tylne koło, naciskaj jednocześnie przycisk zwalniający (6)-1 i zdejmij tylne koło z tylnej nogi (6)-2. Instrukcja TAVO next Instrukcja TAVO next... -
Página 73: Korzystanie Z Produktu
Przestrzeń pomiędzy ciałem dziecka, a górnym pasem nie obniżyć naciśnij przycisk na środku podnóżka (22)-1, a powinna przekraczać grubości jednego palca. następnie go obniż (22)-2. NIE krzyżuj pasów ramiennych, ponieważ skutkować to będzie naciskiem na szyję dziecka. Instrukcja TAVO next Instrukcja TAVO next... -
Página 74: Akcesoria
Z niektórymi modelami nie są dostarczane wszystkie - Aby odblokować tylne koła, naciśnij na zielony obszar akcesoria. dźwigni hamulca. (26) Fotelik dla niemowlęcia NUNA Zawsze używaj hamulca podczas postoju. Pchnij delikatnie wózek dla sprawdzenia, że hamulec Kiedy używasz wózka z fotelikiem zapoznaj się instrukcją... -
Página 75: Folia Przeciwdeszczowa
- Następnie przełóż pasy naramienne i nakładkę krokową przez odpowiednie szczeliny, a następnie wyjmij wkładkę. (40). Aby ponownie zamontować wkładkę, wykonaj czynności wymienione powyżej w kolejności odwrotnej. NUNA International B.V. Nuna i wszystkie powiązane symbole logo są znakami towarowymi. Instrukcja TAVO next Instrukcja TAVO next... - Página 76 Požadavky na používání s dítětem Upozornění POKYNY SI POZORNĚ Seznam součástí PŘEČTĚTE A USCHOVEJTE Sestavení produktu Používání produktu PRO POZDĚJŠÍ POUŽITÍ Příslušenství Autosedačka pro novorozence NUNA Pláštěnka Sejmutí a montáž vložky Čištění a údržba Návod k použití TAVO next Návod k použití TAVO next...
-
Página 77: Informace O Produktu
Registrace produktu Při používání rámu kočárku s autosedačkou pro novorozence Vyplňte výše uvedené informace. Číslo modelu a datum NUNA dodržujte požadavky na používání s dítětem, které výroby jsou uvedeny na štítku na rámu kočárku. jsou uvedeny v příslušných návodech. Svůj produkt můžete zaregistrovat na webu: www.nunababy.com... -
Página 78: Upozornění
Malé předměty, které představují nebezpečí příslušenství, které nebylo dodáno společností udušení, uchovávejte mimo dosah dětí. Nuna, se nebude vztahovat záruka. Při zdolávání obrubníků a hrubého povrchu postupujte opatrně. Opakovaný náraz může kočárek poškodit. Návod k použití TAVO next Návod k použití TAVO next... - Página 79 Aby se zabránilo nebezpečí udušení, před používáním tohoto předmětu odstraňte a zlikvidujte všechny plastové kryty nebo je uchovávejte mimo dosah novorozenců a dětí! Návod k použití TAVO next Návod k použití TAVO next...
-
Página 80: Seznam Součástí
Seznam součástí Před sestavením se ujistěte, že nechybí žádné součásti. Pokud některá část chybí, kontaktujte společnost Nuna. K sestavení nejsou zapotřebí žádné nástroje. Nebezpečí udušení: Odstraňte a ihned zlikvidujte ochranné koncovky z koleček a náprav. Přední kolečko (x2) 13 Tlačítko nastavení... -
Página 81: Sestavení Produktu
Zopakujte na opačné straně. (5) Zatažením za kolečka ověřte, zda jsou řádně nainstalována. - Chcete-li zadní kolečko sejmout, stiskněte uvolňovací tlačítko (6)-1 a oddělte zadní kolečko ze zadní nohy (6)-2. Návod k použití TAVO next Návod k použití TAVO next... -
Página 82: Používání Produktu
- Chcete-li otevřít stříšku, zatlačte ji směrem k přední části sedačky. Chcete-li stříšku zavřít, přitáhněte ji dozadu. - Zatlačením zámku natáčení předního kolečka dolů (16) odblokujete natáčení. (24) - Pro dosažení lepšího stínu, rozepněte zip na stříšce. (17) Návod k použití TAVO next Návod k použití TAVO next... -
Página 83: Příslušenství
(34)-1 a zvedněte autosedačku nahoru tlačítko pro rozložení (29)-2. (34)-2. - Když je aktivovaný sekundární zámek a tlačítko pro rozložení, otočte rukojeť dopředu. (30) - Potom otevřete úložnou západku podle obrázku (31). Návod k použití TAVO next Návod k použití TAVO next... -
Página 84: Pláštěnka
(40). Při vkládání vložky proveďte výše uvedené kroky v opačném pořadí. NUNA International B.V. Nuna a veškerá přidružená loga jsou obchodní známky. Návod k použití TAVO next Návod k použití TAVO next... - Página 85 Požiadavky na používanie s deťmi PREČÍTAJTE POZORNE Upozornenie Zoznam jednotlivých častí TENTO NÁVOD A Zostavenie výrobku USCHOVAJTE HO PRE Používanie výrobku Príslušenstvo BUDÚCU POTREBU Dojčenská detská autosedačka NUNA Pláštenka Odpojenie a zostavenie vložky Čistenie a údržba Návod na TAVO next Návod na TAVO next...
-
Página 86: Informácie O Výrobku
Od narodenia do 22 kg alebo 4 rokov, podľa toho, čo nastane skôr. Registrácia výrobku Pri používaní rámu kočíka s detskou sedačkou NUNA si pozrite požiadavky na používanie s deťmi v ich návodoch na Vyplňte vyššie uvedené informácie. Číslo modelu a dátum použitie. -
Página 87: Upozornenie
Na žiadne poškodenie spôsobené používaním príslušenstva, ktoré nie je dodávané spoločnosťou Obrubníky a nerovný povrch prekonávajte s Nuna, sa nebudú vzťahovať podmienky záruky. opatrnosťou. Opakovaný náraz môže spôsobiť poškodenie kočíka. Akékoľvek zaťaženie pôsobiace na rukoväť a/alebo zadnú stranu operadla a/alebo na boky vozidla NIKDY nedovoľte deťom postaviť... - Página 88 Nuna, môže kočík poškodiť alebo spôsobiť, že nebude bezpečný. Gumené pneumatiky môžu zanechať na hladkých povrchoch, ako sú parkety, lamináty a linoleum, čierne známky oteru.
-
Página 89: Zoznam Jednotlivých Častí
Zoznam jednotlivých častí Pred zostavením skontrolujte, či máte všetky časti. Ak chýba ktorákoľvek časť, obráťte sa na spoločnosť Nuna. Na zostavenie nie sú potrebné žiadne nástroje. Nebezpečenstvo udusenia: Odstráňte a ihneď zlikvidujte ochranné koncové kryty z každého kolesa a náboja nápravy kolesa. -
Página 90: Zostavenie Výrobku
(5) Držadlo je pevne pripevnené Potiahnutím kolies skontrolujte, či sú pevne pripevnené. - Ak chcete vybrať zadné koleso, stlačte uvoľňovacie tlačidlo (6)-1 a odpojte zadné koleso od zadnej nohy (6)-2. Návod na TAVO next Návod na TAVO next... -
Página 91: Používanie Výrobku
časti sedačky a ak ju budete chcieť zložiť, potlačte ju dozadu. (16) - Ak chcete predný zámok otáčania odomknúť, zatlačte ho nadol. (24) - Ak chcete získať viac tieňa, rozopnite zips na plátennej strieške. (17) Návod na TAVO next Návod na TAVO next... -
Página 92: Príslušenstvo
- Posuňte sekundárny zámok (29)-1 a potom stlačte skladacie tlačidlo (29)-2. - Kým sú sekundárny zámok a skladacie tlačidlo zatlačené, otočte rukoväť dopredu. (30) - Potom zatvorte západku úložného priestoru, ako to je zobrazené na obrázku (31). Návod na TAVO next Návod na TAVO next... -
Página 93: Odpojenie A Zostavenie Vložky
(40). Ak chcete vložku znova zostaviť , postupujte podľa vyššie uvedených krokov v opačnom poradí. NUNA International B.V. Nuna a všetky pridružené logá sú ochranné známky. Návod na TAVO next Návod na TAVO next... - Página 94 Uvjeti za upotrebu PROČITAJTE PAŽLJIVO Upozorenje Popis dijelova I SAČUVAJTE ZA Postavljanje proizvoda BUDUĆU UPORABU Uporaba proizvoda Dodatna oprema NUNA sjedalica za bebu Pokrov protiv kiše Skidanje i stavljanje umetka Čišćenje i održavanje Upute za TAVO next Upute za TAVO next...
-
Página 95: Podaci O Proizvodu
Od rođenja do 22 kg ili 4 godine, koje od toga prije nastupi. Registracija proizvoda Kad se okvir dječjih kolica koristi s NUNA nosiljkom za bebu pogledajte uvjete i mjere djeteta navedene u odgovarajućem Ispunite gore navedene podatke. Broj modela i datum priručniku s uputama za taj proizvod. -
Página 96: Upozorenje
Ponavljajući udarci mogu oštetiti Svaka šteta uzrokovana korištenjem dodatne kolica. opreme koju nije isporučila tvrtka Nuna neće biti NIKAD ne dopuštajte djeci stajanje na kolicima. pokrivena jamstvom. Svaki teret prikvačen na ručku i / ili na stražnji dio naslona za leđa i / ili na stranama kolica utjecat će... - Página 97 Nuna mogu oštetiti ili učiniti kolica opasnim. Gumeni kotači mogu ostavljati crne mrlje i tragove na glatkim površinama poput parketa, laminatnih podova i linoleuma.
-
Página 98: Popis Dijelova
Popis dijelova Prije sklapanja provjerite jesu li raspoloživi svi dijelovi. Ako bilo koji dio nedostaje kontaktirajte tvrtku Nuna. Za sklapanje nije potreban alat. Opasnost od gušenja: Uklonite i odmah odbacite zaštitne završne naglavke sa svakog kotača i osovine kotača. Prednji kotačić (x2) 13 Gumb za podešavanje... -
Página 99: Postavljanje Proizvoda
Povucite svaki od kotačića prema van i tako provjerite jesu li Prečka za držanje sigurno pričvršćena sigurno pričvršćeni. - Za skidanje stražnjeg kotačića pritisnite gumb za oslobađanje (6)-1 i odvojite stražnji kotačić sa stražnje noge (6)-2. Upute za TAVO next Upute za TAVO next... -
Página 100: Uporaba Proizvoda
NE križajte trake za pričvršćivanje djetetovih ramena. To je potpore za noge (22)-1 i gurnite prema dolje (22)-2. prouzročiti pritisak na djetetov vrat. Upute za TAVO next Upute za TAVO next... -
Página 101: Dodatna Oprema
(28) provjerite je li je sigurno pričvršćena na dječja kolica. - Za stvaranje jedinstvenog prostora u košari za odlaganje, Prije sklapanja skinite nosiljku za bebu. pritisnite pregradu košare prema dolje. (28) Upute za TAVO next Upute za TAVO next... -
Página 102: Pokrov Protiv Kiše
- Zatim provucite trake za pričvršćivanje ramena i struka kroz odgovarajuće otvore na umetku i izvadite umetak. (40). Za ponovno postavljanje umetka gore navedene korake slijedite obrnutim redoslijedom. NUNA International B.V. Nuna svi pridruženi logotipi su zaštitni znaci. Upute za TAVO next Upute za TAVO next...