Doro PhoneEasy 331PH Manual De Instrucciones
Ocultar thumbs
Ver también para PhoneEasy 331PH:
- Manual del usuario (37 páginas) ,
- Guia de inicio rapido (3 páginas)
Tabla de contenido
Publicidad
Enlaces rápidos
Publicidad
Tabla de contenido

Manuales relacionados para Doro PhoneEasy 331PH


Resumen de contenidos para Doro PhoneEasy 331PH
- Página 1 All manuals and user guides at all-guides.com PhoneEasy 331ph...
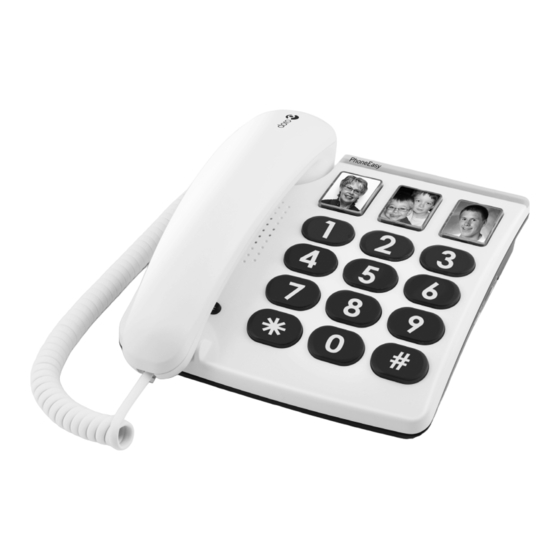
- Página 2 All manuals and user guides at all-guides.com English 1 Ringer indicator 4 Flash button/programming 2 Redial function 5 Speed dial memories 3 Volume control Français 1 Témoin de sonnerie 4 Touche R et de programmation 2 Touche Bis 5 Touches des 3 Curseur de réglage du mémoires directes volume d’écoute combiné Español 1 Indicador de llamada 4 Tecla R/programación 2 Rellamada 5 Marcación rápida 3 Control de volumen...
- Página 3 All manuals and user guides at all-guides.com Italiano 1 Indicatore suoneria 4 Tasto flash/programmazione 2 Richiamata 5 Composizione rapida 3 Regolazione del volume Ελληνικά 1 Ένδειξη κουδουνισμού 4 Πλήκτρο Flash/ προγραμματισμού 2 Λειτουργία επανάκλησης 5 Μνήμες ταχείας κλήσης 3 Ρυθμιστικό έντασης ήχου Português 1 Indicador de toque 4 Botão de flash/programação 2 Função de remarcação 5 Memórias de marcação rápida 3 Controlo do volume Magyar 1 Csengésjelző...
-
Página 4: Redial Function
English All manuals and user guides at all-guides.com Operation Making a call Regular dialling 1. Pick up the handset. 2. Enter the desired number. Redial function If a number was engaged or if you wish to redial the most recently entered number, pick up the handset and press the redial button . Memories This telephone has 3 speed dial memories. Once a number has been saved in a memory location, you only need to press one button to make the call. A picture or symbol can be placed under the transparent cover on the speed dial buttons so it is easy to see who you are calling. Dialling with speed dial 1. Pick up the handset and wait for the dialling tone. 2. Select required speed dial by pressing on the appropriate button. Volume control The handset earpiece volume may be adjusted during a call using Hearing loop The handset has a built-in hearing loop for those who wish to use their hearing aids while using the telephone. Select the T mode on your hearing aid to enable this feature. - Página 5 English All manuals and user guides at all-guides.com Settings Connection 1. Connect the telephone cord to a network wall socket and to the socket on the back of the telephone. 2. Connect the curly cord to the handset and to the socket marked on the side of the telephone. 3. You will hear a click when the modular plug is correctly in place. 4. Set correct Flash button time to 100 (see Technical Information). 5. Lift the handset and listen for the dial tone. Ring signal The ringer volume can be adjusted using Memories Saving speed dial numbers 1. Make sure that the switch on the base of the telephone is set to 2. Lift the receiver and press ) (ignore anything you hear in the earpiece). 3. Enter the phone number (up to 16 digits) using the keypad. Press 4. Select memory position by pressing the corresponding button. 5. Replace the handset. The number has now been saved. Remember to return the switch on the base of the telephone to the position when all the telephone numbers have been saved. Press if you want a pause in the telephone number.
-
Página 6: Technical Information
English All manuals and user guides at all-guides.com Technical Information There are several switches on the base of the telephone. These switches set technical parameters. Flash button time (100/300/600) 100 is the standard setting for most countries. 300 for France/Portugal. 600 for New Zealand. Troubleshooting Check that the telephone cord is undamaged and properly plugged in. Disconnect any additional equipment, extension cords and other phones. If the problem is resolved, the fault is with some other equipment. Test the equipment on a known working line (e.g. at a neighbour’s house). If the equipment works there the fault is probably with your telephone line. Please report this to your network operator. If you are still experiencing difficulties, contact the place of purchase. Guarantee This product is guaranteed for a period of 12 months from the date of purchase. If you experience any problems please contact the place of purchase. Proof of purchase is required for any service or support needed during the guarantee period. This guarantee shall not apply to a fault caused by an accident or a similar incident or damage, liquid ingress, negligence, abnormal usage or any other circumstances on the purchaser’s part. Furthermore, this guarantee will not apply to any fault caused by a thunderstorm or any other voltage... -
Página 7: Declaration Of Conformity
English All manuals and user guides at all-guides.com If you cannot resolve the fault using the faultfinder section, technical support is available by email on or via a premium tech@doro-uk.com rate telephone number: 0905 895 0854, calls cost 50 pence per minute (prices correct at the time of publication). Further contact details are available on our website: www.doro-uk.com Alternatively you can write to: Customer Services Doro UK Ltd 1 High Street Chalfont St Peter Buckinghamshire... - Página 8 Français All manuals and user guides at all-guides.com Utilisation Appeler Appel normal 1. Prenez le combiné. 2. Composez le numéro désiré. Touche Bis Lorsque la ligne de votre correspondant est occupée ou si vous désirez rappeler le dernier numéro composé, prenez le combiné et appuyez sur la touche . Mémoires directes Ce téléphone possède 3 touches de mémoire directe. Une fois qu’un numéro est enregistré sur l’une d’elles, vous le composez en pressant simplement la touche correspondante. Vous pouvez placer une photo ou un symbole sous le couvercle transparent des touches d’appel direct pour reconnaître facilement le destinataire. Appeler un numéro en mémoire directe 1. Prenez le combiné et attendez la tonalité. 2. Sélectionnez une plage d’appel direct en appuyant sur la touche correspondante. Régler le volume Utilisez la touche pour ajuster le volume d’écoute du combiné en cours de conversation. Appareil auditif Le combiné intègre une bobine à induction électromagnétique qui assure directement la compatibilité avec la position T des prothèses auditives (sans aucun accessoire supplémentaire).
-
Página 9: Informations Techniques
Français All manuals and user guides at all-guides.com Réglages Raccordement 1. Reliez le câble téléphonique fourni à la prise téléphonique et à la prise située au dos du téléphone marquée 2. Reliez le cordon spiralé au combiné et au connecteur du téléphone marqué 3. Un clic indique que la prise est branchée correctement. 4. Vérifiez que le curseur de synchronisation de la touche R est bien sur 300 (voir Informations techniques). 5. Prenez le combiné : vous devez entendre la tonalité. Sonnerie Le volume de sonnerie peut être réglé sur fort ou faible à l’aide du curseur Touches des mémoires directes Enregistrer un numéro en mémoire directe 1. Vérifiez que le curseur de la base du téléphone est sur 2. Prenez le combiné et appuyez sur la touche ) (ne tenez pas... -
Página 10: En Cas De Problèmes
Service d’Assistance Téléphonique au 08 92 68 90 18 ( N° Audiotel - 0,34€ /min.) (Il est recommandé de débrancher le téléphone en cas d’orage.) Déclaration de conformité Doro certifie que cet appareil Doro PhoneEasy 331ph est compatible avec l’essentiel des spécifications requises et autres points des directives 1999/5/EC (R&TTE) et 2002/95/EC (ROHS). La déclaration de conformité peut être consultée à l'adresse suivante :... -
Página 11: Funcionamiento
Español All manuals and user guides at all-guides.com Funcionamiento Realización de una llamada Marcación normal 1. Descuelgue el auricular. 2. Introduzca el número deseado. Rellamada Si un número se encontraba ocupado o desea volver a marcar el último número al que ha llamado, descuelgue el auricular y pulse la tecla de rellamada . Memorias Este teléfono tiene 3 memorias de marcación rápida. Una vez guardado un número en una ubicación de memoria, tan sólo tendrá que pulsar una tecla para realizar la llamada. Podrá colocarse una foto o símbolo debajo de la tapa transparente de las teclas de marcación rápida para poder ver a quién se está llamando. Llamada con marcación rápida 1. Descuelgue el auricular y espere el tono de marcación. 2. Seleccione la marcación rápida deseada pulsando la tecla adecuada. Control de volumen Durante una llamada, es posible ajustar el nivel de sonido del auricular con Adaptador de audífono El auricular dispone de un adaptador de audífono incorporado para aquellas personas que desean utilizar su audífono mientras usan el teléfono. Seleccione el modo T en su audífono para activar esta función. -
Página 12: Conexión
Español All manuals and user guides at all-guides.com Ajustes Conexión 1. Conecte el cable del teléfono a la toma de pared de la red telefónica y al conector de la parte posterior teléfono. 2. Conecte el cable en espiral al conector del auricular y al conector 3. Oirá un clic cuando la clavija modular se introduzca correctamente. 4. Establezca el tiempo correcto de la tecla en 100 (consulte Información técnica). 5. Descuelgue el auricular y compruebe si hay tono de marcación. Señal de llamada Existe un conmutador de volumen de la señal de llamada en el lateral del teléfono: Memorias Almacenamiento de números de marcación rápida 1. Asegúrese de establecer en el conmutador situado en la base del teléfono. 2. Descuelgue el auricular y pulse ) (ignore cualquier sonido que oiga por el mismo). 3. Introduzca el número de teléfono (máximo de 16 dígitos) con el teclado. Pulse 4. Seleccione una posición de la memoria pulsando la tecla correspondiente. 5. Cuelgue el auricular. Ahora se habrá guardado el número. -
Página 13: Garantía
Verifique que el cable del teléfono está en perfectas condiciones y conectado correctamente. Desconecte cualquier equipo adicional, cables alargadores u otros teléfonos. Si el problema se soluciona, el fallo estará en otro equipo. Compruebe el equipo en una línea de cuyo funcionamiento esté seguro (por ej. en la casa de un vecino). Si el equipo funciona, el fallo se encontrará probablemente en su línea de teléfono. Informe de ello a su operador de red. Si sigue teniendo problemas, póngase en contacto con el establecimiento en el que adquirió el teléfono. Garantía Este producto está cubierto por una garantía de 12 meses a partir de la fecha de compra. Si tiene cualquier problema, póngase en contacto con el establecimiento en el que adquirió el teléfono. Para cualquier servicio o asistencia necesarios durante el período de validez de la garantía se exigirá una prueba de compra. Esta garantía no será aplicable en caso de fallos causados por accidentes o trato brusco, daños, introducción de líquidos, negligencia, uso anormal o cualquier otra circunstancia por parte del comprador. Esta garantía tampoco será aplicable en caso de fallos causados por tormentas eléctricas o fluctuaciones de tensión. A modo de precaución, se recomienda desconectar el teléfono durante las tormentas eléctricas. Declaración de conformidad Doro declara que el producto Doro PhoneEasy 331ph es conforme a los requisitos esenciales y a otras normativas relevantes contenidas en las Directivas 1999/5/CE (Radio & Telecommunications Terminal Equipment (Equipos terminales de radio y telecomunicaciones), R&TTE) y 2002/95/CE (Restriction of certain Hazardous Substances (Restricciones para el uso de determinadas sustancias peligrosas), ROHS). En la dirección puede encontrarse una copia de la www.doro.com/dofc declaración del fabricante. - Página 14 Italiano All manuals and user guides at all-guides.com Funzionamento Esecuzione di una chiamata Composizione normale 1. Sollevare la cornetta. 2. Inserire il numero desiderato. Richiamata Se il numero composto è occupato o se si desidera richiamare l’ultimo numero composto, sollevare la cornetta e premere il pulsante di ripetizione . Memorie Il telefono è dotato di 3 memorie di composizione rapida. Quando un numero telefonico viene memorizzato in una posizione di memoria, per eseguire la chiamata è sufficiente premere un solo pulsante. È possibile inserire un’immagine o un simbolo sotto il coperchio trasparente sui tasti a composizione rapida, per vedere immediatamente chi si sta chiamando. Composizione di un numero con le memorie di composizione rapida 1. Sollevare la cornetta e attendere il segnale acustico di linea libera. 2. Selezionare la memoria di composizione rapida desiderata premendo il tasto corrispondente.
- Página 15 Italiano All manuals and user guides at all-guides.com Impostazioni Collegamento 1. Collegare il cavo telefonico alla presa di rete a muro e alla presa sul retro del telefono. 2. Collegare il cavo spiralato al microtelefono e alla presa contrassegnata con sul lato del telefono. 3. Quando la spina modulare è posizionata correttamente, si sente uno scatto. 4. Impostare il tempo del tasto Flash su 100 (vedere Informazioni tecniche). 5. Sollevare la cornetta e attendere il segnale acustico di linea libera. Segnale di chiamata Il volume della suoneria può essere impostato su alto o basso utilizzando Memorie Memorizzazione dei numeri di composizione rapida 1. Assicurarsi che l’interruttore alla base del telefono sia impostato 2. Sollevare il ricevitore e premere ) (ignorare il segnale acustico di linea libera). 3. Digitare il numero telefonico (fino a 16 cifre) utilizzando la tastiera. Premere 4. Selezionare la posizione di memoria premendo il pulsante corrispondente.
-
Página 16: Informazioni Tecniche
Qualora si riscontrino ulteriori difficoltà, contattare il punto d'acquisto. Garanzia Il presente prodotto è garantito per un periodo di 12 mesi a decorrere dalla data di acquisto. Qualora si riscontrino difficoltà, contattare il punto d’acquisto. Per avere diritto a qualsiasi servizio o assistenza durante il periodo di garanzia, è necessario presentare il relativo documento di acquisto. La presente garanzia non verrà applicata in caso di eventuali guasti dovuti a incidenti, infortuni o danni simili, penetrazione di liquidi, negligenza, uso anomalo o altre circostanze simili imputabili all’acquirente. Inoltre, la presente garanzia non verrà applicata in caso di eventuali guasti provocati da temporali o altre cause di sbalzi di tensione. Come misura precauzionale, si consiglia di scollegare il telefono durante i temporali. Dichiarazione di conformità Con la presente, Doro dichiara che il prodotto Doro PhoneEasy 331ph è conforme ai requisiti essenziali e alle altre norme applicabili contenute nelle Direttive R&TTE 1999/5/EC (Apparecchiature radio e apparecchiature terminali di comunicazione) e ROHS 2002/95/EC (Restrizioni d’uso delle sostanze pericolose). Una copia della dichiarazione del costruttore è disponibile al sito Internet www.doro.com/dofc... -
Página 17: Πραγματοποίηση Κλήσης
Ελληνικα All manuals and user guides at all-guides.com Λειτουργία Πραγματοποίηση κλήσης Κανονική κλήση 1. Σηκώστε το ακουστικό. 2. Εισάγετε τον επιθυμητό αριθμό. Λειτουργία επανάκλησης Αν κάποιος αριθμός ήταν κατειλημμένος ή για επανάκληση του τελευταίου εισαγόμενου αριθμού, σηκώστε το ακουστικό και πιέστε το πλήκτρο επανάκλησης... - Página 18 Ελληνικά All manuals and user guides at all-guides.com Ρυθμίσεις Σύνδεση 1. Συνδέστε το τηλεφωνικό καλώδιο στην επιτοίχια υποδοχή τηλεφωνικού δικτύου και στην υποδοχή με την ένδειξη που υπάρχει στο πίσω μέρος του τηλεφώνου. 2. Συνδέστε το σπιράλ καλώδιο στην υποδοχή του ακουστικού και στην υποδοχή...
-
Página 19: Τεχνικές Πληροφορίες
Ελληνικα All manuals and user guides at all-guides.com Τεχνικές πληροφορίες Υπάρχουν διάφοροι διακόπτες στη βάση του τηλεφώνου. Οι διακόπτες αυτοί ρυθμίζουν τεχνικές παραμέτρους. Χρόνος πλήκτρου Flash (100/300/600) 100 είναι η τυπική ρύθμιση για τις περισσότερες χώρες. 300 για Γαλλία/Πορτογαλία 600 Νέα Ζηλανδία Αντιμετώπιση προβλημάτων Βεβαιωθείτε... - Página 20 Português All manuals and user guides at all-guides.com Funcionamento Efectuar uma chamada Marcação normal 1. Levante o auscultador. 2. Marque o número desejado. Função de remarcação Se o número para o qual ligou estiver ocupado ou se desejar marcar o último número marcado, levante o auscultador e prima o botão de remarcação . Memórias O telefone possui 3 memórias de marcação rápida. Assim que um número tiver sido guardado numa posição de memória, é possível fazer chamadas para esse número premindo apenas um botão. Pode colocar uma imagem ou um símbolo debaixo da capa transparente de cada botão de marcação rápida para conseguir identificá-los mais facilmente. Marcar números de marcação rápida 1. Levante o auscultador e aguarde pelo sinal de existência de linha. 2. Seleccione a marcação rápida desejada premindo o botão correspondente.
-
Página 21: Configuração
Português All manuals and user guides at all-guides.com Configuração Ligação 1. Ligue o cabo da linha telefónica a uma tomada de rede telefónica na parede e à tomada que se encontra na parte posterior do telefone. 2. Ligue o cabo enrolado ao auscultador e à tomada indicada com na parte lateral do telefone. 3. Ouvirá um clique quando a ficha modular ficar encaixada correctamente. 4. Defina o tempo do botão de Flash para 300 (ver secção “Informação técnica”). -
Página 22: Informação Técnica
Português All manuals and user guides at all-guides.com Informação técnica O telefone possui vários interruptores na base. Estes interruptores regulam parâmetros técnicos. Tempo do botão de flash (100/300/600) O valor 100 é o adequado para a maior parte dos países. 300 para França/Portugal. 600 para a Nova Zelândia. Resolução de problemas Verifique que o cabo telefónico não está danificado e que está devidamente ligado. Desligue todos os outros equipamentos, tais como cabos de extensão e outros telefones. Se o problema ficar resolvido, isso significa que a anomalia provém de algum outro equipamento. - Página 23 Magyar All manuals and user guides at all-guides.com Használat Hívás kezdeményezése Normál tárcsázás 1. Vegye fel a kézibeszélőt. 2. Adja meg a kívánt számot. Újrahívás funkció Ha a hívott szám foglalt volt, vagy ha újra fel szeretné tárcsázni a legutóbb hívott számot, vegye fel a kézibeszélőt, és nyomja meg az Újrahívás gombot . Memória A telefon 3 gyorstárcsázási memóriával rendelkezik. Az egyes memóriahelyekre mentett számok tárcsázásához elegendő egyetlen gombot megnyomni. A gyorshívó gombok átlátszó borítása alá...
- Página 24 Magyar All manuals and user guides at all-guides.com Beállítások Csatlakoztatás 1. Csatlakoztassa a telefonzsinórt a fali telefonhálózati aljzatba és a telefon hátulján lévő aljzatba. 2. Csatlakoztassa a csavart kábelt a kézibeszélő aljzatába és a jelzésű aljzatba a telefon oldalán. 3. A moduláris csatlakozó helyes csatlakoztatása esetén kattanás hallható. 4. A hívásátadási időt (R gomb) állítsa „100” értékre (lásd a Műszaki tudnivalókat).
- Página 25 Magyar All manuals and user guides at all-guides.com Műszaki tudnivalók A készülék alján néhány kapcsoló található. Ezek a műszaki paraméterek beállítására szolgálnak. Hívásátadási idő (100/300/600) 100: standard beállítás a legtöbb ország számára 300: Franciaország, Portugália 600: Új-Zéland Hibaelhárítás Ellenőrizze, ép-e és megfelelően van-e csatlakoztatva a telefonzsinór. Csatolja le az egyéb berendezéseket, hosszabbítózsinórokat és további telefonokat. Ha ez megoldja a problémát, akkor azt a csatlakoztatott eszközök okozták. Próbálja a készüléket egy biztosan működő...
- Página 26 Česky All manuals and user guides at all-guides.com Používání telefonu Volání Normální volání 1. Zvedněte sluchátko. 2. Zadejte požadované číslo. Funkce opětovného vytočení Pokud bylo číslo obsazené, nebo chcete znovu vytočit poslední zadané číslo, zvedněte sluchátko a stiskněte tlačítko opětovného vytočení Paměti Telefon má...
- Página 27 Česky All manuals and user guides at all-guides.com Nastavení Zapojení 1. Zapojte telefonní kabel do zásuvky na zdi a do zdířky na zadní straně telefonu. 2. Připojte kroucenou telefonní šňůru do sluchátka a do zdířky označené na boku telefonu. 3. Po správném zapojení modulárního konektoru se ozve cvaknutí. 4. Nastavte správnou dobu prodlevy (tlačítko Flash) na 100 (viz Technické údaje).
-
Página 28: Technické Informace
Dále se tato záruka nevztahuje na závady způsobené bouřkou či jinými výkyvy napětí v elektrické síti. Jako předběžné opatření doporučujeme přístroj během bouřky odpojit. Na baterie se žádná záruka nevztahuje. Použitím jiných než originálních baterií DORO pozbývá tato záruka platnost. -
Página 29: Nawiązywanie Połączenia
Polski All manuals and user guides at all-guides.com Obsługa Nawiązywanie połączenia Normalne wybieranie 1. Podnieś słuchawkę. 2. Wprowadź numer. Ponowne wybieranie Jeśli numer był zajęty lub jeśli chcesz ponownie wybrać ostatnio wybierany numer, podnieś słuchawkę i naciśnij przycisk ponownego wybierania . Przyciski szybkiego wybierania W pamięci telefonu można zapisać... - Página 30 Polski All manuals and user guides at all-guides.com Ustawienia Podłączanie 1. Podłącz przewód telefoniczny do sieciowego gniazdka ściennego oraz do gniazdka w tylnej części telefonu. 2. Podłącz przewód spiralny do słuchawki i gniazdka oznaczonego symbolem z boku telefonu. 3. Po poprawnym włożeniu wtyczki modularnej do gniazdka powinno być...
-
Página 31: Informacje Techniczne
Polski All manuals and user guides at all-guides.com Informacje techniczne Na spodzie telefonu jest kilka przełączników. Przełączniki służą do ustawiania parametrów technicznych. Przycisk czasu Flash (100/300/600) 100 jest ustawieniem standardowym dla większości krajów. 300 dla Francji/Portugalii. 600 dla Nowej Zelandii. Rozwiązywanie problemów Sprawdź, czy przewód telefoniczny nie jest uszkodzony i czy jest prawidłowo podłączony. -
Página 32: Karta Gwarancyjna
Polski All manuals and user guides at all-guides.com KARTA GWARANCYJNA W wypadku pytań związanych z obsługą urządzenia, pomoc dostępna jest poprzez: www.tmdistribution.pl, pomoc@tmdistribution.pl, infolinia 0-801-674-888. DEFINICJE Gwarant: TM Distribution Sp. z o.o., ul. Lutniana 39, 71-425 Szczecin, tel. (0-91) 431-11-50, fax. (0-91) 431-11-66. NUMER INFOLINII: Numer telefoniczny służący do bezpośredniego kontaktu, uzyskania informacji dotyczących pomocy technicznej. W wypadku zmiany numeru, aktualny numer jest dostępny na stronie internetowej www.tmdistribution.pl AUTORYZOWANY ZAKŁAD SERWISOWY: Firma świadcząca usługi serwisowe na zlecenie Gwaranta. Aktualne informacje dotyczące lokalizacji Autoryzowanych Zakładów Serwisowych są dostępne pod numerem Infolinii i na stronie internetowej www.tmdistribution.pl SERWIS CENTRALNY: Firma świadcząca usługi serwisowe na zlecenie Gwaranta. Aktualne informacje dotyczące lokalizacji Serwisu Centralnego dostępne są pod numerem Infolinii i na stronie internetowej www.tmdistribution.pl SPRZEDAWCA: Firma handlowa lub punkt handlowy, w którym dokonany został zakup produktu objętego niniejszą gwarancją. - Página 33 Polski All manuals and user guides at all-guides.com POSTANOWIENIA OGÓLNE 1. TM Distribution Sp. z o.o. gwarantuje sprawne działanie produktu, zgodnie z warunkami techniczno-eksploatacyjnymi opisanymi w instrukcji obsługi. Niniejsza gwarancja dotyczy produktów dystrybuowanych przez firmę TM Distribution Sp. z o.o., sprzedawanych na terenie Polski. 2. Gwarant zapewnia serwis w Autoryzowanych Zakładach Serwisowych lub ich pośrednictwo w przekazaniu sprzętu do naprawy w Serwisie Centralnym. 3. Serwis gwarancyjny będzie świadczony jedynie po przedstawieniu w Autoryzowanym Zakładzie Serwisowym niniejszej Karty Gwarancyjnej wraz z oryginałem dowodu zakupu (paragon, rachunek, faktura VAT). 4. Gwarancja przewiduje bezpłatne części zamienne oraz robociznę w okresie 12 miesięcy od daty zakupu produktu, zgodnie z warunkami podanymi poniżej. W zakres gwarancji nie wchodzą odpłatne konserwacje sprzętu np. czyszczenie klawiatury itp. Gwarancja nie obejmuje naturalnego zużycia elementów. 5. Niniejsza gwarancja obejmuje jedynie produkty i nie stosuje się do zasilaczy prądu zmiennego, akumulatorów, zespołów do ładowania, żarówek, obudów i innego wyposażenia dodatkowego. 6. Obowiązkiem kupującego jest: a) dopilnowanie, aby Karta Gwarancyjna była właściwie wypełniona, podpisana i opatrzona datą sprzedaży oraz pieczęcią sklepu także na odcinkach gwarancyjnych. W...
-
Página 34: Warunki Gwarancji
Polski All manuals and user guides at all-guides.com WARUNKI GWARANCJI 10. Niniejszą gwarancją objęte są usterki produktu spowodowane wadliwymi podzespołami i/lub defektami produkcyjnymi. 11. Niniejszą gwarancję stosuje się do produktów przedstawionych przez Klienta w Autoryzowanym Zakładzie Serwisowym łącznie z: a) poprawnie wypełnioną Kartą Gwarancyjną, b) oryginalnym dowodem opatrzonym datą zakupu taką samą jak w Karcie Gwarancyjnej. 12. Gwarancja przewiduje bezpłatne części zamienne oraz robociznę w okresie 12 miesięcy od daty zakupu, okres ten nie jest przedłużany lub odnawiany, także w wypadku wymiany produktu na nowy na zasadach określonych w niniejszej gwarancji. 13. Produkt musi być dostarczony bezpośrednio do najbliższego Autoryzowanego Zakładu Serwisowego lub Sprzedawcy wraz z poprawnie wypełnioną Kartą Gwarancyjną i oryginalnym dowodem zakupu lub przesłany do Serwisu Centralnego. Informacja o sposobie wysyłki sprzętu, rodzaju przewoźnika jest dostępna pod numerem Infolinii. Przesyłki realizowane w inny niż wskazany sposób, nie będą odbierane. 14. W przypadku wysyłki do Serwisu Centralnego, wraz z produktem należy przesłać: a) szczegółowy opis problemu technicznego, b) kartę gwarancyjną, c) kopię oryginału dowodu zakupu. - Página 35 Polski All manuals and user guides at all-guides.com 20. Gwarancją nie są objęte: a) wypadki zaistniałe podczas transportu i przeładunku oraz wywołane tym uszkodzenia, b) wadliwe działanie lub uszkodzenie spowodowane niewłaściwym użytkowaniem, niedbałością Klienta lub stosowaniem produktu niezgodnie z zaleceniami instrukcji obsługi, przeznaczeniem lub przepisami bezpieczeństwa, c) mechaniczne uszkodzenia produktu i wywołane nim wady, d) wadliwe działanie lub uszkodzenie wynikłe na skutek pożaru, powodzi, zjawisk atmosferycznych (np. uderzenia pioruna), nieprzewidzianych wypadków, korozji, rdzy, plam, zalania, przepięć w sieci energetycznej lub telefonicznej, e) produkty, w których osoby inne niż Autoryzowany Zakład Serwisowy (w tym Klient) naruszyły plombę gwarancyjną lub w jakikolwiek inny sposób przeprowadziły przeróbki, zmiany, dostrojenia lub naprawy, f) produkty, w których Kartę Gwarancyjną lub numery seryjne w jakikolwiek sposób zmieniono, zamazano lub zatarto. 21. Urządzenie traci gwarancję w przypadku stwierdzenia przez Autoryzowany Zakład Serwisowy, że uszkodzenie nastąpiło na skutek zjawiska atmosferycznego lub przepięcia w linii telefonicznej lub zasilającej sieci energetycznej. 22. Decyzja Serwisu Centralnego odnośnie zasadności zgłaszanych usterek jest decyzją ostateczną.
- Página 36 Polski All manuals and user guides at all-guides.com Uwagi dotyczące bezpiecznego użytkowania ● Zapoznać się dokładnie z instrukcją obsługi. ● Przed przystąpieniem do czyszczenia urządzenia odłączyć przewody zasilające, liniowe, sieciowe itp. Urządzenie należy czyścić miekką, suchą szmatką. Nie kierować środków czyszczących bezpośrednio na obudowę. ● Nie wystawiać urządzenia na działanie deszczu lub jakiejkolwiek wilgoci. ● Urządzenie ustawić na płaskiej stabilnej powierzchni lub prawidłowo zawiesić na ścianie, jeśli informują o tym wskazówki zamieszczone w instrukcji. ● Nie używać urządzenia w czasie burzy lub w pobliżu miejsca wydobywania się gazu. ● Jeśli obudowa urządzenia zawiera otwory wentylacyjne, należy sprawdzić, czy są odsłonięte. ● Kable zasilające, liniowe, sieciowe itp. nie mogą być narażone na nadepnięcie, potrącenie. ● Urządzenie nie może być ustawione w pobliżu źródeł ciepła - grzejnika, pieca, kominka itp. ● Nie przekłuwać obudowy, może to spowodować uszkodzenia w obwodach elektrycznych.
- Página 37 Polski All manuals and user guides at all-guides.com Prawidłowe usuwanie zużytego sprzętu elektrycznego i elektronicznego Symbol przekreślonego pojemnika na śmieci umieszczony na produkcie lub na opakowaniu oznacza, że tego produktu nie należy po upływie okresu użytkowania usuwać wraz z innymi odpadami pochodzącymi z gospodarstw domowych. Celem uniknięcia szkodliwego wpływu niekontrolowanego usuwania odpadów na środowisko naturalne i zdrowie ludzi, prosimy o oddzielenie produktu od innego typu odpadów. Ten sposób postępowania, będący stałą praktyką, umożliwi zbieranie, przetwarzanie, odzysk, w tym recykling, i unieszkodliwianie zużytego sprzętu elektrycznego i elektronicznego. W celu uzyskania informacji na temat bezpiecznego dla środowiska postępowania ze zużytym sprzętem, użytkownicy w gospodarstwach domowych powinni skontaktować się z punktem sprzedaży detalicznej, w którym dokonali zakupu produktu lub z organem władz lokalnych. ���������������������� Użytkownicy w firmach powinni skontaktować się ze swoim dostawcą i sprawdzić warunki umowy zakupu. Zużytego produktu nie należy ��������������������� usuwać razem z innymi odpadami. ������ �������������� ��������� �� ���������...
- Página 38 Polski All manuals and user guides at all-guides.com Numer fabryczny......KARTA GWARANCYNJA DORO Data sprzedaży......pieczątka sklepu Model: PhoneEasy 331ph podpis sprzedawcy...
- Página 39 All manuals and user guides at all-guides.com...
- Página 40 All manuals and user guides at all-guides.com English French Spanish Italian Greek Portuguese Hungarian Czech Polish Version 1.0...