Publicidad
Idiomas disponibles
Idiomas disponibles
Enlaces rápidos
R
Provide Structural
Pivot
Ceiling Support
Jamb
Wall
Jamb
Side
Panel
Receptor
Curb
Center line
#8 x 1 1/2"
Flathead Screw
Receptor
Curb
Wall
Jamb
Deflector
A
1012414 2
Pivot
Jamb
Wall
Jamb
Wall
Jamb
Strike
Seal
Side
Door
Panel
Receptor
32 7/8"
(83.5cm)
Fig. #1
Base
Center hole
Fig. #2
Strike
Seal
Wall
Jamb
Fig. #3
End Cap
Fig. #4
Español, Página 5
Français, Page 9
All information in these instructions is based on the latest
product information available at the time of publication. Kohler
Co.
reserves
the
right
characteristics, packaging or availability at any time without
notice.
MATERIALS REQUIRED:
S #2 Phillips screwdriver
S Level
S Drill (1/8" and 5/16" drill bit)
S Hacksaw
S Tape measure
S Clear silicone sealant
S (2) 9/16" open end wrenches
S Center punch
S Razor knife
S Masking tape
S Glass cleaner
S Safety glasses and shoes
NOTE: REFER TO Fig. #1 TO DETERMINE WHICH SIDE THE
DOOR SHOULD PIVOT ON. THE PIVOT SHOULD
ALWAYS BE OPPOSITE THE SHOWER HEAD.
NOTE: STRUCTURAL CEILING SUPPORT MUST BE
PROVIDED FOR THE PIVOT JAMB AS SHOWN IN
Fig. #1.
1. Install shower receptor according to packed instructions.
Finished wall material should be installed at this time. The
finished walls must be plumb to within 1/8" (3mm) from the
receptor to the top of the wall jambs.
2. Refer to Fig. #2. Place a piece of masking tape along the center
of the receptor curb where the door will pivot. Measure and mark
a location 32-7/8" (83.5cm) from the wall along the center line.
Place the 90 base on the receptor curb so that the marked
location is centered in the center hole of the base and the line is
centered in the base slot.
3. Mark the screw hole locations with a pencil. Remove the base. Drill
clearance holes into the receptor with a 1/8" drill. Remove the tape
from the receptor. Mount the 90 base to the receptor as shown
in Fig. #2 using two #8 x 1-1/2" flathead screws.
4. Mount the bottom end caps to the wall jambs using two #6 x 3/4"
flathead screws. Refer to Fig. #3. Position wall jambs against the
wall and in line with the slots in the 90_ base. Mark screw locations
on the wall and drill holes using a 1/8" drill. Slide the strike seal into
the wall jamb on the door side of the receptor. If necessary trim the
strike seal so it is flush with the top of the wall jamb. Install wall
jambs using four #8 x 1-1/2" flathead screws. Assemble deflector
to wall jamb using a #8 x 1-1/2" flathead screw, as shown in
Fig. #4.
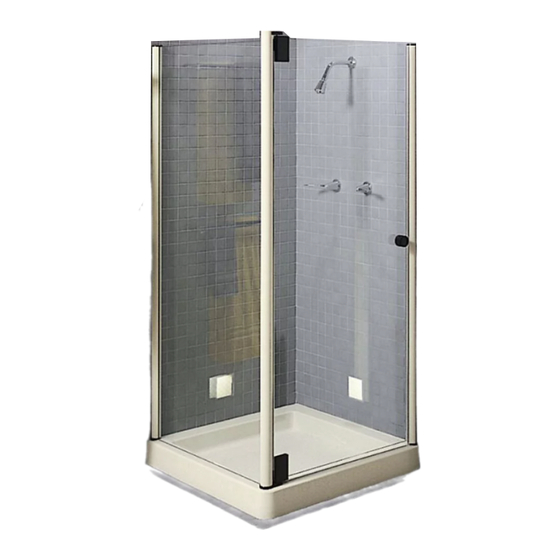
PROFILEt
SHOWER DOOR
36" (91.4cm)
K 9856
to
make changes in product
Publicidad

Manuales relacionados para Kohler PROFILE K-9856


Resumen de contenidos para Kohler PROFILE K-9856
- Página 1 PROFILEt SHOWER DOOR 36" (91.4cm) K 9856 All information in these instructions is based on the latest product information available at the time of publication. Kohler reserves right make changes in product characteristics, packaging or availability at any time without notice.
- Página 2 NOTE: Drill through the strike seal with a 5/16” bit to provide Ceiling clearance holes for fastening the wall jamb. Vinyl Mount Glazing Filler Seal Strip NOTE: For tiled-in installations, it may be necessary to use plastic wall anchors to mount wall jambs. Ceiling 5.
- Página 3 13. Mount the hinges to the door using the front and back of hinge, hinge gaskets, and two 1/4” - 20 x 5/8” flathead hex socket screws, as Hinge Plate shown in Fig. #13. Be sure that the hinges are square with the Hinge Gaskets edge of the glass.
- Página 4 CONSUMER RESPONSIBILITIES Your Kohler Shower Door will remain beautiful if you take care of it. Water conditions in various parts of the country will determine any It is recommended that you replace seals, when they show signs extra cleaning attention you may have to give your new shower of wear, yellowing, or are not watertight.
- Página 5 Toda la información contenida en las instrucciones está basada en la información más reciente disponible al momento de su publicación. Kohler Co. se reserva el derecho de efectuar cambios en las características del producto, empaque o disponibilidad en cualquier momento, sin previo aviso.
- Página 6 NOTA: Perfore a través del sello de contacto, con una broca Pieza de montaje de 5/16” para sujetar la jamba mural. Tira de del techo relleno Sello de vinilo vidriado NOTA: Para instalaciones con azulejos, puede ser necesario emplear sujetadores murales plásticos para montar Perno de las jambas murales.
- Página 7 13. Monte las bisagras a la puerta, asegurando el frente y el dorso de la bisagra con empaques y dos tornillos de cabeza hexagonal de Placa de bisagra 1/4” - 20 x 5/8”, como se ilustra en la Fig. #13. Verifique que las Empaques de bisagras estén cuadradas con el borde del vidrio.
-
Página 8: Garantía Limitada De Un Año
Para obtener el servicio de garantía, comuníquese con Kohler Adicionalmente, es posible que usted cuente con derechos Co. o con Kohler Ltd. a través de su comerciante o contratista que varían de estado en estado y provincia en provincia. de plomería, escribiendo a la dirección contenida abajo, o Esta garantía le otorga ciertos derechos legales específicos... - Página 9 DE 36 po (91,4cm) D'INSTALLATION K 9856 Tous les renseignements contenus dans ces instructions proviennent des plus récentes données disponibles sur les produits au moment d'aller sous presse. La société Kohler se réserve droit d'apporter modifications caractéristiques, conditionnement et disponibilité des produits Prévoir du...
- Página 10 REMARQUE : Percer les trous pour assujettir le montant de Monture de mur, à travers le joint de fermeture, à l’aide d’une plafond Joint mèche de 5/16 po. Fausse vitrifié tapée en vinyle REMARQUE : Pour des installations avec des carreaux, il peut être nécessaire d’utiliser des dispositifs d’ancrage Tige de monture de...
- Página 11 13. Assembler les charnières à la porte avec des joints de charnière et Plaque de charnière deux vis à tête plate de 1/4 po - 20 x 5/8 po, tel qu’illustré à la Fig. #13. S’assurer que les charnières soient de niveau et à Joints de charnière l’équerre avec les bords de la vitre.
- Página 12 RESPONSABILITÉS DU CONSOMMATEUR Votre porte de douche Kohler conservera toute sa beauté si l’on y Selon la qualité de l’eau dans les diverses régions du pays, il faudra apporte les soins nécessaires. Il est conseillé de remplacer les peut-être prendre des précautions supplémentaires pour le joints étanches lorsqu’ils affichent des signes d’usure, de...