Tabla de contenido
Publicidad
Idiomas disponibles
Idiomas disponibles
Enlaces rápidos
SYNERGY PRO MAGNETIC INDOOR
English, Page 9~18
Español, Page 19~30
Français, Page 31~42
Deutsch, Seite 43~53
CYCLING BIKE
USER MANUAL
IMPORTANT! Please retain owner's manual for maintenance and adjustment instructions. Your satisfaction is
very
important
to
us,
support@sunnyhealthfitness.com or 1- 877 - 90SUNNY (877-907- 8669).
¡IMPORTANTE! Conserve el manual del propietario para las instrucciones de mantenimiento y ajuste. Su
satisfacción es muy importante para nosotros, NO DEVUELVA HASTA HABERNOS CONTACTADO:
support@sunnyhealthfitness.com ó 1- 877 - 90SUNNY (877-907-8669).
IMPORTANT! Veuillez conserver le manuel du propriétaire pour les instructions de réglage et d'entretien. Votre
satisfaction est très importante pour nous, VEUILLEZ NE PAS EFFECTUER DE RETOUR AVANT DE NOUS
AVOIR CONTACTÉ: support@sunnyhealthfitness.com ou 1- 877 – 90SUNNY (877-907-8669).
WICHTIG! Bitte bewahren Sie das Benutzerhandbuch für Wartungs- und Einstellanweisungen auf. Ihre
Zufriedenheit ist besonders wichtig für uns, BITTE SCHICKEN SIE DAS PRODUKT NICHT ZURÜCK, BEVOR
SIE SICH MIT UNS IN VERBINDUNG GESETZT HABEN: support@sunnyhealthfitness.com oder 1- 877 -
90SUNNY (877-907- 8669).
SF-B1851
PLEASE
DO
NOT
RETURN
UNTIL
YOU
HAVE
CONTACTED
US:
Publicidad
Tabla de contenido

Manuales relacionados para Sunny SF-B1851


Resumen de contenidos para Sunny SF-B1851
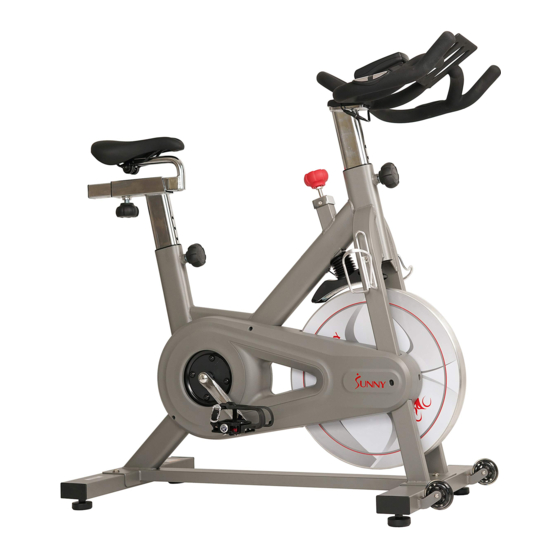
- Página 1 SYNERGY PRO MAGNETIC INDOOR CYCLING BIKE SF-B1851 USER MANUAL English, Page 9~18 IMPORTANT! Please retain owner’s manual for maintenance and adjustment instructions. Your satisfaction is very important PLEASE RETURN UNTIL HAVE CONTACTED support@sunnyhealthfitness.com or 1- 877 - 90SUNNY (877-907- 8669).
- Página 2 IMPORTANT SAFETY INFORMATION We thank you for choosing our product. To ensure your safety and health, please use this equipment correctly. It is important to read this entire manual before assembling and using the equipment. Safe and effective use can only be achieved if the equipment is assembled, maintained, and used properly.
-
Página 3: Informations De Sécurité Importantes
INFORMATIONS DE SÉCURITÉ IMPORTANTES Nous vous remercions d’avoir choisi notre produit. Pour votre santé et votre sécurité, veuillez utiliser correctement cet appareil. Il est important de lire entièrement le présent manuel avant d’assembler l’appareil et de l’utiliser. L’utilisation sûre et efficace n’est possible que si l’appareil est correctement assemblé, entretenu et utilisé. -
Página 4: Exploded Diagram
EXPLODED DIAGRAM... -
Página 5: Hardware Package
HARDWARE PACKAGE #74 Φ10.5*Φ20*2.0 4PCS #74 φ10.5*φ20*2.0 4PCS #79 M10*25*S6 4PCS #79 M10*25*S6 4PCS #90 Φ10.5*Φ20*2.0 2PCS #90 φ *φ20*2.0 2PCS 1 0.5 #91 M10*25*S6 2PCS #91 M10*25*S6 2PCS #70 M5*10 4PCS #70 M5*10 4PCS #95 S6 1PC #95 S6 1PC #94 S13-S14-S15 1PC #94 S13-S14-S15 1PC #96 S17-S19 1PC... -
Página 6: Parts List
PARTS LIST Description Spec. Qty. Description Spec. Qty. Main Frame Computer Seat Post Computer Wire A Idler Wheel Shaft Computer Wire B Handlebar Post Magnet Front Stabilizer Sensor Wire 800mm Rear Stabilizer Handle Pulse Sensor Brake Cover Handle Pulse Wire Seat Slider Inductor Seat Handlebar... -
Página 7: Lista De Piezas
LISTA DE PIEZAS n.° Descripción Especificacione Cant. n.° Descripción Especificacione Cant. Estructura Principal Computadora Barral del Asiento Cable de la Computadora A Eje de Rueda de Transmisión Cable de la Computadora B Barral del Manubrio Imán Estabilizador Delantero Cable del Sensor 800 mm Estabilizador Trasero Sensor de Pulso del Manubrio... -
Página 8: Liste Des Éléments
LISTE DES ÉLÉMENTS Nº Description Spécification Qté. Nº Description Spécification Qté. Cadre Principal Ordinateur Tige de Selle Câble Ordinateur A Arbre de la Roue Libre Câble Ordinateur B Tige de Guidon Aimant Stabilisateur Avant Câble de Capteur 800 mm Stabilisateur Arrière Capteur de Pouls de Poignée Couvercle du Frein Câble du Capteur de Pouls... - Página 9 TEILELISTE Bezeichnung Spezif. Menge. Bezeichnung Spezif. Menge. Hauptrahmen Computer Sattelstütze Computerkabel A Leitradwelle Computerkabel B Lenkerstütze Magnet Stabilisator Vorne Sensordraht 800mm Stabilisator Hinten Griffimpuls-Sensor Bremsabdeckung Griffimpulskabel Sattelschlitten Induktorsitz Lenkstange Schraube M5*15 Selbstschneidende Magnetklammer ST4,2*15 Schraube Stützstab Schraube M5*10 Verbindungsplatte Sechskantschraube M5*10 Riemenrad Sechskantschraube...
- Página 10 ASSEMBLY INSTRUCTIONS We value your experience using Sunny Health and Fitness products. For assistance with parts or troubleshooting, please contact us at support@sunnyhealthfitness.com or 1-877-90SUNNY (877- 907-8669). STEP 1: #75 M10*15*S6 4PCS #90φ10.5*φ20*2.0 4PCS Unscrew 4 Hex Socket Head Bolts (No. 75) from Main Frame (No.
- Página 11 We value your experience using Sunny Health and Fitness products. For assistance with parts or troubleshooting, please contact us at support@sunnyhealthfitness.com or 1-877-90SUNNY (877- 907-8669). STEP 3: #91 M10*25*S6 2PCS #90 φ10.5*φ20*2.0 2PCS Loosen and pull out Adjustment Knob (No.
- Página 12 We value your experience using Sunny Health and Fitness products. For assistance with parts or troubleshooting, please contact us at support@sunnyhealthfitness.com or 1-877-90SUNNY (877- 907-8669). STEP 5: #84L 9/16 1PC WARNING! Read instructions carefully as #94 S13-S14-S15 improper assembly may cause permanent #84R 9/16 1PC damage to your bike.
-
Página 13: Battery Installation And Replacement
BATTERY INSTALLATION AND REPLACEMENT Battery Battery Cover BATTERY INSTALLATION: 1. Take out 2 AAA batteries from the manual’s plastic bag. 2. Press the buckle of battery cover on the back of the Computer (No. 50), then remove battery cover. 3. Install 2 AAA batteries into the battery case on the back of the Computer (No. 50). Pay attention to the battery + and –... - Página 14 ADJUSTMENTS AND USAGE GUIDE ADJUSTING THE HEIGHT AND BALANCE In order to achieve a smooth and comfortable ride, you must ensure that the stability of the bike is secured. If you notice that the bike is unbalanced during use, adjust the Adjustment Foot Pads (No.
-
Página 15: Adjusting The Handlebar
ADJUSTING THE HANDLEBAR It is important that the handlebar and seat are both set to the correct height to your body. To adjust the handlebar height, loosen and pull the Adjustment Knob (No. 22) outward, then slide the Handlebar (No. 9) up or down to the desired height. - Página 16 SPD TECHNICAL SERVICE INSTRUCTIONS Caution! Before use, read these instructions carefully. Practice engaging and disengaging from the pedals several times in a stationary position before riding. Before using, lubricate the concave area of the clip. Keep the cleat and pedal clean to ensure proper usage. ...
- Página 17 EXERCISE COMPUTER FUNCTION BUTTONS MODE: Press to select the function displayed or enter value during setting mode. Press and hold for 2 seconds to enter the RACE MODE interface during stop mode. SET: To set up the target value of TARGET, TIME, DIST, CAL. Press the button and hold for 2 seconds to speed up the increment during stop mode.
- Página 18 1. TARGET: the preset CADENCE. 2. In STOP mode, press SET key to enter the TARGET setting. Press SET to increase the CADENCE five at a time. The setting change is 15 →20→ ……110→115→120→15→20→……→115 →120→15→20→ …… 3. The setting range of 15 -120 (Preset value is 60 CADENCES which equals six bars). 4.
-
Página 19: Maintenance Instructions
MAINTENANCE INSTRUCTIONS This is general information for daily, weekly and monthly maintenance to be performed on your bike. DAILY MAINTENANCE MONTHLY MAINTENANCE After each exercise session, wipe down all the 1. Check if all hardware is secure, such as: equipment: seat, frame, and handlebars. Pay water bottle holder, flywheel nuts, belt/chain special attention to the seat post, handlebar guard bolts, brake caliper lock nuts, and... -
Página 20: Instrucciones De Armado
INSTRUCCIONES DE ARMADO Valoramos su experiencia con los productos de Sunny Health and Fitness. Para obtener ayuda con piezas resolución problemas, escríbanos dirección correo support@sunnyhealthfitness.com o llámenos al 1-877-90SUNNY (877-907-8669). PASO 1: #75 M10*15*S6 4PCS #90φ10.5*φ20*2.0 4PCS Desatornille 4 Pernos de Cabeza Hueca Hexagonal (n.°... - Página 21 Valoramos su experiencia con los productos de Sunny Health and Fitness. Para obtener ayuda con piezas resolución problemas, escríbanos dirección correo support@sunnyhealthfitness.com o llámenos al 1-877-90SUNNY (877-907-8669). PASO 3: #91 M10*25*S6 2PCS #90 φ10.5*φ20*2.0 2PCS Afloje y extraiga la Perilla de Ajuste ( n.° 22), inserte el Barral del Manubrio ( n.°...
-
Página 22: ( N.° 84R) Hacia La Izquierda Al Mismo
Valoramos su experiencia con los productos de Sunny Health and Fitness. Para obtener ayuda con piezas resolución problemas, escríbanos dirección correo support@sunnyhealthfitness.com o llámenos al 1-877-90SUNNY (877-907-8669). PASO 5: #84L 9/16 1PC ¡ADVERTENCIA! atentamente #94 S13-S14-S15 instrucciones, ya que el armado incorrecto podría ocasionar daños permanentes a su bicicleta. -
Página 23: Instalación Y Reemplazo De Las Pilas
INSTALACIÓN Y REEMPLAZO DE LAS PILAS Battery Pila Battery Tapa de las Pilas Cover INSTALACIÓN DE LAS PILAS: 1. Saque las 2 pilas AAA de la bolsa de plástico del manual. 2. Presione el broche de la cubierta de las pilas en la parte posterior de la Computadora (n.° 50), luego, retire la cubierta de las pilas. -
Página 24: Ajuste De Altura Y Equilibrio
AJUSTES Y GUÍA DE USO AJUSTE DE ALTURA Y EQUILIBRIO Con el fin de lograr un uso suave y cómodo, debe garantizar que la estabilidad de la bicicleta sea segura. nota bicicleta está desequilibrada durante uso, ajuste Almohadillas de Ajuste de Apoyo (n.° 37), ubicada debajo de los Estabilizadores Delantero y Trasero (n.°... -
Página 25: Ajuste Del Asiento
AJUSTE DEL ASIENTO El asiento de esta bicicleta es totalmente ajustable, ya que se mueve Up (Hacia arriba), Down (Hacia abajo), Fore (Hacia adelante), Aft (Hacia atrás). Para ajustar la altura del Barral del Asiento (n.° 2), afloje y tire de la Perilla de Ajuste (n.° 22) hacia afuera, luego suba o baje el asiento a la altura deseada. -
Página 26: Traslado De La Bicicleta
TRASLADO DE LA BICICLETA Para trasladar la bicicleta, primero asegúrese de que el Manubrio (n.° 9) esté fijado correctamente. Si el manubrio está flojo, apriete la Perilla de Ajuste (n.° 22) para asegurarlo. A continuación, párese delante de la bicicleta de modo que se encuentre en frente del manubrio. -
Página 27: Ajuste De La Tensión Del Resorte De La Unión
INSTRUCCIONES DE SERVICIO TÉCNICO SPD ¡PRECAUCIÓN! Antes de usar, lea atentamente estas instrucciones. Practique engancharse y desengancharse de los pedales varias veces en una posición estacionaria antes de conducir. Antes de usar, lubrique la zona cóncava del clip. ... -
Página 28: Computadora De Ejercicios
COMPUTADORA DE EJERCICIOS BOTONES DE FUNCIÓN MODE (MODO): Presione para seleccionar la función mostrada o durante el modo de configuración. Mantenga presionado por 2 segundos para ingresar a la interfaz de RACE MODE (MODO CARRERA) durante el modo STOP (PARADA). SET (CONFIGURACIÓN): Para configurar el valor objetivo de TARGET (OBJETIVO), TIME (TIEMPO), DIST (DISTANCIA), CAL (CALORÍAS). -
Página 29: Set Target Values (Configurar Valores Objetivo)
SET TARGET VALUES (CONFIGURAR VALORES OBJETIVO): 1. Presione SET (CONFIGURACIÓN) para seleccionar un valor objetivo. CADENCE(CADENCIA) comenzará a parpadear. 2. Mantenga pulsado SET (CONFIGURACIÓN) y el valor aumentará continuamente. 3. Presione MODE (MODO) para ingresar un valor. 4. TIME (TIEMPO) parpadeará. 5. - Página 30 RACE MODE (MODO CARRERA): Mantenga presionado MODE (MODO) durante 2 segundos para ingresar al modo RACE (CARRERA). En RACE MODE (MODO CARRERA), solo se pueden configurar TIME (TIEMPO) y DIST (DISTANCIA). Valores predeterminados para 10 minutos/4 (KM o millas). El total es de 10 barras. PULSE (PULSO): Para medir el pulso, presione MODE (MODO) hasta que la computadora esté...
-
Página 31: Instrucciones De Mantenimiento
INSTRUCCIONES DE MANTENIMIENTO Esta es información general para realizar el mantenimiento diario, semanal y mensual en su bicicleta. MANTENIMIENTO DIARIO MANTENIMIENTO MENSUAL Después de cada sesión de ejercicio, limpie todo el 1. Verifique que todas las herramientas estén equipo: asiento, estructura y manubrio. Preste seguras, como: soporte de botella, tuercas del especial atención al barral del asiento, al barral del volante, pernos de protección de la cinta/cadena,... -
Página 32: Instructions D'ASsemblage
INSTRUCTIONS D’ASSEMBLAGE Votre expérience d’utilisation des produits Sunny Health and Fitness compte pour nous. Pour obtenir l’aide avec les pièces et le dépannage, veuillez nous contacter à l’adresse: support@sunnyhealthfitness.com ou au 1-877-90SUNNY (877-907-8669). ÉTAPE 1: #75 M10*15*S6 4PCS #90φ10.5*φ20*2.0 4PCS Dévisser... - Página 33 Votre expérience d’utilisation des produits Sunny Health and Fitness compte pour nous. Pour obtenir l’aide avec les pièces et le dépannage, veuillez nous contacter à l’adresse: support@sunnyhealthfitness.com ou au 1-877-90SUNNY (877-907-8669). ÉTAPE 3: #91 M10*25*S6 2PCS #90 φ10.5*φ20*2.0 2PCS Desserrer et retirer le Bouton de Réglage (Nº...
- Página 34 Votre expérience d’utilisation des produits Sunny Health and Fitness compte pour nous. Pour obtenir l’aide avec les pièces et le dépannage, veuillez nous contacter à l’adresse: support@sunnyhealthfitness.com ou au 1-877-90SUNNY (877-907-8669). ÉTAPE 5: #84L 9/16 1PC ATTENTION! Lire attentivement les instructions, #94 S13-S14-S15 car un assemblage incorrect peut entraîner des...
-
Página 35: Installation Et Remplacement Des Piles
INSTALLATION ET REMPLACEMENT DES PILES Battery Piles Battery Couvercle de la Batterie Cover INSTALLATION DES PILES: 1. Sortir 2 piles AAA du sac en plastique du manuel. 2. Appuyer sur le fermoir du couvercle du compartiment à piles situé à l’arrière de l’Ordinateur (Nº 50) et retirer le couvercle. -
Página 36: Réglage De La Résistance
RÉGLAGES ET GUIDE D’UTILISATION RÉGLAGE HAUTEUR L’ÉQUILIBRE Pour une séance fluide et confortable, veiller à ce que le vélo soit bien stable. Si vous remarquez un déséquilibre lors de l’utilisation du vélo, ajustez le Pédales de Réglable (Nº 37) situé sous les Stabilisateurs Avant et Arrière (Nº... -
Página 37: Réglage De La Selle
RÉGLAGE DE LA SELLE La selle de ce vélo est entièrement réglable, dans les sens Up (haut), Down (bas), Fore (avant), Aft (arrière). Pour régler la hauteur de la Tige de Selle (Nº 2), desserrer le Bouton de Réglage (Nº 22) et le tirer vers l’extérieur, puis élever ou abaisser la selle au niveau souhaité. - Página 38 TRANSPORT DU VÉLO Pour déplacer le vélo, vérifier d’abord que le Guidon (Nº 9) est bien fixé. Si le guidon est lâche, resserrer le Bouton de Réglage (Nº 22) pour bien le fixer. Se tenir ensuite devant le vélo, directement en face du guidon. Saisir fermement chaque côté...
- Página 39 INSTRUCTIONS DU SERVICE TECHNIQUE DE SPD Attention! Avant toute utilisation, lisez attentivement ces instructions. Entraînez-vous à mettre les pieds dans les pédales et à les retirer plusieurs fois à l’arrêt avant de commencer à pédaler. Avant utilisation, lubrifiez la zone concave de la courroie. ...
- Página 40 ORDINATEUR D’EXERCICE TOUCHES DE FONCTION MODE: Appuyer pour sélectionner la fonction affichée ou pendant le mode de réglage. Appuyer sur cette touche pendant 2 secondes pour accéder à l’interface RACE MODE (MODE COURSE) quand le vélo est à l’arrêt. SET (RÉGLER): Définir la valeur cible de la TARGET (CIBLE), de la TIME (DURÉE), de la DISTANCE et des CALORIES.
- Página 41 RÉGLAGE DES VALEURS CIBLES: 1. Appuyer sur SET (RÉGLER) pour sélectionner une valeur cible. CADENCE (TR/MIN) se met à clignoter. 2. Appuyer et maintenir la touche SET (RÉGLER) enfoncée pour augmenter la valeur progressivement. 3. Appuyer sur MODE pour saisir la valeur. 4.
- Página 42 MODE COURSE: Appuyer sur la touche MODE pendant 2 secondes pour accéder à RACE MODE (MODE COURSE). En MODE RACE (MODE COURSE), seuls les paramètres TIME (DURÉE) et DIST (DISTANCE) peuvent être définis. Les valeurs par défaut sont de 10 minutes / 4 (km ou milles). Au total, il y a 10 barres.
-
Página 43: Instructions D'ENtretien
INSTRUCTIONS D’ENTRETIEN Il s’agit d’informations générales concernant l’entretien quotidien, hebdomadaire et mensuel à effectuer sur votre vélo. ENTRETIEN QUOTIDIEN ENTRETIEN MENSUEL 1. Vérifiez que toute la quincaillerie est bien serrée, Après chaque séance d’exercice, essuyez tout notamment: le porte-bouteille, les écrous du l’équipement: selle, cadre, guidon. - Página 44 MONTAGEANLEITUNG Wir schätzen Ihre Erfahrung im Umgang mit den Produkten von Sunny Health and Fitness. Für Fragen zu Teilen oder Hilfe bei der Fehlerbehebung kontaktieren Sie uns bitte unter support@sunnyhealthfitness.com oder 1-877-90SUNNY (877-907-8669). SCHRITT 1: #75 M10*15*S6 4PCS #90φ10.5*φ20*2.0 4PCS Entfernen Sie 4 Innensechskantbolzen (Nr.
- Página 45 Wir schätzen Ihre Erfahrung im Umgang mit den Produkten von Sunny Health and Fitness. Für Fragen zu Teilen oder Hilfe bei der Fehlerbehebung kontaktieren Sie uns bitte unter support@sunnyhealthfitness.com oder 1-877-90SUNNY (877-907-8669). SCHRITT 3: #91 M10*25*S6 2PCS Lockern und ziehen Sie den Einstellknopf (Nr. 22) #90 φ10.5*φ20*2.0 2PCS...
- Página 46 Wir schätzen Ihre Erfahrung im Umgang mit den Produkten von Sunny Health and Fitness. Für Fragen zu Teilen oder Hilfe bei der Fehlerbehebung kontaktieren Sie uns bitte unter support@sunnyhealthfitness.com oder 1-877-90SUNNY (877-907-8669). SCHRITT 5: #84L 9/16 1PC WARNUNG! Lesen Sie die Anweisungen sorgfältig #94 S13-S14-S15 durch, da eine unsachgemäße Montage dauerhafte...
-
Página 47: Einlegen Und Austauschen Der Batterien
EINLEGEN UND AUSTAUSCHEN DER BATTERIEN Battery Batterie Battery Batterieabde Cover EINLEGEN DER BATTERIEN: 1. Nehmen Sie 2 AAA-Batterien aus der Plastiktüte des Handbuchs heraus. 2. Drücken Sie die Verschlusskappe der Batterieabdeckung auf der Rückseite des Computer (Nr. 50) und entfernen Sie dann die Batterieabdeckung. 3. - Página 48 EINSTELLUNGEN UND GEBRAUCHSANWEISUNG EINSTELLEN DER HÖHE UND DER BALANCE eine gleichmäßige komfortable Bewegung erreichen, müssen sicherstellen, dass die Standsicherheit des Fahrrads gewährleistet ist. Wenn Sie feststellen, dass das Fahrrad nicht im Gleichgewicht ist, dann sollten Sie die Einstell-Fußpolster (Nr. 37) unterhalb Vorderen Hinteren...
-
Página 49: Einstellen Des Sitzes
EINSTELLEN DES SITZES Der Sitz dieses Fahrrads ist stufenlos verstellbar, nach oben (Up), nach unten (Down), nach vorne (Fore) und nach hinten (Aft). Um die Höhe der Sattelstütze (Nr. 2) einzustellen, lösen und ziehen Sie den Einstellknopf (Nr. 22) nach außen und heben oder senken Sie den Sitz dann auf die gewünschte Höhe. - Página 50 TRANSPORTIEREN DES FAHRRADS Zum Transportieren des Fahrrads muss zunächst sichergestellt werden, dass die Lenkstange (Nr. 9) ordnungsgemäß gesichert ist. Wenn die Lenkstange locker ist, ziehen Einstellknopf (Nr. 22) fest, um sie zu sichern. Stellen Sie sich anschließend vor das Fahrrad, sodass Sie sich direkt vor der Lenkstange befinden.
- Página 51 SPD – TECHNISCHE SERVICEANLEITUNG Vorsicht! Lesen Sie vor der Benutzung diese Anleitung sorgfältig durch. Üben Sie vor Inbetriebnahme mehrmals im Stand das Ein- und Aussteigen in/aus die/den Pedale(n). Schmieren Sie vor der Verwendung den konkaven Bereich der Klemmen. ...
- Página 52 TRAININGSCOMPUTER FUNKTIONSTASTEN MODE: Drücken Sie, um die angezeigte Funktion auszuwählen oder während des Einstellmodus. Halten Sie die Taste 2 Sekunden lang gedrückt, um die RACE MODE- Schnittstelle im Stoppmodus aufzurufen. SET: Zum Einstellen des Zielwertes von TARGET, TIME (ZEIT), DIST(DISTANZ), CAL (KALORIEN).
- Página 53 1. TARGET: die voreingestellte CADENCE. 2. Drücken Sie im STOP-Modus die SET-Taste, um die TARGET-Einstellung aufzurufen. Drücken Sie SET, um die CADENCE um jeweils fünf zu erhöhen. Die Einstellungsänderung ist 15 →20→……110→115→120→15→20→……→115→120→15→20→…… 3. Der Einstellbereich Beträgt 15 -120 (der voreingestellte Wert ist 60 CADENCES, was sechs Balken entspricht).
-
Página 54: Wartung Und Pflege
WARTUNG UND PFLEGE Hier finden Sie allgemeine Informationen für die tägliche, wöchentliche und monatliche Wartung Ihres Fahrrads. TÄGLICHE WARTUNG MONATLICHE WARTUNG Wischen Sie nach jeder Trainingseinheit alle Teile 1. Überprüfen Sie, ob alle Hardwareteile sicher sind, des Gerätes ab: Sitz, Rahmen und Lenkstangen. Wasserflaschenhalter, Achten Sie besonders auf die Sattelstütze, die Schwungradmuttern,...