Capítulos
Tabla de contenido
Solución de problemas

Manuales relacionados para Bertazzoni REF24BMBPNB


Resumen de contenidos para Bertazzoni REF24BMBPNB
- Página 1 BERTAZZONI REFRIGERATOR INSTALLATION AND USE MANUAL RÉFRIGÉRATEUR MANUEL D’INSTALLATION ET D’UTILISATION REFRIGERADOR INSTALACIÓN Y MANUAL DEL USUARIO REF24BMBPNB WWW.BERTAZZONI.COM...
-
Página 4: Tabla De Contenido
CONTENTS 1. IMPORTANT INFORMATION ....5 1.1 Important Information................................5 2. APPLIANCE ACCESSORIES ....6 2.1 Appliance Accessories................................6 3. APPLIANCE INSTALLATION AND OPERATING CONDITIONS ....7 3.1 Installation and Preparing to Use the Appliance for the First Time.................7 3.2 Minimum distances from heat sources..........................7 3.3 Connecting to the power supply............................7 3.4 Disconnecting from the power supply..........................7 4. -
Página 5: Important Information
1. IMPORTANT INFORMATION system by puncturing the refrigerant tubing in 1.1 Important Information the evaporator or breaking it. The refrigerant is flammable. If the refrigerant comes into contact with the eyes, rinse them with clean water and 1. This manual is general in nature and may call for medical assistance immediately. -
Página 6: Appliance Accessories
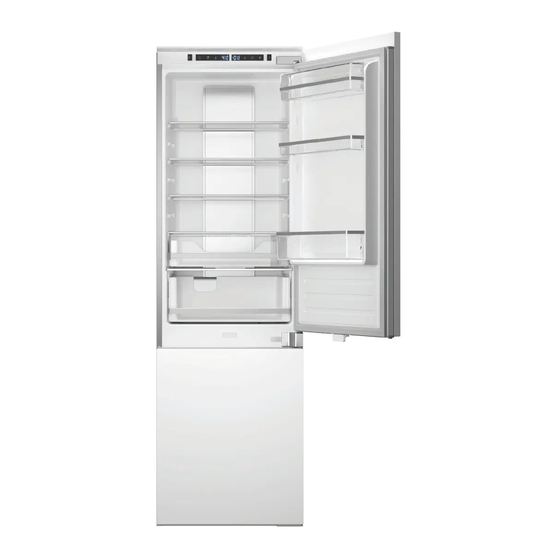
2. APPLIANCE ACCESSORIES 2.1 Appliance Accessories 1. Control panel 2. Air duct panel 3. Glass shelves 4. Crispers 5. Fresh Zone 6. Drawers 7. Door bins... -
Página 7: Appliance Installation And Operating Conditions
3. APPLIANCE INSTALLATION AND OPERATING CONDITIONS and safety certificate), its socket must be located 3.1 Installation and Preparing to Use at a safe distance, away from sinks, and must not the Appliance for the First Time be in a place where it could be exposed to water or wastewater. -
Página 8: Installation Instructions
4. INSTALLATION INSTRUCTIONS 6. Mount the right upper hinge on the left bottom 4.1 Installation Instructions corner and install the cover. CHANGING THE SIDE ON WHICH THE DOORS OPEN 1. Using a screw driver, remove the right upper hinge cover and hinge. 7. - Página 9 AIR FLOW An air passageway should be provided in the top of the cabinet to allow air to flow freely in and out. There should be space at the rear of the cabinet to allow cool air to be drawn over the condenser. A cutout should be made in the base beneath the fridge/ freezer and this finished neatly around the air vent grille.
- Página 10 4. INSTALLATION INSTRUCTIONS...
-
Página 11: Installation Into A Cabinet
4.3 Installation into a cabinet With the help of one or two other people, move the appliance into the cabinet. There are two metal plates at the base of the appliance. Fit the supplied white spacers to these plates. 1. Insert the appliance into the column cabinet, placing it on the opposite side of with respect to the hinges, and make sure there is a gap of 5. - Página 12 4. INSTALLATION INSTRUCTIONS Cabinet door Seal Important After completing the installation, check that the appliance is secure within the cabinet and that the door(s) close and open properly. If there is no resistance from the door seals when opening the door(s), then it is probable that the appliance and/or cabinet door(s) are not fitted properly.
-
Página 13: Before Use
5. BEFORE USE 5.1 Before use Before first use, you must allow the fridge to settle for at least twenty-four hours prior to switching the power on. It is recommended that you clean the interior of the appliance prior to first use using a solution of baking soda and warm water, then thoroughly dry the interior. -
Página 14: Storage Instructions
6. STORAGE INSTRUCTIONS provided, foods should not be stored for longer than three months after the purchase date. 6.1 Fridge use 4. Store food in small packages (ideally less than 1 kg). This reduces freezing time and improves 1. Never put liquids into the refrigerator the quality of the food after thawing. -
Página 15: Fresh Zone
6.3 Fresh Zone > You can control the temperature inside the fresh zone independently. > The temperature range for the fresh zone is from 37°F (3°C) to 27°F (-3°C). > Zero-degree biological preservation technology allows the refrigerator to maintain a relatively stable independent temperature very close to 37°F (3°C), but not lower than the 27°F (-3°C) of the Fresh Zone compartment. -
Página 16: Controls
7. CONTROLS Display compressor stop operating. Press and hold button H for 3 seconds to switch your appliance 7.1 Fridge use on; the symbol lights up and power is restored. 9. Press button A to temporarily show the 1. When the appliance is switched on for the first Fresh Zone settings on the display;, press time or power is restored after a power failure, button A again to adjust the temperature. -
Página 17: Defrosting
8. DEFROSTING 8.1 Defrosting The product has a No Frost system, which is designed to prevent heavy buildup of ice. Under normal conditions of use, there should be no need to regularly defrost the freezer system. NOTE If you are regularly finding heavy ice buildup or pools of water in the freezer section, then it is likely that the door is not sealing properly. -
Página 18: Maintenance And Cleaning
9. MAINTENANCE AND CLEANING 9.1 Maintenance and cleaning Always disconnect the appliance from the power supply before performing any cleaning or maintenance. The fridge and freezer sections should be cleaned using a solution of bicarbonate of soda and lukewarm water. Do not use abrasive products or detergents. -
Página 19: Troubleshooting
10. TROUBLESHOOTING the seal can be replaced. 10.1 Troubleshooting This can be due to the cabinet door(s) not being properly fitted. If you are at all unsure, ask your installer to check the cabinet doors. If you have any problems with your appliance, you should check this troubleshooting section prior to If excessive ice has formed in the freezer: calling Customer Care. -
Página 20: Warranty
> Use of the Product for anything other than its Bertazzoni’s liability on any claim of any kind, with intended purpose. respect to the goods and/or services provided, shall > Repair services provided by anyone other than a in no event exceed the value of the goods or service Bertazzoni Authorized Service agency. - Página 21 Some states do not allow the exclusion or limitation of In no case shall Bertazzoni be held liable or incidental or consequential damages, so the above responsible for damage to surrounding property, limitation or exclusion may not apply to you. This...
- Página 22 TABLE DES MATIÈRES 1. AVIS IMPORTANTS ..23 1.1 Avis importants...................................23 2. ACCESSOIRES DE L’APPAREIL ..24 2.1 Accessoires de l’appareil..............................24 3. CONDITIONS D’INSTALLATION ET DE FONCTIONNEMENT DE L’APPAREIL ..25 3.1 Installation avant la première utilisation de l’appareil....................25 3.2 Distances minimales des sources de chaleur......................25 3.3 Raccordement à l’alimentation électrique........................25 3.4 Déconnexion de l’alimentation électrique........................25 4.
-
Página 23: Avis Importants
1. AVIS IMPORTANTS l’eau, glaçons, etc.), car leur basse température 1.1 Avis importants pourrait provoquer de graves gelures. 13. Veiller à ne pas endommager le système de refroidissement, en perçant les tuyaux du 1. Ce manuel est générique et peut faire référence réfrigérant dans l’évaporateur ou en cassant à... -
Página 24: Accessoires De L'APpareil
2. ACCESSOIRES DE L’APPAREIL 2.1 Accessoires de l’appareil 1. Panneau de commande 2. Panneau de conduit d’air 3. Clayettes en verre 4. Bacs à légumes 5. Zone fraîcheur 6. Bacs 7. Balconnets... -
Página 25: Conditions D'INstallation Et De Fonctionnement De L'APpareil
3. CONDITIONS D’INSTALLATION ET DE FONCTIONNEMENT DE L’APPAREIL > Ne pas utiliser d’adaptateurs, de prises multiples 3.1 Installation avant la première et de rallonges à deux fils. S’il est nécessaire utilisation de l’appareil d’utiliser une rallonge, celle-ci doit être équipée d’une bague de protection et d’une prise unique. -
Página 26: Instructions D'INstallation
4. INSTRUCTIONS D’INSTALLATION 6. Assembler la charnière supérieure droite en 4.1 Instructions d’installation bas à gauche et monter le cache. CHANGER LE SENS D’OUVERTURE DU PRODUIT 1. Retirer le cache de la charnière supérieure droite et la charnière à l’aide d’un tournevis. 7. - Página 27 DÉBIT D’AIR Une voie de passage pour l’air doit être prévue dans la partie supérieure de l’armoire pour per- mettre à l’air d’entrer et de sortir librement. Un espace à l’arrière de l’armoire doit être présent pour permettre à l’air frais d’être aspiré au-dessus du condenseur.
- Página 28 4. INSTRUCTIONS D’INSTALLATION...
-
Página 29: Installation Dans L'aRmoire
4.3 Installation dans l’armoire Avec l’aide d’une ou deux autres personnes, placer l’appareil dans l’armoire. Deux plaques métalliques se trouvent à la base de l’appareil. Monter les entretoises blanches fournies sur ces plaques. 1. Insérer l’appareil dans la colonne en le plaçant du côté... - Página 30 4. INSTRUCTIONS D’INSTALLATION Porte de l’armoire Joint Important Une fois l’installation terminée, vérifier que l’appareil est correctement fixé dans l’armoire, et que la ou les portes se ferment et s’ouvrent correctement. Si les joints de porte n’opposent pas de résistance lors de l’ouverture des portes, il est probable que l’appareil et/ou les portes de l’armoire ne sont pas correctement installés.
-
Página 31: Avant L'UTilisation
5. AVANT L’UTILISATION 5.1 Avant l’utilisation Avant la première utilisation, laisser le réfrigérateur se stabiliser pendant au moins vingt-quatre heures avant de le mettre sous tension. Il est recommandé de nettoyer l’intérieur de l’appareil avant la première utilisation en utilisant une solution de bicarbonate de soude et d’eau chaude, puis de sécher soigneusement l’intérieur. -
Página 32: Instructions D'ENtreposage
6. INSTRUCTIONS D’ENTREPOSAGE 2. Ne jamais mettre d’aliments chauds ou tièdes dans le congélateur, les laisser refroidir 6.1 Utilisation du réfrigérateur complètement avant de les mettre dans le congélateur. 1. Ne jamais mettre de liquides non recouverts 3. Suivre les instructions figurant sur l’emballage dans le réfrigérateur. -
Página 33: Zone Fraîcheur
> Les clayettes du réfrigérateur peuvent être conservés dans le bac à légumes et le curseur de déplacées en fonction des besoins de rangement réglage doit rester fermé (complètement à gauche dans la partie réfrigérateur. - élevé). En gardant le curseur de réglage fermé, >... -
Página 34: Commandes
7. COMMANDES Affichage congélateur commence à fonctionner en mode de congélation rapide, à une température de 7.1 Utilisation du réfrigérateur -22 °C (-9 °F). Après 6 heures, la fonction de congélation rapide s’arrête automatiquement. 1. Lors de la première mise en marche de 8. -
Página 35: Dégivrage
8. DÉGIVRAGE 8.1 Dégivrage Le produit est équipé d’un système No Frost conçu pour empêcher la formation de glace. Dans des conditions normales d’utilisation, il ne devrait pas être nécessaire de dégivrer régulièrement le système de congélation. Remarque Si l’on constate régulièrement une forte accumulation de glace ou la présence d’eau dans la section du congélateur, il est probable que la porte ne soit pas... -
Página 36: Entretien Et Nettoyage
9. ENTRETIEN ET NETTOYAGE 9.1 Entretien et nettoyage Débrancher toujours l’appareil de l’alimentation électrique avant tout nettoyage ou entretien. Les parties réfrigérateur et congélateur doivent être nettoyées avec une solution de bicarbonate de soude et d’eau tiède. Ne pas utiliser de produits abrasifs ou de détergents. -
Página 37: Résolution Des Problèmes
10. RÉSOLUTION DES PROBLÈMES Vérifier l’absence de pliures, de débris ou de 10.1 Résolution des problèmes dommages sur le joint de la porte. Le cas échéant, et si le problème ne peut-être résolu, contacter le service clientèle afin de remplacer le joint. En cas de problème avec l’appareil, vérifier la Cela peut être dû... -
Página 38: Garantie
Couverture de la présente garantie limitée : détail d’origine du Produit. garantie fournie Bertazzoni Spa (« Bertazzoni ») à travers le présent document Cette couverture inclut : s’applique exclusivement à l’appareil Bertazzoni – Imperfections de la peinture d’origine (« Produit ») vendu au client (« Acheteur ») – Éclats... - Página 39 > Produits dont le numéro de série a été modifié, Bertazzoni. endommagé, altéré. > Dommages ou réparations réalisés afin de Bertazzoni ne pourra en aucun cas être tenue corriger une réparation effectuée par une société responsable de dommages aux biens environnants non autorisée ou par l’utilisation de composants comme le mobilier, les meubles, le sol, les panneaux non autorisés.
- Página 40 11. GARANTIE CAUSÉS PAR LA NÉGLIGENCE DE BERTAZZONI. LA PRÉSENTE GARANTIE LIMITÉE NE S’ÉTEND À PERSONNE D’AUTRE QUE L’ACHETEUR ORIGINAL DE CE PRODUIT, ELLE N’EST PAS CESSIBLE REPRÉSENTE VOTRE UNIQUE RECOURS. Bertazzoni décline toute responsabilité en cas de dommages indirects ou consécutifs à...
- Página 41 REMARQUES...
- Página 42 ÍNDICE 1. AVISOS IMPORTANTES ..43 1.1 Avisos importantes................................43 2. ACCESORIOS DEL ELECTRODOMÉSTICO ..44 2.1 Accesorios del electrodoméstico...........................44 3. INSTALACIÓN Y CONDICIONES OPERATIVAS DEL ELECTRODOMÉSTICO ..45 3.1 Instalación antes de usar el electrodoméstico por primera vez................45 3.2 Distancias mínimas de las fuentes de calor......................45 3.3 Conexión a la red eléctrica...............................45 3.4 Desconexión de la red eléctrica.............................45 4.
-
Página 43: Avisos Importantes
1. AVISOS IMPORTANTES 13. Asegúrese de no dañar el sistema de 1.1 Avisos importantes refrigeración perforando o rompiendo las tuberías por donde circula el refrigerante en el evaporador. El refrigerante es inflamable. 1. Este manual es genérico y puede hacer Si el refrigerante entra en contacto con los referencia a varios modelos de refrigeradores. -
Página 44: Accesorios Del Electrodoméstico
2. ACCESORIOS DEL ELECTRODOMÉSTICO 2.1 Accesorios del electrodoméstico 1. Panel de control 2. Panel de conductos de aire 3. Estantes de vidrio 4. Cajones para verduras 5. Zona para alimentos frescos 6. Cajones 7. Contenedores en puerta... -
Página 45: Instalación Y Condiciones Operativas Del Electrodoméstico
3. INSTALACIÓN Y CONDICIONES OPERATIVAS DEL ELECTRODOMÉSTICO del incumplimiento de esta obligación. 3.1 Instalación antes de usar el > No utilice adaptadores, regletas ni alargadores electrodoméstico por primera vez sin toma de tierra. Si fuera necesario usar un alargador, deberá llevar un anillo protector y un >... -
Página 46: Instrucciones De Instalación
4. INSTRUCCIONES DE INSTALACIÓN 4.1 Instrucciones de instalación 6. Monte la bisagra superior derecha en la parte inferior izquierda y ponga la tapa. CAMBIO DEL SENTIDO DE APERTURA DE LA PUERTA DEL PRODUCTO 1. Quite la tapa de la bisagra superior derecha y la propia bisagra con un destornillador. - Página 47 FLUJO DE AIRE En la parte superior del armario debería dejarse un paso para que el aire pueda circular libre- mente hacia dentro y hacia fuera. Detrás del armario debe haber espacio para que el aire frío pueda circular hasta el condensador. Debe hacerse una abertura en el zócalo que queda bajo el frigorífico/congelador, bien terminada con la rejilla de ventilación.
- Página 48 4. INSTRUCCIONES DE INSTALACIÓN...
-
Página 49: Instalación En El Armario
4.3 Instalación en el armario Con ayuda de otra persona o de dos personas, mueva el electrodoméstico hasta el armario. Hay dos placas metálicas en la base del electrodoméstico. Instale separadores blancos que se incluyen de serie en estas placas. 1. - Página 50 4. INSTRUCCIONES DE INSTALACIÓN Puerta decorativa Junta Importante completada instalación, compruebe que el electrodoméstico está bien sujeto al armario y que la puerta o puertas cierren y abran bien. Si las juntas de la puerta no oponen ninguna resistencia a la apertura, entonces es probable que electrodoméstico puertas decorativas no se hayan instalado bien.
-
Página 51: Instrucciones Antes De Usar El Electrodoméstico
5. INSTRUCCIONES ANTES DE USAR EL ELECTRODOMÉSTICO 5.1 Instrucciones antes de usar el electrodoméstico Antes de usar por primera vez el frigorífico, deberá dejar que se asiente durante al menos veinticuatro horas antes de encenderlo. Recomendamos limpiar interior electrodoméstico antes de usarlo por primera vez con una solución de bicarbonato sódico y agua caliente y, después, séquelo muy bien por dentro. -
Página 52: Instrucciones De Conservación
6. INSTRUCCIONES DE CONSERVACIÓN 3. Siga las instrucciones en el embalaje/ envase de los alimentos para conservar 6.1 Uso del frigorífico alimentos congelados. Si no se facilita ninguna información, los alimentos deberían 1. Nunca meta líquidos sin tapar en el refrigerador. almacenarse durante más de tres meses 2. -
Página 53: Zona Para Alimentos Frescos
tire de él hacia fuera. > Por el contrario, la fruta que tiende a pudrirse > Para volver a colocarlo, deslice el estante hasta debe conservarse en el cajón para verduras con el control deslizante de ajuste de la humedad meterlo en la ranura y luego baje la parte trasera. -
Página 54: Controles
7. CONTROLES Pantalla Freezing» se desconecta automáticamente. 8. Pulse el botón H durante 3 segundos para 7.1 Uso del frigorífico desconectar el electrodoméstico y el botón se ilumina, la alimentación se corta. La luz 1. La primera vez que encienda el electrodoméstico interna deja de funcionar, el compresor deja de o que reestablezca la alimentación tras un funcionar. -
Página 55: Desescarche
8. DESESCARCHE 8.1 Desescarche El producto tiene un sistema «No Frost» que se ha diseñado para evitar que se acumulen grandes cantidades de hielo. En condiciones de uso normales, no sería necesario desescarchar regularmente el sistema congelador. Nota Si detecta una acumulación frecuente de grandes cantidades de hielo o charcos de agua en la sección del congelador, entonces es probable que la puerta no cierre bien. -
Página 56: Mantenimiento Y Limpieza
9. MANTENIMIENTO Y LIMPIEZA 9.1 Mantenimiento y limpieza Desconecte siempre el electrodoméstico de la toma de alimentación antes de realizar cualquier operación de limpieza o mantenimiento. Limpie las secciones del refrigerador o del congelador con bicarbonato de sodio disuelto en agua tibia. No utilice productos abrasivos ni detergentes. -
Página 57: Resolución De Problemas
10. RESOLUCIÓN DE PROBLEMAS Compruebe que la puerta del electrodoméstico 10.1 Resolución de problemas oponga cierta resistencia al abrirla. Si se abre solo con el más leve toque significa que hay que cambiar la junta. Si tiene algún problema con su electrodoméstico, Inspeccione la junta de la puerta para ver si hay debería consultar este apartado sobre resolución pliegues, restos o daños. -
Página 58: Garantía
Servicio de Asistencia de obra dentro de un plazo de 2 años a partir de la fecha Bertazzoni para identificar el problema y los de la compra minorista original y en condiciones de procedimientos de mantenimiento correctos. - Página 59 > Instalación no conforme con los códigos, Bertazzoni no será en ningún caso responsable de los daños a la propiedad circundante, incluido el normativas o leyes locales/estatales/municipales/ mobiliario, los armarios, el pavimentos, los paneles del condado en materia de incendios, electricidad, y otras estructuras alrededor del Producto.
- Página 60 11. GARANTÍA POR BERTAZZONI Y QUE NO SEAN IMPUTABLES DE MANERA DIRECTA A LA NEGLIGENCIA DE BERTAZZONI. ESTA GARANTÍA LIMITADA NO SE AMPLIA A NINGUNA OTRA PERSONA DISTINTA DEL COMPRADOR ORIGINAL DE ESTE PRODUCTO, NO ES TRANSMISIBLE Y ESTIPULA SU ÚNICO RECURSO.
- Página 61 NOTAS...
- Página 62 NOTAS...
- Página 63 NOTAS...