Tabla de contenido
Publicidad
Idiomas disponibles
Idiomas disponibles
Piège photographique / Trail camera
Cámara de rastreo / Fotofalle
Fotocamera da esplorazione
# SL1008
Guide d'utilisation .................................................... 2
Instruction manual ................................................. 41
Manual de instrucciones ........................................ 79
Gebrauchsanleitung ............................................ 119
Manuale d'uso ..................................................... 159
SL1008 - Indice A
1/200
Publicidad
Capítulos
Tabla de contenido

Manuales relacionados para Num'axes SL1008


Resumen de contenidos para Num'axes SL1008
- Página 1 Piège photographique / Trail camera Cámara de rastreo / Fotofalle Fotocamera da esplorazione # SL1008 Guide d’utilisation ............ 2 Instruction manual ..........41 Manual de instrucciones ........79 Gebrauchsanleitung ..........119 Manuale d’uso ............. 159 SL1008 - Indice A 1/200...
-
Página 2: Tabla De Contenido
En cas de dysfonctionnement .......... 37 Garantie ................38 Conditions de garantie ............. 38 Enregistrement de votre produit ........39 Collecte et recyclage de votre équipement en fin de vie 39 Accessoires ............... 40 Conformité aux normes européennes ......40 SL1008 - Indice A 2/200... -
Página 3: Composition Du Produit
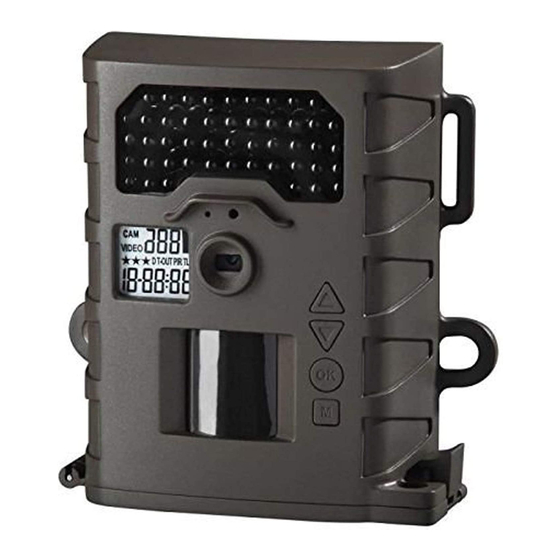
Vue de face Leds infrarouges Passage de sangle Microphone Laser pour test Ecran LCD Objectif Touche HAUT Touche BAS Touche OK Passage pour câble antivol Touche MENU Capteur Infrarouge Passif (PIR) Loquet du couvercle Couvercle SL1008 - Indice A 3/200... -
Página 4: Vue De Dessous
Emplacement Couvercle externe pour cadenas Vue de dessous (couvercle ouvert) Port pour alimentation externe Sélecteur 5 positions Port USB (SET/OFF/A/B/MANUAL) Emplacement carte SD Sortie TV Bouton pour ouverture Compartiment à piles du compartiment à piles SL1008 - Indice A 4/200... -
Página 5: Précautions D'eMploi
Cela endommagerait le produit et annulerait la garantie. NOTA : Ce produit est un appareil électronique de précision. Ne tentez pas de le réparer vous-même, car ouvrir le produit pourrait vous exposer à un voltage dangereux et autres risques. SL1008 - Indice A 5/200... -
Página 6: Définitions
Capteur Infrarouge Passif (PIR) : permet de détecter les objets en mouvement. • Loquet : permet de bien fermer le couvercle. • Couvercle : permet d’empêcher l’entrée d’eau. Fermez le couvercle à l’aide du loquet après avoir fait les réglages. SL1008 - Indice A 6/200... - Página 7 AA (non fournies). • Bouton du compartiment à piles : appuyez sur ce bouton pour sortir le compartiment à piles. NOTA : respectez bien les polarités lorsque vous installez les piles ou une alimentation externe. SL1008 - Indice A 7/200...
- Página 8 > < Piles déchargées Piles pleines déchargées > < (pictogramme (pas de (pictogramme pictogramme) fixe) > < qui clignote) Quand les piles sont faibles, l’écran indique “bAtLO”. Remplacez les piles usagées par des piles neuves. SL1008 - Indice A 8/200...
- Página 9 • TLS : indique que l’appareil est en mode Time Lapse (des photos sont prises à intervalles de temps réguliers de votre choix pendant une plage horaire définie par vous). SL1008 - Indice A 9/200...
-
Página 10: Installation Des Piles Et De La Carte Sd
Le compartiment à piles accepte 8 piles AA. Utilisez des piles de bonne qualité (vous pouvez vous procurer des piles NUM’AXES auprès de votre distributeur ou directement auprès de NUM’AXES). Insérez les piles en respectant bien les polarités (+/-) indiquées dans le compartiment à piles. SL1008 - Indice A 10/200... -
Página 11: Recommandations Spéciales Concernant Les Piles
Assurez-vous que l’appareil est en position OFF. • Branchez l’alimentation externe au port pour alimentation externe situé sous l’appareil à l’aide d’un câble d’alimentation. • Faites glisser le sélecteur de la position OFF à la position SET, A, B ou MANUAL. SL1008 - Indice A 11/200... - Página 12 Formater supprime aussi tout les fichiers systèmes cachés. N’utilisez pas les fichiers de type « NTFS » ou « exFAT », ces formats ne sont pas supportés. SL1008 - Indice A 12/200...
-
Página 13: Configuration Et Programmation Du Produit
: détection PIR / mode Vidéo / durée vidéo : 10 secondes / résolution HD 720 P / Time Out : 30 secondes SL1008 - Indice A 13/200... - Página 14 LCD. • Appuyez sur le bouton HAUT [▲] ou BAS [▼] pour sélectionner le mode Détection PIR. • Appuyez sur le bouton [OK] pour sauvegarder votre choix. • Appuyez sur le bouton [M] pour sortir. SL1008 - Indice A 14/200...
- Página 15 Réglage du mode Rafale en mode Détection PIR L’appareil peut être programmé pour prendre 1 à 10 photos par déclenchement. • Faites glisser le sélecteur en position SET, l’écran LCD indique le statut actuel de l’appareil. SL1008 - Indice A 15/200...
- Página 16 2 étoiles = HD 1280 x 720 pixels / 1 étoile = VGA 640 x 480 pixels • Faites glisser le sélecteur en position SET, l’écran LCD indique le statut actuel de l’appareil. • Pressez une fois le bouton [M] pour entrer dans le mode Programmation Manuelle. SL1008 - Indice A 16/200...
-
Página 17: Réglage De La Durée De La Vidéo En Mode Détection
à 10 minutes (10:00) par incréments de 5 secondes). • Appuyez sur le bouton [OK] pour sauvegarder votre choix puis « T-O » va clignoter. Appuyez sur le bouton [OK] pour régler le Time Out ou sur le bouton [M] pour sortir. SL1008 - Indice A 17/200... - Página 18 • Faites glisser le sélecteur en position SET, l’écran LCD indique le statut actuel de l’appareil. • Appuyez une fois sur le bouton [M] pour entrer dans le mode Programmation Manuelle. SL1008 - Indice A 18/200...
- Página 19 Les 2 chiffres du jour vont clignoter. • Appuyez sur le bouton HAUT [▲] ou BAS [▼] pour augmenter ou diminuer le jour (01 – 31). • Appuyez sur le bouton [OK] pour sauvegarder votre SL1008 - Indice A 19/200...
- Página 20 Time Lapse (par exemple de 19:00 heures à 07:00 heures le jour suivant). Puis vous devez indiquer à quelle fréquence l’appareil doit prendre des photos pendant cette plage horaire. L’appareil va rester en mode Time SL1008 - Indice A 20/200...
- Página 21 Les 2 chiffres des minutes vont clignoter. • Appuyez sur le bouton HAUT [▲] ou BAS [▼] pour augmenter ou diminuer les minutes (00 – 59) puis appuyez sur [OK] pour sauvegarder le réglage de « l’heure SL1008 - Indice A 21/200...
- Página 22 NOTA : le Time Out en mode Time Lapse peut aller de 5 secondes (00:05) à 10 minutes (10:00) par incréments de 5 secondes. • Pressez le bouton [M] pour sortir. L’écran LCD indique à nouveau le statut de l’appareil. SL1008 - Indice A 22/200...
- Página 23 : Piles : piles lithium Résolution photo : 1 étoile (3 MP) Time Out : plus de 15 secondes SL1008 - Indice A 23/200...
-
Página 24: Installation Du Produit Sur Le Terrain
Assurez-vous d’avoir bien inséré la carte mémoire. • Vérifiez que la date et l’heure sont correctes. • Pensez bien à faire passer le sélecteur de la position SET à la position A, B ou MANUAL avant de vous en aller. SL1008 - Indice A 24/200... -
Página 25: Exemples De Montage
Exemples de montage Montage sur un poteau ou un arbre Champ de vision Portée SL1008 - Indice A 25/200... - Página 26 3 secondes sur le bouton [M]. • Une fois que vous avez terminé vos tests, faites glisser le sélecteur de la position SET à la position OFF. Attention : ne dirigez pas le faisceau laser vers les yeux. SL1008 - Indice A 26/200...
-
Página 27: Utilisation Du Produit En Mode Détection Pir
Le mot « PIR » va clignoter, pressez le bouton [OK] pour confirmer le mode Détection PIR. • Appuyez sur le bouton HAUT [▲] ou BAS [▼] jusqu’à ce que le mot « CAM » clignote. SL1008 - Indice A 27/200... - Página 28 MANUAL puis fermez le couvercle de l’appareil. A présent, l’écran LCD va décompter 60 secondes afin que vous puissiez quitter la zone de couverture, puis l’appareil va prendre des photos ou des vidéos à chaque déclenchement du capteur PIR. SL1008 - Indice A 28/200...
-
Página 29: Utilisation Du Produit En Mode Time Lapse
Pour les autre réglages, suivez les instructions du paragraphe « Configuration programmation produit – Réglage du mode Time Lapse ». • Faites glisser le sélecteur de la position SET à la position MANUAL puis fermez le couvercle de l’appareil. SL1008 - Indice A 29/200... -
Página 30: Visionner Et Effacer Les Photos/Vidéos
2000 / ME / XP / Vista / Windows 7. L’appareil est compatible avec les systèmes d’exploitation MAC 10.6 et suivants. Visionner les fichiers sur un ordinateur via une connexion USB • Assurez-vous que le sélecteur de l’appareil est bien en position OFF. SL1008 - Indice A 30/200... - Página 31 Effacer les images et les vidéos : mettez en surbrillance le ou les fichiers que vous souhaitez effacer puis appuyez sur le bouton [Suppr] de votre clavier. SL1008 - Indice A 31/200...
- Página 32 Le port AV de l’appareil est réglé sur PAL par défaut (PAL = format TV européen). Si l’écran du téléviseur ne vacille pas, alors vous n’avez pas à changer le réglage AV de l’appareil. Allez directement au point suivant concernant les vignettes. SL1008 - Indice A 32/200...
- Página 33 Appuyez sur le bouton BAS [▼] pour faire passer le port TV de l’appareil de NTSC à PAL. • A présent, l’indication « tu – P » va clignoter sur l’écran. • Appuyez sur le bouton [OK] pour confirmer le réglage. SL1008 - Indice A 33/200...
- Página 34 (Delete One = Effacer un) : seul le dernier fichier est effacé. d-ALL (Delete ALL = Effacer tout) : efface tous les fichiers présents sur la carte SD. Ft (Format = Formater) : efface tous les fichiers et reformate la carte SD. SL1008 - Indice A 34/200...
-
Página 35: Caractéristiques Techniques
Direct X 9.0 ou supérieur – normalement fourni avec votre système d’exploitation. • Carte son et haut parleur compatible avec Windows. NOTA : pour toute question concernant les spécifications de votre ordinateur, contactez son fabricant. SL1008 - Indice A 35/200... - Página 36 10 minutes avec incréments de 5 secondes • Capteur de température intégré • Marquage sur les photos et vidéos : heure, date, température (en degrés centigrades), phase lunaire • Format des fichiers : photos : JPEG / vidéos : motion JPEG SL1008 - Indice A 36/200...
-
Página 37: En Cas De Dysfonctionnement
Ne retournez pas votre produit à votre distributeur. Retournez-le à l’adresse suivante : NUM’AXES Z.A.C. des Aulnaies – 745 rue de la Bergeresse – CS 30157 45161 OLIVET CEDEX – FRANCE SL1008 - Indice A 37/200... -
Página 38: Garantie
NUM’AXES • l’endommagement du produit résultant : − de la négligence ou faute de l’utilisateur − d’une utilisation contraire aux instructions ou non prévue − de réparations faites par des réparateurs non agréés SL1008 - Indice A 38/200... -
Página 39: Enregistrement De Votre Produit
être remis à un point de collecte approprié pour le traitement, la valorisation et le recyclage des déchets électroniques ou rapporté chez votre distributeur. En adoptant cette démarche, vous faites un geste pour l’environnement, vous contribuez à la préservation des SL1008 - Indice A 39/200... -
Página 40: Accessoires
EN55022 : 2010 et EN55024 :2010. Z.A.C des Aulnaies – 745 rue de la Bergeresse C.S. 30157 45161 OLIVET CEDEX – FRANCE Tél. +33 (0)2 38 63 64 40 / Fax +33 (0)2 38 63 31 00 info@numaxes.com www.numaxes.com SL1008 - Indice A 40/200... - Página 41 Guarantee ................ 75 Guarantee conditions ............75 Register your product............76 Collection and recycling of your device at the end of its life ..................76 Spare parts ............... 77 FCC Compliance ..............77 EC Compliance ..............78 SL1008 - Indice A 41/200...
-
Página 42: Camera Kit Contents
Camera Kit Contents − Trail Camera − Instruction Manual − USB Cable − Mounting Strap Camera Overview Front View SL1008 - Indice A 42/200... - Página 43 Bottom View Bottom View (After Open Cover) SL1008 - Indice A 43/200...
-
Página 44: Cautions For Use
NOTE: This camera is a precision electronic device. Do not attempt to service this camera by yourself, as opening or removing covers may expose you to dangerous voltage points or other risks. SL1008 - Indice A 44/200... -
Página 45: Definitions
Cover: prevents water leakage, close up with locker after settings. • Power Port Cover: open it to connect a DC 12V external power or battery pack (not supplied) in right polarity. Tightly close to prevent water leakage. SL1008 - Indice A 45/200... - Página 46 (not supplied). • Battery Tray Releaser: press to release the battery tray, and then pull it out to install or replace the batteries. NOTE: Make sure the batteries or external power are installed in correct polarity. SL1008 - Indice A 46/200...
- Página 47 : indicates the battery status. > < > < > < Full (Icon on) Half (Icon blinking) Low (Icon off) When batteries are low, the status display will show “bAtLO”. Please replace with new batteries. SL1008 - Indice A 47/200...
- Página 48 PIR sensor’s detection of activity in the area it covers) • TLS: indicates the camera is in Time Lapse Mode (the camera will take photos automatically at your choice of intervals during one block of time you set up) SL1008 - Indice A 48/200...
-
Página 49: Battery And Memory Installation
(you can purchase NUM’AXES batteries from NUM’AXES or from your distributor). Install the batteries with correct polarity (+/-) as noted inside the battery tray. WARNING: when changing the batteries, the time and date setting is lost. SL1008 - Indice A 49/200... - Página 50 Memory Options The camera is also equipped with an expandable media card slot capable of accepting up to 32GB SD card with Class 10 or below speed rating (not supplied). The status display will show the SL1008 - Indice A 50/200...
-
Página 51: Inserting The Sd Card
Formatting also removes all Hidden System files as well. Basically it cleans your SD memory card just like if it was brand new. DO NOT USE File System type: “NTFS” or “exFAT”, these formats are not supported. SL1008 - Indice A 51/200... -
Página 52: Camera Setup And Program
/ Time out: 30 seconds • B (Preset B) - This bypasses all user defined settings and uses the following settings: PIR mode / Video: 10 seconds video / Video resolution: 720P / Time out: 30 seconds SL1008 - Indice A 52/200... - Página 53 “PIR” or “TLS” will be blinking. • Press the [UP] or [DN] button to select PIR mode. • Press [OK] to save your selection. • Press the [M] button to exit. SL1008 - Indice A 53/200...
- Página 54 Your camera can be programmed to shoot 1 to 10 pictures per trigger. • Slide the switch to the SET position, the status display will show the camera current status. • Press the [M] button once to enter the Manual programming mode. SL1008 - Indice A 54/200...
- Página 55 PIR detection. • Press the [UP] or [DN] button until the word “VIDEO” is blinking. • Press [OK] once to confirm the camera in VIDEO mode, the word “RES” will be blinking. SL1008 - Indice A 55/200...
- Página 56 • After pressing [OK] to confirm the Burst Shoot or Video Length setting, “T-O” will be blinking on the status display. • Press [OK] to enter the Time Out setting. SL1008 - Indice A 56/200...
- Página 57 • The Hours digits will be blinking. • Press the [UP] or [DN] button to increase or decrease the hour value (00 – 23). • Press [OK] to save your selection and enter the Minutes SL1008 - Indice A 57/200...
- Página 58 “- dEL –” blinking on the status screen. • Press the [M] button to exit the Manual programming mode and go back to the status screen. Setting the Time Lapse Mode (TLM) In Time Lapse mode, the camera will take photos automatically SL1008 - Indice A 58/200...
- Página 59 Press [OK] to confirm and go into the Time Lapse Mode "Start Time" setting. • The display will show T + S-88:88 (S = Start, 88:88 = time in HH:MM). • Press [OK] to set the “Start Time” setting. SL1008 - Indice A 59/200...
- Página 60 NOTE: The Time Out for Time Lapse mode can be programmed from 5 seconds (00:05) to 10 minutes (10:00) in 5-second increments. • Then press the [M] button to exit. The status display will show the camera updated status. SL1008 - Indice A 60/200...
- Página 61 If you are using the Time Lapse feature and want to extend the battery life and get as many pictures as possible, we recommend you use the following settings: Batteries: Lithium Batteries Image resolution: 3M Time Out: More than 15 seconds SL1008 - Indice A 61/200...
-
Página 62: Setting Up The Camera In The Field
Make sure the memory card is properly inserted and have sufficient available space. • Verify time and date is correct. • Make sure to turn the camera from SET to A or B or MANUAL mode before you leave. SL1008 - Indice A 62/200... - Página 63 Example: Mounting Pillar or tree mounting Effective Angle Effective Range SL1008 - Indice A 63/200...
- Página 64 [M] button for 3 seconds. • When you have completed testing, slide the switch back to the OFF position from SET. Warning: Do not point the laser beam to the eyes. SL1008 - Indice A 64/200...
-
Página 65: Using The Camera In Pir Detection Mode
Press the [UP] or [DN] button until the word “CAM” is blinking. • Press the [OK] button once to confirm and then press the [M] button to exit. • Then slide the switch from the SET position to MANUAL and close the cover. SL1008 - Indice A 65/200... - Página 66 NOTE: The time between motion detection and the camera taking the pictures may vary due to lighting conditions, program settings, and battery power level. The IR Emitter will only be activated in low light conditions. SL1008 - Indice A 66/200...
-
Página 67: Using The Camera In Time Lapse Mode
Now, the status display will count down 60 seconds for you to leave the coverage area and then the camera will start capturing photos once reached the programmed start time, and stop at the programmed end time. SL1008 - Indice A 67/200... -
Página 68: Viewing And Deleting Files
Plug the larger end of the supplied USB cable into an available USB port on your computer. • Open the cover of the camera and then plug the smaller end of the USB cable into the camera’s USB port on the bottom. SL1008 - Indice A 68/200... - Página 69 The camera will turn OFF automatically. Viewing files on Your home TV • Open the cover of the camera and then attach a TV out cable (not supplied) to the AV port on the bottom of the camera. SL1008 - Indice A 69/200...
- Página 70 Press the [OK] button again and it will return to the thumbnail view from the full screen image. NOTE: All videos are recorded with audio but only have sound when viewing playback on a PC. SL1008 - Indice A 70/200...
- Página 71 Press the [OK] button to enter the d-ALL (DELETE) & F-t (FORMAT) menu. • Press the [UP] or [DN] button to select the desired function: NO-dL (No Delete) - No images get deleted. d-ONE (Delete One) - Only the last file will get deleted. SL1008 - Indice A 71/200...
-
Página 72: Technical Specifications
Direct X 9.0 or above – Should come with your operating system already. • Windows compatible sound card and speaker. NOTE: If you have any questions regarding your PC specifications please contact your PC manufacturer. SL1008 - Indice A 72/200... - Página 73 Time Out for PIR operation: from 5 seconds to 1 hour with 5-second increments. • Time Out for TLM operation: from 5 seconds to 10 minutes with 5-second increments. • Real time clock for date and time stamping. SL1008 - Indice A 73/200...
- Página 74 External memory support: SD memory card up to 32GB (not supplied). • Interface type: USB 2.0 • Built-in TV out port. • Power: AA size Batteries x 8 (not supplied). • External power: DC 12 Volts battery pack or power adaptor (not supplied). SL1008 - Indice A 74/200...
-
Página 75: Troubleshooting
(invoice or sales receipt), without cancellation, is submitted to the distributor or to NUM’AXES. The guarantee is limited to the original purchaser. 2. This guarantee does not cover the following: • changing the strap and USB cable SL1008 - Indice A 75/200... -
Página 76: Register Your Product
7. Photos and drawings are not contractual. Register your product Your product registered website www.numaxes.com. Collection and recycling of your device at the end of its life The pictogram which appears on your product means that SL1008 - Indice A 76/200... -
Página 77: Spare Parts
• Reorient or relocate the receiving antenna. • Increase the separation between the equipment and the receiver. • Connect the equipment into an outlet on a circuit different from SL1008 - Indice A 77/200... -
Página 78: Ec Compliance
EC Compliance This equipment has been tested and found to comply with EC Directives EN55022: 2010 and EN55024: 2010. export@numaxes.com www.numaxes.com SL1008 - Indice A 78/200... - Página 79 En caso de malfuncionamiento ........115 Garantía ................116 Condiciones de garantía ..........116 Inscriba su producto ............117 Reciclaje de aparatos electrónicos al final de su vida ..117 Accesorios ..............118 Conformidad a las normas europeas ......118 SL1008 - Indice A 79/200...
-
Página 80: Composición Del Producto
Vista frontal Leds infrarrojos Orificio para la correa Micrófono Puntero láser Pantalla LCD Objetivo Tecla ARRIBA Tecla ABAJO Tecla OK Orificio para candado Tecla MENU Sensor de infrarrojos pasivo (PIR) Pestillo de la tapa Tapa SL1008 - Indice A 80/200... -
Página 81: Vista Desde Abajo (Tapa Cerrada)
Vista desde abajo (tapa abierta) Conector de entrada de alimentación externa Interruptor con 5 posiciones Puerto USB (SET/OFF/A/B/MANUAL) Ranura para tarjeta SD Salida TV Botón para abrir el Alojamiento de pilas alojamiento de pilas SL1008 - Indice A 81/200... -
Página 82: Precauciones De Uso
No abra el producto para reparaciones no autorizadas. Esto dañará el producto y anulará la garantía. NOTA: este producto es un dispositivo electrónico de precisión. No intente repararlo usted mismo porque abrir el aparato puede exponerle a voltajes peligrosos y otros peligros. SL1008 - Indice A 82/200... -
Página 83: Definiciones
Botón [OK]: permite confirmar los ajustes. • Botón MENU [M]: permite cambiar los ajustes. • Pasajes para cable de seguridad Python: permiten una fijación segura de la cámara en un poste o un árbol con un cable antirrobo (no suministrado). SL1008 - Indice A 83/200... - Página 84 Entrada para una alimentación externa: permite conectar una fuente de alimentación externa o una batería de 12 V (no suministradas). • Interruptor: tiene 5 posiciones: SET / OFF / modo predeterminado A / modo predeterminado B / MANUAL. SL1008 - Indice A 84/200...
- Página 85 Alojamiento de pilas: alojamiento para instalar 8 pilas AA (no suministradas). • Botón del alojamiento de pilas: presione este botón para abrir el alojamiento de pilas. NOTA: Respete la polaridad correcta al instalar las pilas o una fuente de alimentación externa. SL1008 - Indice A 85/200...
-
Página 86: Pantalla Lcd
Pilas en buen descargadas a > < estado (ningún símbolo) medio (símbolo (símbolo fijo) > < parpadeante) Cuando el nivel de carga de las pilas es bajo, la pantalla muestra “bAtLO”. Cambie las pilas por otras nuevas. SL1008 - Indice A 86/200... - Página 87 TLS: indica que el aparato está en modo Time Lapse (fotografías se toman automáticamente a intervalos regulares de su elección, durante un lapso de tiempo definido por usted, sin la necesidad de que un animal SL1008 - Indice A 87/200...
-
Página 88: Ajustes Predeterminados De Fábrica
¡Atención! la cámara debe estar en la posición OFF al instalar o reemplazar las pilas y cuando se inserta la tarjeta SD. Retirar las pilas o la tarjeta SD mientras la cámara está encendida podría dañar el producto. SL1008 - Indice A 88/200... -
Página 89: Instalación De Las Pilas Y De La Tarjeta Sd
Conecte la fuente de alimentación al puerto situado debajo de la unidad con un cable de alimentación (no suministrado). • Deslice el interruptor de la posición OFF a la posición SET, A, B o MANUAL. SL1008 - Indice A 89/200... - Página 90 NOTA: Formatear elimina todos los archivos almacenados en una tarjeta, para poderla reutilizar. ¡Atención! antes de formatear la tarjeta, compruebe que ha descargado y hecho copias de todos los archivos que quiera conservar. SL1008 - Indice A 90/200...
-
Página 91: Configuración Y Programación Del Producto
• B (modo predefinido B) – Este modo ignora los ajustes realizados por el usuario y utiliza los siguientes ajustes: detección PIR / modo Vídeo / duración vídeo: 10 segundos / resolución HD 720 P / Time Out: 30 segundos SL1008 - Indice A 91/200... - Página 92 LCD. • Pulse el botón ARRIBA [▲] o ABAJO [▼] para seleccionar el modo Detección PIR. • Pulse el botón [OK] para guardar su elección. • Pulse el botón [M] para salir. SL1008 - Indice A 92/200...
-
Página 93: Ajuste De La Resolución De La Imagen En El Modo Detección Pir
Imágenes Múltiples o el botón [M] para salir. Ajuste del modo Imágenes Múltiples en modo Detección PIR El dispositivo puede ser programado para tomar de 1 hasta 10 fotografías por disparo. • Deslice el interruptor a la posición SET, la pantalla LCD SL1008 - Indice A 93/200... -
Página 94: Ajuste De La Resolución Vídeo En El Modo Detección
El aparato dispone de 2 niveles de resolución vídeo: 2 estrellas = HD 1280 x 720 p / 1 estrella = VGA 640 x 480 p • Deslice el interruptor en la posición SET, la pantalla LCD muestra el estado actual del dispositivo. SL1008 - Indice A 94/200... - Página 95 (de 5 segundos (00:05) hasta 10 minutos (10:00) con incrementos de 5 segundos). • Pulse el botón [OK] para guardar su elección, a continuación “T-O” parpadeará. Pulse el botón [OK] para SL1008 - Indice A 95/200...
-
Página 96: Ajuste De La Hora Y De La Fecha En Modo Detección Pri O En Modo Time Lapse
Antes de empezar a usar la cámara, debe fijar la fecha y hora, para que se impriman correctamente en las fotos y vídeos. ¡Atención! al cambiar las pilas, el ajuste de la fecha y de la hora no se conserva. SL1008 - Indice A 96/200... - Página 97 Pulse el botón ARRIBA [▲] o ABAJO [▼] para aumentar o disminuir el mes (1 – 12). • Pulse el botón [OK] para guardar el ajuste y entrar en el ajuste del día. • Los 2 dígitos del día parpadearán. SL1008 - Indice A 97/200...
- Página 98 Detección PIR. Primero debe determinar el lapso de tiempo durante el cual la cámara debe funcionar en modo Time Lapse (por ejemplo, de las 19:00 a las 07:00 del día siguiente). SL1008 - Indice A 98/200...
- Página 99 • Los 2 dígitos de los minutos parpadearán. • Pulse el botón ARRIBA [▲] o ABAJO [▼] para aumentar o disminuir los minutos (00 – 59), entonces pulse el botón SL1008 - Indice A 99/200...
- Página 100 # 1: Si el usuario selecciona el modo Time Lapse y programa la hora de inicio a las 07:00 y la hora de finalización a las 20:30, y después selecciona un Time Out de 3 minutos con un modo Imágenes Múltiples de 3 fotografías, esta configuración provoca SL1008 - Indice A 100/200...
-
Página 101: Instalación Del Producto En El Terreno
Una vez que se han realizado todos los ajustes, el dispositivo está listo para ser utilizado en el terreno. Para iniciar A continuación, encontrará una lista de consejos útiles sobre cómo utilizar la cámara para obtener los mejores resultados. SL1008 - Indice A 101/200... - Página 102 Asegúrese de que ha correctamente insertado la tarjeta de memoria. • Compruebe que la fecha y la hora son correctas. • Recuerde que debe deslizar el interruptor de la posición SET a la posición A, B o MANUAL antes de irse. SL1008 - Indice A 102/200...
-
Página 103: Ejemplos De Instalación
Ejemplos de instalación Instalación en un poste o un árbol Campo de visión Alcance SL1008 - Indice A 103/200... - Página 104 3 segundos el botón [M]. • Una vez que se ha completado su prueba, deslice el interruptor de la posición SET a la posición OFF. ¡Atención! no apunte el rayo láser a los ojos. SL1008 - Indice A 104/200...
-
Página 105: Para Tomar Fotografías, Asegúrese Que La Pantalla Lcd Muestra Cam
Pulse una vez el botón [M] para entrar en el modo Programación Manual. • La indicación “PIR” parpadeará, pulse el botón [OK] para confirmar el modo Detección PIR. • Pulse el botón ARRIBA [▲] o ABAJO [▼] hasta que la indicación “CAM” parpadea. SL1008 - Indice A 105/200... -
Página 106: Para Tomar Vídeos, Asegúrese Que La Pantalla Lcd Muestra Video
MANUAL y entonces cierre la tapa del dispositivo. Ahora, la pantalla LCD realizará una cuenta atrás 60 segundos para que pueda salir de la zona de cobertura, a continuación, la cámara tomará fotografías o vídeos con cada disparo del sensor PIR. SL1008 - Indice A 106/200... -
Página 107: Utilización Del Producto En Modo Time Lapse
La cámara comenzará a disparar cuando se alcanzará la hora de inicio del modo Time Lapse y se detendrá cuando se alcanzará la hora de finalización del modo Time Lapse. SL1008 - Indice A 107/200... -
Página 108: Ver Y Borrar Fotos Y Vídeos
/ ME / XP / Vista / Windows 7. El dispositivo es compatible con los sistemas operativos Mac 10.6 y siguientes. Ver los archivos en un ordenador a través de una conexión USB • Asegúrese de que el interruptor de la unidad está en la posición OFF. SL1008 - Indice A 108/200... - Página 109 Suprimir imágenes y vídeos: seleccione el archivo o archivos que desea eliminar y pulse el botón [Suppr] en el teclado. Suprimir todos los archivos y formatear la tarjeta SD: SL1008 - Indice A 109/200...
- Página 110 Si la pantalla del televisor no parpadea, entonces usted no tiene que cambiar la configuración AV de la cámara. Ir directamente al siguiente punto sobre las viñetas. Si la pantalla del televisor parpadea, hay que ir al SL1008 - Indice A 110/200...
- Página 111 TV de NTSC a PAL. • Ahora, la indicación “tu – P” parpadeará en la pantalla. • Pulse el botón [OK] para confirmar el ajuste. • La indicación “tu – P” parpadeará y luego se detendrá. SL1008 - Indice A 111/200...
- Página 112 Ft (Format = Formatear): borra todos los archivos y formatea la tarjeta SD. • Pulse el botón [OK] para confirmar su elección. • Pulse el botón [M] para salir del modo de ajuste y volver a SL1008 - Indice A 112/200...
-
Página 113: Características Técnicas
Direct X 9.0 o superior – normalmente incluido con su sistema operativo. • Tarjeta sonido y altavoces compatibles con Windows NOTA: para alguna pregunta relacionada con las especificaciones de su ordenador, póngase en contacto con el fabricante. SL1008 - Indice A 113/200... -
Página 114: Características E Especificaciones Del Dispositivo
10 minutos con incrementos de 5 segundos • Sensor de temperatura integrado • Estampación sobre las fotos y los vídeos: fecha, hora, temperatura, fase de la luna • Formato de archivo: fotos: JPEG / vídeos: motion JPEG SL1008 - Indice A 114/200... -
Página 115: En Caso De Malfuncionamiento
Para cualquier reparación, el servicio post venta necesita obligatoriamente: − el aparato completo − la fecha de compra (factura o ticket de compra) SL1008 - Indice A 115/200... -
Página 116: Garantía
− una utilización contraria a las instrucciones o no prevista − las reparaciones realizadas personas habilitadas • la pérdida o el robo 3. Si se reconoce que el producto es defectuoso, NUM’AXES lo reparará o lo cambiará, según decida. SL1008 - Indice A 116/200... -
Página 117: Inscriba Su Producto
Adoptando este comportamiento, hará un gesto con el medio ambiente, contribuyendo así a la preservación de los recursos naturales y a la protección de la salud humana. SL1008 - Indice A 117/200... -
Página 118: Accesorios
Accesorios Puede encargar a su distribuidor, en cualquier momento, los accesorios (pilas, tarjetas SD…). Conformidad a las normas europeas Este producto cumple con las normas europeas EN55022 : 2010 et EN55024 :2010. www.numaxes.com / export@numaxes.com SL1008 - Indice A 118/200... - Página 119 Technische Spezifikationen ..........153 Fehlersuche ..............155 Garantie ................156 Garantiebedingungen ............ 156 Registrieren Ihres Produkts ..........157 Sammeln und Recycling der Geräte am Ende ihres Lebens ................157 Zubehöre ................ 158 CE-Kennzeichnung ............158 SL1008 - Indice A 119/200...
-
Página 120: Lieferumfang Der Fotofalle
− Bedienungshandbuch − USB-Kabel − Befestigungsgurt Überblick über die Fotofalle Vorderansicht Infrarot-LED Öffnung für den Befestigungsgurt Mikrofon Testlaserstrahl Statusanzeige Kameralinse Taste NACH OBEN Taste NACH UNTEN Bestätigungstaste Öffnung für Python- Kabelschloss Menütaste Bewegungsmelder (PIR-Sensor) Schloss Abdeckung SL1008 - Indice A 120/200... - Página 121 Untenansicht Abdeckung des Anschlusses für Abdeckung Schlossöffnung die Stromversorgung Untenansicht (nach Öffnen der Abdeckung) Externer Anschluss für die 12-V- Gleichstrom-Stromversorgung USB-Anschluss Wahlschalter (SET/OFF/A/B/MANUAL) SD-Kartensteckplatz AV-Out-Anschluss Taste des Batteriefach Batteriefachs SL1008 - Indice A 121/200...
-
Página 122: Sicherheitshinweise
Garantieausschluss zur Folge. HINWEIS: Diese Fotofalle elektronisches Präzisionsgerät. Versuchen Sie nicht, die Fotofalle selbst zu warten, da Sie sich durch das Öffnen des Geräts oder Entfernung Abdeckungen gefährlichen Spannungen oder anderen Gefahren aussetzen könnten. SL1008 - Indice A 122/200... -
Página 123: Definitionen
[OK] Bestätigungstaste: Ermöglicht die Bestätigung der Einstellungen. • Menütaste: Ermöglicht eine Änderung Einstellungen. • Öffnung für Python-Kabelschloss: Ermöglicht das sichere Befestigen der Fotofalle mit einem (nicht im Lieferumfang enthaltenen) Python-Kabelschloss an einem Pfosten oder einem Baum. SL1008 - Indice A 123/200... - Página 124 USB-Anschluss: Mit diesem Anschluss können Sie die Fotofalle über das mitgelieferte USB-Kabel an einen PC anschließen aufgezeichneten Bilder/Videos herunterladen. • Externer Anschluss für die Stromversorgung: Mit diesem Anschluss können eine externe Gleichstromversorgung oder einen Akku (nicht Lieferumfang enthalten) anschließen. SL1008 - Indice A 124/200...
- Página 125 Taste des Batteriefachs: Drücken Sie diese Taste, um das Batteriefach zu entsperren, und ziehen Sie es dann heraus, um Batterien einzulegen oder auszutauschen. HINWEIS: Beachten Sie die korrekte Polarität der Batterien oder der externen Stromversorgung. SL1008 - Indice A 125/200...
- Página 126 : Gibt die Anzahl der Serienbildaufnahmen an. • : Gibt den Batterieladestatus an. > < Nahezu leer Voll Halb voll > < (Symbol aus) (Symbol ein) (Symbol blinkt) > < Bei niedrigem Ladestatus zeigt die Statusanzeige „bAtLO“ an. Bitte Batterien austauschen. SL1008 - Indice A 126/200...
- Página 127 Bildern belegt wird. • PIR : Gibt an, dass für die Fotofalle der PIR- Erkennungsmodus aktiviert ist (die Fotofalle macht Fotos oder Videos, wenn der PIR-Sensor eine Aktivität innerhalb der Reichweite detektiert und die Fotofalle auslöst). SL1008 - Indice A 127/200...
-
Página 128: Einsetzen Von Batterie Und Speicherkarte
HINWEIS: Stellen Sie sicher, dass die Fotofalle auf OFF steht, bevor Sie SD-Karten oder Batterien einlegen oder entfernen. „AA“-Batterien In das integrierte Batteriefach passen 8 „AA“-Batterien. Es müssen qualitativ hochwertige Alkalinebatterien verwendet werden (NUM’AXES-Batterien sind bei NUM’AXES oder bei SL1008 - Indice A 128/200... - Página 129 (nicht im Lieferumfang enthalten) angeschlossen werden kann. • Sicherstellen, dass die Fotofalle auf OFF steht. • Stecker Kabel des externen AC/DC-Netzadapters oder Akkus an den Anschluss für die 12 V-Gleichstromversorgung auf der Gehäuseunterseite der Fotofalle einstecken. SL1008 - Indice A 129/200...
- Página 130 Ihrem Computer, bevor Sie sie in die Fotofalle einsetzen. Neue Karten können nach der Packungsentnahme direkt eingesetzt werden. FORMATIERUNG – Definition: Beim Formatieren einer SD- Speicherkarte löscht das Betriebssystem alle Daten und Dateien auf der Karte. Dann erstellt es eine interne SL1008 - Indice A 130/200...
-
Página 131: Konfiguration Und Einstellung Del Fotofalle
Ihre Fotofalle ausschließlich im PIR-Modus (nicht im Zeitraffermodus). • A (Voreinstellung A) - Umgeht alle Benutzereinstellungen und nutzt folgende Einstellungen: PIR-Modus / Foto / Auflösung: 5MP / Serie: 3P (3 Bilder pro Auslösung) / Zeitlimit: 30 Sekunden SL1008 - Indice A 131/200... - Página 132 Schalter von der Position OFF in die Position SET stellen. • Die Statusanzeige zeigt den aktuellen Status der Fotofalle an. • Drücken Sie die Taste [M] einmal, um zum manuellen Programmiermodus zu wechseln, blinkt die Anzeige SL1008 - Indice A 132/200...
- Página 133 Drücken Sie [OK], um Ihre Auswahl zu speichern. Dann blinkt die Anzeige „burst“ (Burst Shoot = Serienaufnahmen). Drücken Sie die Taste [OK], um zur Einstellung der Serienaufnahmen zu gelangen, oder die Taste [M], um die Einstellung zu verlassen. SL1008 - Indice A 133/200...
- Página 134 Zeitlimitanzeige „T-O“. Drücken Sie die Taste [OK], um zur Einstellung der Serienbildaufnahmen zu gelangen, oder die Taste [M], um die Einstellung zu verlassen. Einstellung der Videoauflösung im PIR-Modus Für Ihre Fotofalle können 2 verschiedene Videoauflösungen programmiert werden: SL1008 - Indice A 134/200...
- Página 135 10 Minuten (10:00) pro Auslösung programmiert werden. • Nach dem Drücken von [OK] zur Bestätigung der Videoauflösung blinken die Buchstaben „T“ und „ᴜ“ in der Statusanzeige. • Drücken Sie einmal auf [OK], um zur Einstellung der SL1008 - Indice A 135/200...
- Página 136 • Drücken Sie [OK], um die Zeitlimit-Einstellung zu speichern. • Nun blinkt das Wort „T“ (Time). Drücken Sie die Taste [OK], um zur Zeiteinstellung zu gelangen, oder die Taste [M], um die Einstellung zu verlassen. SL1008 - Indice A 136/200...
- Página 137 • Drücken Sie die Taste [▲] oder [▼], um den Minutenwert (00 – 59) zu erhöhen oder zu senken. • Drücken Sie [OK], um Ihre Auswahl zu speichern und zur Einstellung des Monats zu gelangen. SL1008 - Indice A 137/200...
- Página 138 Zeitspanne und in den von Ihnen angegebenen Abständen automatisch Fotos. Der Videomodus steht im Zeitraffermodus nicht zur Verfügung. Die Standardeinstellungen für den Zeitraffer: • Zeitspanne: 19:00 bis 07:00 am nächsten Tag • Zeitlimit: 60 Sekunden SL1008 - Indice A 138/200...
- Página 139 Nun blinken die Stundenziffern. • Drücken Sie die Taste [▲] oder [▼], um den Stundenwert (00 – 23) zu erhöhen oder zu senken, und dann [OK], um Ihre Auswahl zu speichern und die Minuten einzustellen. SL1008 - Indice A 139/200...
- Página 140 HINWEIS: Das Zeitlimit für den Zeitraffermodus kann in 5-Sekunden-Schritten von 5 Sekunden (00:05) bis 10 Minuten eingestellt werden (10:00). • Drücken Sie zum Beenden die Taste [M]. Die Statusanzeige zeigt den aktualisierten Status der Fotofalle an. SL1008 - Indice A 140/200...
- Página 141 5 Minuten 3 Bilder. Empfehlungen zur Einstellung des Zeitraffermodus Wenn Zeitrafferfunktion verwenden Batterielebensdauer erhöhen wollen, um eine maximale Anzahl an Bildern machen zu können, empfehlen wir Ihnen, folgendermaßen vorzugehen: Batterien: Lithiumbatterien Bildauflösung: 3 M Zeitlimit: Über 15 Sekunden SL1008 - Indice A 141/200...
-
Página 142: Aufstellen Der Fotofalle
Stellen Sie sicher, dass die Speicherkarte korrekt eingesteckt ist und ausreichend verfügbaren Speicherplatz aufweist. • Überprüfen Sie die korrekte Uhrzeit- und Datumseinstellung. • Prüfen Sie bevor Sie gehen, dass die Fotofalle von SET auf A oder B oder MANUAL gestellt wurde. SL1008 - Indice A 142/200... - Página 143 Beispiel: Montage Befestigung an einem Pfosten oder Baum Effektiver Winkel Effektive Reichweite SL1008 - Indice A 143/200...
- Página 144 Alternativ dazu können Sie ihn auch abschalten, indem Sie 3 Sekunden lang die Taste [M] drücken. • Stellen Sie den Schalter nach Abschluss des Tests wieder von der Position SET in die Position OFF. Warnung: Laserstrahl nicht auf die Augen richten. SL1008 - Indice A 144/200...
-
Página 145: Verwendung Der Fotofalle Im Pir-Erkennungsmodus
Stellen Sie den Wahlschalter in die Position SET, die Statusanzeige zeigt daraufhin den aktuellen Status der Fotofalle an. • Drücken einmal Taste [M], Programmiermodus Manual zu aktivieren. • Wenn die Anzeige „PIR“ blinkt, drücken Sie [OK], um zu SL1008 - Indice A 145/200... - Página 146 Drücken Sie zur Bestätigung einmal die Taste [OK] und dann die Taste [M], um die Einstellung zu verlassen. • Stellen Sie dann den Schalter von der Position SET in die Position MANUAL und schließen Sie die Abdeckung. SL1008 - Indice A 146/200...
-
Página 147: Verwendung Der Fotofalle Im Zeitraffermodus
Drücken Sie zur Bestätigung einmal die Taste [OK] und dann die Taste [M], um die Einstellung zu verlassen. • Für andere Einstellungen folgen Sie bitte den Anweisungen „Konfiguration und Einstellung der Fotofalle – Einstellung des Zeitraffermodus“ (siehe oben), um den TLM-Modus zu SL1008 - Indice A 147/200... -
Página 148: Anzeigen Und Löschen Von Dateien
Anzeige von Dateien auf einem Computer Ihre Fotofalle ist ein Plug- and Play USB-Speichergerät, wenn Sie die Betriebssysteme Windows 2000 / ME / XP / Vista oder Windows 7 benutzen. Diese Fotofalle ist mit MAC 10.6 und höher kompatibel. SL1008 - Indice A 148/200... - Página 149 Wechseldatenträger, scrollen Sie dann zu der Datei, die Sie ansehen möchten, und führen Sie einen Doppelklick auf den Dateinamen aus. Speichern Ihrer Bilder und Videos: Markieren Sie die zu speichernde(n) Datei(en) und ziehen Sie sie auf Ihre SL1008 - Indice A 149/200...
- Página 150 Schalten Sie die Fotofalle ein, indem Sie den Schalter von OFF auf A, B, MANUAL oder SET stellen, und schalten Sie das TV-Gerät ein. • Stellen Sie sicher, dass das TV-Gerät auf den AUX / VIDEO IN Modus umgeschaltet wird. Ausführlichere Informationen finden SL1008 - Indice A 150/200...
- Página 151 Drücken Sie erneut die Taste [OK], wechselt das Gerät vom Vollbildmodus zur Miniaturbildansicht. HINWEIS: Alle Videos werden mit Ton aufgezeichnet. Dieser wird jedoch nur wiedergegeben, wenn Sie die Videos auf dem PC ansehen. TV Out Systemeinstellungen • Drücken Sie einmal die Taste [M]. SL1008 - Indice A 151/200...
- Página 152 Drücken Sie die Taste [OK], um zum Menü d-ALL (LÖSCHEN) und F-t (FORMATIEREN) zu gelangen. • Drücken Sie die Taste [▲] oder [▼], um die gewünschte Funktion auszuwählen: NO-dL (No Delete = Kein Löschen) - Es werden keine Bilder gelöscht. SL1008 - Indice A 152/200...
-
Página 153: Technische Spezifikationen
Ein freier USB 1.1 Anschluss (empfohlen: USB 2.0) • Direct X 9.0 oder höher – Sollte Ihr Betriebssystem bereits umfassen. • Windows-kompatible Soundkarte und Lautsprecher. HINWEIS: Wenn Sie Fragen zu Ihren PC-Spezifikationen haben, wenden Sie sich bitte an Ihren PC-Hersteller. SL1008 - Indice A 153/200... - Página 154 Zeitlimit für PIR-Betrieb: von 5 Sekunden bis zu 1 Stunde in 5-Sekunden-Schritten. • Zeitlimit für TLM-Betrieb: 5 Sekunden bis 10 Minuten in 5- Sekunden-Schritten. • Echtzeituhr für Datums- und Zeitstempel. • Integrierter Temperatursensor. • Datum, Zeit, Temperatur (in °C) und Mondphase sind auf SL1008 - Indice A 154/200...
-
Página 155: Fehlersuche
Batterien, um sie ggf. auszutauschen. Stellen Sie außerdem sicher, dass Sie das Produkt sachgemäß verwenden. Falls das Problem bestehen bleibt, kontaktieren Sie Ihren Händler oder NUM'AXES unter +33.2.38.69.96.27 oder per E- Mail an export@numaxes.com. Je nach Ausmaß der Fehlfunktion kann es sein, dass Sie das Produkt zurücksenden müssen. -
Página 156: Garantie
Zurücksenden des Artikels an den Händler oder an NUM’AXES • Beschädigung des Produkts aufgrund von: − Fahrlässigkeit oder fehlerhafter Bedienung − Nutzung entgegen den Anweisungen bzw. nicht vorgesehene Nutzung − Reparaturen durch nicht zugelassene Personen • Verlust oder Diebstahl SL1008 - Indice A 156/200... -
Página 157: Registrieren Ihres Produkts
, die auf diesem Gerät abgebildet ist, bedeutet, dass dieses Produkt nach dem Ende seiner Betriebszeit getrennt von den Haushaltsabfällen zu entsorgen ist. Entweder sollte es an einer Sammelstelle für elektrische und elektronische Altgeräte abgegeben werden oder, SL1008 - Indice A 157/200... -
Página 158: Zubehöre
Ihrem örtlichen Amt für Abfallentsorgung oder in der Verkaufsstelle dieses Geräts. Zubehöre Si können jederzeit die Zubehöre (Batterie, SD-Karte…) bei Ihrem Verbreiter erwerben. CE-Kennzeichnung Dieses Gerät entspricht den EG-Richtlinien EN55022 : 2010 und EN55024 :2010. www.numaxes.com / export@numaxes.com SL1008 - Indice A 158/200... - Página 159 In caso di malfunzionamento ......... 195 Garanzia ................. 196 Condizioni di garanzia ............ 196 Registrazione del prodotto ..........197 Raccolta e riciclaggio del vostro vecchio apparecchio ... 197 Accessori................. 198 Conformità alle normative Europee ....... 198 SL1008 - Indice A 159/200...
-
Página 160: Composizione Del Prodotto
− Cinghia di ancoraggio Presentazione del prodotto LEDs infrarossi Fessure per la cinghia Microfono Puntatore laser Schermo LCD Obiettivo Tasto SU Tasto GIÙ Tasto OK Foro per cable Lock Tasto MENU Sensore Infrarosso Passivo (PIR) Chiusura Coperchio SL1008 - Indice A 160/200... - Página 161 Foro per Jack di alimentazione lucchetto sotto il pad in gomma Coperchio Ingresso DC Selettore 5 posizioni Porta USB (SET/OFF/A/B/MANUAL) Compartimento per la Uscita TV scheda SD Pulsante per aprire il Vano batterie vano batterie SL1008 - Indice A 161/200...
-
Página 162: Precauzioni Per L'uSo
NOTA: Questo prodotto è un dispositivo elettronico di precizione. Non tentare di riparare da soli, l’apertura del prodotto può esporre a tensioni pericolose e ad altri risci. SL1008 - Indice A 162/200... -
Página 163: Glossario
Python (non in dotazione). • Sensore infrarosso passivo (PIR): permette il rilevamento di soggetti in movimento. • Chiusura: permette di bloccare il coperchio. SL1008 - Indice A 163/200... - Página 164 Vano batterie: posizione in cui installare 8 batterie AA (non in dotazione). • Pulsante per aprire il vano batterie: premere questo pulsante per rimuovere il vano batterie. NOTA: rispettare corretta polarità durante l’inserimento delle batterie o della alimentazione esterna. SL1008 - Indice A 164/200...
- Página 165 Batterie mezze > < Batterie scariche Batterie cariche morte > < (simbolo fisso) (no simbolo) (simbolo > < lampeggiante) Quando le batterie sono scariche, sul schermo LCD compare “bAtLO”. Sostituire le batterie scariche per batterie nuove. SL1008 - Indice A 165/200...
- Página 166 PIR nell’area monitorata). • TLS: indica che l’apparecchio è in modalità Time Lapse (realizzazione di immagini entre intervalli di tempo selezionati dall’utente nel corso di un blocco di tempo SL1008 - Indice A 166/200...
-
Página 167: Impostazioni Di Default
Evitare di utilizzare insieme batterie vecchie e nuove. Evitare di utilizzare insieme diversi tipi di batterie (alcaline, al litio ...). ATTENZIONE: impostare sempre il selettore su OFF prima dell’installazione o rimozione delle batterie. SL1008 - Indice A 167/200... -
Página 168: Installazione Batterie E Scheda Sd
SET, A, B o MANUAL. Memoria La fotocamera dispone di una slot per la memoria che supporta schede SD fino a un massimo di 32 GB (scheda SD non in dotazione). Sul schermo LCD, vedrà il numero di immagini SL1008 - Indice A 168/200... - Página 169 Laddove la scheda SD sia stata utilizzata all’interno di un altro dispositivo, eseguire una formattazione nel vostro computer. Le schede nuove sono pronte per l’uso non appena estratte dall’imballaggio. NOTA: la formattazione elimina tutti i file memorizzati su la scheda SD. SL1008 - Indice A 169/200...
-
Página 170: Configurazione E Programmazione Del Prodotto
• B (modalità preimpostata B) – Questa modalità bypassa tutte le impostazioni effettuate dall’utente e utilizza le seguenti impostazioni: rilevamento PIR / modalità Video / lunghezza video: 10 secondi / risoluzione HD 720 P / Time Out: 30 secondi SL1008 - Indice A 170/200... - Página 171 Programmazione Manuale, l’indicazione “PIR” o “TLS” inizia a lampeggiare sul schermo LCD. • Premere il tasto SU [▲] o GIÙ [▼] per selezionare la modalità Rilevamento PIR. • Premere il tasto [OK] per salvare la selezione. SL1008 - Indice A 171/200...
- Página 172 “burSt” (burst shoot = immagine multipla) inizia a lampeggiare. Premere il tasto [OK] per passare all’impostazione de la modalità Immagine Multipla o premere il tasto [M] per uscire. Impostazione modalità Immagine Multipla in modalità Rilevamento PIR SL1008 - Indice A 172/200...
- Página 173 Immagine Multipla (da 1P a 10P). • Premere il tasto [OK] per salvare la selezione, quindi l’indicazione “T-O” (Time Out) inizia a lampeggiare. Premere il tasto [OK] per passare all’impostazione del Time Out o premere il tasto [M] per uscire. SL1008 - Indice A 173/200...
- Página 174 [OK] per entrare nell’impostazione della lunghezza del filmato o premere il tasto [M] per uscire. Impostazione lunghezza video modalità Rilevamento PIR La fotocamera può registrare video con una durata di 5 secondi (00:05) a 10 minuti (10:00) per attivazione. SL1008 - Indice A 174/200...
- Página 175 È possibile impostare l’intervallo di tempo durante il quale il dispositivo “dorme” tra due attivazioni del sensore PIR. • Dopo aver premuto tasto [OK] salvare l’impostazione della modalità Immagine Multipla o della lunghezza video, l’indicazione “T-O” inizia a lampeggiare SL1008 - Indice A 175/200...
- Página 176 • L’indicazione “PIR” o “TLS” inizia a lampeggiare, premere il tasto [OK] per confermare la modalità desiderata (Rilevamento PIR o Time Lapse). • Premere il tasto SU [▲] o GIÙ [▼] fino a quando la SL1008 - Indice A 176/200...
- Página 177 Premere il tasto [OK] per salvare l’impostazione e entrare nell’impostazione del anno. • Le due cifre del anno lampeggiano. • Premere il tasto SU [▲] o GIÙ [▼] per aumentare o diminuire l’anno (01 – 99). SL1008 - Indice A 177/200...
- Página 178 Lapse (ad esempio dalle 19:00 alle 07:00 del giorno successivo). Una volta terminate le impostazioni del orario di inizio e del orario di fine del blocco di tempo, dovete specificare la frequenza alla quale l’apparecchio scatta foto durante questo blocco di tempo. SL1008 - Indice A 178/200...
- Página 179 Le due cifre dei minuti lampeggiano. • Premere il tasto SU [▲] o GIÙ [▼] per aumentare o diminuire i minuti (00 – 59) poi premere il tasto [OK] per salvare l’impostazione del “orario di inizio” e passare SL1008 - Indice A 179/200...
- Página 180 NOTA: il Time Out in modalità Time Lapse può variare da 5 secondi (00:05) a 10 minuti (10:00) con incrementi di 5 secondi. • Premere il tasto [M] per uscire. Lo schcermo LCD mostra il stato del dispositivo. SL1008 - Indice A 180/200...
- Página 181 Se si utilizza la modalità Time Lapse e si vuole aumentare la durata delle pile e ottenere più foto possibili, si consiglia di utilizzare le seguenti impostazioni: Pile: pile litio Risoluzione foto: 1 stella (3 MP) Time Out: più di 15 secondi SL1008 - Indice A 181/200...
-
Página 182: Montaggio E Posizionamento Del Prodotto
Assicurarsi di aver inserito la scheda di memoria. • Controllare la data e l’ora sono corrette. • Assicurarsi di portare il selettore dalla posizione SET a la posizione A, B o MANUAL prima di andare. SL1008 - Indice A 182/200... -
Página 183: Esempi Di Installazione
Esempi di installazione Montaggio su un palo o un albero Angolo di visione Portata SL1008 - Indice A 183/200... -
Página 184: Orientamento Del Prodotto
3 secondi il tasto [M]. • Dopo aver completato i test, far scorrere il selettore dalla posizione SET alla posizione OFF. ATTENZIONE: non puntare il fascio laser agli occhi. SL1008 - Indice A 184/200... -
Página 185: Uso Del Prodotto In Modalità Rilevamento Pir
Programmazione Manuale. • L’indicazione “PIR” inizia a lampeggiare, premere il tasto [OK] per confermare la modalità Rilevamento PIR. • Premere il tasto SU [▲] o GIÙ [▼] fino a quando l’indicazione “CAM” inizia a lampeggiare. SL1008 - Indice A 185/200... - Página 186 MANUAL poi chiudere il coperchio del dispositivo. Ora lo schermo LCD conta alla rovescia 60 secondi in modo che si può lasciare l’area di copertura, poi la fotocamera scatterà foto o video ogni volta che viene attivato il sensore PIR. SL1008 - Indice A 186/200...
-
Página 187: Uso Del Prodotto In Modalità Time Lapse
Per le altre impostazioni, seguire le istruzioni nel paragrafo “Configurazione programmazione prodotto – Impostazione della modalità Time Lapse”. • Fare scivolare il selettore dalla posizione SET alla posizione MANUAL poi chiudere il coperchio del dispositivo. SL1008 - Indice A 187/200... -
Página 188: Visualizzare E Eliminare Foto E Video
Windows 2000 / ME / XP / Vista / Windows7. Il dispositivo è compatibile con Mac 10.6 e seguenti sistemi operativi. Visualizzare i file su un computer tramite una connessione USB • Assicurarsi che il selettore è in posizione OFF. SL1008 - Indice A 188/200... - Página 189 Eliminare le immagini e i video: evidenziare il file o i file che si desidera eliminare e premere il tasto [Suppr] (cancella) sulla tastiera. Eliminare tutti i file e riformattare la scheda SD: fare SL1008 - Indice A 189/200...
- Página 190 La porta AV sul dispositivo è impostato di default a PAL (PAL = formato TV europeo). Se lo schermo del televisore non lampeggia, allora non c’è bisogno di cambiare l’impostazione AV del dispositivo. Vai direttamente al prossimo punto sulle SL1008 - Indice A 190/200...
- Página 191 L’indicazione “tu” inizia a lampeggiare sul schermo LCD della fotocamera. • Premere una volta il tasto [OK] e vedrete l’indicazione “tu – n” lampeggiare. • Premere il tasto GIÙ [▼] per passare la porta TV del dispositivo da NTSC a PAL. SL1008 - Indice A 191/200...
- Página 192 Premere il tasto SU [▲] o GIÙ [▼] per selezionare la funzione desiderata: NO-dL (No Delete = Non cancellare): nessun file viene eliminato. d-ONE (Delete One = Cancellare uno): solo l’ultimo file viene eliminato. d-ALL (Delete ALL = Cancellare tutte): cancella tutti i file SL1008 - Indice A 192/200...
-
Página 193: Caratteristiche Tecniche
• Porta USB 1.1 disponibile (USB 2.0 consigliata) • Direct X 9.0 o superiore - in genere fornito con il sistema operativo. • Scheda audio e altoparlanti compatibili con Windows. NOTA: per qualsiasi domanda riguardante le caratteristiche del computer, contattare il produtore. SL1008 - Indice A 193/200... - Página 194 Time Out modalità Time Lapse: da 5 secondi a 10 minuti con incrementi di 5 secondi • Sensore di temperatura integrato • Stampa su ogni foto e video: data, ora, temperatura, fase lunare • Formato file: immagine: JPEG / video: motion JPEG SL1008 - Indice A 194/200...
-
Página 195: In Caso Di Malfunzionamento
Nel caso in cui sia necessario inviare il prodotto al servizio assistenza clienti, documentate con una chiara descrizione il difetto riscontrato. Il servizio assistenza clienti provvederà a riparare o sostituire il prodotto. SL1008 - Indice A 195/200... -
Página 196: Garanzia
3. Se il prodotto.è riconosciuto difettoso, NUM’AXES lo riparerà o lo sostituirà a suo insindacabile giudizio. 4. Contro NUM’AXES non è ammesso alcun ricorso, in particolare in caso di cattivo uso, manomissione o uso non conforme del prodotto. SL1008 - Indice A 196/200... -
Página 197: Registrazione Del Prodotto
In questo modo contribuite alla conservazione delle risorse naturali e alla protezione della salute umana. SL1008 - Indice A 197/200... -
Página 198: Accessori
Sono disponibili presso il vostro rivenditore di fiducia accessori e parti di ricambio (pile, schede SD...). Conformità alle normative Europee Questo prodotto è conforme alle normative Europee EN55022 : 2010 e EN55024 :2010. www.numaxes.com / export@numaxes.com SL1008 - Indice A 198/200... - Página 199 SL1008 - Indice A 199/200...
- Página 200 NUM’AXES Z.A.C. des Aulnaies 745 rue de la Bergeresse CS 30157 45161 OLIVET CEDEX - FRANCE Tél. +33 (0)2 38 63 64 40 Fax +33 (0)2 38 63 31 00 www.numaxes.com info@numaxes.com export@numaxes.com SL1008 - Indice A 200/200...