Tabla de contenido
Publicidad
Enlaces rápidos
Use only with a Power Wheels
Requires four "C" (LR14) alkaline batteries for FM Radio/Simulated CD Player/Digital Clock operation.
f Guide de l'utilisateur, incluant les instructions pour l'assemblage
Outils requis pour l'assemblage : tournevis cruciforme (non fourni) et outil d'assemblage (fourni).
Utiliser seulement avec une batterie rechargeable Power Wheels de 12 V au plomb et un chargeur Power Wheels de 12 V muni d'un connecteur de 12 V (fournis).
La radio FM/lecteur de CD factice/horloge numérique fonctionne avec quatre piles alcalines C (LR14).
S Manual del usuario con instrucciones de montaje
Leer este manual y guardarlo con el comprobante de venta original. Para el modelo H0439.
Herramientas necesarias para el montaje: destornillador de estrella (no incluido) y herramienta de ensamblaje (incluida).
Usar únicamente con una batería Power Wheels de 12V de ácido-plomo recargable y un cargador Power Wheels de 12V con conector tipo 12V (ambos incluidos).
El radio FM/toca-CD de juguete/reloj digital funciona con cuatro pilas alcalinas tipo 4 x "C" (LR14) x 1,5V (no incluidas).
e Cadillac, the Wreath & Crest Emblem, Escalade, all related Emblems and vehicle body designs are General Motors Trademarks used under license to Fisher-Price.
f Cadillac, l'emblème de la couronne et du blason, Escalade et tous les emblèmes et designs de carrosseries y afférents sont des marques de General Motors utilisées sous licence par Fisher-Price.
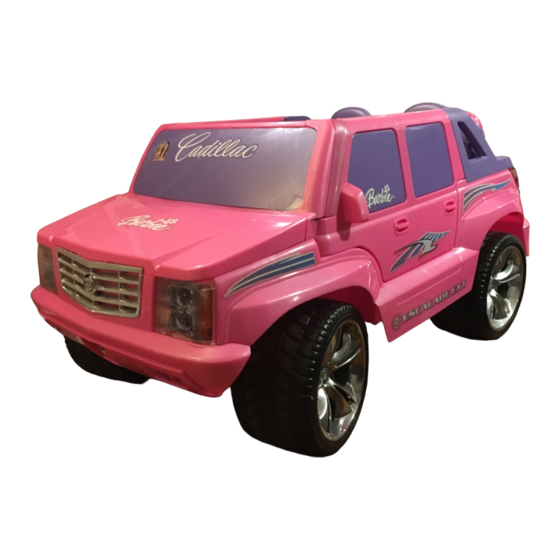
e Product features may vary from the picture above.
f Les caractéristiques du produit peuvent varier par rapport à l'illustration ci-dessus.
S Las características del producto pueden variar de la imagen de arriba.
e Owner's Manual with Assembly Instructions
Please read this manual and save it with your original sales receipt. For Model H0439.
Tools needed for assembly: Phillips Screwdriver (not included); Assembly Tool (included).
®
12 Volt Lead Acid Rechargeable Battery and Power Wheels
Lire le présent guide et le garder avec le reçu de caisse original. Pour le modèle H0439.
LEA LAS INSTRUCCIONES ANTES DE USAR ESTE PRODUCTO.
®
12 Volt Charger with Type 12V Connector (both included).
Publicidad
Tabla de contenido

Manuales relacionados para Fisher-Price Power Wheels Cadillac Escalade EXT


Resumen de contenidos para Fisher-Price Power Wheels Cadillac Escalade EXT
- Página 1 Cadillac, the Wreath & Crest Emblem, Escalade, all related Emblems and vehicle body designs are General Motors Trademarks used under license to Fisher-Price. f Cadillac, l’emblème de la couronne et du blason, Escalade et tous les emblèmes et designs de carrosseries y afférents sont des marques de General Motors utilisées sous licence par Fisher-Price.
- Página 2 Fisher-Price ne se maneja el vehículo sobre ellos. Fisher-Price used indoors. peut être tenue responsable des dommages no se hace responsable de daños a pisos si el •...
-
Página 3: Warning F Avertissement S Advertencia
e WARNINGS AND CAUTIONS f AVERTISSEMENTS ET MISES EN GARDE S ADVERTENCIAS Y PRECAUCIONES e ELECTRICAL HAZARD f DANGERS LIÉS À L’ÉLECTRICITÉ S PELIGRO ELÉCTRICO e WARNING f AVERTISSEMENT S ADVERTENCIA e • Battery can fall out and injure a child if vehicle tips over. Always use battery retainer. •... -
Página 4: Caution F Mise En Garde
e WARNINGS AND CAUTIONS f AVERTISSEMENTS ET MISES EN GARDE S ADVERTENCIAS Y PRECAUCIONES e RIDING HAZARD f DANGERS LIÉS À LA CONDUITE S PELIGRO AL CONDUCIR e WARNING f AVERTISSEMENT S ADVERTENCIA e • Prevent Injuries and Deaths • Direct Adult Supervision Required •... - Página 5 e PARTS f PIÈCES S PIEZAS e • If you experience a problem with this product, or are missing a part, please contact Power Wheels Consumer Relations, rather than return this ® product to the store. • Please identify all parts before assembly and save all packaging material until assembly is complete to ensure that no parts are discarded. Please Note: Some parts of this product have been packed with a protective foam cover.
- Página 6 e PARTS f PIÈCES S PIEZAS e Steering Column f Colonne de direction S Columna de mando e 2 Front Wheels (Left and Right) f 2 roues avant (gauche et droite) S 2 ruedas delanteras (izquierda y derecha) e Steering Wheel f Volant S Manubrio e 2 Wheel Covers...
- Página 7 e PARTS f PIÈCES S PIEZAS e Fasteners Shown Actual Size f Pièces de fixation (dimensions réelles) S Los sujetadores se muestran a tamaño real e 0,9 cm ( ") -16 Lock Nut – 2 f Écrou de sécurité no 16 de 0,9 cm – 2 S Tuerca ciega No.
- Página 8 e PARTS PICTURE f ILLUSTRATION DES PIÈCES S DIAGRAMA DE PIEZAS e Note: Some parts shown are assembled on both sides of the vehicle. f Remarque : Certaines pièces illustrées devront être assemblées de chaque côté du véhicule. S Nota: Algunas de las piezas mostradas se montan en ambos costados del vehículo. H0439pr-0720...
-
Página 9: Battery Charging F Charge De La Batterie
e BATTERY CHARGING f CHARGE DE LA BATTERIE S CARGAR LA BATERÍA e ELECTRICAL HAZARD f DANGERS LIÉS À L’ÉLECTRICITÉ S PELIGRO ELÉCTRICO e WARNING f AVERTISSEMENT S ADVERTENCIA e • Battery can fall out and injure a child if vehicle tips over. Always use battery retainer. •... -
Página 10: Caution Mise En Garde Sprecaución
e BATTERY CHARGING f CHARGE DE LA BATTERIE S CARGAR LA BATERÍA S Fusibles térmicos f Remarques importantes La batería Power Wheels de 12V incluye un • La batterie neuve doit être chargée pendant fusible térmico integrado. Los fusibles térmicos au moins 18 heures avant d’être utilisée CAUTION son dispositivos de seguridad que se restablecen... - Página 11 e BATTERY CHARGING f CHARGE DE LA BATTERIE S CARGAR LA BATERÍA S Notas importantes f • Brancher le connecteur du chargeur sur la e Battery batterie • La nueva batería debe ser cargada f Batterie • Brancher le chargeur sur une prise de durante un periodo de por lo menos S Batería courant standard...
- Página 12 e ASSEMBLY f ASSEMBLAGE S MONTAJE e WARNING f AVERTISSEMENT S ADVERTENCIA e Children can be harmed by small parts, sharp edges and sharp points in the vehicle’s unassembled state, or by electrical items. Care should be taken in unpacking and assembly of the vehicle. Children should not handle parts, including the battery, or help in assembly of the vehicle.
- Página 13 e ASSEMBLY f ASSEMBLAGE S MONTAJE e Wheel Cover e Front Wheel f Enjoliveur e Hubcap f Roue avant f Chapeau de moyeu S Rin e Assembly Tool S Rueda delantera S Tapón f Outil d’assemblage e Wheel Cover S Herramienta de f Enjoliveur ensamblaje S Rin...
- Página 14 e ASSEMBLY f ASSEMBLAGE S MONTAJE e Front End e Front End f Avant f Avant S Extremo delantero S Extremo delantero e Battery Compartment f Compartiment de la batterie S Compartimento de la batería e TOP VIEW e Vehicle f Véhicule f VUE DU DESSUS S Vehículo...
- Página 15 e ASSEMBLY f ASSEMBLAGE S MONTAJE e Headlights e Grille f Phares f Calandre S Faros delanteros S Rejilla e Bumper e • Before applying the labels, wipe the surface f Pare-chocs of the vehicle with a clean, dry cloth to S Defensa e •...
- Página 16 e ASSEMBLY f ASSEMBLAGE S MONTAJE e Plates e Doors f Plates f Portières S Placas S Puertas e • Fit the door pegs onto the holes near the front end of the vehicle. Hint: There is a left and right door. They are designed to be assembled one way.
- Página 17 e ASSEMBLY f ASSEMBLAGE S MONTAJE e Windshield/Dash e Windshield/Dash f Pare-brise/tableau de bord f Pare-brise/tableau vde bord e Motor Harness Connector S Parabrisas/Tablero S Parabrisas/Tablero f Connecteur du câble du moteur S Conector del arnés del motor e Dash Connector f Connecteur du tableau de bord S Conector del tablero...
- Página 18 e ASSEMBLY f ASSEMBLAGE S MONTAJE e Steering Rod e Metal Bar Hole f Barre d’accouplement f Trou de la barre de métal S Varilla de mando S Orificio de la barra de metal e Dash f Tableau de bord e Vehicle Hole S Tablero f Trou du véhicule...
- Página 19 e ASSEMBLY f ASSEMBLAGE S MONTAJE e Steering Wheel f Volant S Manubrio e Steering Column f Colonne de direction S Columna de mando e Assembly Tool e DASH VIEW f Outil d’assemblage f VUE DU TABLEAU DE BORD S Herramienta de ensamblaje S VISTA DEL TABLERO e •...
- Página 20 e ASSEMBLY f ASSEMBLAGE S MONTAJE S • Localizar el radio FM/toca-CD de juguete/ f Conseils de sécurité concernant les piles reloj digital en el tablero. Lors circonstances exceptionnelles, les piles • Desenroscar ambos tornillos en la tapa del pourraient couler et causer des brûlures compartimento de pilas.
- Página 21 e ASSEMBLY f ASSEMBLAGE S MONTAJE • Tirer également sur les deux bouts de la e Hood e Short Seat Belts ceinture de sécurité longue pour qu’ils f Capot f Ceintures de sécurité courtes soient de la même longueur. S’assurer S Cofre S Cinturones de seguridad cortos de faire passer chaque extrémité...
- Página 22 e ASSEMBLY f ASSEMBLAGE S MONTAJE e BACK VIEW f VUE DE L’ARRIÈRE S VISTA DESDE ATRÁS e Seat f Banquette S Asiento e Taillights f Feux arrière S Luces traseras e • Before applying the labels, wipe the surface of the vehicle with a clean, dry cloth to e •...
- Página 23 e ASSEMBLY f ASSEMBLAGE S MONTAJE e Wings f Custodes S Alas e • Insert three #8 x 1,9 cm ( ") screws into e Taillight Tabs the top of the truck bed. Tighten the screws. f Pattes des feux arrière e •...
- Página 24 e LABEL DECORATION f POSE DES AUTOCOLLANTS S DECORACIÓN DE LAS ETIQUETAS e Please Note: Your vehicle comes with replacement warning labels which you can apply over the factory applied warning label if English is not your primary language. Select the warning label with the appropriate language for you. Proper label application will help to keep the labels looking their best! When applying labels, keep the following guidelines in mind: •...
- Página 25 e LABEL DECORATION f POSE DES AUTOCOLLANTS S DECORACIÓN DE LAS ETIQUETAS e REAR VIEW f VUE DE L’ARRIÈRE S VISTA DESDE ATRÁS e DASH VIEW f VUE DU TABLEAU DE BORD S VISTA DEL TABLERO X1000 H0439pr-0720...
-
Página 26: Battery Installation
e BATTERY INSTALLATION f INSTALLATION DE LA BATTERIE S INSTALACIÓN DE LA BATERÍA e IMPORTANT! Use only Power Wheels 12 volt lead-acid rechargeable battery. Use of any other battery will damage your vehicle. Make sure that you ® charge the battery for at least 18 hours using the enclosed Power Wheels 12 volt charger before operating your vehicle for the first time. - Página 27 e BATTERY CARE AND DISPOSAL f ENTRETIEN ET MISE AU REBUT DE LA BATTERIE S MANTENIMIENTO Y ELIMINACIÓN DE LA BATERÍA f Entretien S Mantenimiento e Care Si une batterie fuit, éviter tout contact avec If a battery leak develops, avoid contact with Si ocurre un derrame de la batería, evitar el l’acide répandu et mettre la batterie dans un sac contacto con el ácido que se derramó...
- Página 28 e BATTERY CARE AND DISPOSAL f ENTRETIEN ET MISE AU REBUT DE LA BATTERIE S MANTENIMIENTO Y ELIMINACIÓN DE LA BATERÍA e Disposal f Mise au rebut S Eliminación • Your Power Wheels battery is a non- • La batterie Power Wheels est une batterie ®...
- Página 29 e SAFE DRIVING RULES f RÈGLES POUR UNE CONDUITE SÉCURITAIRE S NORMAS DE SEGURIDAD PARA CONDUCIR e Teach Safety Rules 9. Do not allow your child to drive up steep 6. Ne jamais conduire dans l’obscurité. inclines. The motor may stop and the L’enfant pourrait rencontrer des obstacles to Children vehicle could roll backwards at an...
- Página 30 e SAFE DRIVING RULES f RÈGLES POUR UNE CONDUITE SÉCURITAIRE S NORMAS DE SEGURIDAD PARA CONDUCIR S Los niños pueden desarrollar rápidamente la 4. No permitir que ningún niño maneje el 10. Nunca colocar nada cerca de cualquier habilidad necesaria para conducir este vehículo, vehículo en la calle o cerca de vehículos parte movible.
- Página 31 VEHICLE OPERATION f FONCTIONNEMENT DU VÉHICULE S CÓMO OPERAR EL VEHÍCULO e IMPORTANT! Use this vehicle ONLY outdoors. Most interior flooring can be damaged by riding this vehicle indoors. Fisher-Price ® will not be responsible for damage to the floor if the vehicle is used indoors.
- Página 32 e VEHICLE OPERATION f FONCTIONNEMENT DU VÉHICULE S CÓMO OPERAR EL VEHÍCULO f • Avant de débrancher le dispositif inhibiteur, ADVANCED USE - TO DRIVE s’assurer que l’enfant sait comment manier HIGH SPEED DRIVE le volant, comment démarrer et arrêter le POUR CONDUIRE véhicule, et qu’il connaît les règles de UTILISATION POUR...
- Página 33 e FM RADIO/SIMULATED CD PLAYER/DIGITAL CLOCK USE f UTILISATION DE LA RADIO FM/LECTEUR DE CD FACTICE/HORLOGE NUMÉRIQUE S USO DEL RADIO FM/TOCA-CD DE JUGUETE/RELOJ DIGITAL e Volume e FM Radio Station/Time Display f Volume f Affichage radio FM et heure S Volumen S Estación de radio FM/ visualización de hora...
-
Página 34: Charge Indicator F Témoin De Charge De La Batterie S Indicador De Carga
e FM RADIO/SIMULATED CD PLAYER/DIGITAL CLOCK USE f UTILISATION DE LA RADIO FM/LECTEUR DE CD FACTICE ET HORLOGE NUMÉRIQUE S USO DEL RADIO FM/TOCA-CD DE JUGUETE/RELOJ DIGITAL S Encendido/Volumen • La recepción del radio FM varía de una zona Establecer el reloj digital a otra. - Página 35 e VEHICLE CARE f ENTRETIEN DU VÉHICULE S MANTENIMIENTO DEL VEHÍCULO S • Revisar periódicamente todos los tornillos, e • Check all screws, cap nuts and their f • Vérifier régulièrement les vis, les écrous sujetadores y cubiertas protectoras y protective coverings regularly and tighten borgnes et leur revêtement protecteur etles ajustarlas según sea necesario.
- Página 36 e BUMPER-TO-BUMPER LIMITED WARRANTY* f GARANTIE LIMITÉE PARE-CHOCS À PARE-CHOCS* S GARANTÍA LIMITADA DEL VEHÍCULO* e *One year limited warranty from the date of f *Garantie limitée de un (1) an à partir S Garantía limitada de un año a partir de purchase on the Power Wheels ®...
- Página 37 e PROBLEMS AND SOLUTIONS GUIDE ® IMPORTANT! If you experience a problem with your vehicle, please contact Power Wheels Consumer Relations. PROBLEM POSSIBLE CAUSE SOLUTION Vehicle does not run Undercharged battery Charge the battery. A new battery should have been charged for at least 18 hours before using the vehicle for the first time.
- Página 38 e PROBLEMS AND SOLUTIONS GUIDE PROBLEM POSSIBLE CAUSE SOLUTION Vehicle was running but Loose wires or loose connectors Check all wires and connectors. Make sure the motor suddenly stopped harness connector is tightly plugged into the battery, and that there are no loose wires around the motors. Tripped thermal fuse The built-in thermal fuse may "trip"...
-
Página 39: Forward And Reverse
e PROBLEMS AND SOLUTIONS GUIDE PROBLEM POSSIBLE CAUSE SOLUTION Vehicle runs sluggishly Undercharged battery Charge the battery. A new battery should have been charged for at least 18 hours before using the vehicle for the first time. After first-time use, recharge the battery for at least 14 hours after each use. - Página 40 e PROBLEMS AND SOLUTIONS GUIDE PROBLEM POSSIBLE CAUSE SOLUTION FM Radio does not function Simulated CD is inserted Press the eject button to switch back to FM radio use. Power is off Power automatically turns off after about one hour of non-use. Press the power button to turn it back on.
-
Página 41: Problèmes Et Solutions
f PROBLÈMES ET SOLUTIONS IMPORTANT ! En cas de problèmes avec le véhicule, consulter d’abord la section Problèmes et solutions. Si le problème persiste, communiquer avec le service à la clientèle de Power Wheels. PROBLÈMES CAUSE POSSIBLE SOLUTIONS Le véhicule ne fonctionne pas La batterie n’est pas Charger la batterie. - Página 42 f PROBLÈMES ET SOLUTIONS PROBLÈMES CAUSE POSSIBLE SOLUTIONS Le temps d’autonomie est insuffisant La batterie n’est pas suffisamment chargée Charger la batterie. Une nouvelle batterie doit avoir été chargée (moins de 3 heures par charge). durant au moins 18 heures avant d’être utilisée dans le véhicule pour la première fois.
- Página 43 f PROBLÈMES ET SOLUTIONS PROBLÈMES CAUSE POSSIBLE SOLUTIONS Le véhicule roule très lentement La batterie n’est pas suffisamment chargée Charger la batterie. Une nouvelle batterie devrait avoir été chargée pendant au moins 18 heures avant d’être utilisée dans le véhicule pour la première fois. Après la première utilisation, recharger la batterie pendant au moins 14 heures après chaque utilisation.
- Página 44 f PROBLÈMES ET SOLUTIONS PROBLÈMES CAUSE POSSIBLE SOLUTIONS La radio FM ne fonctionne Le CD factice est dans le lecteur Appuyer sur le bouton Éjection pour utiliser la radio FM. pas du tout La radio est éteinte La radio s’éteint automatiquement après environ une heure si elle n’est pas utilisée.
-
Página 45: S Guía De Problemas Y Soluciones
S GUÍA DE PROBLEMAS Y SOLUCIONES ¡IMPORTANTE! Si llega a tener algún problema con su vehículo, póngase en contacto con el Departamento de Atención al Cliente de Power Wheels. PROBLEMA CAUSA PROBABLE SOLUCIÓN El vehículo no funciona Batería con poca carga Cargar la batería. - Página 46 S GUÍA DE PROBLEMAS Y SOLUCIONES PROBLEMA CAUSA PROBABLE SOLUCIÓN Duración corta (menos de Batería con poca carga Cargar la batería. Una batería nueva se debe cargar durante 1 a 3 horas por carga) lo menos 18 horas antes de usar el vehículo por primera vez. Después de usar el vehículo por primera vez, cargar la batería durante por lo menos 14 horas después de cada uso.
- Página 47 S GUÍA DE PROBLEMAS Y SOLUCIONES PROBLEMA CAUSA PROBABLE SOLUCIÓN El vehículo no funciona bien Batería poco cargada Cargar la batería. Una batería nueva se debe cargar durante por lo menos 18 horas antes de usar el vehículo por primera vez.
- Página 48 S GUÍA DE PROBLEMAS Y SOLUCIONES PROBLEMA CAUSA PROBABLE SOLUCIÓN El radio FM no funciona El CD de juguete está insertado Presionar el botón Expulsar para cambiar a la modalidad de radio FM. La unidad está apagada La unidad se apaga automáticamente después de aproximada- mente una hora de inactividad.