Tabla de contenido
Publicidad
Idiomas disponibles
Idiomas disponibles
Enlaces rápidos
Publicidad
Tabla de contenido

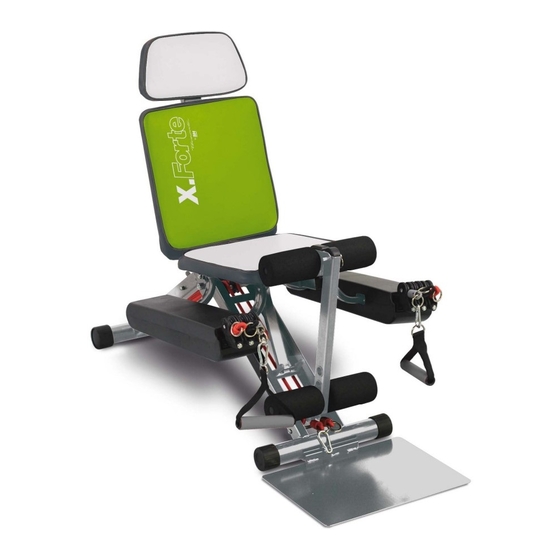
Manuales relacionados para BH FITNESS X.Forte YF88


Resumen de contenidos para BH FITNESS X.Forte YF88
- Página 1 YF88 Instrucciones de montaje y utilización Instructions for assembly and use Instructions de montage et utilisation Montage- und Gebrauchsanleitung Instruções de montagem e utilização Istruzioni di montaggio e uso...
- Página 2 Español INSTRUCCIONES DE SEGURIDAD.- Rogamos leer estas instrucciones atentamente, antes del montaje y del primer uso. Obtendrá importantes informaciones para su seguridad, así como para el uso y para el mantenimiento del aparato de ejercicio. Guardar cuidadosamente las instrucciones para su información, así como para los trabajos de mantenimiento o los pedidos de piezas de repuesto.
- Página 3 Los ejercicios incorrectos o excesivos pueden dañar su salud. Trabaje en el nivel de ejercicio recomendado, no llegue al agotamiento. ■ Preste por favor mucha atención a las indicaciones del manual del entrenamiento. Fig. 1 INSTRUCCIONES DE MONTAJE.- Retire los componentes de la caja y compruebe que tenga todas las piezas Fig.1: Las piezas que vienen sueltas están señalizadas en negrita.
- Página 4 MONTAJE.- MONTAJE DE BRAZO El banco X-Forte viene casi montado, solo hay que montar un brazo de resistencias elásticas. 1. Para desplegar la unidad siga los pasos 1 – 5. 2. Alinee el brazo de resistencias elásticas (5) con los dos orificios situados en la base del asiento (Fig.
-
Página 5: Montaje De Soporte Piernas
MONTAJE DE SOPORTE PIERNAS Para desplegar la unidad siga los pasos 1 – 5 del apartado anterior. En primer lugar coja el tubo redondo con la espuma más pequeña e introdúzcalo en una de las tres posiciones de los orificios del tubo del soporte de piernas más largo (13). -
Página 6: Montaje De La Placa De Pies
lado de las ruedas (soporte sin brazos) con ayuda de la otra mano (Fig. 5). Ajuste la posición del asiento (Fig. 6) MONTAJE DE LA PLACA DE PIES Coja la placa de pies (9) con la solapa hacia arriba, engánchela en la ranura del tubo de soporte inferior delantero. -
Página 7: Ajuste Del Asiento Y Respaldo
La placa de pies (9) está diseñada para usar haciendo los ejercicios en posición de pie. Importante: Asegúrese de que tenga los pies bien apoyados en la placa durante los ejercicios realizados de pie. No salga fuera de la placa durante los ejercicios ni cuando esté... -
Página 8: Uso De Accesorios
Para cambiar la posición del asiento/respaldo ponga una mano por debajo del asiento/respaldo (Fig. a), con la otra mano presione el muelle (3) hacía dentro (Fig. b), baje o suba el asiento/respaldo a la posición deseada y suelte el muelle (3). Asegúrese que las clavijas del muelle están bien enganchadas en los orificios de los tubos de soporte (Fig. - Página 9 Manetas Ponga el gancho de metal en la anilla de la maneta. Luego engánchela con la anilla de una o más de las tres resistencias del brazo (Fig 1a). Después de conecar las manetas con las anillas es conveniente posicionarlas encima de los brazos para facilitar el comienzo del ejercicio (Fig 1b).
-
Página 10: Almacenamiento
Repozacabezas El reposacabezas (12) sirve para apoyar la cabeza durante los ejercicios que se realicen boca arriba. Monte el reposacabezas tirando del pasador ubicado en la parte trasera del respaldo (2) e insértelo en el tubo receptor y ajústelo en una de las 3 posiciones disponibles según su comodidad. -
Página 11: Inspecciones Y Mantenimiento
MANTENIMIENTO Revise y apriete todas las partes de su unidad cada tres meses. Cuando tenga dudas sobre la condición de cualquier parte, le recomendamos que la reponga usando partes originales. El uso de otras partes podría producir lesiones o afectar al rendimiento de la máquina. - Página 12 English SAFETY INSTRUCTIONS.- Please read these instructions carefully before assembling and using the equipment. They contain important information for your safety and for the use and maintenance of the exercise equipment. Keep the instructions safe for future reference and maintenance tasks as well as for ordering spare parts.
- Página 13 Fig. 1 ASSEMBLY INSTRUCTIONS.- Take the components out of the box and make sure that you have all of the pieces, Fig. 1: The loose pieces are highlighted in black. 1- Seat 9- Foot plate 2- Backrest 10- Handgrip 3- Spring retainer 11- Ankle strap 4- Seat adjustment hole 12- Headrest...
- Página 14 ASSEMBLY.- FITTING THE ARMS The X-Forte bench is supplied almost fully assembled, it is only necessary to fit a bank of elastic resistance bands. 1. To unfold the unit, follow steps 1-5. 2. Align the elastic resistance arm (5) with the two holes in the base of the seat (Fig.
- Página 15 FITTING THE LEG SUPPORT To unfold the unit, follow steps 1-5 given in the previous section. First, take the round tube with smaller foam pad and insert it into one of the three hole positions on the longer leg support tube (13). Then fit the smaller foam pad onto the other side of the round tube.
- Página 16 FITTING THE FOOT PLATE Place the foot plate (9) with the lip facing upward, hook it into the slot on the front lower support tube. Lower the plate onto the floor. Make sure the plate is held correctly.
- Página 17 The foot plate (9) is designed for doing exercises while standing. Important: Make sure that your feet are placed squarely on the plate when doing standing exercises. Do not step off the plate during the exercise or when you are attaching or removing the rings.
-
Página 18: Use Of Accessories
To change the position of the seat/backrest place one hand below the seat/backrest (Fig a) and use the other hand to press the spring (3) inward (Fig b), raise or lower to seat/backrest to the desired position and release the spring (3). Make sure that the locating pins for the spring are inserted correctly into the holes on the support tube (Fig c). - Página 19 Handgrips Place the metal hook onto the ring of the handgrip. Then hook it onto the ring of one or more of the three resistance bands for the arm (Fig 1a) After connecting the handgrip to the rings, it is advisable to position them above the arms to make it easier to start the exercise (Fig 1b) Important: Connect the same resistance bands for both arms (Fig 1c).
- Página 20 Headrest The headrest (12) is used to support your head during exercises that are done lying face up. Fit the headrest by pulling the lock pin located at the back of the backrest (2) and insert it into the location tube, adjust it to one of the three available positions to suit your needs.
- Página 21 Français CONSIGNES DE SÉCURITÉ.- Veuillez lire attentivement ces consignes avant le montage et la première utilisation. Vous obtiendrez des informations importantes pour votre sécurité ainsi que pour l’utilisation et la maintenance de l’appareil. Conservez soigneusement ces consignes pour votre information ainsi que pour les travaux de maintenance ou les commandes de pièces de rechange.
- Página 22 ■ Veuillez prêter la plus grande attention aux indications du manuel d'entraînement. Fig. 1 INSTRUCTIONS DE MONTAGE.- Retirez les composants du carton et vérifiez que vous avez bien toutes les pièces Fig.1 : Les pièces sont indiquées en gras : 1- Siège 9- Plaque d’appui pieds 2- Dossier...
- Página 23 MONTAGE.- MONTAGE DU BRAS Le banc X-Forte est livré pratiquement monté ; il ne reste plus qu’à monter les bras avec leurs élastiques. 1. Pour déplier l’unité, suivez les pas 1 – 5. 2. Alignez le bras avec ses élastiques (5) sur les deux orifices situés à la base du siège (Fig.
- Página 24 MONTAGE DU SUPPORT JAMBES Pour déplier l’unité, suivez les pas 1-5 du paragraphe précédent. Prenez d’abord le tube arrondi avec la plus petite pièce de mousse et introduisez- le dans l’une des trois positions des orifices du tube du support de jambes le plus long (13).
- Página 25 du côté des roues (support sans bras) à l’aide de l’autre main (Fig. 5). Réglez la position du siège (Fig. 6) MONTAGE DE LA PLAQUE D’APPUI DES PIEDS Prenez la plaque d’appui des pieds (9) avec le revers vers le haut ; insérez-la dans la rainure du tube du support inférieur avant.
- Página 26 La plaque d’appui des pieds (9) est conçue pour réaliser les exercices debout. Important : Assurez-vous que vos pieds sont bien appuyés sur la plaque pendant les exercices debout. Ne sortez pas de la plaque pendant les exercices ni lorsque vous montez/démontez les anneaux.
-
Página 27: Utilisation D'ACcessoires
Pour changer la position du siège/dossier, mettez la main sous le siège/dossier (Fig. a) et avec l’autre main, pressez le ressort (3) vers l’intérieur (Fig. b), descendez ou montez le siège/dossier à la position souhaitée et lâchez le ressort (3). Assurez-vous que les tiges du ressort sont bien encastrées dans les trous des tubes du support (Fig. - Página 28 Poignées Introduisez le crochet métallique dans l’anneau de la poignée. Puis accrochez la poignée à l’anneau d’un ou plusieurs élastiques du bras (max. 3) (Fig. 1a). Après avoir accroché les poignées aux anneaux, il est recommandé de les placer au-dessus des bras pour faciliter le démarrage de l’exercice (Fig. 1b). Important : Installez les mêmes élastiques sur chaque bras (Fig.
- Página 29 Appui-tête L’appui-tête (12) sert à soutenir la tête pendant les exercices réalisés sur le dos. Montez l’appui-tête en tirant sur le goujon situé à l'arrière du dossier (2) et introduisez-le dans le tube récepteur ; réglez-le sur l’une des 3 positions disponibles, selon le confort souhaité.
-
Página 30: Instruções De Segurança
Português INSTRUÇÕES DE SEGURANÇA Leia estas instruções atentamente antes da montagem e da primeira utilização. Obterá informações importantes de segurança e sobre a manutenção do aparelho de exercício. Guarde cuidadosamente as instruções para futura consulta, assim como para trabalhos de manutenção ou pedidos de peças de substituição. ATENÇÃO: Este equipamento deverá... -
Página 31: Instruções De Montagem
Fig. 1 INSTRUÇÕES DE MONTAGEM Retire os componentes da caixa e comprove se tem todas as peças Fig. 1: As peças que são enviadas soltas estão assinaladas a negrito. 1- Assento 10- Manípulo 2- Apoio para as costas 11- Bandas para os tornozelos 3- Bloqueio mola 12- Apoio para a cabeça 13- Suporte para pernas... - Página 32 MONTAGEM MONTAGEM DO BRAÇO O banco X-Forte é entregue praticamente montado, faltando apenas montar um braço de resistências elásticas. 1. Para desdobrar a unidade siga os passos 1 – 5. 2. Alinhe o braço de resistências elásticas (5) com os dois orifícios situados na base do assento (Fig.
- Página 33 MONTAGEM DO SUPORTE PERNAS Para desdobrar a unidade siga os passos 1 – 5 da secção anterior. Em primeiro lugar, segure no tubo redondo com a espuma mais pequena e introduza-o numa das três posições dos orifícios do tubo de suporte de pernas mais comprido (13).
-
Página 34: Montagem Da Placa De Pés
DESDOBRAMENTO DA UNIDADE Para desdobrar a unidade, coloque-a primeiro numa superfície plana (Fig. 1) e retire a tampa (12) (Fig. 2). Segure a unidade pela pega com uma mão (Fig. 3) e abra-a pelo lado das rodas (suporte sem braços) com ajuda da outra mão (Fig. 5). Ajuste a posição do assento (Fig. -
Página 35: Ajuste Do Assento E Apoio Para As Costas
A placa de pés (9) foi concebida para ser utilizada nos exercícios efectuados de pé. Importante: certifique-se de que tem os pés bem apoiados na placa durante os exercícios realizados de pé. Não saia da placa durante os exercícios nem ao montar/desmontar os anéis. - Página 36 Para mudar a posição do assento/apoio para as costas, coloque uma mão por baixo do assento/apoio para as costas (Fig. a), com a outra mão prima a mola (3) para dentro (Fig. b), baixe ou levante o assento/apoio para as costas até à posição desejada e solte a mola (3).
-
Página 37: Uso De Acessórios
Exemplos de posição do assento/apoio para as costas USO DE ACESSÓRIOS Cada braço pode comportar 3 resistências elásticas. Resistência cinza – nível baixo Resistência preta – nível médio Resistência vermelha – nível alto Cada resistência possui um anel que serve para engatar o manípulo (10) ou banda para os tornozelos (11). - Página 38 Bandas para os tornozelos Coloque o gancho de metal no anel das bandas para os tornozelos. Posteriormente, coloque a banda para o tornozelo e aperte-a bem (Fig. 1, 2). Engate a banda para o tornozelo no anel de uma ou mais das três resistências (Fig.
- Página 39 ARMAZENAMENTO 1. Retire a placa de pés (9), o braço-pernas (13) e o apoio para a cabeça (12). 2. Coloque o assento (1) e o apoio para as costas (2) na posição 1A. 3. Puxe a asa para cima aproximando os pés do suporte. Importante: deixe um espaço entre os pés do suporte para assegurar uma melhor estabilidade.
- Página 40 Italiano ISTRUZIONI DI SICUREZZA.- La preghiamo di leggere le seguenti istruzioni attentamente, prima del montaggio e del primo utilizzo. Otterrà importanti informazioni per la sua sicurezza, oltre che per l’uso e per la manutenzione dell’attrezzo ginnico. Conservare accuratamente le istruzioni per sua informazione, così come per i lavori di manutenzione o gli ordini dei pezzi di ricambio.
- Página 41 Fig. 1 ISTRUZIONI D’INSTALLAZIONE.- Estrarre i componenti dalla scatola e verificare che ci siano tutti i pezzi Fig.1: I pezzi che sono singoli sono segnalati in neretto. 1- Sedile 9- Placca piedi 2- Schienale 10- Impugnatura 3- Blocco molla 11- Cavigliera 4- Orificio di regolazione del 12- Poggiatesta sedile...
-
Página 42: Montaggio Del Braccio
MONTAGGIO.- MONTAGGIO DEL BRACCIO Il banco X-Forte è quasi del tutto montato, bisogna solo montare un braccio delle resistenze elastiche. 1. Per aprire l’unità seguire i passi 1 – 5. 2. Allineare il braccio delle resistenze elastiche (5) con i due orifici situati alla base del sedile (Fig. -
Página 43: Montaggio Del Supporto Gambe
MONTAGGIO DEL SUPPORTO GAMBE Per aprire l’unità seguire i passi 1 – 5 del dispositivo anteriore. Prendere il tubo rotondo con la spugna più piccola e inserirlo in una delle tre posizioni degli orifici del tubo del supporto per le gambe più lungo (13). Successivamente inserire la spugna più... - Página 44 MONTAGGIO DELLA PLACCA DEI PIEDI Prendere la placca dei piedi (9) con la falda verso l’alto, agganciarla alla fessura del tubo di supporto inferiore anteriore. Abbassare la placca sul pavimento. Assicurarsi che la placca sia ben ferma.
- Página 45 La placca dei piedi (9) è disegnata per essere usata durante gli esercizi in piedi. Importante: Assicurarsi di avere i piedi ben appoggiati sulla placca durante gli allenamenti realizzati in piedi. Non uscire fuori dalla placca durante gli allenamenti neanche quando sta montando/smontando gli anelli. REGOLAZIONE DEL SEDILE E SCHIENALE Si può...
-
Página 46: Uso Di Accessori
Per cambiare la posizione del sedile/schienale mettere una mano sotto il sedile/schienale (Fig. a), con l’altra mano premere la molla (3) verso dentro (Fig. b), abbassare o alzare il sedile/schienale in base alla posizione desiderata e lasciare la molla (3). Assicurarsi che le chiavette della molla siano ben collegate agli orifici dei tubi di supporto (Fig. - Página 47 Impugnature Mettere il gancio di metallo nell’anello dell’impugnatura. Successivamente agganciarla con l’anello di una o più delle tre resistenze del braccio (Fig 1a). Dopo aver collegato le impugnature agli anelli è conveniente posizionarle al di sopra delle braccia per facilitare l'inizio dell'allenamento (Fig 1b). Importante: Collegare le stesse resistenze per entrambe le braccia (Fig.
- Página 48 Poggiatesta Il poggiatesta (12) serve ad appoggiare la testa durante gli allenamenti che si realizzano con la testa rivolta verso l’alto. Montare il poggiatesta tirando il perno che si trova nella parte posteriore dello schienale (2) e inserirlo nel tubo del recettore e regolarlo in una delle 3 posizioni disponibili in base alla sua comodità.
-
Página 49: Sicherheitshinweise
Deutsch SICHERHEITSHINWEISE Bitte lesen Sie die Anweisungen aufmerksam durch, bevor Sie das Gerät montieren und es zum ersten Mal benutzen. Sie erhalten wichtige Informationen sowohl zu Ihrer Sicherheit, als auch zum Gebrauch und zur Wartung des Trainingsgerätes. Bewahren diese Anleitungen Ihrer Information für... - Página 50 Abb. 1 MONTAGEANLEITUNG Holen Sie die Komponenten aus der Schachtel und stellen Sie sicher, dass alle Teile vorhanden sind. Lose Teile werden in Fettschrift angezeigt. 1- Sitz 9- Fußplatte 2- Lehne 10- Handhebel 3- Federblockierung 11- Knöchelstütze 4- Öffnung zum Anpassen des 12- Kopfstütze Sitzes 13- Beinstütze...
- Página 51 MONTAGE MONTAGE DES ARMS Die Bank X-Forte wird fast fertig montiert geliefert, es muss nur ein Arm mit elastischen Widerständen montiert werden. 1. Um das Gerät aufzustellen, folgen Sie den Schritten 1 - 5. 2. Passen Sie den Arm mit den elastischen Widerständen (5) an die beiden Öffnungen am unteren Teil des Sitzes an (Abb.
- Página 52 ANBRINGUNG DER BEINSTÜTZE Um das Gerät aufzustellen, folgen Sie den Schritten 1 - 5 des vorangegangenen Abschnitts. Nehmen Sie zuerst das runde Rohr mit der kleinsten Schaumstoffrolle und stecken Sie es in eine der drei Positionen der Öffnungen des Rohres der längsten Beinstütze (13).
- Página 53 AUFKLAPPEN IHRES GERÄTES.- Um das Gerät aufzuklappen, stellen Sie es zunächst auf eine ebene Oberfläche (Abb. 1) und nehmen Sie die Hülle (12) (Abb. 2) ab. Nehmen Sie das Gerät mit einer Hand beim Griff (Abb. 3) und öffnen Sie es von der Seite der Rollen (Stütze ohne Arme) mithilfe der anderen Hand (Abb.
- Página 54 Die Fußplatte (9) ist zum Durchführen von Übungen im Stehen gedacht. Wichtig: Stellen Sie sicher, dass Sie fest mit den Füßen auf der Platte stehen, während Sie Übungen im Stehen durchführen. Verlassen Sie die Platte während des Trainings nicht und auch nicht, während Sie die Ringe anbringen/entfernen. ANPASSEN VON SITZ UND LEHNE Die Position von Sitz und Lehne kann an die entsprechenden Übung angepasst werden.
- Página 55 Um die Position von Sitz/Lehne zu verändern, legen Sie eine Hand unter Sitz/Lehne (Abb. a), mit der anderen Hand drücken Sie die Feder (3) nach innen (Abb. b), schieben Sie Sitz/Lehne nach oben oder unten in die gewünschte Position und lassen Sie die Feder (3) los. Stellen Sie sicher, dass die Stifte der Feder fest in den Öffnungen der Stützrohre (Abb.
- Página 56 Beispiele für Positionen von Sitz/Lehne GEBRAUCH DES ZUBEHÖRS Jeder Arm hat 3 elastische Widerstände. Grauer Widerstand - niedriger Schwierigkeitsgrad Schwarzer Widerstand - mittlerer Schwierigkeitsgrad Roter Widerstand - hoher Schwierigkeitsgrad Jeder Widerstand hat einen Ring zum Festhaken des Handhebels (10) oder der Knöchelstütze (11).
- Página 57 Knöchelstütze Bringen Sie den Metallhaken am Ring der Knöchelstütze an. Legen Sie sodann die Knöchelstütze um Ihren Knöchel und ziehen Sie diese fest (Abb. 1, 2) Haken Sie die Knöchelstütze an den Ring einer oder mehrerer der drei Widerstände (Abb. 3). Kopfstütze Die Kopfstütze (12) dient zum Anlehnen des Kopfes während Übungen, die auf dem Rücken liegend durchgeführt werden.
-
Página 58: Inspektion Und Wartung
LAGERUNG 1. Entfernen Sie die Fußplatte (9), die Beinstütze (13) und die Kopfstütze (12). 2. Bringen Sie den Sitz (1) und die Rückenlehne (2) in Position 1A. 3. Ziehen Sie am Hebel nach oben und bringen Sie die Gestellfüsse zusammen. Wichtig: Lassen Sie zwischen den Füßen des Gestells etwas Raum frei, um so eine höhere Stabilität sicherzustellen. - Página 59 YF 88 Para pedido de repuesto: Para encomenda de peça de recambio: Nº correspondiente a la pieza Cantidad Nº correspondente à peça Quantidade To order replacement parts: Bestellung von Ersatzteilen: Corresponding parts Quantity Nr. des entsprechenden Ersatzteils Menge Pour toute commande pièces détachées Per ordinare pezzi di ricambio: Nº...
- Página 60 Español Por medio de la presente Exercycle S.L. declara que este producto cumple con los requisitos esenciales y cualesquiera otras disposiciones aplicables o exigibles de la Directiva 2004/108/CE. Hereby, Exercycle S.L, declares that this product is in compliance with English the essential requirements and other relevant provisions of Directive 2004/108/EC.
- Página 61 Fax: +33 0810 00 290 Fax: +34 945 56 05 27 e-mail: info@bhfitness.pt e-mail: e-mail: sat@bhfitness.es savfrance@bhfitness.com BH FITNESS NORTH AMERICA BH FITNESS MEXICO BH FITNESS UK 20155 Ellipse BH Exercycle de México S.A. de Halliards, Terrington Drive Foothill Ranch...