Tabla de contenido
Publicidad
Idiomas disponibles
Idiomas disponibles
Enlaces rápidos
Single-Phase 0U Switched
Power Distribution Units with
Individual Outlet Current Metering
PDUMVR20NET • PDUMVR30NET • PDUMVR30HVNET
(AG-0044)
PROTECT YOUR INVESTMENT!
Register your product for quicker service
and ultimate peace of mind.
You could also win an
ISOBAR6ULTRA surge protector-
www.tripplite.com/warranty
1111 W. 35th Street, Chicago, IL 60609 USA • www.tripplite.com/support
16-10-211-933668.indb 1
Owner's Manual
(AG-0045)
a $100 value!
Copyright © 2016 Tripp Lite. All rights reserved.
(AG-0046)
1
2
3
8
8
11
11
12
13
25
12/22/2016 11:36:07 AM
Publicidad
Capítulos
Tabla de contenido

Manuales relacionados para Tripp-Lite PDUMVR20NET


Resumen de contenidos para Tripp-Lite PDUMVR20NET
-
Página 1: Tabla De Contenido
Owner’s Manual Single-Phase 0U Switched Power Distribution Units with Individual Outlet Current Metering PDUMVR20NET • PDUMVR30NET • PDUMVR30HVNET (AG-0044) (AG-0045) (AG-0046) Important Safety Instructions Installation Digital Load Meter Features Configuration and Operation Service Warranty and Product Registration Español Français PROTECT YOUR INVESTMENT! Register your product for quicker service and ultimate peace of mind. -
Página 2: Important Safety Instructions
Important Safety Instructions SAVE THESE INSTRUCTIONS This manual contains instructions and warnings that should be followed during the installation, operation, and storage of this product. Failure to heed these instructions and warnings may affect the product warranty. • The PDU provides the convenience of multiple outlets, but DOES NOT provide surge or line noise protection for connected equipment. -
Página 3: Installation
Installation Mounting the PDU Note: The illustrations may differ somewhat from your PDU model. Regardless of configuration, the user must determine the fitness of hardware and procedures before mounting. The PDU and included hardware are designed for common rack and rack enclosure types and may not be appropriate for all applications. Exact mounting configurations may vary. -
Página 4: Connecting The Pdu
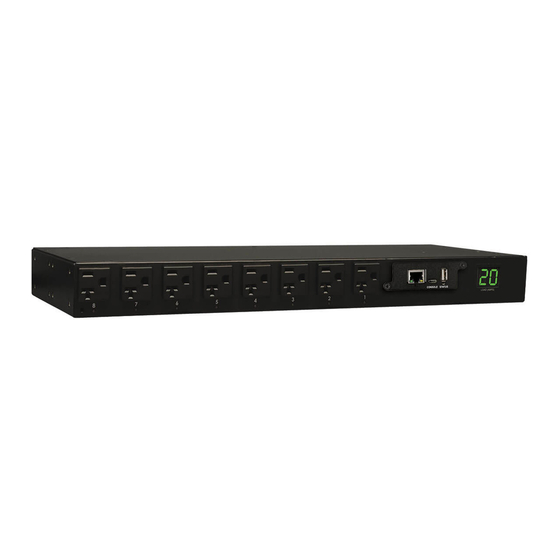
Connect the input plug to your facility’s compatible AC power source. All models contain 2 banks of output receptacles. • PDUMVR20NET and PDUMVR30NET contain 2 banks of 12 5-15/20R Plug type may vary by model. receptacles (24 total). • PDUMVR30HVNET contains 2 banks of 10 C13 and 2 C19 receptacles (24 total). -
Página 5: Dynamic Ip Address Assignment
Installation Dynamic IP Address Assignment Connect Network Interface to Network: Connect a standard Ethernet patch cable to your network using the RJ45 Ethernet port on the PDU’s Network Interface. Note: This port does not support PoE (Power over Ethernet) applications. The interface will attempt to obtain an IP address via DHCP . -
Página 6: Network Settings
Installation Select Option 3: IPv4 setting, or Option 4: IPv6 settings. Select Option 1: Method. Select Option 2: Static. Assign the address, subnet mask, gateway, etc. Save your settings by selecting “A” (apply). Choose “y” to restart PowerAlert now. Close your terminal session. Remove Cable: Remove the cable and proceed to the Test Network Connection section. -
Página 7: Network Connection
Installation Network Service Configuration The following prompts configure the connection methods the Network Interface will accept. Enable Telnet Menu? [Y] Port number? [2112] Enable SNTP? [Y] Port number? [23] Enable SNMP? [Y] Enable FTP? [Y] Port number? [21] Enable Telnet Programs? [Y] Port number? [161] Enable HTTP? [Y] Port number? [5214]... -
Página 8: Digital Load Meter
Digital Load Meter Select Bank Button: This button can be pressed to show total current for each bank. Pressing this button once will display the total current for all of the Bank 1 outlets, located nearest to the input cord. The LED for Bank 1 will illuminate and the total Amp current for Bank 1 outlets will display on the LED screen... - Página 9 Features Circuit Breaker (Select Models): Each bank has its own breaker labeled Bank 1 and Bank 2. If the connected equipment load exceeds the Maximum Load Rating for that bank of the PDU, the circuit breaker will trip. Circuit Breaker (Select Models): If the connected equipment load exceeds the Maximum Load Rating of the PDU, the circuit breaker will trip.
- Página 10 Features Network Interface A1 A2 Ethernet Port: RJ45 jack connects the PDU’s Network Interface to the network using a standard Ethernet patch cable. LEDs indicate the operating conditions (shown in the table below). RJ45 Configuration Port: Use this port to provide a direct terminal connection to a computer with a terminal emulation program.
-
Página 11: Configuration And Operation
Configuration and Operation Remote Monitoring and Control The PDU provides remote monitoring, outlet control and more via Web browser, telnet and SNMP- based Network Management Systems. For more information about configuration and operation of the PDU via the PowerAlert Device Manger, refer to the LX Platform User’s Guide, which can be found by going to www.tripplite.com/support and typing LX Platform in the search field. -
Página 12: Warranty And Product Registration
Warranty and Product Registration 2- YEAR LIMITED WARRANTY Seller warrants this product, if used in accordance with all applicable instructions, to be free from original defects in material and workmanship for a period of 2 years from the date of initial purchase. If the product should prove defective in material or workmanship within that period, Seller will repair or replace the product, in its sole discretion. -
Página 13: Español
Manual del propietario Unidades de Distribución de Energía Monofásicas controlables de 0U con Medición Individual de Corriente de Salida PDUMVR20NET • PDUMVR30NET • PDUMVR30HVNET (AG-0044) (AG-0045) (AG-0046) Instrucciones de seguridad importantes Instalación Medidor de carga digital Características Configuración y funcionamiento Mantenimiento Garantía... -
Página 14: Instrucciones De Seguridad Importantes
Instrucciones de seguridad importantes GUARDE ESTAS INSTRUCCIONES Este manual contiene instrucciones y advertencias que deben seguirse durante la instalación, el funcionamiento y el almacenamiento de este producto. Si no sigue estas instrucciones y advertencias puede afectar la garantía del producto. •... -
Página 15: Instalación
Instalación Montaje de la PDU Nota: Las ilustraciones pueden diferir del modelo de la PDU. Independientemente de la configuración, el usuario debe determinar la aptitud de las herramientas y los pasos antes de montarlo. La PDU y las herramientas incluidas están diseñadas para racks comunes y racks y pueden no ser adecuadas para todas las aplicaciones. -
Página 16: Conexión De La Pdu
CA compatible de la instalación. Todos los modelos contienen 2 bancos de tomacorrientes. • PDUMVR20NET y PDUMVR30NET El tipo de calavija puede variar contienen 2 bancos de tomacorrientes según el modelo. 12 5-15/20R (24 en total). -
Página 17: Asignación De Dirección Ip Dinámica
Instalación Asignación de dirección IP dinámica Conecte a la Red la Interfaz de Red: Conecte un cable patch estándar para Ethernet al puerto de Ethernet RJ45 en la Interfaz de Red del PDU. Nota: Este puerto no admite aplicaciones de PoE (Energía sobre la Ethernet). -
Página 18: Parámetros De Red
Instalación Seleccione Opción 3: Parámetro IPv4, o Opción 4: Parámetros IPv6. Seleccione Opción 1: Método. Seleccione Opción 2: Estática Asigne la dirección, máscara de subred, portal, etc. Guarde sus parámetros seleccionando “A” (aplicar). Elija “y” para reiniciar ahora PowerAlert. Elija su sesión de terminal. Retire el Cable: Retire el cable y proceda a la sección de Probar Conexión de Red. -
Página 19: Conexión A La Red
Instalación Configuración de Servicio de Red. Los siguientes indicadores configuran los métodos de conexión que aceptará la Interfaz de Red. Enable SNTP? [Y] Enable Telnet Menu? [Y] Port number? [2112] Enable FTP? [Y] Port number? [23] Enable SNMP? [Y] Port number? [21] Enable Telnet Programs? [Y] Port number? [161] Enable HTTP? [Y]... -
Página 20: Medidor De Carga Digital
Medidor de carga digital Botón de Selección de Banco: Este botón puede oprimirse para mostrar la corriente total para cada banco. Oprimiendo este botón una vez, mostrará la corriente total para todos los tomacorrientes del Banco 1, localizados más cerca al cable de alimentación. Se encenderá... - Página 21 Características LED del tomacorriente: Una vez que la unidad esté encendida, cada tomacorriente se activa individualmente y cada LED de tomacorriente se iluminará cuando el tomacorriente asociado esté listo para distribuir alimentación de CA. Breaker (modelos selectos): Cada banco tiene su propio breaker etiquetados Bank 1 y Bank 2.
-
Página 22: Interfaz De Red
Características Interfaz de Red A1 A2 Puerto Ethernet: El conector RJ45 conecta la Interfaz de Red del PDU a la red usando un cable patch estándar de Ethernet. Los LEDs indican las condiciones de operación (se muestra en la siguiente tabla). Puerto de Configuración RJ45: Use este puerto para proporcionar una conexión directa de terminal a una computadora con un programa de emulación de terminal. -
Página 23: Configuración Y Funcionamiento
Configuración y funcionamiento Supervisión y control remotos El PDU proporciona monitoreo remoto, control de los tomacorrientes y más mediante un navegador de Internet, telnet y sistemas de administración de red basados en SNMP . Para obtener más información sobre la configuración y operación del PDU mediante la el Administrador de Dispositivo PowerAlert, consulte la Guía del Usuario de la Plataforma LX visitando www.tripplite.com/support y escribiendo LX Platform en el campo de búsqueda. -
Página 24: Garantía
Garantía GARANTÍA LIMITADA DE 2 AÑOS El vendedor garantiza que este producto no tiene defectos originales de materiales ni de mano de obra por un período de dos años a partir de la fecha original de compra, si se utiliza de acuerdo con todas las instrucciones correspondientes. -
Página 25: Français
Guide de l’utilisateur Unités de distribution électrique commutée monophasée 0U avec mesure de tension pour chaque sortie PDUMVR20NET • PDUMVR30NET • PDUMVR30HVNET (AG-0044) (AG-0045) (AG-0046) Importantes consignes de sécurité Installation Indicateur de charge numérique Caractéristiques Configuration et fonctionnement Service Garantie English Español... -
Página 26: Importantes Consignes De Sécurité
Importantes consignes de sécurité Conserver ces directives Ce guide contient des instructions et des mises en garde qui doivent être respectées durant l’installation, l’utilisation et l’entreposage de ce produit. Le non- respect de ces instructions et mises en garde annulera la garantie du produit. •... -
Página 27: Installation
Installation Montage de la PDU Remarque : Les illustrations peuvent être différentes de celles de votre modèle de PDU. Sans tenir compte de la configuration, l’utilisateur doit déterminer la compatibilité de la quincaillerie et les procédures avant d’effectuer l’installation. La PDU et la quincaillerie incluse sont conçues pour des types de bâti et boîtier courants et peuvent ne pas convenir à... -
Página 28: Connexion De La Pdu
Brancher la fiche d’entrée à une prise de courant CA compatible. Tous les modèles contiennent 2 blocs de prises de sortie. • Le PDUMVR20NET et le PDUMVR30NET contiennent 2 blocs Le type de fiche peut de 12 prises de sortie 5-15/20R (24 varier selon le modèle... -
Página 29: Affectation D'uNe Adresse Ip Dynamique
Installation Affectation d’une adresse IP dynamique Brancher l’interface réseau au réseau : connecter un cordon de raccordement Ethernet standard au réseau en utilisant le port Ethernet RJ-45 sur l’interface réseau de la PDU. Remarque : Ce port ne prend pas en charge les applications d’alimentation par Ethernet (PoE). -
Página 30: Paramètres Réseau
Installation Sélectionner l’option 3 : IPv4 setting (paramètre IPv4), ou l’option 4 : IPv6 settings (paramètres IPv6). Sélectionner l’option 1 : Method (méthode). Sélectionner l’option 2 : Static (statique). Attribuer l’adresse, le menu de sous-réseau, la passerelle, etc. Sauvegarder les paramètres en sélectionnant «... -
Página 31: Connexion Réseau
Installation Configuration du service réseau Les messages-guides suivants configurent les méthodes de connexion que la l’interface réseau peut acceptera. Enable SNTP? [Y] Enable Telnet Menu? [Y] Port number? [2112] Enable FTP? [Y] Port number? [23] Enable SNMP? [Y] Port number? [21] Enable Telnet Programs? [Y] Port number? [161] Enable HTTP? [Y]... -
Página 32: Indicateur De Charge Numérique
Indicateur de charge numérique Sélectionner le bouton du bloc : ce bouton peut être pressé pour afficher le courant total pour chaque bloc. En appuyant sur ce bouton une fois, le courant total s’affichera pour toutes les sorties du bloc 1 situées le plus près du câble d’entrée. -
Página 33: Caractéristiques
Caractéristiques DEL de prise : Une fois que l’appareil est mis sous tension, chaque prise individuelle accélère et chaque DEL de prise s’illuminera lorsque la prise leur étant associée est prête à distribuer du courant CA. Disjoncteur (modèles sélectionnés) : chaque bloc a son propre disjoncteur étiqueté... - Página 34 Caractéristiques Interface réseau A1 A2 Port Ethernet : Utiliser cette prise RJ45 pour connecter l’interface réseau de la PDU au réseau avec un cordon de raccordement Ethernet standard. Voyants à DEL indiquent les conditions de fonctionnement (affichées dans le tableau ci-dessous). Port de configuration RJ45 : Utiliser ce port pour fournir un raccordement terminal direct à...
-
Página 35: Configuration Et Fonctionnement
Configuration et fonctionnement Surveillance et commande à distance La PDU fournit une surveillance à distance, une commande de sortie et bien davantage via un navigateur Web, telnet et des systèmes de gestion de réseau basés sur SNMP . Pour en savoir plus au sujet de la configuration et du fonctionnement de la PDU via le gestionnaire de périphérique PowerAlert, se reporter au Manuel de l’utilisateur de la plateforme LX en visitant www.tripplite.com/support et en tapant Platform LX (plateforme LX) dans le champ de recherche. -
Página 36: Garantie
Garantie GARANTIE LIMITÉE DE 2 ANS Le vendeur garantit que ce produit, s’il est utilisé selon toutes les directives applicables, est exempt de défauts d’origine de matériel et de main-d’œuvre pour une période de 2 ans à partir de la date initiale d’achat. Si le produit s’avère défectueux en matériel ou en main-d’œuvre durant cette période, le vendeur réparera ou rem- placera le produit à...