Tripp-Lite PDUMNH20HV Manual Del Propietário
Ocultar thumbs
Ver también para PDUMNH20HV:
- Manual del propietário (32 páginas) ,
- Manual de propietario (18 páginas) ,
- Manual del usario (36 páginas)
Publicidad
Idiomas disponibles
Idiomas disponibles
Enlaces rápidos
Owner's Manual
Monitored Rack PDUs
Models: PDUMNH20HV, PDUMNH30HV & PDUMNH32HV
PROTECT YOUR INVESTMENT!
Register your product for quicker service
You could also win an
ISOBAR6ULTRA surge protector-
www.tripplite.com/warranty
1111 W. 35th Street, Chicago, IL 60609 USA • www.tripplite.com/support
16-11-159-933684.indb 1
High Voltage
1.
2.
3.
3.1
3.2
3.3
4.
5.
and ultimate peace of mind.
a $100 value!
Copyright © 2016 Tripp Lite. All rights reserved.
1
2
3
5
5
8
10
10
11
12
23
34
1/3/2017 3:57:51 PM
Publicidad
Capítulos

Manuales relacionados para Tripp-Lite PDUMNH20HV


Resumen de contenidos para Tripp-Lite PDUMNH20HV
-
Página 1: Tabla De Contenido
Owner’s Manual High Voltage Monitored Rack PDUs Models: PDUMNH20HV, PDUMNH30HV & PDUMNH32HV Important Safety Instructions Features Installation Mounting the PDU Connecting the PDU Networking the PDU Technical Support Warranty & Warranty Registration Español Français Póññêèé PROTECT YOUR INVESTMENT! Register your product for quicker service and ultimate peace of mind. -
Página 2: Important Safety Instructions
1. Important Safety Instructions SAVE THESE INSTRUCTIONS This manual contains instructions and warnings that should be followed during the installation, operation, and storage of this product. Failure to heed these instructions may affect your warranty. • The PDU provides convenient multiple outlets, but it DOES NOT provide surge or line noise protection for connected equipment. -
Página 3: Features
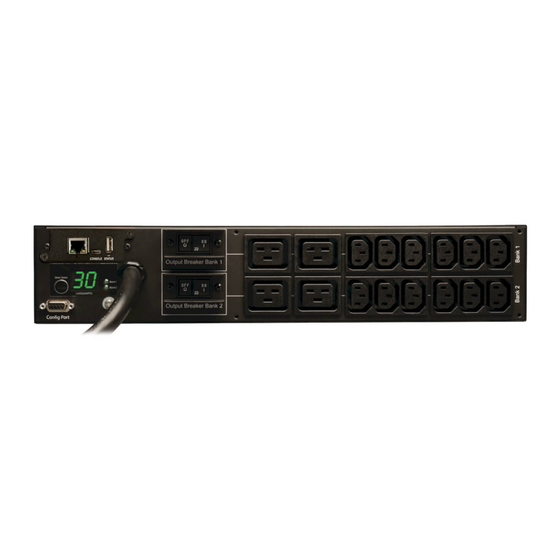
309P plug. L6-30P AC Input Power Cord (PDUMNH30HV): The cord is permanently attached to the PDU and has a NEMA L6-30P plug. AC Input Power Cord (PDUMNH20HV): The detachable cord has an IEC-320-C19 connector and an IEC-320-C20 connector IEC-320-C20 Power Inlet (PDUMNH20HV): The IEC power inlet connects to the included power cord or a compatible user-supplied power cord. - Página 4 2. Features (PDUMNH30HV & PDUMNH32HV): The Digital Load Meter may be set using the Meter Select switch to display the PDU’s total connected load (all 16 outlets-both LEDs illuminated), or the load carried by either the upper bank (Bank 1 LED illuminated) or lower bank (Bank 2 LED illuminated) of 8 outlet receptacles.
-
Página 5: Installation
PDU as shown. You can mount the PDU in a recessed position by 3.1-2 PDUMNH20HV attaching the mounting brackets so they extend beyond the front panel of the PDU. (If you plan to use the... - Página 6 PDU as shown. Mount the PDU vertically by inserting two or more 3.1-3 PDUMNH20HV user-supplied screws through the mounting brackets and into mounting points in the rack or rack enclosure.
- Página 7 (1U models) or 2U mounting brackets to the PDU as shown. Mount the PDU under the 3.1-5 PDUMNH20HV counter by inserting two or more user-supplied screws through the mounting brackets and into secure mounting points.
-
Página 8: Connecting The Pdu
PDU without removing the cable tie. 3.2 Connecting the PDU 3.2-1 Plug the PDU Into a Compatible AC Outlet: 208/230V for PDUMNH20HV, 208/240V for PDUMNH30HV, 230V for PDUMNH32HV. 3.2-1 Your model may vary. 16-11-159-933684.indb 8 1/3/2017 3:57:58 PM... - Página 9 3. Installation 3.2-2 NEMA Adapter Connection (Optional - PDUMNH20HV Only): The PDUMNH20HV includes a plug adapter that adds a NEMA L6-20P plug to the input power cord. Use 3.2-2 this adapter only if you will be connecting the PDUMNH20HV to a NEMA L6-20R outlet.
-
Página 10: Networking The Pdu
3. Installation 3.3 Networking the PDU For network configuration instructions, please refer to the WEBCARDLX owner’s manual (PN 93358E) included with this product. 4. Technical Support Web: www.tripplite.com/support Email: techsupport@tripplite.com 16-11-159-933684.indb 10 1/3/2017 3:57:59 PM... -
Página 11: Warranty & Warranty Registration
5. Warranty & Warranty Registration LIMITED WARRANTY Seller warrants this product, if used in accordance with all applicable instructions, to be free from original defects in material and workmanship for a period of 2 years from the date of initial purchase. If the product should prove defective in material or workmanship within that period, Seller will repair or replace the product, in its sole discretion. -
Página 12: Pdus Monitoreables De Alto Voltaje Para Rack
Manual del Propietario PDUs Monitoreables de Alto Voltaje para Rack Modelos: PDUMNH20HV, PDUMNH30HV y PDUMNH32HV Instrucciones de Seguridad Importantes Características Instalación 3.1 Instalación del PDU 3.2 Conexión del PDU 3.3 Conexión en Red del PDU Soporte Técnico Garantía English Français Póññêèé... -
Página 13: Instrucciones De Seguridad Importantes
1. Instrucciones de Seguridad Importantes CONSERVE ESTAS INSTRUCCIONES Este manual contiene instrucciones y advertencias que deben seguirse durante la instalación, operación y almacenamiento de este producto. La omisión en la observancia de estas instrucciones puede afectar su garantía. • El PDU proporciona múltiples tomacorrientes convenientes, pero NO proporciona protección contra sobretensión o ruido en la línea para los equipos conectados. -
Página 14: Características
2P + E IEC 309P . Cable de alimentación de CA L6-30P (PDUMNH30HV): El cable está conectado permanentemente al PDU y tiene una clavija NEMA L6-30P . Cable de alimentación de CA (PDUMNH20HV): El cable desprendible tiene un conector IEC-320-C19 y un conector IEC-320-C20 Entrada de Alimentación IEC-320-C20 (PDUMNH20HV):... - Página 15 2. Características (PDUMNH30HV y PDUMNH32HV): El Medidor Digital de Carga puede ser configurado usando el Switch Selector de Medidor para mostrar la carga conectada total del PDU (ambos LEDs de las 16 salidas iluminados) o la carga soportada por el banco superior (LED de Banco 1 iluminado) o el banco inferior (LED de Banco 2 iluminado) de 8 tomacorrientes.
-
Página 16: Instalación
Rack: Use tres tornillos para instalar cada uno de los dos soportes de instalación más grandes al PDU como se muestra. 3.1-2 PDUMNH20HV Puede instalar el PDU en una posición empotrada colocando los soportes de instalación para que sobresalgan de la parte frontal del PDU. - Página 17 PDU como se muestra. Instale 3.1-3 PDUMNH20HV verticalmente el PDU insertando dos o más tornillos suministrados por el usuario a través de los soportes de instalación y en los puntos de instalación en el rack o gabinete.
- Página 18 (modelos de 1U) o 2U al PDU 3.1-5 PDUMNH20HV como se muestra. Instale el PDU bajo el mostrador insertando dos o más tornillos suministrados por el usuario a través de los soportes de instalación y en puntos seguros de...
-
Página 19: Conexión Del Pdu
PDU sin retirar el amarre del cable. 3.2 Conexión del PDU 3.2-1 Enchufe el PDU en una Salida de CA Compatible: 208V / 230V para PDUMNH20HV, 208V / 240V para PDUMNH30HV, 230V para PDUMNH32HV. 3.2-1 Su modelo puede variar. 16-11-159-933684.indb 19... - Página 20 NEMA L6-20P al 3.2-2 cable de alimentación. Use este adaptador únicamente si conectará el PDUMNH20HV a un tomacorrientes NEMA L6-20R. Inserte el conector IEC 60320 C19 del adaptador en el conector IEC 60320 C20 del cable de alimentación.
-
Página 21: Conexión En Red Del Pdu
3. Instalación 3.3 Conexión a red del PDU Para instrucciones de configuración de red, consulte por favor el manual del propietario de la tarjeta WEBCARDLX (PN 93358E) incluido con este producto. 4. Soporte Técnico www.tripplite.com/support Correo Electrónico: techsupport@tripplite.com 16-11-159-933684.indb 21 1/3/2017 3:58:06 PM... -
Página 22: Garantía
5. Garantía GARANTÍA LIMITADA El vendedor garantiza este producto, si se usa de acuerdo con todas las instrucciones aplicables, de que está libre de defectos en material y mano de obra por un período de 2 años a partir de la fecha de compra inicial. Si el producto resulta defectuoso en material o mano de obra dentro de ese período, el vendedor reparará... -
Página 23: Français
Manuel de l'utilisateur PDU à bâtis surveillées haute tension Modèles : PDUMNH20HV, PDUMNH30HV et PDUMNH32HV Consignes de sécurité importantes Caractéristiques Installation 3.1 Montage de la PDU 3.2 Raccordement de la PDU 3.3 Fonctionnement en réseau de la PDU 32 Soutien technique... -
Página 24: Consignes De Sécurité Importantes
1. Consignes de sécurité importantes CONSERVEZ CES INSTRUCTIONS Ce manuel contient des instructions et des avertissements qui doivent être respectés pendant l'installation, l'utilisation et l'entreposage de ce produit. Le non-respect de ces instructions pourrait avoir une incidence sur la garantie du produit. •... -
Página 25: Caractéristiques
Cordon d'alimentation d'entrée CA L6-30P (PDUMNH30HV) : Le cordon est attaché en permanence à la PDU et comporte une fiche NEMA L6-30P . Cordon d'alimentation d'entrée CA (PDUMNH20HV) : Le cordon amovible comporte un connecteur IEC-320-C19 un connecteur IEC-320-C20 Entrée d'alimentation IEC-320-C20 (PDUMNH20HV) : L'entrée d'alimentation IEC se branche au cordon... - Página 26 2. Caractéristiques (PDUMNH30HV et PDUMNH32HV) : L'indicateur de charge peut être configuré en utilisant le commutateur de sélection de l'indicateur pour afficher la charge totale connectée à la PDU (les 16 sorties - les deux voyants à DEL allumés), ou la charge transportée par le banc supérieur (voyant à...
-
Página 27: Installation
à la PDU comme illustré. Vous pouvez monter la PDU dans une position 3.1-2 PDUMNH20HV encastrée en fixant les supports de montage de façon à ce qu'ils dépassent le panneau avant de la PDU. (Si l'étagère de rétention du cordon est utilisée, fixer les... - Página 28 à la PDU comme illustré. Monter la PDU verticalement en insérant au moins 3.1-3 PDUMNH20HV deux vis fournies par l'utilisateur à travers les supports de montage et dans les points de montage ou le boîtier pour bâti.
- Página 29 à la PDU comme illustré. Monter la PDU sous le comptoir 3.1-5 PDUMNH20HV en insérant au moins deux vis fournies par l'utilisateur à travers les supports de montage et dans les points de montage solides.
-
Página 30: Raccordement De La Pdu
PDU sans avoir à retirer l'attache de câble. 3.2 Raccordement de la PDU 3.2-1 Brancher la PDU dans une sortie CA compatible : 208/230 V pour PDUMNH20HV, 208/240 V pour PDUMNH30HV, 230 V pour PDUMNH32HV. 3.2-1 Le modèle peut varier. 16-11-159-933684.indb 30... - Página 31 3. Installation 3.2-2 Connexion de l'adaptateur NEMA (optionnel - PDUMNH20HV seulement) : La PDUMNH20HV inclut un adaptateur de fiche qui ajoute une fiche NEMA L6-20P au cordon 3.2-2 d'alimentation d'entrée. Utiliser cet adaptateur uniquement si vous connectez la PDUMNH20HV à une prise NEMA L6-20R.
-
Página 32: Fonctionnement En Réseau De La Pdu
3. Installation 3.3 Fonctionnement en réseau de la PDU Pour des instructions sur la configuration en réseau, veuillez vous référer au manuel de l'utilisateur de la WEBCARDLX (n° de pièce 93358E) inclus avec ce produit. 4. Soutien technique Web : www.tripplite.com/support Adresse électronique : techsupport@tripplite.com 16-11-159-933684.indb 32 1/3/2017 3:58:09 PM... -
Página 33: Garantie
5. Garantie GARANTIE LIMITÉE Le vendeur garantit ce produit, s'il est utilisé conformément à toutes les instructions applicables, est exempt de tous défauts de matériaux et de fabrication pour une période de 2 ans à partir de la date d'achat initiale. Si le produit s'avère défectueux en raison d'un vice de matière ou de fabrication au cours de cette période, le vendeur s'engage à... -
Página 34: Руководство Пользователя
Руководство пользователя Высоковольтные контролируемые стоечные PDU Модели: PDUMNH20HV, PDUMNH30HV и PDUMNH32HV Важные указания по технике безопасности Функциональные возможности Установка Монтаж PDU Подключение PDU Включение PDU в сеть Техническая поддержка Гарантийные обязательства English Español Français 1111 W. 35th Street, Chicago, IL 60609 USA • www.tripplite.com/support Охраняется... -
Página 35: Важные Указания По Технике Безопасности
1. Важные указания по технике безопасности СОХРАНИТЕ НАСТОЯЩИЕ УКАЗАНИЯ В настоящем руководстве содержатся указания и предупреждения, которые необходимо соблюдать в процессе установки, эксплуатации и хранения данного изделия. Игнорирование этих указаний может привести к потере гарантии. • Блок распределения питания (PDU) оснащен несколькими удобными розетками, но НЕ обеспечивает защиту подключенного... -
Página 36: Функциональные Возможности
Входной шнур питания переменного тока L6-30P (для мод. PDUMNH30HV): шнур прикреплен к PDU неразъемным способом и оснащен разъемом типа NEMA L6-30P. Входной шнур питания переменного тока (для мод. PDUMNH20HV): отсоединяемый шнур оснащен разъемом IEC-320-C19 ( ) и разъемом IEC- 320-C20 ( Входной... - Página 37 2. Функциональные возможности (Для мод. PDUMNH30HV и PDUMNH32HV): цифровой измеритель нагрузки может быть настроен с помощью переключателя выбора измерительных приборов на отображение полной нагрузки, создаваемой всеми подключенными к PDU потребителями (все 16 розеток ― горят оба СИДа), либо нагрузки, приходящейся на верхнюю группу (горит СИД "Bank 1" ("Группа 1")) или нижнюю группу...
-
Página 38: Установка
помощью трех винтов прикрепите оба удлиненных монтажных кронштейна к корпусу PDU, как показано на рисунке. PDU может монтироваться заподлицо путем 3.1-2 PDUMNH20HV прикрепления монтажных кронштейнов таким образом, чтобы они выходили за переднюю панель PDU. (Если планируется использование кронштейна для фиксации... - Página 39 (высота 0U): с помощью трех винтов прикрепите оба укороченных монтажных кронштейна к корпусу PDU, как показано на рисунке. Прикрепите PDU вертикально 3.1-3 PDUMNH20HV путем ввертывания двух или более винтов (в комплект поставки не входят) через монтажные кронштейны в отверстия, соответствующие точкам монтажного...
- Página 40 (для моделей высотой 1U) монтажных кронштейна или монтажных кронштейна размером 2U к корпусу PDU, как показано 3.1-5 PDUMNH20HV на рисунке. Закрепите PDU под прилавком путем ввертывания двух или более винтов (в комплект поставки не входят) через монтажные кронштейны в отверстия, расположенные...
-
Página 41: Подключение Pdu
кабельной стяжки. 3.2 Подключение PDU 3.2-1 Включите PDU в совместимую с ним розетку сети переменного тока напряжением 208/230 В для мод. PDUMNH20HV, 208/240 В для мод. PDUMNH30HV, 230 В для мод. PDUMNH32HV. Ваша модель может 3.2-1 отличаться от представленных. 16-11-159-933684.indb 41... - Página 42 3.2-2 дополнительным разъемом типа NEMA L6-20P. Этот переходник следует использовать только при подключении устройства модели PDUMNH20HV к розетке типа NEMA L6-20R. Вставьте разъем IEC 60320 C19 ( переходника в разъем IEC 60320 C20 ( входного шнура питания. Зафиксируйте соединение с помощью зажима для фиксации...
-
Página 43: Включение Pdu В Сеть
3. Установка 3.3 Включение PDU в сеть Указания по настройке сети изложены в руководстве пользователя устройства WEBCARDLX (PN 93358E), поставляемом в комплекте с ним. 4. Техническая поддержка Веб-страница: www.tripplite.com/support Эл. почта: techsupport@tripplite.com 16-11-159-933684.indb 43 1/3/2017 3:58:11 PM... -
Página 44: Гарантийные Обязательства
5. Гарантийные обязательства ОГРАНИЧЕННАЯ ГАРАНТИЯ Продавец гарантирует отсутствие изначальных дефектов материала или изготовления в течение 2 лет с момента первой покупки данного изделия при условии его использования в соответствии со всеми применимыми к нему указаниями. В случае проявления каких-либо дефектов материала...