Tabla de contenido
Publicidad
Enlaces rápidos
CONTENTS
• CONTENU • CONTENIDO
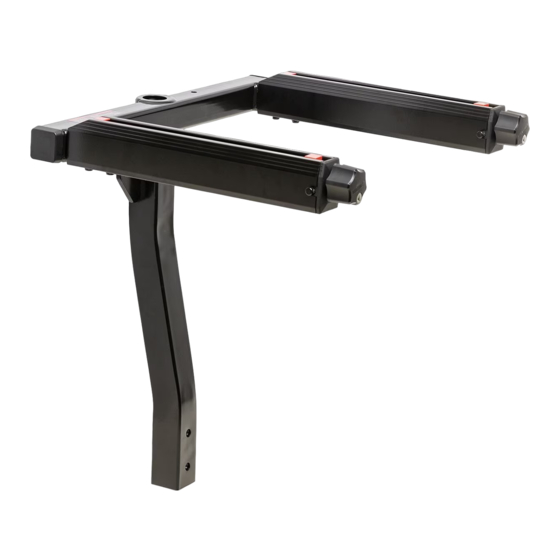
mast (1X)
mât (x 1)
mástil (1x)
hitch lock (1X)
serrure d'attelage (x 1)
cerrojo para enganche (1X)
Weight limits for the EXO system are defined by the accessories installed. Please refer to each accessory's
instructions for weight limits. Only EXO-specific accessories should be used on the EXO system.
Les limites de charge du système EXO dépendent des
accessoires installés. Les instructions accompagnant chacun
des accessoires indiquent ces limites. Avec le système EXO, on
ne doit employer que les accessoires qui lui sont spécifiques.
Pour le français, aller à la page 7.
Instruction #1036039A - page 1 of 10
arms (1X)
bras (x 1)
brazos (1x)
bridge pin (1X)
lock core (2X)
broche de sûreté (x 1)
serrure (x 2)
pasador (1x)
cerradura (2X)
key (2X)
clé (x 2)
llave (2X)
LOAD CAPACITY
®
EXO TopShelf™
6 mm wrench (1X)
clé de 6 mm (x 1)
llave de 6 mm (1x)
lock pin (1X)
goupille de blocage (x 1)
pasador de bloqueo (1X)
lock washer (3X)
rondelle de sécurité (x 3)
arandela grower (3X)
flat washer (3X)
knob (1X)
rondelle plate (x 3)
bouton (x 1)
arandela plana (3X)
perilla (1x)
• CAPACITÉ • CAPACIDAD DE CARGA
Los límites de peso para el sistema EXO están determinados por
los accesorios instalados. Por favor, consulte las instrucciones de
cada accesorio para conocer dichos límites. En el sistema EXO
sólo deben utilizarse accesorios específicos para ese sistema.
screw (3X)
vis (x 3)
turnillo (3X)
jack (3X)
patte (x 3)
gato (3X)
not to scale
• non à l'échelle • fuera de escala
Para español ir a la página 7.
Publicidad
Tabla de contenido

Manuales relacionados para Yakima EXO TopShelf


Resumen de contenidos para Yakima EXO TopShelf
- Página 1 ® EXO TopShelf™ CONTENTS • CONTENU • CONTENIDO 6 mm wrench (1X) mast (1X) clé de 6 mm (x 1) mât (x 1) llave de 6 mm (1x) mástil (1x) arms (1X) bras (x 1) brazos (1x) lock pin (1X)
-
Página 2: Assembly And Installation
ALL moving parts! INSERT THE EXO TOPSHELF™ MAST. A. Insert the mast into the EXO SwingBase™ as shown. B. Use the provided 6 mm wrench to install 2 bolts, lock washers, and flat washers as shown on the front of the 30 Nm swing plate. - Página 3 INSTALL THE ARMS. 1.5 Nm NOTE: If you choose not to use the hitch lock, install the bridge pin in its place. A. Lower the arms onto the mast as shown. B. Install the knob at the rear of the mast and tighten it to 1.5 Nm. C.
- Página 4 B. Remove the pin. C. Remove the knob. D. Store the knob in the upper hole. E. Rotate the EXO TopShelf to the 180° position. F. Insert the lock pin, reattach the lock or bridge pin, and reinstall the knob.
- Página 5 OPTIONAL: USE THE INCLUDED JACK TO LEVEL AND STABILIZE THE EXO TOPSHELF™. If you intend to keep A. Choose the appropriate height of tubing, ensure the base of the your EXO System jack is in its lowest position, and insert the jack base into the tube.
-
Página 6: Recommended Accessories
TopShelf™, in which case you will need to change A. Open the driver-side arm of the EXO SwingBase™. the EXO TopShelf arms to the outer position. B. Remove bolts and washers. Lift from EXO SwingBase. C. Reinstall the cap onto EXO SwingBase. -
Página 7: Assemblage Et Installation
F. Introduzca el pasador de bloqueo, instale nuevamente el cerrojo, o el pasador, y vuelva a instalar la perilla. POUR REFERMER L’EXO SWINGBASE NOTA: Es posible hacer girar el EXO TopShelf con cualquier accesorio EXO instalado. A. Tirer la goupille de la charnière. -
Página 8: Desinstalación
D. Ranger l’EXO TopShelf à l’abri. Ciertos vehículos pueden presentar problemas de interferencia con AVERTISSEMENT determinados accesorios EXO instalados en el EXO TopShelf. En ese caso, tendrá que extender los brazos del mismo hacia afuera. Si l’on monte l’EXO DoubleUp sur l’EXO TopShelf... -
Página 9: Important Warnings
à www. In order to replace any lost or defective keys, note the lock and key yakima.com. numbers below and register them at www.yakima.com. Anote el número de su llave: Record Your Key Number:... -
Página 10: Advertencias Importantes
Para reemplazar una llave perdida o defectuosa, anote más abajo los números de la cerradura y de la llave y regístrelos en www.yakima.com. Anote el número de su llave: (grabado en las llaves de bloqueo)