Publicidad
CONTENTS
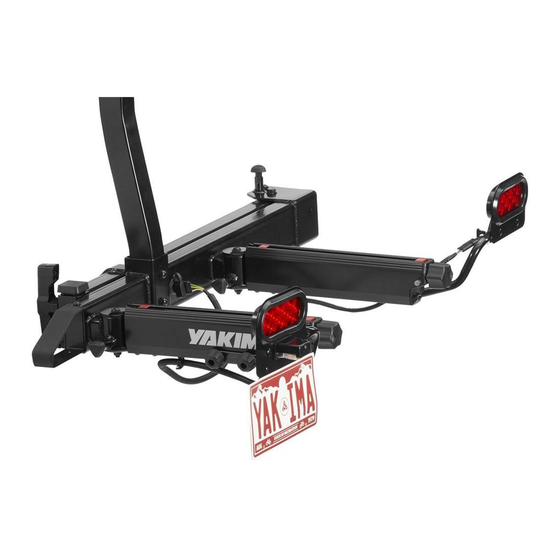
• CONTENU • CONTENIDO
left light tube (1X)
support de feu gauche (x 1)
tubo para luz izquierda (1x)
vehicle wiring harness (1X)
faisceau de branchement au véhicule (x 1)
arnés de cables del vehículo (1X)
Pour le français, aller à la page 7.
Instruction #1036058B - page 1 of 10
®
right light tube (1X)
support de feu droit (x 1)
tubo para luz derecha (1x)
left light (1X)
feu gauche (x 1)
luz izquierda (1x)
thumbscrew (2X)
molette (x 2)
tuerca moleteada (2X)
10 mm wrench (1X)
right light (1X)
clé de 10 mm (x 1)
feu droit (x 1)
llave de 10 mm (1x)
luz derecha (1x)
Para español ir a la página 7.
EXO LitKit™
screw (2X)
nut (4X)
vis (x 2)
écrou (x 4)
tornillo (2X)
tuerca (4X)
bolt (4X)
washer (4X)
boulon (x 4)
rondelle (x 4)
tornillo (4X)
arandela (4X)
clip (6X)
collier (x 6)
clip (6X)
knob (4X)
bouton (x 4)
perilla (4x)
main wiring harness (1X)
faisceau électrique (x 1)
arnés principal de cables (1X)
Publicidad
Tabla de contenido

Manuales relacionados para Yakima EXO LitKit


Resumen de contenidos para Yakima EXO LitKit
- Página 1 ® EXO LitKit™ CONTENTS • CONTENU • CONTENIDO screw (2X) nut (4X) left light tube (1X) vis (x 2) écrou (x 4) support de feu gauche (x 1) tornillo (2X) tuerca (4X) tubo para luz izquierda (1x) right light tube (1X)
- Página 2 Then, pull the pin on the passenger-side arm and swing it out until it locks into place. NOTE: The EXO LitKit is not intended to remain installed when the EXO SwingBase arms are folded back to their stowed positions.
- Página 3 NOTE: Use the inner 2 holes unless you are using the EXO SwingBase™ with the EXO DoubleUp™ (2-Bike Carrier) or EXO GearWarrior (Basket). If so, use the outer 2 holes to install the EXO LitKit™. ALTERNATIVE LICENSE PLATE MOUNT INSTALL YOUR LICENSE PLATE.
- Página 4 INSTALL THE CLIPS. Install the cable clips by pressing them into the holes at the locations shown. PLUG IN THE MAIN WIRING HARNESS. Open the plug cover on the EXO SwingBase™ and plug in the main wiring harness. Instruction #1036058B - page 4 of 10...
- Página 5 PLUG THE MAIN HARNESS INTO THE LIGHTS. Plug the main wiring harness into the the left and right side lights as shown. CONNECT THE EXO ROUTE THE MAIN WIRING LITKIT™ TO YOUR VEHICLE. HARNESS THROUGH THE CLIPS. Route the wiring harness through the cable clips Connect one end of the vehicle wiring you installed in step 5.
-
Página 6: Care And Maintenance
REMOVAL IMPORTANT! The arms of the EXO SwingBase™ cannot be folded in with the EXO LitKit™ installed. We recommend removing it when not in use so you can return your EXO SwingBase to the stowed position. • Unplug the vehicle wiring harness from your vehicle and the back of the EXO SwingBase™. - Página 7 Ensuite, du côté passager, tirer d’abord la goupille et déplier le bras lugar. Luego, tire del pasador del brazo del lado pasajero y gírelo jusqu’à ce qu’il se verrouille. REMARQUE : les feux EXO LitKit ne sont hacia afuera hasta que quede bloqueado en su lugar. NOTA: El EXO pas faits pour rester installés quand les bras du EXO SwingBase sont...
- Página 8 SwingBase si les feux EXO LitKit sont installés. Nous SwingBase™ con el EXO LitKit™ instalado. Recomendamos recommandons de déposer les feux quand ils ne servent pas retirarlo cuando no se utilice para que pueda volver a colocar el afin de pouvoir replier l’EXO SwingBase en position fermée.
-
Página 9: Important Warnings
à www. In order to replace any lost or defective keys, note the lock and key yakima.com. numbers below and register them at www.yakima.com. Instruction #1036058B - page 9 of 10... -
Página 10: Advertencias Importantes
Usted debe respetar al pie de la letra estas instrucciones de uso y utilizar solamente las piezas de origen provistas. Para reemplazar una llave perdida o defectuosa, anote más abajo los números de la cerradura y de la llave y regístrelos en www.yakima.com. Instruction #1036058B - page 10 of 10...