Tabla de contenido
Publicidad
Idiomas disponibles
Idiomas disponibles
Enlaces rápidos
ATTACH YOUR RECEIPT HERE
Serial Number _____________________________ Purchase Date ______________________
Questions, problems, missing parts? Before returning to your retailer, call our customer
service department at 1-877-447-4768, 8:00 a.m. – 4:30 p.m., CST, Monday – Friday
or e-mail us at customerservice@ghpgroupinc.com.
NATURAL GAS GRILL
Model #DGP397SNN / DGP397SNN-D / DGP397CNN /
DGP397CNN-D / DGP397GNN / DGP397GNN-D
1
3 BURNER PREMIER
/ DGP397MNN / DGP397MNN-D
Français p. 30
XX
Français p.
Español p. 59
XX
Español p.
Rev. 08/02/2019
Publicidad
Capítulos
Tabla de contenido
Solución de problemas

Manuales relacionados para Dyna-Glo DGP397SNN


Resumen de contenidos para Dyna-Glo DGP397SNN
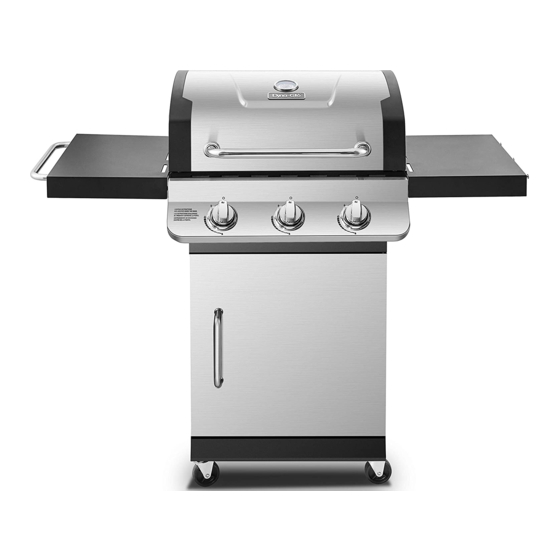
- Página 1 3 BURNER PREMIER NATURAL GAS GRILL Model #DGP397SNN / DGP397SNN-D / DGP397CNN / DGP397CNN-D / DGP397GNN / DGP397GNN-D / DGP397MNN / DGP397MNN-D Français p. 30 Français p. Español p. 59 Español p. ATTACH YOUR RECEIPT HERE Serial Number _____________________________ Purchase Date ______________________ Questions, problems, missing parts? Before returning to your retailer, call our customer service department at 1-877-447-4768, 8:00 a.m.
-
Página 2: Tabla De Contenido
TABLE OF CONTENTS Safety Information ........................3 Package Contents ........................5 Hardware Contents ........................6 Preparation ..........................6 Assembly Instructions ........................ 7 Operation Instructions ......................... 19 Care and Maintenance ......................... 21 Troubleshooting ........................... 24 Warranty ............................26 Replacement Parts List ......................27 Assembler/Installer: This manual contains important information necessary for the proper assembly and safe use of this appliance. -
Página 3: Safety Information
SAFETY INFORMATION Please read and understand this entire manual before attempting to assemble, operate or install 1-877-447-4768, 8:00 a.m. – 4:30 p.m., CST, Monday – Friday. DANGER • Do not use in an explosive atmosphere. Keep grill area clear and free from combustible WARNING the products of combustion of such fuels, can expose you to chemicals including benzene, which is known to the State of California to cause cancer and reproductive harm. - Página 4 SAFETY INFORMATION WARNING • Do not place the grill under overhead combustible construction or awnings. Minimum clearance from sides 36in and back of unit to combustible 36in 914.4mm 914.4mm from sides and back. NOTE: The installation must conform with local codes or, in the absence of local codes, with either the National Fuel Gas Code, ANSI Z223.1/NFPA 54, Natural Gas and Propane Installation Code,...
-
Página 5: Package Contents
PACKAGE CONTENTS PART DESCRIPTION QUANTITY PART DESCRIPTION QUANTITY Hood Handle Door Handle Temp Gauge Left Side Shelf Assembly Grill Body Assembly Heat Tent Side Shelf Bracket A Cooking Grate Right Side Shelf Assembly Warming Rack Side Shelf Bracket B Control Knob Cart Right Side Panel Assembly Grease Pan Locking Swivel Caster... -
Página 6: Hardware Contents
HARDWARE CONTENTS M6x16 M6x35 M3x10 Bolt Plain Spring Wing Nut Bolt Bolt Washer Washer Qty. 18 Qty. 2 Qty. 2 Qty. 2 Qty. 4 Qty. 4 M6x12 Shoulder Wrench M4x12 Flat Bolt Bolt Bolt Qty. 8 Qty. 4 Qty. 1 Qty. -
Página 7: Assembly Instructions
ASSEMBLY INSTRUCTIONS Hardware Used Wrench DO NOT TIGHTEN BOLTS AT THIS TIME. Hardware Used M6x16 Bolt... - Página 8 ASSEMBLY INSTRUCTIONS Insert the hook on the bottom panel skirt Tighten ALL bolts from step 2 securely. Hardware Used M6x16 Bolt Hardware Used M6x16 Bolt...
- Página 9 ASSEMBLY INSTRUCTIONS Hardware Used M6x35 Bolt Hardware Used M3x10 Bolt...
- Página 10 ASSEMBLY INSTRUCTIONS Hardware Used M6x16 Bolt Insert the bottom hinge pin of the cart bottom hinge pin into the hole on the upper front door...
- Página 11 ASSEMBLY INSTRUCTIONS Hardware Used M6 Plain Washer M6 Spring Washer M6 Wing Nut Remove pre-assembled wing nut and plain and plain washer removed earlier in this step.
- Página 12 ASSEMBLY INSTRUCTIONS aligned with holes in the tabs of cart left side Note: Make sure the natural gas hose assembly is inside the cart. Secure the grill Hardware Used M6x16 Bolt tighten them. Make sure to leave a 5mm gap between the bolt and the panel.
- Página 13 ASSEMBLY INSTRUCTIONS Hardware Used M6x12 Flat Bolt...
- Página 14 ASSEMBLY INSTRUCTIONS brackets installed at step 13 with two shoulder Hardware Used Shoulder Bolt...
- Página 15 ASSEMBLY INSTRUCTIONS burner.
- Página 16 ASSEMBLY INSTRUCTIONS into place. valve stems.
- Página 17 ASSEMBLY INSTRUCTIONS Fully Assembled Front View Rear View CONNECTING THE GRILL TO THE NATURAL GAS SUPPLY The supply connection must be made in accordance with local codes or, in the absence of local codes, with either the National Fuel Gas Code, ANSI Z223.1/NFPA 54, in the USA, of the Natural Gas and Propane Installation Code, CSA B149.1, in Canada.
-
Página 18: Checking For Leaks
ASSEMBLY INSTRUCTIONS WARNING In the connection process, make sure: CHECKING FOR LEAKS gas hose and manifold for leaks with a water and soap solution. • Always perform leak test prior to lighting the grill. • Do not smoke while testing for a leak. •... -
Página 19: Operation Instructions
OPERATION INSTRUCTIONS Lighting The Grill Remove all hangings or plastic straps, if present. Before you cook on your new gas grill, it is important to clean your grill with heat. To do this, operate the grill for approximately 15 minutes with the lid closed and the control knob in the highest position. -
Página 20: Shutdown Instructions
OPERATION INSTRUCTIONS LIGHTING THE GRILL WITH A MATCH 1. Open the lid. 2. Insert a match in the end of the match holder that is installed on the inside of the cabinet door. 3. Light the match. 4. Immediately place the lit match through the spaces in the grill gates near the ports of the burner between the heat tents as shown. -
Página 21: Care And Maintenance
CARE AND MAINTENANCE Cooking Grates To ‘burn off’ or heat clean your grill, turn the burners to highest position and run for 15 minutes with the lid closed. Then turn off the burners and use a wire brush to clean excess food residue from the grates. - Página 22 CARE AND MAINTENANCE Warming Rack Cooking 1. Make sure all control knobs are in the OFF Grates position, gas supply valve is closed, and the Heat Tents gas hose is disconnected from the gas supply. 2. Open lid and remove warming rack, cooking grates, and heat tents.
- Página 23 CARE AND MAINTENANCE – Make sure the grill is cool 1. Ensure all burner ports are clear of clogs. Use of a pin or paper clip works well. 2. Ensure burner is free of any damage. If damage is found, replace with new burner. 3.
-
Página 24: Troubleshooting
TROUBLESHOOTING 1-877-447-4768, 8:00 a.m. – 4:30 p.m., CST, Monday – Friday. PROBLEM POSSIBLE CAUSE CORRECTIVE ACTION The burner will 1. The igniter electrode may be 1. Clean the ignitor electrode. not light using the covered with grease or residue. ignitor procedure 2. - Página 25 TROUBLESHOOTING PROBLEM POSSIBLE CAUSE CORRECTIVE ACTION The burner will not 1. Match not reaching burners 1. Use match holder found in light with a match (when holding match with hand). cabinet door. 2. Gas supply shut off. 2. Check that the natural gas supply shut-off valve is open.
-
Página 26: Warranty
6440 W. Howard Street Niles, IL, USA 60714-3302 Item Name: 3 Burner Premier Natural Gas Grill Model #: DGP397SNN / DGP397SNN-D / DGP397CNN / DGP397CNN-D / DGP397GNN / DGP397GNN-D / DGP397MNN / DGP397MNN-D Main burner total rated BTU: 36,000 BTU/Hr... -
Página 27: Replacement Parts List
REPLACEMENT PARTS LIST For replacement parts, call our customer service department at 1-877-447-4768, 8:00 a.m. – 4:30 p.m., CST, Monday – Friday. 28 29... - Página 28 Control panel heat shield 70-01-949 70-02-488 Corrugated hose assembly 70-01-836 Connector 70-01-886 Control panel - DGP397SNN-D / DGP397SNN, DGP397GNN-D / DGP397GNN, DGP397MNN-D 70-01-953 /DGP397MNN - Stainless Control panel - DGP397CNN-D / DGP397CNN - Black 70-01-954 Control knob bezel 70-01-184 Control knob...
- Página 29 REPLACEMENT PARTS LIST For replacement parts, call our customer service department at 1-877-447-4768, 8:00 a.m. – 4:30 p.m., CST, Monday – Friday. PART DESCRIPTION PART # Cart right rear leg tube 70-01-958 Match holder with chain 70-01-846 Cart bottom panel shelf 70-02-489 Cart rear panel 70-02-490...
- Página 30 BARBECUE AU NATUREL DE PREMIÈRE QUALITÉ À TROIS BRÛLEURS DGP397CNN/DGP397CNN-D/DGP397GNN/ DGP397GNN-D/DGP397MNN/DGP397MNN-D English p. 1 Français p. Español p. 59 Español p. AGRAFEZ VOTRE FACTURE ICI Questions, problèmes, pièces manquantes? Avant de retourner l’article au détaillant, di au vendredi, ou envoyez un courriel à customerservice@ghpgroupinc.com.
- Página 31 TABLE DES MATIÈRES Informations relatives à la sécurité ..................... 32 Contenu de l’emballage ......................34 Quincaillerie fournie ........................35 Préparation ..........................35 Instructions d’assemblage ......................36 Instructions de fonctionnement ....................48 Entretien et maintenance ......................50 Dépannage ..........................53 Garantie ............................55 Assembleur/installateur : Ce guide contient des informations importantes nécessaires au bon assemblage et à...
-
Página 32: Informations Relatives À La Sécurité
INFORMATIONS RELATIVES À LA SÉCURITÉ Veuillez lire et comprendre le présent guide avant de tenter d’assembler, d’utiliser ou d’installer le DANGER AVERTISSEMENT Pour plus de renseignements, visitez le www.p65Warnings.ca.gov MISE EN GARDE... - Página 33 INFORMATIONS RELATIVES À LA SÉCURITÉ AVERTISSEMENT • Ne placez pas le barbecue sous des Le dégagement minimum entre l’appareil, sur 36 po 36 po 914,4mm 914,4mm codes locaux ou, en l’absence de codes locaux, au code ANSI Z223.1/NFPA 54 intitulé « National Fuel au code CSA B149.1 intitulé...
-
Página 34: Contenu De L'eMballage
CONTENU DE L’EMBALLAGE PIÈCE DESCRIPTION QUANTITÉ PIÈCE DESCRIPTION QUANTITÉ Poignée du couvercle Poignée de porte Jauge de température Tablette latérale gauche Bâti du barbecue Support de tablette latérale A Grille de cuisson Tablette latérale droite Grille d’attente Support de tablette latérale B Bouton de commande Panneau droit du chariot Plateau à... -
Página 35: Quincaillerie Fournie
QUINCAILLERIE FOURNIE Boulon Rondelle Rondelle Écrou à Boulon Boulon M6 x 16 mm plate M6 élastique M6 oreilles M6 M6 x 35 mm M3 x 10 mm Qté18 Qté 2 Qté 2 Qté 2 Qté 4 Qté. 4 Boulon plat Boulon à... -
Página 36: Instructions D'aSsemblage
INSTRUCTIONS D’ASSEMBLAGE Matériel utilisé Clé NE SERREZ PAS COMPLÈTEMENT LES BOULONS À CE STADE. Matériel utilisé Boulon M6 x 16 mm... - Página 37 INSTRUCTIONS D’ASSEMBLAGE Serrez fermement TOUS les boulons de l’étape 2. Matériel utilisé Boulon M6 x 16 mm Matériel utilisé Boulon M6 x 16 mm...
- Página 38 INSTRUCTIONS D’ASSEMBLAGE Matériel utilisé Boulon M6 x 35 mm Matériel utilisé Boulon M3 x 10 mm...
- Página 39 INSTRUCTIONS D’ASSEMBLAGE Matériel utilisé Boulon M6 x 16 mm comme illustré.
- Página 40 INSTRUCTIONS D’ASSEMBLAGE Matériel utilisé Rondelle plate M6 Rondelle élastique M6 Écrou à oreilles M6 Enlevez l’écrou à oreilles et la rondelle plate rondelle plate retirés précédemment.
- Página 41 INSTRUCTIONS D’ASSEMBLAGE de gaz naturel soit à l’intérieur du chariot. Matériel utilisé Boulon M6 x 16 mm rer. Assurez-vous de laisser un espace de 5 mm entre les boulons et le panneau. Placez ensuite le support du tuyau du gaz naturel sur les boulons, puis serrez les deux boulons.
- Página 42 INSTRUCTIONS D’ASSEMBLAGE Matériel utilisé Boulon plat M6 x 12 mm...
- Página 43 INSTRUCTIONS D’ASSEMBLAGE supports installés à l’étape 13 avec deux Matériel utilisé Boulon à épaulement...
- Página 44 INSTRUCTIONS D’ASSEMBLAGE...
- Página 45 INSTRUCTIONS D’ASSEMBLAGE aux tiges de la vanne.
-
Página 46: Pour Raccorder
INSTRUCTIONS D’ASSEMBLAGE Vue de face RACCORD DU BARBECUE À L’ALIMENTATION EN GAZ NATUREL ou, en l’absence d’une telle réglementation, selon le National Fuel Gas Code, ANSI Z223.1/NFPA 54, aux Etats-Unis, ou le Natural Gas and Propane Installation Code, CSA B149.1, au Canada. d’alimentation en gaz. -
Página 47: Détection Des Fuites
INSTRUCTIONS D’ASSEMBLAGE AVERTISSEMENT • le tuyau d’alimentation en gaz ne touche pas au foyer du barbecue DÉTECTION DES FUITES savonneuse sur le raccord de gaz naturel à branchement rapide, le tuyau de gaz et le collecteur. DÉTECTION DES FUITES • Branchez le tuyau de gaz au réseau de distribution de gaz. fuite de gaz. -
Página 48: Instructions De Fonctionnement
INSTRUCTIONS DE FONCTIONNEMENT Avant la première utilisation : sur votre nouveau barbecue au propane, il est important de le nettoyer avec de la chaleur. Pour ce faire, faites fonctionner le barbecue pendant environ 15 minutes avec le couvercle baissé et le bouton résidus et les odeurs générés par le processus de fabrication. -
Página 49: Instructions D'ARrêt
INSTRUCTIONS DE FONCTIONNEMENT ALLUMER LE BARBECUE AVEC UNE ALLUMETTE 1. Ouvrez le couvercle. 3. Allumez l’allumette. MISE EN GARDE AVERTISSEMENT INSTRUCTIONS D’ARRÊT 1. Tournez les boutons de commande en sens horaire 3. Fermez le couvercle. fonction. -
Página 50: Entretien Et Maintenance
ENTRETIEN ET MAINTENANCE Grilles de cuisson pour le nettoyage demande moins de combustible. gratter les résidus de nourriture sur les grilles. pour éviter de les endommager. MISE EN GARDE Produits de nettoyage recommandés N’utilisez PAS de nettoyants contenant des acides, de l’essence minérale ou tout autre produit abrasif. Surfaces externes Récupérateur de graisse Trou permettant de... - Página 51 ENTRETIEN ET MAINTENANCE Grille d’attente Grilles de cuisson vanne d’alimentation en propane est fermée rayonnement l’alimentation. 2. Retirez la grille d’attente, les grilles de cuisson de la chambre de combustion. Figure 1 Figure 2...
- Página 52 ENTRETIEN ET MAINTENANCE broche ou un trombone. d’insectes, de saletés ou de débris. illustré ci-dessous. Incorrect Incorrect Correct Vue du dessous dessous de la chambre de combustion. AVERTISSEMENT Entretien et maintenance supplémentaires Il est recommandé de faire inspecter et entretenir cet appareil une fois par année par un technicien d’obstructions.
-
Página 53: Dépannage
DÉPANNAGE PROBLÈME CAUSE POSSIBLE SOLUTION Le brûleur ne est peut-être recouverte de que la procédure graisse ou de résidus. est faible ou raccordé. raccordés. la liste des pièces de rechange). Chaleur faible. 1. Appelez une institution de service Flambées 1. Il y a une accumulation de 1. - Página 54 DÉPANNAGE PROBLÈME CAUSE POSSIBLE SOLUTION Le brûleur ne 1. Utilisez le support à allumettes situé brûleurs (lorsque vous la allumette. coupée. naturel est ouverte. 3. Il y a un mauvais 3. Tournez les boutons de commande branchement entre le raccord à...
-
Página 55: Garantie
GARANTIE LIMITÉE Garantie limitée d’un an Ce barbecue au gaz naturel contre les défauts. La peinture est garantie contre les défauts, mais n’est pas garantie contre la de main-d’œuvre. obtenir ce service, appelez sans frais au vendredi. ou la limitation des dommages consécutifs ou indirects, ou encore, la limitation de la durée d’une la province ou le territoire. -
Página 56: Liste Des Pièces De Rechange
LISTE DES PIÈCES DE RECHANGE au 1 877 447-4768, de 8 h à 28 29... - Página 57 70-01-874 Support de tablette latérale A 70-01-875 Support de tablette latérale B 70-01-876 70-01-833 70-01-827 Couvercle – DGP397SNN-D/DGP397SNN – acier inoxydable 70-01-945 Couvercle – DGP397CNN-D/DGP397CNN – noir 70-01-946 Couvercle – DGP397GNN-D/DGP397GNN – bronze industriel 70-01-947 Couvercle – DGP397MNN-D/DGP397MNN – moka...
- Página 58 LISTE DES PIÈCES DE RECHANGE au 1 877 447-4768, de 8 h à PIÈCE DESCRIPTION 70-01-958 70-01-846 Tablette du panneau inférieur du chariot 70-02-489 70-02-490 Support du manguera de gas natural 70-01-897 Support supérieur de porte 70-01-898 70-01-963 Aimant de porte 70-01-807 Tube du pied avant gauche du chariot 70-02-405...
- Página 59 PARRILLA PREMIER CON 3 QUEMADORES PARA GAS N.° de modelo DGP397SNN / DGP397SNN-D / DGP397CNN / DGP397CNN-D / DGP397GNN / DGP397GNN-D / DGP397MNN / DGP397MNN-D English p. 1 Français p. Français p. 30 Français p. ADJUNTE SU RECIBO AQUÍ Número de serie _________________________ Fecha de compra ______________________ ¿Preguntas, problemas, piezas faltantes? Antes de hacer una devolución a la tienda,...
- Página 60 CONTENIDO Información de seguridad ......................61 Preparación ..........................64 Instrucciones de funcionamiento ....................77 Cuidado y mantenimiento ......................79 Solución de problemas ........................ 82 Lista de piezas de repuesto ....................... 85 Ensamblador/instalador: Este manual contiene información importante, necesaria para ensamblar correctamente el artefacto y utilizarlo de manera segura. Lea y respete todas las advertencias e instrucciones antes de ensamblar y utilizar este artefacto.
-
Página 61: Información De Seguridad
INFORMACIÓN DE SEGURIDAD Lea y comprenda este manual por completo antes de intentar ensamblar, poner en funcionamiento o instalar el producto. Si tiene preguntas relacionadas con el producto, llame al Departamento de Atención al Cliente al 1-877-447-4768, de lunes a viernes de 8:00 a. m. a 4:30 p. m. (hora central PELIGRO encuentra la parrilla. - Página 62 INFORMACIÓN DE SEGURIDAD ADVERTENCIA desde los laterales y la parte trasera de la 36" unidad hasta una estructura combustible 36" 914,4 mm 914,4 mm N OTA: la instalación debe cumplir con los códigos locales o, en ausencia de códigos locales, con el Código Nacional de Gas Combustible ANSI Z223.1/NFPA 54, el Código de Instalación de Gas Natural y Propano CSA B149.1, o el Código de Almacenamiento...
-
Página 63: Contenido Del Paquete
CONTENIDO DEL PAQUETE PIEZA DESCRIPCIÓN CANTIDAD PIEZA DESCRIPCIÓN CANTIDAD Indicador de temperatura Abrazadera A de la repisa lateral Protector térmico Abrazadera B de la repisa lateral Perilla de control carro Grasera grande Ruedecillas giratorias con mecanismo de Tirante de la puerta de la parte frontal superior Ruedecillas giratorias sin mecanismo de Panel de la parte trasera del carro Imán de la puerta... -
Página 64: Paquete De Tornillería
PAQUETE DE TORNILLERÍA Pernos Arandela Arandela de Tuerca Pernos Pernos M6 × 16 plana M6 resorte M6 mariposa M6 M6 × 35 M3 × 10 Cant. 18 Cant. 2 Cant. 2 Cant. 2 Cant. 4 Cant. 4 Pernos planos Perno de Llave Pernos M6 x 12... -
Página 65: Instrucciones De Ensamblaje
INSTRUCCIONES DE ENSAMBLAJE ruedecillas giratorias sin mecanismo de Tornillería utilizada Llave NO AJUSTE LOS PERNOS TODAVÍA. Tornillería utilizada Pernos M6 × 16 × 4... - Página 66 INSTRUCCIONES DE ENSAMBLAJE paso 2. Tornillería utilizada Pernos M6 × 16 Tornillería utilizada Pernos M6 × 16 × 4...
- Página 67 INSTRUCCIONES DE ENSAMBLAJE Tornillería utilizada Pernos M6 × 35 × 4 Tornillería utilizada Pernos M3 × 10 × 4...
- Página 68 INSTRUCCIONES DE ENSAMBLAJE Tornillería utilizada Pernos M6 × 16 × 2 Inserte el pasador de la bisagra inferior del luego presione el resorte del pasador de la bisagra de la puerta en la parte superior del...
- Página 69 INSTRUCCIONES DE ENSAMBLAJE Tornillería utilizada Arandela plana M6 × 2 Arandela de resorte M6 × 2 Tuerca mariposa M6 × 2 Retire la tuerca mariposa preensamblada y la arandela plana del indicador de temperatura retiraron anteriormente en este paso.
- Página 70 INSTRUCCIONES DE ENSAMBLAJE Nota: de gas natural esté dentro del carro. Asegure Tornillería utilizada Pernos M6 × 16 × 4 un espacio libre de 5 mm entre el perno y el panel. Cuelgue la abrazadera de la manguera Tornillería utilizada Pernos M6 ×...
- Página 71 INSTRUCCIONES DE ENSAMBLAJE Tornillería utilizada Pernos planos M6 x 12 × 8...
- Página 72 INSTRUCCIONES DE ENSAMBLAJE a los soportes instalados en el paso 13 con dos Tornillería utilizada Perno de tope × 4...
- Página 73 INSTRUCCIONES DE ENSAMBLAJE...
- Página 74 INSTRUCCIONES DE ENSAMBLAJE vástagos de la válvula.
-
Página 75: Conexión De La Parrilla Al Suministro De Gas Natural
INSTRUCCIONES DE ENSAMBLAJE Ensamblado por completo Vista frontal Vista trasera CONEXIÓN DE LA PARRILLA AL SUMINISTRO DE GAS NATURAL o, en su ausencia, el National Fuel Gas Code,A NSI Z223.1/NFPA 54, en los Estados Unidos, o el Natural Gas and Propane Installation Code, CSA B149.1, en Canadá. suministro. -
Página 76: Búsqueda De Fugas
INSTRUCCIONES DE ENSAMBLAJE ADVERTENCIA • La manguera de suministro de gas no entre en contacto con la cámara de combustión BÚSQUEDA DE FUGAS conectores del conector rápido de gas natural, la manguera de gas y el tubo colector con una solución Para evitar incendios o explosiones mientras realiza la prueba de fugas: •... -
Página 77: Instrucciones De Funcionamiento
INSTRUCCIONES DE FUNCIONAMIENTO Encender la parrilla Antes de utilizar la unidad por primera vez: parrilla a gas con calor antes de utilizarla por primera vez. Para esto, ponga en funcionamiento la parrilla durante aproximadamente 15 minutos, con la tapa cerrada, y la perilla de control en la posición PRECAUCIÓN Si la llama se apaga accidentalmente durante el encendido o durante el funcionamiento, control. -
Página 78: Instrucciones De Apagado
INSTRUCCIONES DE FUNCIONAMIENTO ENCENDER LA PARRILLA CON UN FÓSFORO 1. Abra la tapa. 3. Encienda el fósforo. hasta la posición de llama máxima PRECAUCIÓN ADVERTENCIA INSTRUCCIONES DE APAGADO 1. Gire las perillas de control 2. Cierre completamente la válvula de cierre de gas natural. 3. -
Página 79: Cuidado Y Mantenimiento
CUIDADO Y MANTENIMIENTO menos combustible para llegar a la temperatura necesaria para limpiar con calor. PRECAUCIÓN Elementos de limpieza recomendados Protectores térmicos Limpie los residuos con el cepillo de alambre y lave con rendimiento al cocinar, la llama debe ser de color azul-amarilla y tener entre 1 y 2"... - Página 80 CUIDADO Y MANTENIMIENTO calentar cocinar estén en la posición de APAGADO, la válvula de Protectores suministro de gas esté cerrada y la manguera de térmicos gas esté desconectada del suministro de gas. 3. Retire las varillas de la bisagra, como se muestra en la Figura 1.
- Página 81 CUIDADO Y MANTENIMIENTO insectos, suciedad o tierra. combustión, tal como se ilustra a continuación. encendido al electrodo. Incorrecto Incorrecto Correcto Vista inferior Observe la posición correcta desde la parte inferior de la cámara de combustión ADVERTENCIA Si no se siguen las instrucciones anteriores, podría producirse un incendio o una Otros procedimientos de cuidado y mantenimiento encuentra el artefacto para cocinar esté...
-
Página 82: Solución De Problemas
SOLUCIÓN DE PROBLEMAS Si tiene alguna pregunta acerca de este producto, llame al Departamento de Atención al Cliente al PROBLEMA CAUSA POSIBLE ACCIÓN CORRECTIVA El quemador no 1. El electrodo de encendido 1. Limpie el electrodo de encendido. se enciende con podría estar cubierto de grasa el procedimiento o residuos. - Página 83 SOLUCIÓN DE PROBLEMAS PROBLEMA CAUSA POSIBLE ACCIÓN CORRECTIVA El quemador no se 1. El fósforo no alcanza los 1. Use el soporte para fósforos que se enciende con un quemadores (al sostenerlo encuentra en la puerta del gabinete. fósforo. con la mano). 2.
-
Página 84: Garantía Limitada
AVISO: Algunos estados no permiten la exclusión o limitación por daños incidentales o indirectos por haber otros derechos legales aplicables según el estado. GHP Group Inc. 6440 W. Howard Street Niles, IL, EE. UU. 60714-3302 N.º de modelo: DGP397SNN / DGP397SNN-D / DGP397CNN / DGP397CNN-D / DGP397GNN / DGP397GNN-D / DGP397MNN / DGP397MNN-D... -
Página 85: Lista De Piezas De Repuesto
LISTA DE PIEZAS DE REPUESTO Para obtener las piezas de repuesto, llame a nuestro Departamento de Atención al Cliente al 28 29... - Página 86 Pantalla térmica del panel de control 70-01-949 70-02-488 70-01-836 Conector 70-01-886 Panel de control - DGP397SNN-D / DGP397SNN, DGP397GNN-D / DGP397GNN, 70-01-953 DGP397MNN-D /DGP397MNN - Inoxidable Panel de control - DGP397CNN-D / DGP397CNN - Negro 70-01-954 Bisel de la perilla de control...
- Página 87 LISTA DE PIEZAS DE REPUESTO Para obtener las piezas de repuesto, llame a nuestro Departamento de Atención al Cliente al PIEZA DESCRIPCIÓN N.º DE PIEZA Tubo de la pata trasera derecha del carro 70-01-958 Portafósforo con cadena 70-01-846 Repisa del panel inferior del carro 70-02-489 Panel de la parte trasera del carro 70-02-490...