Capítulos
Tabla de contenido
Solución de problemas

Manuales relacionados para Truper SME-10X-3


Resumen de contenidos para Truper SME-10X-3
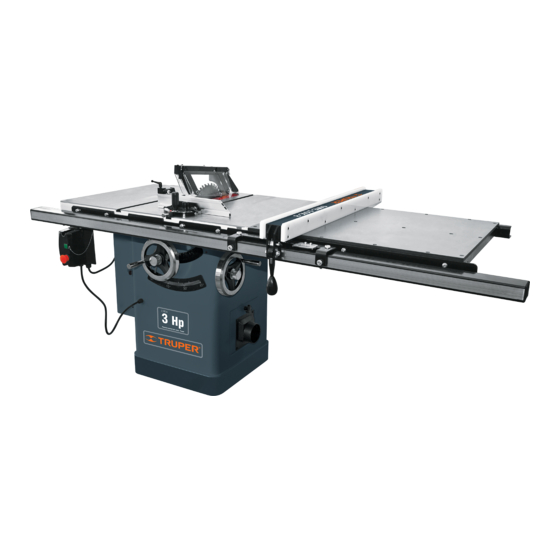
- Página 1 Instructivo para Sierra de piso 2 240 W con extensión Potencia Este instructivo es para: Modelo Código SME-10X-3 10640 SME-10X-3 Lea este instructivo por completo ATENCIÓN antes de usar la herramienta.
-
Página 2: Tabla De Contenido
Conexiones Ajustes Guarde este instructivo para futuras referencias. Los gráficos de este instructivo son para Operación referencia, pueden variar del aspecto real de la herramienta. Mantenimiento Solución de problemas Centros de Servicio Autorizados Sucursales Póliza de Garantía SME-10X-3 ESPAÑOL... -
Página 3: Especificaciones Técnicas
Especificaciones técnicas SME-10X-3 Código 10640 Descripción Sierra de piso con extensión Medidas 208,2 cm x 104,1 cm x 86,3 cm (82” x 41” x 34”) Base: 50,8 cm x 50,8 cm (20” x 20”) Disco 254 mm (10”) Motor 2 240 W (3 Hp) -
Página 4: Advertencias Generales De Seguridad Para Herramientas Eléctricas
Advertencias generales de seguridad para herramientas eléctricas ¡ADVERTENCIA! Lea detenidamente todas las advertencias de seguridad y todas las instrucciones que se enlistan a continuación. La omisión de alguna de ellas puede dar como resultado un choque eléctrico, incendio y/o daño serio. Conserve las advertencias y las instrucciones para futuras referencias. Área de trabajo No sobrepase su campo de acción. -
Página 5: Normas De Seguridad
Normas de Seguridad para uso de sierras de piso Antes de operar la sierra Precauciones adicionales ATENCIÓN • Obtenga capacitación de alguna • El equipo debe ser operado sólo por personas con persona calificada que esté familiarizada con el equipo y su experiencia en su uso o instruidas y entrenadas en trabajo funcionamiento. -
Página 6: Ensamble
Ensamble • Antes de ensamblar el equipo desatornille la tarima de El equipo incluye toda la Incluye embalaje de la base del gabinete. tornillería necesaria para su • Ensamble el equipo en el lugar donde se operará, en ensamble, así como un juego de un piso bien nivelado y capaz de sostener su peso. - Página 7 Ensamble Riel trasero Antes de apretar los pernos de ambos rieles revise que no obstruyan las ranuras de la mesa para que la guía de inglete corra libremente. Mesa de extensión Riel frontal Carril de la guía Seguro de la guía Guía Coloque la guía en su carril y baje la...
-
Página 8: Montaje Del Disco
Ensamble Montaje del disco • Retire el inserto de la mesa. • Gire ambos volantes de control para colocar el eje del disco hasta arriba y con un ángulo de corte de 90° • Retire la tuerca y la brida del eje. •... -
Página 9: Montaje Del Separador Y Guarda Del Disco
Ensamble Montaje del separador y guarda del disco • Con el inserto de la mesa en su lugar gire la perilla A para hacer retroceder el perno B, dejando libre el espacio para que el separador pueda entrar. • Inserte el separador hasta que tope. El separador debe tener la guarda montada previamente como lo muestra la figura C. -
Página 10: Conexiones
Conexiones Recolección de polvo Salida de polvo • El equipo se debe conectar a un sistema externo de (10 cm de diámetro) extracción de astillas y polvo antes de empezar a trabajar. • La velocidad de aire requerido es de 20 m/s para astillas secas y de 28 m/s para astillas mojadas (18% de humedad). -
Página 11: Ajustes
Ajustes Altura y ángulo del disco de corte • Afloje la perilla de bloqueo (A) y gire el volante de control (B) hasta que el disco alcance la altura deseada. • Los dientes del disco deben de quedar a una altura de 3,1 mm (1/8”) a 6,3 mm (1/4”) sobre la superficie de la pieza de trabajo. -
Página 12: Operación
Operación Se recomienda hacer un ensayo del trabajo a realizar con madera de desecho para familiarizarse con el procedimiento más seguro y eficiente antes de comenzar a trabajar en la pieza de trabajo. Encendido y control de operación Observaciones generales •... -
Página 13: Mantenimiento
Mantenimiento Lubricación Superficie de la mesa • La sierra tiene rodamientos sellados en la carcasa del • La superficie de la mesa es de metal sin acabado, motor y en el ensamblado del centro del disco que no que con el tiempo acumula óxido si no se tiene el requiere de lubricación adicional. -
Página 14: Solución De Problemas
Solución de problemas Problema Causa Solución La sierra no arranca • Cable desconectado del suministro eléctrico. • Conecte el cable de suministro eléctrico. • Fusible fundido o interruptor de circuito botado. • Cambie el fusible o active el interruptor de circuito. •... -
Página 15: Centros De Servicio Autorizados
Centros de Servicio Autorizados En caso de tener algún problema para contactar un Centro de Servicio consulte nuestra página www.truper.com donde obtendrá un listado actualizado, o llame al teléfono: 01(800) 690-6990 ó 01(800) 018-7873 donde le informarán cuál es el Centro de Servicio Autorizado más cercano. -
Página 16: Sucursales
Centros de Servicio Autorizados enlistados en este Instructivo, en www.truper.com o en los teléfonos proporcionados: 01800-690-6990 ó 01800-018-7873. En caso de tener problemas para hacer Sello del establecimiento comercial: válida esta Póliza de Garantía repórtelo... - Página 17 Manual Table Saw 3 Hp with Extension Power Applies for: Model Code SME-10X-3 10640 SME-10X-3 Read the user’s manual thoroughly CAUTION before operating this tool.
- Página 18 Manual before using the tool. Connections Adjustments Keep this manual for future references. Operation The illustrations in this manual are for reference only. They might be different from the real tool. Maintenance Troubleshooting Authorized Service Centers Branches Warranty Policy SME-10X-3 ENGLISH...
-
Página 19: Technical Data
Technical Data SME-10X-3 Code 10640 Description Table Saw with Extension Measurements 82” x 41” x 34” Base: 20” x 20” Disc 10” Motor 3 Hp Speed 3 450 RPM Voltage 220 V Frequency 60 Hz Current 12,8 A Work Cycle 120 min work per 30 min rest. -
Página 20: General Power Tool Safety Warnings
General Power Tools Safety Warnings WARNING! Read carefully all safety warnings and instructions listed below. Failure to comply with any of these warnings may result in electric shock, fire and / or severe damage. Save all warnings and instructions for future references. -
Página 21: Safety Warnings For Power Saws
Safety Warnings for Power Saws Before Operating the Saw Additional Caution Measures CAUTION • Obtain training from a qualified person, • This equipment shall only be used by people with ATENCIÓN familiar with the equipment and its functioning. experience, instructed and trained in the use of wood WARNING •... -
Página 22: Assembly
Assembly • Before assembling the equipment, unscrew the The equipment includes all the Included packaging pallet from the cabinet base. nuts and bolts needed to • Assemble the equipment in the site it is going to be assemble. Also, a set of hex keys operated. - Página 23 Assembly Rear rail Before tightening the bolts in both rails, double check there is no obstruction in the table to allow the miter guide to run freely. Extension Table Front Rail Guide Lane Guide Lock Guide Set the guide in the lane and lower the guide lock lever before mounting...
- Página 24 Assembly Disc Mounting • Remove the table insert. • Turn both control flywheels to set the disc axis up to the top and with a 90° cut angle. • Remove nut and the axis flange. • Insert the disc in the axis, double check the teeth point towards the front of the equipment. •...
- Página 25 Assembly Mount the Riving Knife and the Disc Guard • Having the table insert in place, turn the knob (A) to move back the bolt (B), leaving some free space so the riving knife can be set. • Insert the riving knife all the way. Install the guard previously as shown in figure C.
-
Página 26: Connections
Connections Dust Collection Dust Chute • The equipment shall be connected into an external device (4” diameter) to extract chips and dust before starting to work. • The air speed required is 65,6 ft/s for dry chips and 91,8 ft/s for wet chips (18% humidity). •... -
Página 27: Adjustments
Adjustments Cutting Disc Height and Angle • Loosen the blocking knob (A) and turn the control flywheel (B) until the disc reaches the desired height. • The disc teeth shall be 1/8” to 1/4” height above the work piece surface. •... -
Página 28: Operation
Operation We recommend making test of the job to be carried out. Use a piece of scrap wood to familiarize with the safest and more efficient procedure before starting work in the real work piece. Turning ON and Operation Control General Observations •... -
Página 29: Maintenance
Maintenance Lubrication Table Surface • The saw is built with sealed bearings in the motor • The table surface is made of unfinished metal that housing and in the center of the disc assembly and do not with the passing of time and without proper care require additional lubrication. -
Página 30: Troubleshooting
Troubleshooting Problem Cause Solution The saw will not start. • Cable disconnected from the power supply. • Connect the cable to the power supply. • Fuse blown or circuit breaker jumped. • Replace the fuse or activate the circuit breaker. •... -
Página 31: Authorized Service Centers
Authorized Service Centers In the event of any problem contacting a Service Center, please see our webpage www.truper.com to get an updated list, or call our toll-free numbers 01(800) 690-6990 or 01 (800) 018-7873 to get information about the nearest Authorized Service Center. -
Página 32: Branches
This warranty shall be effective when presenting the product and the valid Warranty policy duly stamped by the supplier or the proof of purchase. To comply with this warranty, Truper will cover transportation expenses in case consumer’s address is out of range from Authorized Service Centers listed herein or at the website www.truper.com or at our toll-free numbers: 01 (800) 690-6990 or 01(800) 018-7873.