Publicidad
Enlaces rápidos
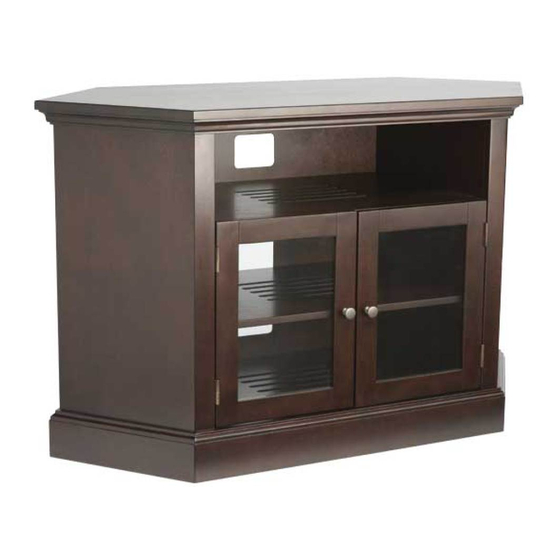
BFAV48
(6901-002065 <00>)
Sanus Systems
2221 Hwy 36 West
Saint Paul, MN 55113 USA
Customer Service
Americas: 800-359-5520 • 651-484-7988 • info@sanus.com
Europe, Middle East, and Africa: + 31 40 2324700 • europe.sanus@milestone.com
Asia Pacifi c: 86 755 8996 9226 • sanus.ap@milestone.com
sanus.com
©2010 Milestone AV Technologies, a Duchossois Group Company.
All rights reserved. Sanus is a division of Milestone.
All other brand names or marks are used for identifi cation purposes and are trademarks of their respective owners.
Publicidad

Manuales relacionados para Sanus BFAV48

Resumen de contenidos para Sanus BFAV48
- Página 1 Saint Paul, MN 55113 USA Customer Service Americas: 800-359-5520 • 651-484-7988 • info@sanus.com Europe, Middle East, and Africa: + 31 40 2324700 • europe.sanus@milestone.com Asia Pacifi c: 86 755 8996 9226 • sanus.ap@milestone.com sanus.com ©2010 Milestone AV Technologies, a Duchossois Group Company.
- Página 2 IMPORTANT SAFETY INSTRUCTIONS - SAVE THESE INSTRUCTIONS - PLEASE READ ENTIRE MANUAL BEFORE USING THIS PRODUCT Thank you for choosing the Sanus Foundations BFAV48. The BFAV48 is designed to support audio/video equipment. The total weight capacity is 136 kg (300 lbs). The top supports up to 68 kg (150 lbs), the upper fi xed shelf supports up to 22.7 kg (50 lbs), the lower adjustable shelf supports up to 22.7 kg (50 lbs), and the base section supports up to22.7 kg (50 lbs).
- Página 3 English WARNING: This product Caution / Warning This End Up Repeat Step Heavy! Assistance Required. contains small items that could be a choking hazard. Français Ce produit contient de petites TRÈS LOURD ! Cette étape ATTENTION Ce côté vers le haut Répétez l’étape pièces qui peuvent représenter requiert deux personnes.
- Página 4 Supplied Parts and Hardware Before starting assembly, verify all parts are included and undamaged. If any parts are missing or damaged, do not return the damaged item to your dealer, contact Customer Service. Never use damaged parts! NOTE: Depending on your confi guration needs, the pillar kit hardware may not be used. [03] x 1 [04] x 1 [01] x 1...
- Página 5 English USING THE PANEL LOCK: Insert the key of the lock into the key hole of the joining panel. Turn the key tab until it fi ts in the slot of the lock. The key tab should be fl ush with the surface of the lock when fi nished. 6901-002065 <00>...
- Página 6 English CENTER ASSEMBLY Insert dowels [14] into holes in the inside of the left [01] and right side panels [02]. [02] [01] Attach the side panels [01] and [02] to the fi xed shelf [03] by fi tting the side panel dowels [14] into the holes in the ends of the fi xed shelf [03] at the same time, fi t the keys of fi xed shelf [03] into the key holes of the left [01] and right side panels [02].
- Página 7 CAUTION: CENTER ASSEMBLY TO BASE Insert fourteen dowels [14] into the twelve holes in the base [04]. Slide the large back panel [08] into the slots at the back of the side panels [01] and [02]. CAUTION: You will need assistance with this step. Holding the back panel [08] in place, carefully lower the center assembly and back panel [08] onto the base [04], fi tting the holes of the side panels onto the dowels [14] in the base [04] and the keys of the side panels [01] and [02] into the keyholes of the base [04].
- Página 8 English [05] ANGLED SIDE PANELS Fit angled side panels [05] and [06] onto [01] dowels in the base [04]. Fit the small back panel [07] into the slots on the top side of the rear of the fi xed shelf [06] [03] [03] and the inside edges the side panels...
- Página 9 CAUTION: English [05] [05] Insert fourteen dowels [14] into the holes in the top of the left [01], [14] right [02], and angled side panels [05] and [06]. CAUTION: You will need assistance with this step. Carefully fi t the top [09] onto the base structure fi tting the holes in the underside of the top [09] onto the dowels [14] of the side panels and fi tting the keys of the side panels into the slots of the top [09].
-
Página 10: Adjustable Shelf
English ADJUSTABLE SHELF Fit the four shelf supports [13], into the holes on the inside of the fi xed panels [01] and [02]. Be sure to use the same level of holes for all shelf supports [13]. Slide the adjustable shelf [10] onto the shelf supports [13] until it is fl ush with the back panel [08]. - Página 11 English DOORS Insert the door knob screws [16] through the holes of the door frames [11] and [12] from the back and twist the door knobs [15] onto the screws [16] by hand. Hang both door assemblies onto the frame hinges of the table assembly. [11], [12] [15] [16]...
- Página 12 NOTE: allen pillar bracket luded with FMK0 pilla ount. 6901-002065 <00>...
- Página 13 6901-002065 <00>...
- Página 14 Français Merci d’avoir choisi l’unité BFAV48 de Sanus Foundations. L’unité BFAV48 est conçue pour supporter un équipement audio/vidéo. La limite totale de poids de ce modèle est de 136 kg (300 lb). Le dessus supporte jusqu’à 68 kg (150 lb), la tablette supérieure fi xe jusqu’à 22,7 kg (50 lb), la tablette réglable inférieure jusqu’à...
- Página 15 DESSUS Insérez 14 goupilles [14] dans les trous du dessus des panneaux gauche [01], droit [02], et angulaires [05] et [06]. ATTENTION : Vous aurez besoin de quelqu’un pour vous aider à cette étape. Posez soigneusement le dessus [09] sur la structure de base en alignant les trous de la face inférieure du dessus [09] avec les goupilles [14] des panneaux latéraux et en enfonçant les clavettes des panneaux latéraux dans les trous du dessus [09].
- Página 16 Español Gracias por haber elegido el mueble BFAV48 de la serie Sanus Systems. El BFAV48 fue diseñado para equipos de audio y video. Tiene una capacidad total de 136 kg (300 libras). La tapa soporta hasta 68 kg (150 libras); el estante superior fi jo, hasta 22,7 kg (50 libras); el estante inferior móvil, hasta 22,7 kg (50 libras) y la base, hasta 22,7 kg (50 libras).
- Página 17 TAPA Inserte catorce clavijas [14] en los orifi cios del borde superior de los paneles laterales izquierdo [01] y derecho [02] y de los paneles esquineros [05] y [06]. PRECAUCIÓN: Necesitará ayuda en este paso. Con cuidado, coloque la tapa [09] sobre la estructura del mueble, encajando los orifi cios del reverso de la tapa [09] en las clavijas [14] de los paneles y las llaves de los paneles laterales en las ranuras de la tapa [09].
- Página 18 English Milestone AV Technologies and its affi liated corporations and subsidiaries (collectively, “Milestone”), intend to make this manual accurate and complete. However, Milestone makes no claim that the information contained herein covers all details, conditions, or variations. Nor does it provide for every possible contingency in connection with the installation or use of this product. The information contained in this document is subject to change without notice or obligation of any kind.