Fiat 500L Instrucciones De Montaje
Puertas
Ocultar thumbs
Ver también para 500L:
- Manual de uso (420 páginas) ,
- Manual de uso y mantenimiento (372 páginas) ,
- Manual de empleo y cuidado (248 páginas)
Publicidad
Enlaces rápidos
FIAT 500L
02/12 →
4 Porte, Doors, Portes, Türig,
Puertas, Portas, Kapili, Πόρτες
Ant. Dx/Sx, Front Rh/Lh, Avt. Dr/Ga, Vo. R/L,
Del. Dcho/Izq, Fr. Dt/Esq, On Sag/Sol, Εμπ. Δεξ/Αρ
ISTRUZIONI DI MONTAGGIO
Per installare correttamente l'alzacristallo procedere come segue:
a) Smontare con cura il pannello porta e rimuovere il vecchio
alzacristallo scollegandolo sia meccanicamente che elettricamente.
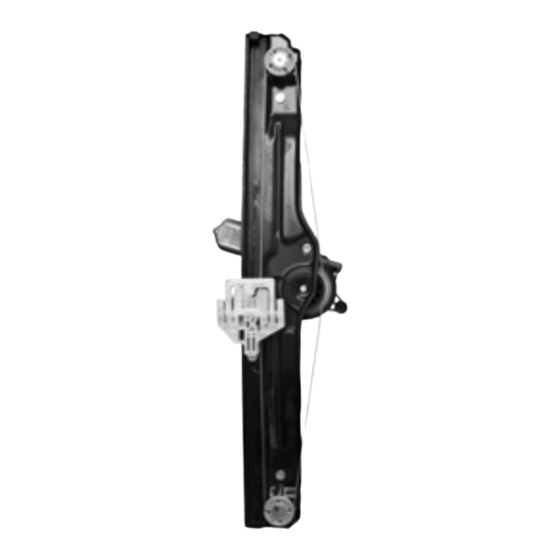
b) Inserire l'alzacristallo di ricambio nella porta attraverso
l'apposito vano "1"
c) Fissare la guida dell'alzavetro alla portiera nei punti "2" e il
motore nei punti "3".
d) Collegare elettricamente l'alzacristallo.
e) Agganciare il cristallo all'alzavetro.
N.B. Prima di procedere con la programmazione della
centralina, è indispensabile collegare la vettura al dispositivo
diagnostico per rimuovere eventuali messaggi di errore,
relativi agli alzacristalli, dalla memoria di bordo
dell'automobile. La mancata rimozione di tali messaggi non
garantisce il corretto funzionamento del sistema Comfort.
Premendo l'interruttore, far salire il cristallo fino a chiusura
totale. A chiusura avvenuta, mantenere premuto l'interruttore
per circa 4 sec. prima di rilasciarlo. Al suo rilascio il cristallo
dovrà scendere automaticamente fino ad apertura totale. Il
sistema Comfort è ora programmato correttamente. Se non
dovesse funzionare, ripetere l'operazione dopo aver scollegato
il connettore dall'impianto elettrico e ricollegato dopo almeno 5
sec. di pausa
f) Verifıcare il funzionamento generale. Rimontare il pannello della
porta.
Grazie per aver scelto i nostri prodotti.
INSTRUCTIONS DE MONTAGE
Pour installer correctement le lève-vitre procéder ainsi :
a) Démonter avec précaution le panneau de la portière et dévisser
l'ancien lève-vitre en le déconnectant également électriquement
b) Insérer le lève-vitre de rechange dans la porte à travers
l'embrasure appropriée "1".
c) Fixer le guide aux points "2" et le moteur aux points "3".
d) Relier électriquement le lève-vitre.
e) Fixer la vitre au lève-vitre.
N.B. Avant de procéder à la programmation de l'unité de
contrôle, il est indispensable de connecter la voiture au
dispositif de diagnostic afin d'éliminer de la mémoire les
éventuels messages d'erreur relatifs aux lève-vitres. Si ces
messages ne sont pas éliminés, le fonctionnement du système
Confort n'est pas garanti.
Tout en appuyant sur l'interrupteur, remonter complètement la
vitre. Une fois fermée, tenir l'interrupteur enfoncé pendant 4
sec. environ. Au moment où l'interrupteur sera relâché, la vitre
devrait descendre automatiquement. Si ce n'est pas le cas,
répéter l'opération après avoir débranché et rebranché le
connecteur (attendre 5 sec. entre les 2 opérations).
f) Vérifier le bon fonctionnement général et remonter le panneau
de la porte.
Merci d'avoir choisi nos produits.
XXIST1710-11
CKD908
ANTIPINCH
Alzacristallo Elettrico Antipinch Elevalunas eléctrico Antipinch
Electric window regulator Antipinch Levantador de vidro electric Antipinch
Lève‐vitre électrique Antipinch Elektrikli pecere düzeneği Antipinch
Elektrische Fernsterheber Antipinch ιάταξη ανύψωσης ηλτρικών παραθύρων
Nostro alzacristallo – our window
regulator – notre lève‐vitre – unser
Fernsterheber – nuestro elevalunas –
nosso levantador de vidro ‐ bizim cam
acacagi ‐ Γρύλος δικός μας
Porta lato destro, Portière avant droite, Right front door, Puerta lado derecho,
Vorne rechte Tür, Porta frente dirieta, Sag on kapi, πόρτα εμπρόσθια δεξιά
ASSEMBLY INSTRUCTIONS
To install the window regulator:
a) Disassemble the door: carefully disconnect the old window
regulator mechanically and electrically and remove it.
b) Place the new window regulator in the door through the opening
"1".
c) Attach the guide of window regulator to points "2".
d) Connect the window regulator to the car's electrics.
e) Attach the car window glass to the window regulator.
N.B. Before programming the central unit, you must connect the
car to the diagnostic device to remove any error messages,
relating to window winders, from the car memory. The
non‐removal of these messages cannot guarantee the correct
functioning of the Comfort system.
Press the switch to totally close the window. Once closed, keep
the switch pressed for approximately 4 seconds before releasing
it. When released, the window should roll down to automatically
open fully. The Comfort system is now correctly programmed. If
it does not work, repeat the operation having disconnected the
connector from the electrics system and reconnecting it after at
least 5 seconds.
f) Check overall functioning: reassemble the door.
Thank you for choosing our products.
Antipinch
2
1
Publicidad

Manuales relacionados para Fiat 500L


Resumen de contenidos para Fiat 500L
- Página 1 FIAT 500L ANTIPINCH Alzacristallo Elettrico Antipinch Elevalunas eléctrico Antipinch 02/12 → Electric window regulator Antipinch Levantador de vidro electric Antipinch 4 Porte, Doors, Portes, Türig, Lève‐vitre électrique Antipinch Elektrikli pecere düzeneği Antipinch Puertas, Portas, Kapili, Πόρτες Elektrische Fernsterheber Antipinch ιάταξη ανύψωσης ηλτρικών παραθύρων Ant. Dx/Sx, Front Rh/Lh, Avt. Dr/Ga, Vo. R/L, Antipinch Del. Dcho/Izq, Fr. Dt/Esq, On Sag/Sol, Εμπ. Δεξ/Αρ ISTRUZIONI DI MONTAGGIO Per installare correttamente l'alzacristallo procedere come segue: a) Smontare con cura il pannello porta e rimuovere il vecchio alzacristallo scollegandolo sia meccanicamente che elettricamente.
- Página 2 FIAT 500L ANTIPINCH Alzacristallo Elettrico Antipinch Elevalunas eléctrico Antipinch 02/12 → Electric window regulator Antipinch Levantador de vidro electric Antipinch 4 Porte, Doors, Portes, Türig, Lève‐vitre électrique Antipinch Elektrikli pecere düzeneği Antipinch Puertas, Portas, Kapili, Πόρτες Elektrische Fernsterheber Antipinch ιάταξη ανύψωσης ηλτρικών παραθύρων Ant. Dx/Sx, Front Rh/Lh, Avt. Dr/Ga, Vo. R/L, Antipinch Del. Dcho/Izq, Fr. Dt/Esq, On Sag/Sol, Εμπ. Δεξ/Αρ INSTRUCCIONES DE MONTAJE MONTAGE ANWEISUNGEN Para instalar correctamente el elevalunas, haga lo siguiente: Zur korrekten Installierung des Fensterhebers folgend vorgehen: a) Desmonte el panel puerta con cuidado y extraiga el antiguo Tür...
- Página 3 FIAT 500L ANTIPINCH Alzacristallo Elettrico Antipinch Elevalunas eléctrico Antipinch 02/12 → Electric window regulator Antipinch Levantador de vidro electric Antipinch 4 Porte, Doors, Portes, Türig, Lève‐vitre électrique Antipinch Elektrikli pecere düzeneği Antipinch Puertas, Portas, Kapili, Πόρτες Elektrische Fernsterheber Antipinch ιάταξη ανύψωσης ηλτρικών παραθύρων Ant. Dx/Sx, Front Rh/Lh, Avt. Dr/Ga, Vo. R/L, Antipinch Del. Dcho/Izq, Fr. Dt/Esq, On Sag/Sol, Εμπ. Δεξ/Αρ MONTAJ TALİMATLARI Ο∆ΗΓΙΕΣ ΓΙΑ ΤΗΝ ΕΓΚΑΤΑΣΤΑΣΗ Cam kaldırma mekanizmasını doğru sekilde monte etmek için Για να εγκαταστήσετε σωστά το μηχανισμόπαραθύρου asağıdaki gibi islem görünüz: προβαίνετε...
- Página 4 Manutenzione Bakým Maintenance Wartung Entretien Manutenção Mantenimiento Συντηρηση MANUTENZIONE Per garantire il buon funzionamento dell’alzacristallo sostituito, accertatevi sempre che le canaline laterali in gomma (A) siano ben posizionate, pulite ed in buone condizioni. Inoltre è sempre consigliabile trattare le canaline (A) con graffite in polvere. MAINTENANCE To ensure the new window regulator works properly, check the side rubber window channels (A) are properly positioned, clean and in good condition.