Johnson Pump F4B-19 Manual De Instrucciones
Ocultar thumbs
Ver también para F4B-19:
- Manual de instrucciones (48 páginas) ,
- Manual de instrucciones (28 páginas)
Resumen de contenidos para Johnson Pump F4B-19
- Página 1 Deck wash kit for pump type F4B-19 IB-408/02 (0004) offered by Busse-Yachtshop.com...
-
Página 2: Tabla De Contenido
INDEX - INDICE Fig........................3 Svenska ......................4 English ....................... 5 Deutsch ......................6 Français ......................7 Español ......................8 Italiano ....................... 9 Recreational Craft Directive 94/25/EEC ISO 8846 Marine Garantie 1 an Garanti 1 år Warranty 1 year Garantía 1 año Garanzia 1 anno Garantie 1 Jahr... -
Página 3: Fig
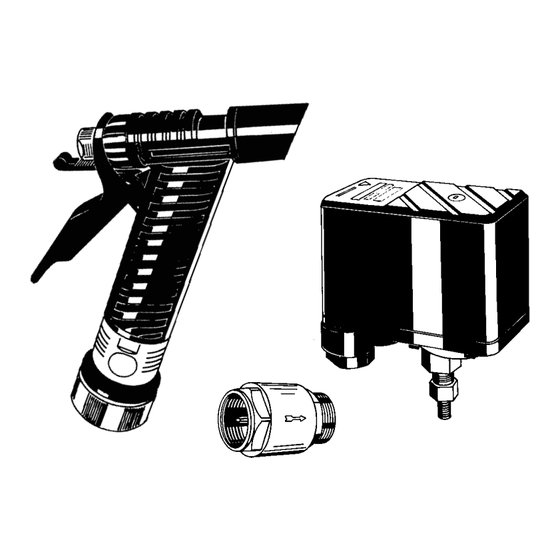
Spolkit för F4B-19 Deckwash kit for F4B-19 A Backventil A Check valve B Tryckströmbrytare B Pressure switch C Spolhandtag C Trigger nozzle Deckwaschkit für F4B-19 Kit d'arrosage pour F4B-19 A Rückschlagventil A Clapet de non-retour B Druckschalter B Pressiostat C Spritzpistole... -
Página 4: Svenska
4. Montera spolmunstycket (C) med anslutning på slangen. Elektrisk installation Se kopplingsschema sid 10. 1. Anslut pumpens pluskabel (röd) till en säkring (se instruktionsbok för F4B-19). Från säkringen kopplas pluskabeln (röd) på anslutningen ”Motor” i tryckströmbrytaren. Kabeln kopplas sedan från anslutningen ”Line” till batteriets pluspol (röd). -
Página 5: Electrical Installation
1. Connect the positive wire (red) from the pump to a fuse (see Instruction Manual for F4B-19). From the fuse, run the positive wire (red) to the ”Motor” connector in the pressure switch. From the ”Line” connector, connect a wire to the battery’s plus pole. -
Página 6: Deutsch
Elektrische Installation Siehe Schaltplan, Seite 10. 1. Pluskabel der Pumpe (rot) an eine Sicherung (siehe Handbuch für F4B-19) anschließen. Von der Sicherung wird das Pluskabel (rot) an den Anschluß “Motor“ im Druckschalter angeschlossen. Das Kabel wird dann vom Anschluß “Line“ zum Pluspol (rot) der Batterie geführt. -
Página 7: Installation Électrique
1. Brancher le câble positif de la pompe (rouge) à un fusible (voir le manuel d’instructions pour F4B-19). A partir du fusible, brancher le câble positif (rouge) au raccord ”Moteur” dans le pressostat. Brancher ensuite le câble du raccord ”Line” à la borne positive (rouge) de la batterie. -
Página 8: Español
1. Conectar el cable positivo (rojo) de la bomba a un fusible (véase el libro de instrucciones de F4B-19). Desde el fusible el cable positivo (rojo) se acopla a la conexión «Motor», del interruptor pulsador. El cable se acopla después desde la conexión «Line»... -
Página 9: Installazione Elettrica
Vedere lo schema dei collegamenti a pagina 10. 1. Collegare il cavo positivo della pompa (rosso) ad un fusibile (vedere il libretto di istruzioni dell’F4B-19). Dal fusibile il cavo positivo (rosso) va poi collegato alla connessione “Motor“ sul pressostato. Il cavo va infine collegato dalla connessione “Line“... - Página 10 ”Line” – 1. Tryckströmbrytare 1. Pressure switch 1. Druckschalter 2. Säkring 2. Fuse 2. Sicherung 3. Pump F4B-19 3. Pump F4B-19 3. Pumpe F4B-19 4. Röd (+) 4. Red (+) 4. Rot (+) 5. Svart (-) 5. Black (-) 5. Schwarz (-) 6.
- Página 11 Setting A) Turn differential nut (1) up completely. B) Adjust range nut (2) to wished cut-in pressure. C) Turn differential nut (1) down to wished cut-out pressure. offered by Busse-Yachtshop.com...
- Página 12 Johnson Pump Orebro AB P O Box 1436, SE-701 14 ÖREBRO, Sweden. Tel. +46 19 21 83 00. Fax +46 19 27 23 72. E-mail: info.se@johnson-pump.com / www.johnson-pump.com offered by Busse-Yachtshop.com...


