Tabla de contenido
Publicidad
Enlaces rápidos
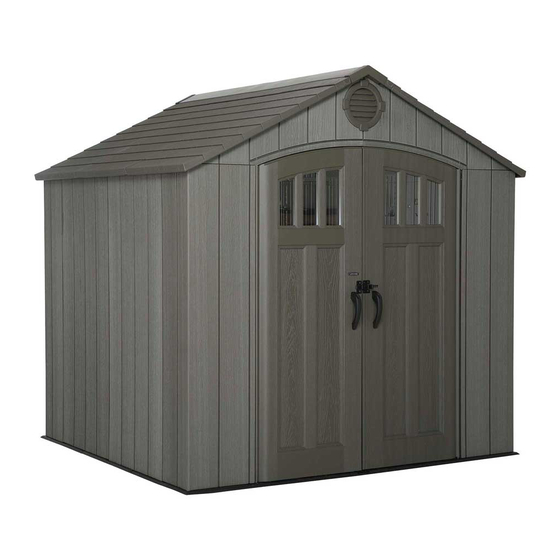
8' x 7.5'
OUTSIDE SHED
MODEL #60091
MODEL 60230
ITM./ART. 1031661
BEFORE ASSEMBLY:
• Assemble on a level surface
• 3+ people recommended for setup
TOOLS REQUIRED
QUESTIONS?
CONTACT LIFETIME CUSTOMER SERVICE:
Call: 1-800-225-3865
7:00 am-5:00 pm (Monday-Friday) MST
and 9:00 am-1:00 pm Saturday MST
Live Chat: www.lifetime.com
(click on "Ask An Expert" tab)
Video Instructions:
www.youtube.com/lifetimeproducts
ASSEMBLY INSTRUCTIONS
Pour le français, voir la page 2. Para el español, ver la página 3.
5/16" (8 mm) Wood Drill Bit
5/16" (8 mm) Masonry Drill Bit
MODEL# AND PRODUCT ID
Model Number: 60230
Product ID:
TABLE OF CONTENTS
Icon Legend...............................4
Warnings & Notices.....................5
Platform Construction.................6
Truss Assembly.........................11
Gable Assembly........................16
Door Assembly..........................20
Floor Assembly.........................34
Wall Assembly...........................37
Parts Identifi er..........................39
Shelving Installation.................46
Door & Gable Installation...........49
Roof Assembly..........................53
Accessory Installation................66
Door Alignment........................68
Shed Anchoring........................70
Cleaning & Care........................75
Registration...........................76
Warranty..............................77
(you will need both when contacting us)
Publicidad
Tabla de contenido

Manuales relacionados para Lifetime 60230


Resumen de contenidos para Lifetime 60230
-
Página 1: Tabla De Contenido
Shed Anchoring......70 Cleaning & Care......75 Registration......76 5/16" (8 mm) Masonry Drill Bit Warranty......77 QUESTIONS? CONTACT LIFETIME CUSTOMER SERVICE: Live Chat: www.lifetime.com MODEL# AND PRODUCT ID Call: 1-800-225-3865 (you will need both when contacting us) (click on “Ask An Expert” tab) Model Number: 60230 7:00 am–5:00 pm (Monday–Friday) MST... -
Página 2: Instructions D'ASsemblage
5/16 po (8 mm) Mèche à maçonnerie Garantie......78 ® QUESTIONS ? CONTACTEZ AUX SERVICES À LA CLIENTÈLE LIFETIME t’Chat en direct: www.lifetime.com N° DE MODÈLE ET RÉFÉRENCE DU PRODUIT Composer le 1-800-225-3865 (vous aurez besoin des deux lorsque vous nous contactez) (cliquer sur la languette «... -
Página 3: Instrucciones De Ensamble
Registro........76 5/16 in (8 mm) Broca de albañilería Garantía........79 ® ¿PREGUNTAS? PÓNGASE EN CONTACTO CON LOS SERVICIOS DE CLIENTES LIFETIME Chat en vivo: www.lifetime.com MODEL E ID DEL PRODUCTO Llamar : 1-800-225-3865 (necesitará los dos al contactarnos) (cliquee en la lengüeta «Ask An Expert») Número de modelo: 60230... -
Página 4: Icon Legend
ICON LEGEND / LÉGENDE DES ICÔNES / LEYENDA DE ÍCONOS • Indicates special heed should be taken when reading. • Indique qu’une attention spéciale doit être prise lors de la lecture. • Indica que uno debe prestar atención al leer. •... -
Página 5: Warnings & Notices
WARNINGS & NOTICES / AVERTISSEMENTS ET AVIS / ADVERTENCIAS Y AVISOS English: • Failure to follow these warnings may result in serious injury or property damage and will void warranty. • To ensure safety, do not attempt to assemble this product without following the instructions carefully. •... -
Página 6: Platform Construction
PLATFORM CONSTRUCTION / CONSTRUCTION DE LA PLATE-FORME / CONSTRUCCIÓN DE LA PLATAFORMA • You must provide a platform on which to assemble your shed. Proper building permit documentation may be required in your neighborhood. Consult all local building codes prior to assembling the shed. Before beginning assembly, you must pour or construct a platform. - Página 7 SECTION 1 (CONTINUED) / SECTION 1 (SUITE) SECCIÓN 1 (CONTINUACIÓN) CONCRETE REQUIRED / BÉTON REQUIS CONCRETO REQUERIDO 1 yd (0,77 m CONCRETE PLATFORM / PLATE-FORME EN BÉTON PLATAFORMA DE CONCRETO • The concrete should be approximately 4" (10,2 cm) thick. The actual dimensions of the shed, at its widest and longest points, are 96"...
- Página 8 SECTION 1 (CONTINUED) / SECTION 1 (SUITE) SECCIÓN 1 (CONTINUACIÓN) WOOD REQUIRED / BOIS REQUIS MADERA REQUERIDA RIDA WOOD PLATFORM / PLATE-FORME EN BOIS PLATAFORMA DE MADERA • The actual dimensions of the shed, at its widest and longest points, are 96" x 90" (2,44 m x 2,29 m). Ensure you select a site that will accommodate these measurements.
- Página 9 SECTION 1 (CONTINUED) / SECTION 1 (SUITE) SECCIÓN 1 (CONTINUACIÓN) TOOLS, PARTS, AND HARDWARE REQUIRED / OUTILS, PIÈCES, ET QUINCAILLERIE REQUIS INSTRUMENTAL, PIEZAS, Y HERRAJE REQUERIDOS 2 in/po x 4 in/po x 88 in/po (5,1 cm x 10,2 cm x 2,24 m) (x2) 2 in/po x 4 in/po x 90 1/2 in/po (5,1 cm x 10,2 cm x 2,30 m) (x7) 16d 3 in/po (16d x 7,62 cm) (x28) 1.2.1...
- Página 10 SECTION 1 (CONTINUED) / SECTION 1 (SUITE) SECCIÓN 1 (CONTINUACIÓN) TOOLS, PARTS, AND HARDWARE REQUIRED / OUTILS, PIÈCES, ET QUINCAILLERIE REQUIS INSTRUMENTAL, PIEZAS, Y HERRAJE REQUERIDOS 40 in/po x 93 1/2 in/po x 3/4 in/po 48 in/po x 93 1/2 in/po x 3/4 in/po (1,02 m x 2,37 m x 19,1 mm) (x1) (1,22 m x 2,37 m x 19,1 mm) (x1) 8d 1 1/2 in/po (8d 3,81 cm) (x48)
-
Página 11: Truss Assembly
TRUSS ASSEMBLY / ASSEMBLAGE DES FERMES / ENSAMBLE DE LAS CERCHAS HARDWARE REQUIRED / QUINCAILLERIE REQUISE / HERRAJE REQUERIDO Hardware Bag / Sac de quincaillerie Bolsa de herraje DTK (x8) ADY (x8) ADJ (x4) ADK (x16) 11 9/16 in/po (29,4 cm) ADH (x2) AIP (x2) PARTS REQUIRED / PIÈCES REQUISES / PIEZAS REQUERIDAS... - Página 12 SECTION 2 (CONTINUED) / SECTION 2 (SUITE) SECCIÓN 2 (CONTINUACIÓN) TOOLS AND HARDWARE REQUIRED / OUTILS ET QUINCAILLERIE REQUIS INSTRUMENTAL Y HERRAJE REQUERIDOS 3/8 in/po (10 mm) ADK (x8) DTK (x8) • Slide a Connector (AIP) onto the ends of two Truss Gutter Channels (DSR) as shown. •...
- Página 13 SECTION 2 (CONTINUED) / SECTION 2 (SUITE) SECCIÓN 2 (CONTINUACIÓN) TOOLS AND HARDWARE REQUIRED / OUTILS ET QUINCAILLERIE REQUIS INSTRUMENTAL Y HERRAJE REQUERIDOS 3/8 in/po (10 mm) ADY (x8) ADK (x8) • Attatch the Large Truss Brace using the hardware included. Do not overtighten the Cap Nuts. •...
- Página 14 SECTION 2 (CONTINUED) / SECTION 2 (SUITE) SECCIÓN 2 (CONTINUACIÓN) TOOLS AND HARDWARE REQUIRED / OUTILS ET QUINCAILLERIE REQUIS INSTRUMENTAL Y HERRAJE REQUERIDOS 11 9/16 in/po (29,4 cm) ADH (x2) • Slide a Truss Rod (ADH) through the holes in the Large Truss Brace and Connector. •...
- Página 15 SECTION 2 (CONTINUED) / SECTION 2 (SUITE) SECCIÓN 2 (CONTINUACIÓN) TOOLS AND HARDWARE REQUIRED / OUTILS ET QUINCAILLERIE REQUIS INSTRUMENTAL Y HERRAJE REQUERIDOS 7/16 in/po (x2) (11 mm) (x2) ADJ (x4) • Secure it with two Cap Nuts (ADJ). Do not overtighten the Nuts. Repeat this section. •...
-
Página 16: Gable Assembly
GABLE ASSEMBLY / ASSEMBLAGE DES PIGNONS / ENSAMBLE DE LAS FACHADAS HARDWARE REQUIRED / QUINCAILLERIE REQUISE / HERRAJE REQUERIDO Hardware Bag / Sac de quincaillerie Bolsa de herraje ADW (x10) ADV (x6) ADZ (x6) CXK (x2) ADK (x2) EYR (x2) EYQ (x2) AEE (x14) AHS (x2) - Página 17 SECTION 3 (CONTINUED) / SECTION 3 (SUITE) SECCIÓN 3 (CONTINUACIÓN) TOOLS AND HARDWARE REQUIRED / OUTILS ET QUINCAILLERIE REQUIS INSTRUMENTAL Y HERRAJE REQUERIDOS ADZ (x4) ADW (x5) AEE (x5) • Secure the two Gable Halves with four (4) Screws • Align the holes in the Left (AGH) and Right (AGI) (ADZ).
- Página 18 SECTION 3 (CONTINUED) / SECTION 3 (SUITE) SECCIÓN 3 (CONTINUACIÓN) TOOLS AND HARDWARE REQUIRED / OUTILS ET QUINCAILLERIE REQUIS INSTRUMENTAL Y HERRAJE REQUERIDOS ADW (x5) ADZ (x2) AEE (x7) AHS (x2) CXK (x2) EYQ (x2) • Secure with the hardware included. •...
- Página 19 SECTION 3 (CONTINUED) / SECTION 3 (SUITE) SECCIÓN 3 (CONTINUACIÓN) TOOLS AND HARDWARE REQUIRED / OUTILS ET QUINCAILLERIE REQUIS INSTRUMENTAL Y HERRAJE REQUERIDOS ADK (x2) ADV (x6) EYR (x2) AEE (x2) • Align the holes in the Header with those in the Gable. •...
-
Página 20: Door Assembly
LEFT DOOR ASSEMBLY / ASSEMBLAGE DE LA PORTE GAUCHE / ENSAMBLE DE LA PUERTA IZQUIERDA HARDWARE REQUIRED / QUINCAILLERIE REQUIS / HERRAJE REQUERIDO Hardware Bag / Sac de quincaillerie Bolsa de herraje BYZ (x2) AEE (x3) AAB (x2) ADW (x1) ACH (x2) ARA (x1) 1/8 in/po (3 mm) BYS (x1) - Página 21 SECTION 4 (CONTINUED) / SECTION 4 (SUITE) SECCIÓN 4 (CONTINUACIÓN) TOOLS AND HARDWARE REQUIRED / OUTILS ET QUINCAILLERIE REQUIS INSTRUMENTAL Y HERRAJE REQUERIDOS BBH (x1) • Slide a Long Tube (EDW) into the hole in the Left Door (AGO) until a few inches remain out of the Door. The end with the hole goes at the top.
- Página 22 SECTION 4 (CONTINUED) / SECTION 4 (SUITE) SECCIÓN 4 (CONTINUACIÓN) TOOLS AND HARDWARE REQUIRED / OUTILS ET QUINCAILLERIE REQUIS INSTRUMENTAL Y HERRAJE REQUERIDOS ACH (x2) AAB (x2) 1/8 in/po (3 mm) ARA (x1) EOY (x1) AEB (x2) • Attach the Left Latch Bracket (EOY) to the Door using the hardware included. Tighten only by hand at this point. •...
- Página 23 SECTION 4 (CONTINUED) / SECTION 4 (SUITE) SECCIÓN 4 (CONTINUACIÓN) TOOLS AND HARDWARE REQUIRED / OUTILS ET QUINCAILLERIE REQUIS INSTRUMENTAL Y HERRAJE REQUERIDOS BYR (x1) ENP (x2) DGR (x1) Lower / Inférieur Inferior DGS (x1) ENO (x4) BYS (x1) Upper / Supérieur Superior •...
- Página 24 SECTION 4 (CONTINUED) / SECTION 4 (SUITE) SECCIÓN 4 (CONTINUACIÓN) TOOLS AND HARDWARE REQUIRED / OUTILS ET QUINCAILLERIE REQUIS INSTRUMENTAL Y HERRAJE REQUERIDOS AEE (x3) ADW (x1) BYZ (x2) • Attach the Handle to the Door using the hardware included. •...
- Página 25 SECTION 4 (CONTINUED) / SECTION 4 (SUITE) SECCIÓN 4 (CONTINUACIÓN) TOOLS AND HARDWARE REQUIRED / OUTILS ET QUINCAILLERIE REQUIS INSTRUMENTAL Y HERRAJE REQUERIDOS EPH (x1) • There is a narrow groove (illustrated in black) running along the outside of the window on the back of each Door. Starting at the top, left corner of the groove in the Left Door, lay the 1/8"...
- Página 26 SECTION 4 (CONTINUED) / SECTION 4 (SUITE) SECCIÓN 4 (CONTINUACIÓN) TOOLS AND HARDWARE REQUIRED / OUTILS ET QUINCAILLERIE REQUIS INSTRUMENTAL Y HERRAJE REQUERIDOS ADZ (x14) 4.10 • Align the holes in the Pane with those in the Door, and gently set a Window Pane (DHN) down onto the Door. •...
- Página 27 RIGHT DOOR ASSEMBLY / ASSEMBLAGE DE LA PORTE DROITE / ENSAMBLE DE LA PUERTA DERECHA HARDWARE REQUIRED / QUINCAILLERIE REQUISE / HERRAJE REQUERIDO Hardware Bag / Sac de quincaillerie Bolsa de herraje ADW (x1) BYZ (x2) EPC (x2) ACH (x2) CHK (x1) BBI (x1) CXK (x2)
- Página 28 SECTION 5 (CONTINUED) / SECTION 5 (SUITE) SECCIÓN 5 (CONTINUACIÓN) TOOLS AND HARDWARE REQUIRED / OUTILS ET QUINCAILLERIE REQUIS INSTRUMENTAL Y HERRAJE REQUERIDOS CHK (x1) BBH (x1) • Slide a Long Tube (EDW) into the hole in the Right Door (AGZ) until a few inches remain out of the Door. The end with the hole goes at the top.
- Página 29 SECTION 5 (CONTINUED) / SECTION 5 (SUITE) SECCIÓN 5 (CONTINUACIÓN) TOOLS AND HARDWARE REQUIRED / OUTILS ET QUINCAILLERIE REQUIS INSTRUMENTAL Y HERRAJE REQUERIDOS 7/16 in/po (11 mm) 3/8 in/po BYS (x1) (10 mm) BYR (x1) AEE (x2) EPA (x1) EOZ (x1) EPC (x2) CXK (x2) AAB (x2)
- Página 30 SECTION 5 (CONTINUED) / SECTION 5 (SUITE) SECCIÓN 5 (CONTINUACIÓN) TOOLS AND HARDWARE REQUIRED / OUTILS ET QUINCAILLERIE REQUIS INSTRUMENTAL Y HERRAJE REQUERIDOS AEE (x1) ADW (x1) BYZ (x2) BBI (x1) • Attach the Handle as shown. Tighten securely. • Attachez la poignée comme affi ché. Bien serrer. •...
- Página 31 SECTION 5 (CONTINUED) / SECTION 5 (SUITE) SECCIÓN 5 (CONTINUACIÓN) TOOLS AND HARDWARE REQUIRED / OUTILS ET QUINCAILLERIE REQUIS INSTRUMENTAL Y HERRAJE REQUERIDOS • Slide a Hinge Tube (CRD) into the hole in the Door until a few inches remain out of the bottom. •...
- Página 32 SECTION 5 (CONTINUED) / SECTION 5 (SUITE) SECCIÓN 5 (CONTINUACIÓN) TOOLS AND HARDWARE REQUIRED / OUTILS ET QUINCAILLERIE REQUIS INSTRUMENTAL Y HERRAJE REQUERIDOS EPH (x1) • There is a narrow groove (illustrated in black) running along the outside of the window on the back of each Door. Starting at the top, right corner of the groove in the Right Door, lay the 1/8"...
- Página 33 SECTION 5 (CONTINUED) / SECTION 5 (SUITE) SECCIÓN 5 (CONTINUACIÓN) TOOLS AND HARDWARE REQUIRED / OUTILS ET QUINCAILLERIE REQUIS INSTRUMENTAL Y HERRAJE REQUERIDOS ADZ (x14) • Align the holes in the Pane with those in the Door, and gently set a Window Pane (DHN) down onto the Door. •...
-
Página 34: Floor Assembly
FLOOR ASSEMBLY / ASSEMBLAGE DU PLANCHER / ENSAMBLE DEL PISO HARDWARE REQUIRED / QUINCAILLERIE REQUISE / HERRAJE REQUERIDO Hardware Bag / Sac de quincaillerie Bolsa de herraje ADC (x1) AHO (x2) BQC (x20) Note: These are not anchoring screws. Their purpose is to fasten together the Floor Panels. Remarque : Ce ne sont pas des vis d’ancrage. - Página 35 SECTION 6 (CONTINUED) / SECTION 6 (SUITE) SECCIÓN 6 (CONTINUACIÓN) TOOLS AND HARDWARE REQUIRED / OUTILS ET QUINCAILLERIE REQUIS INSTRUMENTAL Y HERRAJE REQUERIDOS • Hold an Inner Floor Panel (CUD) at an angle and slide the tabs along the edge underneath an Outer Floor Panel (CUW). The tabs interlock.
- Página 36 SECTION 6 (CONTINUED) / SECTION 6 (SUITE) SECCIÓN 6 (CONTINUACIÓN) TOOLS AND HARDWARE REQUIRED / OUTILS ET QUINCAILLERIE REQUIS INSTRUMENTAL Y HERRAJE REQUERIDOS AHO (x2) BQC (x12) Note: These are not anchoring screws. Their purpose is to fasten together the Floor Panels. Remarque : Ce ne sont pas des vis d’ancrage.
-
Página 37: Wall Assembly
WALL ASSEMBLY / ASSEMBLAGE DES MURS / ENSAMBLE DE LOS MUROS HARDWARE REQUIRED / QUINCAILLERIE REQUISE / HERRAJE REQUERIDO Hardware Bag / Sac de quincaillerie Bolsa de herraje ADZ (x85) PARTS REQUIRED / PIÈCES REQUISES / PIEZAS REQUERIDAS Metal Parts / Pièces en métal / Piezas de metal 67 3/4 in/po (1,72 m) - Página 38 SECTION 7 (CONTINUED) / SECTION 7 (SUITE) SECCIÓN 7 (CONTINUACIÓN) TOOLS AND HARDWARE REQUIRED / OUTILS ET QUINCAILLERIE REQUIS INSTRUMENTAL Y HERRAJE REQUERIDOS ADZ (x28) • Secure a Wall Support Channel (AFM) to the six (6) Wall Panels (AHD) just to the left of the notch at the top of the Wall Panels using four (4) Screws (ADZ) for each.
-
Página 39: Parts Identifi Er
PARTS IDENTIDIER / IDENTIFICATEUR DE PIÈCES / IDENTIFICADOR DE PIEZAS CONTENTS OF BOX 1 / CONTENU DE LA BOÎTE 1 CONTENIDO DE LA CAJA 1 AGO (x1) AGZ (x1) EVZ (x1) EWA (x1) AGQ (x6) AGH (x1) AGI (x1) 45 1/2 in/po (1,16 m) 45 1/2”... - Página 40 PARTS IDENTIDIER / IDENTIFICATEUR DE PIÈCES / IDENTIFICADOR DE PIEZAS CONTENTS METAL KIT / CONTENU DU KIT DE PIÈCES EN MÉTAL CONTENIDO DEL KIT DE PIEZAS DE METAL 50 9/16 in/po (1,28 m) DSR (x4) 59 1/2" (1,51 m) 59 1/2 in/po (1,51 m) EYS (x1) 48 in/po (1,22 m) AFG (x2)
- Página 41 PARTS IDENTIDIER / IDENTIFICATEUR DE PIÈCES / IDENTIFICADOR DE PIEZAS CONTENTS OF BOX 2 / CONTENU DE LA BOÎTE 2 CONTENIDO DE LA CAJA 2 AGL (x1) AGY (x1) AGN (x1) AGW (x1) AHD (x6) CONTENTS OF SMALL PARTS KIT / CONTENU DU KIT PETITES PIÈCES CONTENIDO DEL KIT DE PIEZAS PEQUEÑAS AFL (x6)
- Página 42 PARTS IDENTIDIER / IDENTIFICATEUR DE PIÈCES / IDENTIFICADOR DE PIEZAS HARDWARE BAGS / SACS DE QUINCAILLERIE BOLSAS DE HERRAJE...
- Página 43 SECTION 7 (CONTINUED) / SECTION 7 (SUITE) SECCIÓN 7 (CONTINUACIÓN) TOOLS AND HARDWARE REQUIRED / OUTILS ET QUINCAILLERIE REQUIS INSTRUMENTAL Y HERRAJE REQUERIDOS AIW (x1) ADZ (x4) • Secure a Wall Support Channel (AFM) to the Corner • Insert the two left-most tabs at the Wall Panel (AGN) using four (4) Screws (ADZ).
- Página 44 SECTION 7 (CONTINUED) / SECTION 7 (SUITE) SECCIÓN 7 (CONTINUACIÓN) TOOLS AND HARDWARE REQUIRED / OUTILS ET QUINCAILLERIE REQUIS INSTRUMENTAL Y HERRAJE REQUERIDOS AIW (x1) ADZ (x25) • Align the holes, and • Insert the tabs of two Wall Panels (AHD) and slide secure the Panels together the Panels to the front.
- Página 45 SECTION 7 (CONTINUED) / SECTION 7 (SUITE) SECCIÓN 7 (CONTINUACIÓN) TOOLS AND HARDWARE REQUIRED / OUTILS ET QUINCAILLERIE REQUIS INSTRUMENTAL Y HERRAJE REQUERIDOS AIW (x1) ADZ (x20) 7.11 7.12 • Insert this Corner Panel (AGL) like the fi rst Corner Wall •...
-
Página 46: Shelving Installation
SHELVING INSTALLATION / INSTALLATION DU RAYONNAGE / INSTALACIÓN DE LA ESTANTERÍA HARDWARE REQUIRED / QUINCAILLERIE REQUISE / HERRAJE REQUERIDO Hardware Bag / Sac de quincaillerie Bolsa de herraje AIY (x2) ADZ (x14) PARTS REQUIRED / PIÈCES REQUISES / PIEZAS REQUERIDAS Plastic Parts / Pièces en plastique Piezas de plástico... - Página 47 SECTION 8 (CONTINUED) / SECTION 8 (SUITE) SECCIÓN 8 (CONTINUACIÓN) TOOLS AND HARDWARE REQUIRED / OUTILS ET QUINCAILLERIE REQUIS INSTRUMENTAL Y HERRAJE REQUERIDOS AIY (x2) • Insert the Shelf Brackets (AIY) into the slots in the Wall Support Channels. The Brackets must be at the same height. •...
- Página 48 SECTION 8 (CONTINUED) / SECTION 8 (SUITE) SECCIÓN 8 (CONTINUACIÓN) TOOLS AND HARDWARE REQUIRED / OUTILS ET QUINCAILLERIE REQUIS INSTRUMENTAL Y HERRAJE REQUERIDOS ADZ (x6) • Fold the fl aps on the ends of the Shelf (AFV) up, and set the Shelf onto the Brackets.
-
Página 49: Door & Gable Installation
DOOR & ENTRY GABLE INSTALLATION / INSTALLATION DU PIGNON D’ENTRÉE ET DES PORTES / INSTALACIÓN DE LA FACHADA DE ENTRADA Y LAS PUERTAS HARDWARE REQUIRED / QUINCAILLERIE REQUISE / HERRAJE REQUERIDO Hardware Bag / Sac de quincaillerie Bolsa de herraje ADX (x4) AHP (x2) AIC (x1) - Página 50 SECTION 9 (CONTINUED) / SECTION 9 (SUITE) SECCIÓN 9 (CONTINUACIÓN) TOOLS AND HARDWARE REQUIRED / OUTILS ET QUINCAILLERIE REQUIS INSTRUMENTAL Y HERRAJE REQUERIDOS AHP (x2) • Pull the Hinge Tube down out of the Door about six inches. Align the hole at the bottom of the Hinge Tube with the slit in the Bushing, and insert the Tube.
- Página 51 SECTION 9 (CONTINUED) / SECTION 9 (SUITE) SECCIÓN 9 (CONTINUACIÓN) TOOLS AND HARDWARE REQUIRED / OUTILS ET QUINCAILLERIE REQUIS INSTRUMENTAL Y HERRAJE REQUERIDOS ADZ (x6) • Slide the holes in the Entry Gable down over the two Hinge Tubes. • Glissez les trous dans le pignon d’entrée vers le bas sur les deux tubes d’articulation. •...
- Página 52 SECTION 9 (CONTINUED) / SECTION 9 (SUITE) SECCIÓN 9 (CONTINUACIÓN) TOOLS AND HARDWARE REQUIRED / OUTILS ET QUINCAILLERIE REQUIS INSTRUMENTAL Y HERRAJE REQUERIDOS ADX (x4) AIC (x1) AIM (x1) • Attach the Left (AIC) and Right (AIM) Gap Flaps to the corners of the Doors using the hardware included. These Flaps simply serve to block out light.
-
Página 53: Roof Assembly
ROOF ASSEMBLY / MONTAGE DU TOIT / ENSAMBLE DEL TEJADO HARDWARE REQUIRED / QUINCAILLERIE REQUISE / HERRAJE REQUERIDO Hardware Bag / Sac de quincaillerie Bolsa de herraje ADZ (x122) CUZ (x4) PARTS REQUIRED / PIÈCES REQUISES / PIEZAS REQUERIDAS Metal Parts / Pièces en métal Piezas de metal AFL (x6) - Página 54 SECTION 10 (CONTINUED) / SECTION 10 (SUITE) SECCIÓN 10 (CONTINUACIÓN) TOOLS AND HARDWARE REQUIRED / OUTILS ET QUINCAILLERIE REQUIS INSTRUMENTAL Y HERRAJE REQUERIDOS 10.1 • Set a Truss Assembly into the notches on the fi rst two opposite Wall Panels. Set a Roof Panel (AGQ) onto the Gable, Wall Panel, and Truss Assembly.
- Página 55 SECTION 10 (CONTINUED) / SECTION 10 (SUITE) SECCIÓN 10 (CONTINUACIÓN) TOOLS AND HARDWARE REQUIRED / OUTILS ET QUINCAILLERIE REQUIS INSTRUMENTAL Y HERRAJE REQUERIDOS ADZ (x4) 10.3 • Align the four holes in the Wall Panel with those at the bottom of the Roof Panel, and insert four (4) Screws (ADZ) to secure the Panel in place.
- Página 56 SECTION 10 (CONTINUED) / SECTION 10 (SUITE) SECCIÓN 10 (CONTINUACIÓN) TOOLS AND HARDWARE REQUIRED / OUTILS ET QUINCAILLERIE REQUIS INSTRUMENTAL Y HERRAJE REQUERIDOS ADZ (x2) 10.4 • Insert the fi rst two Screws (ADZ) through the Gable and into the Roof Panel at the locations shown. Insert the Roof Support (AFL) into the notches in the Gable and between the Truss and the Roof Panel.
- Página 57 SECTION 10 (CONTINUED) / SECTION 10 (SUITE) SECCIÓN 10 (CONTINUACIÓN) TOOLS AND HARDWARE REQUIRED / OUTILS ET QUINCAILLERIE REQUIS INSTRUMENTAL Y HERRAJE REQUERIDOS ADZ (x16) 10.5 • Insert fi ve (5) more Screws (ADZ) to secure the Panel in place. •...
- Página 58 SECTION 10 (CONTINUED) / SECTION 10 (SUITE) SECCIÓN 10 (CONTINUACIÓN) TOOLS AND HARDWARE REQUIRED / OUTILS ET QUINCAILLERIE REQUIS INSTRUMENTAL Y HERRAJE REQUERIDOS ADZ (x20) 10.7 • Repeat the previous steps for the center Roof Panels but using ten (10) Screws (ADZ) per Panel. •...
- Página 59 SECTION 10 (CONTINUED) / SECTION 10 (SUITE) SECCIÓN 10 (CONTINUACIÓN) TOOLS AND HARDWARE REQUIRED / OUTILS ET QUINCAILLERIE REQUIS INSTRUMENTAL Y HERRAJE REQUERIDOS ADZ (x14) 10.8 • Attach the Rear Gable to the Shed using fourteen (14) Screws (ADZ). • Fixez le pignon arrière à l’abri à l’aide de quatorze (14) vis (ADZ). •...
- Página 60 SECTION 10 (CONTINUED) / SECTION 10 (SUITE) SECCIÓN 10 (CONTINUACIÓN) TOOLS AND HARDWARE REQUIRED / OUTILS ET QUINCAILLERIE REQUIS INSTRUMENTAL Y HERRAJE REQUERIDOS ADZ (x22) 10.9 • Attach the last two Roof Panels to the shed in the same way you did the fi rst two. •...
- Página 61 SECTION 10 (CONTINUED) / SECTION 10 (SUITE) SECCIÓN 10 (CONTINUACIÓN) TOOLS AND HARDWARE REQUIRED / OUTILS ET QUINCAILLERIE REQUIS INSTRUMENTAL Y HERRAJE REQUERIDOS ADZ (x4) 10.10 • Attach a Roof Extension (CVC) to the front, left Roof Panel, Entry Gable, and Front Truss using four (4) Screws (ADZ) at the locations indicated.
- Página 62 SECTION 10 (CONTINUED) / SECTION 10 (SUITE) SECCIÓN 10 (CONTINUACIÓN) TOOLS AND HARDWARE REQUIRED / OUTILS ET QUINCAILLERIE REQUIS INSTRUMENTAL Y HERRAJE REQUERIDOS ADZ (x5) 10.11 • Attach a Roof Extension (CVE) to the left, center and rear Roof Panels, the front left Roof Extension, Rear Gable, and Rear Truss using fi...
- Página 63 SECTION 10 (CONTINUED) / SECTION 10 (SUITE) SECCIÓN 10 (CONTINUACIÓN) TOOLS AND HARDWARE REQUIRED / OUTILS ET QUINCAILLERIE REQUIS INSTRUMENTAL Y HERRAJE REQUERIDOS ADZ (x9) 10.12 • Repeat steps 10.10–10.11 for the right side of the Roof using nine (9) Screws (ADZ) at the locations indicated. •...
- Página 64 SECTION 10 (CONTINUED) / SECTION 10 (SUITE) SECCIÓN 10 (CONTINUACIÓN) TOOLS AND HARDWARE REQUIRED / OUTILS ET QUINCAILLERIE REQUIS INSTRUMENTAL Y HERRAJE REQUERIDOS ADZ (x2) CUZ (x2) 10.13 • Insert the end of the Skylight (ENS) into the End Roof Cap (CVB) as far as possible. •...
- Página 65 SECTION 10 (CONTINUED) / SECTION 10 (SUITE) SECCIÓN 10 (CONTINUACIÓN) TOOLS AND HARDWARE REQUIRED / OUTILS ET QUINCAILLERIE REQUIS INSTRUMENTAL Y HERRAJE REQUERIDOS CUZ (x2) ADZ (x22) 10.15 • Secure the rear End Roof Cap (CVB) to the Roof and Rear Gable in the same way you did the front. Using a hand screwdriver, attach the Skylight to the Roof Extensions using twenty (20) Screws (ADZ).
-
Página 66: Accessory Installation
ACCESSORY INSTALLATION / INSTALLATION DES ACCESSOIRES / INSTALACIÓN DE LOS ACCESORIOS ACCESSORIES REQUIRED / ACCESSOIRES REQUIS / ACCESORIOS REQUERIDOS Accessory Bag / Sac d’accessoires Bolsa de accesorios EDL (x6) PARTS REQUIRED / PIÈCES REQUISES / PIEZAS REQUERIDAS NO PARTS REQUIRED FOR THIS SECTION AUCUNE PIÈCE REQUISE POUR CETTE SECTION NINGUNA PIEZA REQUERIDA PARA ESTA SECCIÓN TOOLS REQUIRED / OUTILS REQUIS / INSTRUMENTAL REQUERIDO... - Página 67 SECTION 11 (CONTINUED) / SECTION 11 (SUITE) SECCIÓN 11 (CONTINUACIÓN) TOOLS AND ACCESSORIES REQUIRED / OUTILS ET ACCESSOIRES REQUIS INSTRUMENTAL Y ACCESORIOS REQUERIDOS EDL (x6) 11.1 • Insert the six (6) Wall Hooks (EDL) into any of the notches in the Wall Panels (either side of the shed). Then push downward to lock them in place.
-
Página 68: Door Alignment
DOOR ALIGNMENT / ALIGNEMENT DES PORTES / ALINEACIÓN DE LAS PUERTAS HARDWARE REQUIRED / QUINCAILLERIE REQUISE / HERRAJE REQUERIDO NO HARDWARE INCLUDED FOR THIS SECTION AUCUNE QUINCAILLERIE INCLUSE POUR CETTE SECTION NINGÚN HERRAJE INCLUIDO PARA ESTA SECCIÓN PARTS REQUIRED / PIÈCES REQUISES / PIEZAS REQUERIDAS Wood Parts / Pièces en bois Piezas de madera... - Página 69 SECTION 12 (CONTINUED) / SECTION 12 (SUITE) SECCIÓN 12 (CONTINUACIÓN) TOOLS AND HARDWARE REQUIRED / OUTILS ET ACCESSOIRES REQUIS INSTRUMENTAL Y HERRAJE REQUERIDOS AIX (x4) 12.1 • If the Doors are not level, follow the steps on this page to even them out. •...
-
Página 70: Shed Anchoring
SHED ANCHORING / ANCRAGE DE L’ABRI / ANCLAJE DE LA CASETA HARDWARE REQUIRED / QUINCAILLERIE REQUISE / HERRAJE REQUERIDO NO HARDWARE OR PARTS INCLUDED FOR THIS SECTION AUCUNE QUINCAILLERIE OU PIÈCE INCLUSE POUR CETTE SECTION NINGÚN HERRAJE O PIEZA INCLUIDO PARA ESTA SECCIÓN PARTS REQUIRED / PIÈCES REQUISES / PIEZAS REQUERIDAS NO HARDWARE OR PARTS INCLUDED FOR THIS SECTION AUCUNE QUINCAILLERIE OU PIÈCE INCLUSE POUR CETTE SECTION... - Página 71 SECTION 13 (CONTINUED) / SECTION 13 (SUITE) SECCIÓN 13 (CONTINUACIÓN) FOR A CONCRETE PLATFORM / POUR UNE PLATE-FORME EN BÉTON PARA UNA PLATAFORMA DE CONCRETO 5/16 in/po (8 mm) 13.1 • If you plan on anchoring your shed to a concrete platform, you must purchase the correct anchoring hardware. We recommend using a hammer drill, 5/16"...
- Página 72 SECTION 13 (CONTINUED) / SECTION 13 (SUITE) SECCIÓN 13 (CONTINUACIÓN) FOR A WOOD PLATFORM / POUR UNE PLATE-FORME EN BOIS PARA UNA PLATAFORMA DE MADERA 5/16 in/po (8 mm) 7/16 in/po (11 mm) 13.1 • If you plan on anchoring your shed to a wood platform, you must purchase the correct anchoring hardware. We recommend using a drill, 5/16"...
- Página 73 NOTES / REMARQUES / NOTAS...
- Página 74 NOTES / REMARQUES / NOTAS...
-
Página 75: Cleaning & Care
Congratulations on your Lifetime ® product purchase. By following the instructions below, your new Lifetime product should provide you with years of service and enjoyment. The polyethylene panels are stain- and solvent-resistant. Most stains can be removed using a mild soap and a soft-bristled brush. -
Página 76: Registration
REGISTER today! ENREGISTREZ VOTRE PRODUIT EN LIGNE À WWW.LIFETIME.COM Chez Lifetime®, nous nous engageons à fournir des produits innovateurs de qualité. Lors de votre inscription, vous aurez l’occasion de nous faire parvenir vos commentaires. Votre opinion est importante pour nous. -
Página 77: Warranty
All merchandise is sold on this condition, and no representative of the company may waive or change this policy. 5. This product is not intended for institutional or commercial use; Lifetime Products, Inc. does not assume any liability for such use. Institutional or commercial use will void the warranty. - Página 78 2. Cette garantie n’est pas transférable et est expressément limitée à la réparation ou au remplacement du produit défectueux. © Si le produit est déclaré défectueux selon les termes de cette garantie, Lifetime Products, Inc. réparera ou remplacera les parties défectueuses gratuitement pour l’acheteur. Les frais d’expéditions aller et retour de l’usine ne sont pas couverts et sont à...
-
Página 79: Garantía
NO ESTÁN DISPONIBLES O SON OBSOLETAS. 1. El comprador original recibe la garantía de que las casetas Lifetime estarán libres de defectos de material o de mano de obra por un período de 10 años a contar desde la fecha de la compra original. La palabra “defectos” se defi ne como imperfecciones que perjudican el uso del producto. - Página 80 Or call: 1-800-424-3865 ® AMÉLIOREZ VOTRE ACHAT LIFETIME EN AJOUTANT DES ACCESSOIRES OU DES AUTRES PRODUITS ® Pour acheter des accessoires ou des autres produits Lifetime , rendez-vous une visite à : www.lifetime.com Ou appelez-nous au 1-800-424-3865 ® MEJORE SU COMPRA DE LIFETIME AGREGANDO ACCESORIOS U OTROS MARAVILLOSOS PRODUCTOS ®...