Tabla de contenido
Publicidad
Idiomas disponibles
Idiomas disponibles
Enlaces rápidos
PM 4645
SEHW
(DYM1676CD-
3)
Originalbedienungsanleitung (DE)
Lesen Sie diese Bedienungsanleitung vor der Installation und
Verwendung des Geräts sorgfältig durch. Falls Sie mit den
Anleitungen nicht vertraut sind, können Gefahrensituationen
entstehen. Bewahren Sie die Bedienungsanleitung sicher und
für ein zukünftiges Nachschlagen gut auf
Hersteller
Ningbo Daye Garden Machinery Co., Ltd.
No. 58 Jinfeng Road, Yuyao
Zheijiang 315403, P.R. China
Benzin-Rasenmäher
PM 5160
SEHW
(DYM1678D-3)
PM 4335 SE
(DYM162002) (DYM1560EDQ)
66450 Bexbach, Deutschland
PM 5167
SEHW-B
Importeur
Daye Europe GmbH
Parkstraße 1a
www.mowox.com
Publicidad
Capítulos
Tabla de contenido

Manuales relacionados para Mowox PM 4645 SEHW


Resumen de contenidos para Mowox PM 4645 SEHW
- Página 1 Anleitungen nicht vertraut sind, können Gefahrensituationen entstehen. Bewahren Sie die Bedienungsanleitung sicher und für ein zukünftiges Nachschlagen gut auf Hersteller Importeur Ningbo Daye Garden Machinery Co., Ltd. Daye Europe GmbH No. 58 Jinfeng Road, Yuyao Parkstraße 1a Zheijiang 315403, P.R. China 66450 Bexbach, Deutschland www.mowox.com...
-
Página 2: Bestimmungsgemäßer Gebrauch
WARNUNG Lesen Sie diese Betriebsanweisung zu Ihrer eigenen Sicherheit vor der Inbetriebnahme des Geräts durch. Nichtbeachtung der Anleitungen kann zu schwerwiegenden Verletzungen führen. Machen Sie sich vor jedem Gebrauch mit dem Rasenmäher vertraut. Bewahren Sie diese Betriebsanweisung gut auf, damit die darin enthaltenen Informationen jederzeit verfügbar sind. Falls Sie das Gerät an Dritte weitergeben, überreichen Sie auch diese Betriebsanweisung. - Página 3 INHALT KAPITEL 1 SYMBOLE AUF DEM PRODUKT KAPITEL 2 ALLGEMEINE SICHERHEITSHINWEISE KAPITEL 3 IHR RASENMÄHER IM ÜBERBLICK KAPITEL 4 TECHNISCHE DATEN KAPITEL 5 MONTAGE KAPITEL 6 „3 IN 1“ KAPITEL 7 GEBRAUCH KAPITEL 8 WARTUNG KAPITEL 9 SCHMIERUNG KAPITEL 10 REINIGUNG KAPITEL 11 STARTER-BATTERIE AUFLADEN...
-
Página 4: Symbole Auf Dem Produkt
1. SYMBOLE AUF DEM PRODUKT B1 Betriebsanweisung durchlesen! B2 Unbeteiligte Personen fernhalten! B3 Verletzungsgefahr für Hände und Füße! B4 Brennbares Benzin. Von Feuer fernhalten! Benzin nicht bei laufendem Motor nachfüllen! B5 Giftige Dämpfe. Nicht in geschlossenen Räumen verwenden! B6 Während des Betriebs Schutzbrille und Ohrenschutz tragen! B7 Elektrischer Hochstrom-Zündstromkreis. - Página 5 auf. WARNUNG: Dieses Gerät erzeugt während des Betriebs ein elektromagnetisches Feld. Dieses Feld kann unter gewissen Umständen die Funktionsweise aktiver oder passiver medizinischer Implantate beeinträchtigen. Um die Gefahr von schwerwiegenden oder tödlichen Verletzungen zu vermeiden, empfehlen wir Personen mit medizinischen Implantaten, einen Arzt bzw. den Hersteller des Implantats vor der Verwendung dieses Geräts zu kontaktieren.
- Página 6 ● Es wird empfohlen, die Dauer des Betriebs zu beschränken, um Gefahren aufgrund von Lärm und Vibration zu minimieren. ● Seien Sie besonders vorsichtig an Hängen, Abgründen, Gräben und Böschungen. ● Mähen Sie nur bei Tageslicht. ● Vermeiden Sie den Betrieb auf nassem Gras. ●...
- Página 7 ● Eine unsachgemäße Wartung, nicht konforme Ersatzteile oder die Entfernung oder Modifikation von Sicherheitsvorrichtungen kann zu Schäden am Rasenmäher führen und schwerwiegende oder sogar tödliche Verletzungen verursachen. ● Verwenden Sie nur die Messer und Ersatzteile, die vom Hersteller empfohlen wurden. Die Verwendung nicht originaler Ersatzteile kann Schäden am Gerät und Verletzungen verursachen.
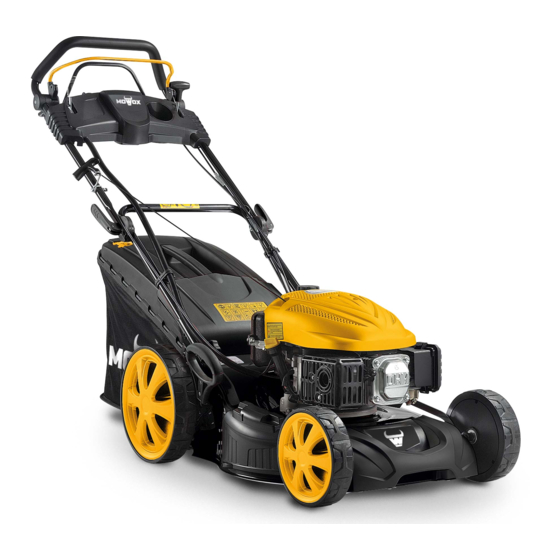
- Página 8 3. IHR RASENMÄHER IM ÜBERBLICK Abb.1A PM 4645 SEHW(DYM1676CD-3) 1. Startergriff 2. Arretierhebel 3. Grasauffangvorrichtung 4. Höheneinstellhebel 5. Rad 6. Seitliche Klappe 7. Zündkerze 8. Öltankdeckel 9. Benzintankdeckel 10. Kabelklemme 11. Chokehebel 12. Steuerhebel für Selbststeuerung 13. Bremsgriff 14. Oberer Griff 15.
-
Página 9: Technische Daten
Fig.1D PM 5157 SEHW-B(DYM1560EDQ) 4. TECHNISCHE DATEN PM 4645SEHW PM5160SEHW PM4335SE PM5157SEHW-B Modell (DYM1676CD-3) (DYM1678D-3) (DYM162002) (DYM1560EDQ) Motor-Typ DYM1P64FE DYM1P70FE DYM1P56FE B&S 575IS Hubraum 135 cm 173cm 98.5cm 150cm Nennleistung 2.4Kw 3.6kw 1.9kW 2.2kW Messerbreite 460mm 510mm 430mm 510mm Drehzahl 2800/min 2800/min 2900/min... - Página 10 Gemessener Schalldruckpegel 92.0dB(A) 95.0dB(A) 94.95dB(A) 95.1dB(A) Garantierter Schalldruckpegel (gemäß K=2.59dB(A) K=2.88B(A) K=0.99dB(A) K=1.94dB(A) 2000/14/EC) 96 dB(A) 98 dB(A) 96 dB(A) 98 dB(A) Vibration 3.099m/s² 3.437m/s² ,K= 7.291m/s² 5.84m/s² K=1.5 (gemäß EN ISO 5395- 1 Anhang G & K=1.5 m/s² 1.5 m/s² K=1.5 m/s²...
- Página 11 Kabelklemme Kabelklemme Abb. 2J Abb.2K 5.2 FÜHRUNGSHOLM AN DIE KÖRPERGRÖßE ANPASSEN A). Öffnen Sie den Arretierhebel. B). Drehen Sie den oberen Griff mittig von der Winkelstellvorrichtung, um den Winkel innerhalb eines Bereichs von -20º bis 20º einzustellen; siehe Abb. 3. C).
- Página 12 Abb.5A Abb.5B 5.5 SCHNITTHÖHE Wenden Sie Kraft an, um den Hebel zu lösen. Schieben Sie den Hebel zum Einstellen der Höhe entsprechend nach vorn oder hinten. (Abb.6A/6B) Abb. 6 Abb. 6B (nur für DYM1560EDQ) 5.6 STARTERBATTERIE (nur DYM1560EDQ) 5.6.1 EINSETZEN 1.
- Página 13 Fig.7C Fig. 7D Achtung: Nach jedem Gebrauch auf Schäden prüfen und aufladen. 6. „3-IN-1“ Ihr Rasenmäher verfügt über Zubehör, das je nach Anwendungszweck am Gerät befestigt werden muss: 1. Normale Funktion Grasfangsack 2. Mulchen Mulchkeil 3. Seitlicher Auswurf Keil für seitlichen Auswurf Was ist Mulchen? Beim Mulchen wird das Gras geschnitten und gleichzeitig fein gehackt und für die Düngung zurück auf den Rasen geworfen.
- Página 14 Mähdecks. (Abb. 8D/ Abb. 8E/Abb. 8F) 3. Senken Sie die hintere Abdeckung wieder ab. (Abb. 8G) Abb.8D Abb.8E Abb.8F Abb.8G 6.2 Rasenmähen mit seitlichem Austritt WARNUNG: Nur mit angehaltenem Motor. 1. Heben Sie die rückseitige Abdeckung an und entnehmen Sie den Grasfangsack (Siehe 6.1). 2.
- Página 15 WARNUNG: Nur mit angehaltenem Motor. Um normal weiter zu mähen, entfernen Sie den Mulchkeil und das Zubehör des seitlichen Auswurfs und lagern Sie diese Teile bis zum nächsten Gebrauch. 7. GEBRAUCH 7.1 VOR DER INBETRIEBNAHME Warten Sie den Motor mit Benzin und Öl gemäß den Anleitungen im separaten Handbuch des Motors. Lesen Sie die Anleitungen sorgfältig durch.
-
Página 16: Motor Ausschalten
Abbildung 1 Abbildung 2. Abbildung 3 Abbildung 4 Abbildung 5 7.2.2 ELEKTRISCHER START FÜR DYM1678D-3/DYM162002/DYM1560EDQ: 7.2.1 MANUELLER START(Für DYM1676CD-3/DYM1678D-3/DYM162002) Das Gerät verfügt an der Zündkerze über eine Gummikappe; vergewissern Sie sich, dass diese sicher aufgesteckt ist. Öffnen Sie das Benzinventil. Stellen Sie es auf die Position „ “... - Página 17 Abb.13 7.5 HINTERRADANTRIEB Ziehen Sie den Antriebsgriff #2 nach vorne. Der Rasenmäher fährt dann mit einer Geschwindigkeit von ca. 3 km/h selbständig vorwärts. Lassen Sie die Selbststeuerung los, um den Rasenmäher anzuhalten (Abb. 14). Abb.14 7.6 OPTIMALE ERGEBNISSE MIT DEM RASENMÄHER ERZIELEN Entfernen Sie Steine, Äste, Drähte und andere Fremdkörper vom Rasen, da diese vom Rasenmäher in unterschiedliche Richtungen aufgeschleudert werden und schwerwiegende Verletzungen oder Sachschäden an umliegenden Gegenständen oder am Gerät selbst verursachen könnten.
- Página 18 Abbildung 6 Abbildung 7 Abb. 15A Abb. 15B Für DYM 1560EDQ An der rückseitigen Abdeckung befindet sich ein Sichtfenster, durch das Sie den Füllstand des Grasbehälters beobachten können Falls der Grasauffangbehälter voll ist, müssen Sie diesen entleeren und reinigen. Vergewissern Sie sich dass der Behälter sauber ist und das Gitter gut belüftet wurde.
- Página 19 einstellen (Abb.15A) ,10 Höhenpositionen nur für DYM1560EDQ). (Abb. 15B) 1. Schalten Sie den Rasenmäher aus und trennen Sie den Zündkerzendraht, bevor Sie die Schnitthöhe des Messers einstellen. 2. Der mittige Höheneinstellhebel verfügt über 7 Positionen. Um die Schnitthöhe zu ändern, drücken Sie den Einstellhebel zum Rad hin und verstellen Sie ihn dann zur Auswahl der gewünschten Höhe nach oben oder unten.
- Página 20 5. Lassen Sie das Filterelement an der Luft trocknen. 6. Geben Sie einige Tropfen SAE30 Öl auf den Schaumstofffilter und drücken Sie ihn leicht aus, um überschüssiges Öl zu entfernen. 7. Installieren Sie dann wieder den Filter. HINWEIS: Ersetzen Sie den Filter, falls dieser ausgefranst, eingerissen, beschädigt oder nicht mehr zu reinigen ist.
- Página 21 und daraus folgend den Motor und den Rasenmäher beschädigen. Das Messer muss nach dem Schärfen also gut ausgeglichen sein. Testen Sie das Messer, indem Sie es auf einem runden Schraubenzieher balancieren. Entfernen Sie Metall von der schwereren Seite, bis es gleichmäßig ausbalanciert ist. Bevor Sie das Messer und den Messeradapter wieder im Gerät installieren, schmieren Sie die Kurbelwelle des Motors und die innere Oberfläche des Messeradapters mit leichtem Öl ein.
- Página 22 10.5 TRAGFLÄCHE UND MESSER REINIGEN (Nur für DYM1678D-3) WARNUNG: Schalten Sie den Rasenmäher vor der Reinigung aus und trennen Sie das Zündkerzenkabel. WARNUNG: Nach dem Ausschalten des Motors dreht sich das Messer noch einige Sekunden weiter. HINWEIS: Entfernen Sie vor der Reinigung die Grasauffangvorrichtung und den Austrittskanal; befestigen Sie dann den Mulchkeil.
- Página 23 11. STARTER-BATTERIE AUFLADEN Für DYM1676CD-3/DYM1678D-3/DYM162002 Die Starter-Batterie ist wartungsfrei, muss jedoch aufgeladen werden: Vor dem Start des Rasenmähers. Falls die Batterie entladen ist, vor der Wintersaison, oder falls Sie das Gerät länger (> 6 Monate) nicht verwenden. Ladevorgang: 1.
- Página 24 - Achten Sie darauf, die Kabel nicht zu knicken oder z verbiegen. - Falls das Starterkabel von der Seilführung am Griff getrennt wird, trennen und erden Sie den Zündkerzendraht, drücken Sie den Bremshebel und ziehen Sie dann das Starterkabel langsam aus dem Motor heraus. Führen Sie das Starterkabel in die Seilführungsschraube am Griff.
- Página 25 im Leerlauf. Belüftungsschlitze Beseitigen Sie Verschmutzungen aus den Schlitzen. Triebwerksgehäuse blockiert. Kühlflossen und Luftkanäle Entfernen Sie Rückstände von den Kühlflossen und den unter dem Gehäuse des Luftkanälen. Motorgebläses sind blockiert. Motor setzt bei Abstand zwischen Elektrodenabstand einstellen; siehe hohen Elektroden der Zündkerze zu BEDIENUNGSANLEITUNG DES MOTORS.
- Página 26 14. GARANTIE...
-
Página 27: Eu-Konformitätserklärung
15. ENTSORGUNG Am Ende der Lebensdauer Ihres Geräts darf dieses nicht über den normalen Haushaltsmüll entsorgt werden. Entsorgen Sie es umweltgerecht. 16. EU-KONFORMITÄTSERKLÄRUNG EU-KONFORMITÄTSERKLÄRUNG Wir erklären hiermit Ningbo Daye Garden Machinery Co., Ltd. No.58 Jingfeng Road, Yuyao, Zhejiang 315403, P. R. China Dass die folgende Maschine mit den entsprechenden, grundlegenden Sicherheits- und Gesundheitsanforderungende der EG-Direktiven zu seinem Design und Typ übereinstimmt, wie es von uns vertrieben wird. -
Página 28: Original Operating Instructions (En)
Keep the operating instructions in a safe place for future reference. Manufacturer Importer Ningbo Daye Garden Machinery Co., Ltd. Daye Europe GmbH No. 58 Jinfeng Road, Yuyao Parkstraße 1a Zheijiang 315403, P.R. China 66450 Bexbach, Deutschland www.mowox.com... -
Página 29: Intended Use
WARNING: For your own safety, please read this manual before attempting to operate your new unit. Failure to follow these instructions can result in serious personal injury. Spend a few moments to familiarize yourself with your mower before each use. Keep this manual in a safe place, so that the information is available anytime. - Página 30 CONTENTS SECTION . 1 SYMBOLS MARKED ON THE PRODUCT SECTION 2 GENERAL SAFETY RULES SECTION 3 PARTS DESCRIPTION SECTION 4 TECHNICAL DATA SECTION 5 ASSEMBLY SECTION 6 “3 IN 1” SECTION 7 OPERATING INSTRUCTIONS SECTION 8 MAINTENANCE INSTRUCTIONS SECTION 9 LUBRICATION INSTRUCTIONS SECTION 10 CLEANING...
-
Página 31: Symbols Marked On The Product
1. SYMBOLS MARKED ON THE PRODUCT Read operating instructions. Keep bystanders away. Risk of injury to hands and feet. Flammable fuel. Keep fire away. Do not add fuel on running machine. Toxic fumes. Don’t operate in closed rooms. Wear glasses and ear plugs during operation. High-current electric ignition circuit. - Página 32 Training ● Read the instructions carefully. Be familiar with the controls and the proper use of the equipment. ● Never allow children or people unfamiliar with these instructions to use the lawn mower. Local regulations may restrict the age of the operator. ●...
-
Página 33: Maintenance And Storage
● Walk, never run. ● Mow across slopes, never up and down. ● Exercise extreme caution when changing direction on slopes. ● Do not mow excessively steep slopes. ● Use extreme caution when reversing or pulling the lawn mower towards you. ●... -
Página 34: Parts Description
3. PARTS DESCRIPTION Fig.1A PM 4645 SEHW(DYM1676CD-3) 1. Starter handle 2. Locking lever 3. Grass catcher 4. Height adjusting lever 5. Wheel 6. Sideward flap 7. Spark Plug 8. Oil cap 9. Fuel cap 10. Cable clamp 11. Throttle choke lever 12. -
Página 35: Technical Data
Fig.1D PM 5157 SEHW-B(DYM1560EDQ) 4. TECHNICAL DATA Model PM 4645SEHW PM5160SEHW PM4335SE PM5157SEHW-B (DYM1676CD-3) (DYM1678D-3) (DYM162002) (DYM1560EDQ) Engine type DYM1P64FE DYM1P70FE DYM1P56FE B&S 575IS Engine Displacement 135 cm 173cm 98.5cm 150cm Nominal Power 2.4Kw 3.6kw 1.9kW 2.2kW Blade Width 460mm 510mm 430mm 510mm... -
Página 36: Folding Handle
5. ASSEMBLY 5.1 FOLDING HANDLE 1. Fix the lower handlebars into the unit body with locking knobs, bolts and bolts as Fig. 2A,/Fig.2B/Fig2C shown. 2. Fix the lower handlebar into the unit body with a suitable spanner (Fig. 2D). (Only for DYM1560EDQ) 3. -
Página 37: Height Of Cut
5.2 ADJUST HANDLE TO BODY HEIGHT (DYM1676CD-3/ DYM1678D3/ DYM162002 only) 1. Open the two quick release skewers to unfold the upper handlebar . 2. Rotate the upper handle centered in the angle adjusting to an ergonomic height. 3. Push the locking lever closed to connect the lower handle and the upper handle. Figure 3 5.3 MOUNTING AND DISMOUNTING THE GRASS CATCHER 1. - Página 38 Fig. 6A Fig. 6B (only for DYM1560EDQ) 5.6 STARTER BATTERY (nur DYM1560EDQ) 5.6.1 DEPLOY 1. Insert the battery into the guide rail on the side of the motor. (Fig. 7A/7B) 2. Push the battery in the middle until you feel it click into place. Fig.
- Página 39 6. “3 IN 1” Your lawn mower is equipped with accessories to be retrofitted based on the application purpose: 1. normal function rear discharge into grass catching bag 2. mulching mower mulching plug 3. side-discharge side discharge wedge What is mulching? When mulching, the grass is simultaneously cut and finely chopped and returned to the grass strip as natural fertilizer.
- Página 40 Abb.8D Abb.8E Abb.8F Abb.8G 6.2 side discharge mowing WARNING: Operate only with a stopped motor. 1. Lift the rear cover and remove the grass catcher #5 (see 6.1). 2. Install the mulching wedge #22. 3. Unlock the lid #20 (fig. 27). 4.
-
Página 41: Before Starting
WARNING: Operate only with a stopped motor. To return back to normal mowing, remove the mulching wedge and the side discharge accessory and store them for later usage. 7. OPERATING INSTRUCTIONS 7.1 BEFORE STARTING Service the engine with gasoline and oil as instructed in the separate engine manual packed in your mower. Read instructions carefully. - Página 42 Fig.10A Fig.10B Fig.10C Fig.10D Start the engine carefully according to instructions and with feet well away from the blade. Do not tilt the lawn mower when starting the engine. Start the mower on a level surface, free of high grass or obstacles. Keep hands and feet away from the rotating parts.
-
Página 43: Operation Procedures
end of the spark plug wire (inside the rubber boot) is fastened securely over the metal tip on the spark plug. 2. When starting cool engine, turn throttle choke lever to “ ” position. When starting warm engine and operating, turn throttle chock lever to “ ”position. -
Página 44: Important
Fig.14 7.6 FOR THE BEST RESULTS WHEN MOWING Clear lawn of debris. Be sure that the lawn is clear of stones, sticks, wire or other foreign objects which could be accidentally thrown out by the mower in any direction and cause serious personal injury to the operator and others as well as damage to property and surrounding objects. -
Página 45: Maintenance Instructions
For DYM 1560EDQ There is a transparent window on the rear cover which you can see the grass condition in the grass catcher. If the grass catcher is full of grass, you will need to empty and clean the grass catcher, make sure it is clean and ensure its meshwork is ventilated. -
Página 46: Engine Air Cleaner
9. LUBRICATION INSTRUCIONS CAUTION: DISCONNECT SPARK PLUG BEFORE SERVICING. 1. WHEELS-Lubricate the ball bearings in each wheel at least once a season with a light oil. 2. ENGINE-Follow engine manual for lubrication instructions. 10. CLEANING CAUTION: Do not hose engine. Water can damage engine or contaminate the fuel system. 1. -
Página 47: Cutting Blade
Filter element Fig.16E (DYM162002) Fig.16F(DYM1560EDQ) 10.2 CUTTING BLADE CAUTION: Be sure to disconnect and ground the spark plug wire before working on the cutting blade to prevent accidental engine starting. Protect hands by using heavy gloves or a rag to grasp the cutting blades .Tip mower as specified in separate engine manual. - Página 48 local dealer or call our company, see cover page) 10.4 ENGINE Refer to the separate engine manual for engine maintenance instructions. Maintain engine oil as instructed in the separate engine manual packed with your unit. Read and follow instructions carefully. Service air cleaner as per separate engine manual under normal conditions.
-
Página 49: Storage Instructions (Off Season)
Keep hands and feet away from the rotating parts. Do not start the engine when standing in front of the discharge opening. WARNING: When cleaning, forbid all other actions, for example mowing, mulching etc. 11. CHARGING THE STARTER BATTERY For DYM1676CD-3/DYM1678D-3/DYM162002 The starter battery is maintenance-free and is normally charged by the lawnmower. - Página 50 NOTE: - When storing any type of power equipment in an unventilated or material storage shed, -Care should be taken to rust-proof the equipment. Using a light oil or silicone, coat the equipment, especially cables and all moving parts. - Be careful not to bend or kink cables. - If the starter rope becomes disconnected from rope guide on handle, disconnect and ground the spark plug wire, Depress the blade control handle and pull the starter rope out from engine slowly.
- Página 51 blower housing are blocked. Engine skips at Gap between electrodes of Set gap between electrodes: refer to ENGINE OWNERS high speed. spark plug is too close. MANUAL Engine Cooling air flow is restricted. Remove any debris from slots in shroud, blower housing, overheats air passages Incorrect spark plug.
- Página 52 14. WARRANTY...
-
Página 53: Ec Declaration Of Conformity
15. ENVIRONMENT Should your machine need replacement after extended use, do not put it in the domestic waste but dispose of it in an environmentally safe way. 16. EC-DECLARATION OF CONFORMITY EC Declaration of Conformity We herewith declare, Ningbo Daye Garden Machinery Co., Ltd. No.58 Jinfeng Road, Yuyao, Zhejiang 315403, P. - Página 54 Conservez ce manuel dans un endroit sûr et gardez-le à porter de main pour toute consulta-tion ultérieure. Fournisseur Importateur Ningbo Daye Garden Machinery Co., Ltd. Daye Europe GmbH No. 58 Jinfeng Road, Yuyao Parkstraße 1a Zheijiang 315403, P.R. China 66450 Bexbach, Deutschland www.mowox.com...
- Página 55 AVERTISSEMENT Pour votre propre sécurité, lisez ce manuel avant d’utiliser votre nouvel appareil. Si vous ne suivez pas les instructions, vous risquez de graves blessures physiques. Consacrez quelques instants pour vous familiariser avec la tondeuse avant utilisation. Gardez ce manuel dans un lieu sûr, afin que l’information soit toujours disponible.
- Página 56 SOMMAIRE SECTION 1 SYMBOLES MARQUÉS SUR LE PRODUIT SECTION 2 RÈGLES GÉNÉRALES DE SÉCURITÉ SECTION 3 DESCRIPTION DES PIÈCES SECTION 4 DONNÉES TECHNIQUES SECTION 5 MONTAGE SECTION 6 MACHINE « 3 EN 1 » SECTION 7 INSTRUCTIONS D'UTILISATION SECTION 8 INSTRUCTIONS D'ENTRETIEN SECTION 9 LUBRIFICATION...
-
Página 57: Règles Générales De Sécurité
1. SYMBOLES MARQUÉS SUR LE PRODUIT B1 Lisez attentivement la notice d’utilisation B2. Tenez les tierces personnes éloignées B3 L'utilisateur doit faire très attention à ses mains et à ses pieds pour éviter les blessures. B4 Le carburant est inflammable, tenez-le éloigné du feu. N'ajoutez pas de carburant lorsque la machine est en cours de fonctionnement. - Página 58 AVERTISSEMENT : Cette machine produit un champ électromagnétique durant l’utilisation. Le champ peut sous certaines circonstances interférer avec des implants médicaux actifs ou passifs. Pour réduire le risque de blessure grave ou mortelle, nous recommandons aux personnes munies d’implants médicaux de consulter leur docteur et le fabriquant de l’implant médical avant d’utiliser cette machine.
- Página 59 équipements pendant le fonctionnement. Gardez les matériaux inflammables à l'écart et ne placez rien sur le moteur pendant qu'il est en marche. ● Il est recommandé de limiter la durée de fonctionnement afin de minimiser les risques liés au bruit et aux vibrations.
-
Página 60: Description Des Éléments
Ne touchez pas les lames rotatives. AVERTISSEMENT Faites le plein en extérieur, dans une zone bien ventilée, avec le moteur arrêté. 3. DESCRIPTION DES ÉLÉMENTS Fig.1A PM 4645 SEHW(DYM1676CD-3) Poignée du démarreur Bouchon de carburant Levier de verrouillage Pince de câble... -
Página 61: Caractéristiques Techniques
Fig.1B PM 5160 SEHW(DYM1678D-3) Fig.1C PM 4335 SE(DYM162002) Fig.1D PM 5157 SEHW-B(DYM1560EDQ) 4. CARACTÉRISTIQUES TECHNIQUES PM 4645SEHW PM5160SEHW PM4335SE PM5157SEHW-B Modèle (DYM1676CD-3) (DYM1678D-3) (DYM162002) (DYM1560EDQ) Type de moteur DYM1P64FE DYM1P70FE DYM1P56FE B&S 575IS 135 cm 173cm 98.5cm 150cm Cylindrée 2.4Kw 3.6kw 1.9kW 2.2kW... -
Página 62: Poignée De Pliage
39kg 41.7kg/ 33.7kg 33.7kg Poids net 25-75mm 7 réglages 25-75mm 10 Réglage de hauteur : réglages Modèle du chargeur HYCH0131380500G CU25-1124200 ou IS12C Données techniques du Entrée : AC100-240 V, 50-60Hz, 0,32 A Tension de Entrée : 100- chargeur sortie 13,8 Vd.c. , 0,5A 240V~,... - Página 63 Fig.2A Fig.2B Fig.2C Fig.2D (pour DYM1560EDQ) Fig.2E Fig.2F Fig.2G Fig.2H (pour DYM1560EDQ) Fig.2I (pour DYM1560EDQ) Serre-câble Serre-câble Fig 2J Fig.2K 5.2 RÉGLAGE POUR UN ANGLE APPROPRIÉ pour: DYM1676CD-3/DYM1678D3/DYM162002 A).Tirez le levier de verrouillage en position d’ouverture ; B) . Faites tournez la poignée supérieure pour définir l'angle d’engrenage de rotation pour ajuster un angle approprié...
-
Página 64: Hauteur De Coupe
Angle d’engrenage rotation Fig.3 5.3 ASSEMBLAGE ET DESASSEMBLAGE DU SAC DE COLLECTE 1. Pour installer : Soulever la protection arrière et attachez le sac à herbe à l'arrière de la tondeuse. 2. Pour enlever : attrapez et soulevez la protection arrière, enlevez le sac à herbe. Fig.4A Fig.4B Fig.4C... -
Página 65: Retirer La Batterie
5.6 ASSEMBLER ET RETIRER LA BATTERIE (Seulement pour le modèle DYM1560EDQ) 5.6.1 ASSEMBLER LA BATTERIE 1. Insérez la batterie dans le compartiment de la batterie. (Fig. 7A / 7B) 2. Assurez-vous que le loquet de verrouillage situé au bas de la batterie soit bien enclenché et que la batterie est bien installée. -
Página 66: Tondeuse En Mode Paillage
6.1 Tondeuse en mode paillage AVERTISSEMENT : Uniquement lorsque le moteur et les lames de coupe sont à l'arrêt ! Pour les modèles DYM1676CD-3/DYM1678D-3/DYM1560EDQ : 1. Soulevez la protection arrière et retirez le sac de collecte. 2. Insérez l’obturateur de paillage dans le pont. Verrouillez l’obturateur de paillage avec le bouton dans l'ouverture sur le pont (fig. -
Página 67: Avant De Démarrer
4. Soulevez le couvercle #20 (fig. 28). 5. Montez le canal d’éjection latéral #19 sur la broche de support du rabat latéral (fig. 29). 6. Abaissez le rabat - le rabat repose sur le canal d'éjection latéral (fig. 30) Mécanisme de verrouillage Figure 6 Figure 7 Figure 8... - Página 68 AVERTISSEMENT : Ne remplissez jamais le réservoir en intérieur, avec le moteur qui tourne ou tant que le moteur n'a pas refroidi pendant au moins 15 minutes après le fonctionnement. 7.2 POUR DÉMARRER LE MOTEUR ET ENGAGER LA LAME 7.2.1 DÉMARRER MANUELLEMENT (Pour DYM1676CD-3/DYM1678D-3/DYM162002) 1.
- Página 69 N'inclinez pas la tondeuse à gazon lors du démarrage du moteur. Démarrez la tondeuse sur une surface horizontale, dégagée d'herbe haute ou d'obstacles. Gardez vos mains hors de portée des parties rotatives. N’allumez pas le moteur lorsque vous êtes placé devant l'ouverture d’évacuation.
-
Página 70: Procédures De Fonctionnement
3. Debout derrière l'appareil, saisissez la poignée de frein et maintenez-la contre la poignée supérieure comme illustré sur la figure 12A. Démarrez le moteur avec précaution selon les instructions et avec les pieds à distance de la lame. N’inclinez pas la tondeuse à gazon au démarrage du moteur. Démarrez la tondeuse sur une surface plane, exempte d'herbe ou d'obstacles. - Página 71 automatique, la tondeuse cessera de bouger. (Fig. 14) Fig.14 7.6 POUR DE MEILLEURS RÉSULTATS LORS DE LA TONTE Dégagez les débris du gazon. Assurez-vous que le gazon ne comporte pas de pierres, de bâtons, de câbles ou d'objets extérieurs qui pourraient être accidentellement éjectés par la tondeuse dans n'importe quelle direction et causer des blessures physiques grave à...
- Página 72 Si la position de l'indicateur d'ouverture est très sale, l'indicateur ne se déploiera pas, dans ce cas, nettoyez l'emplacement de l'indicateur d'ouverture immédiatement. Fig. 15A Fig. 15B Pour DYM 1560EDQ Il y a une fenêtre transparente sur le couvercle arrière où vous pouvez voir les conditions de coupe de l’herbe dans le bac de ramassage.
-
Página 73: Instructions D'ENtretien
Pour changer la hauteur de coupe, pincez le levier d'ajustement en direction de la roue et déplacez vers le haut ou le bas pour choisir la hauteur. Fig.15D Fig.15E (Seulement pour DYM1560EDQ) 8. INSTRUCTIONS D’ENTRETIEN BOUGIE N'utilisez que des bougies d'origine pour le remplacement. Pour de meilleurs résultats, remplacez la bougie toutes les 100 heures d'utilisation. -
Página 74: Lame De Coupe
2. Soulevez la languette sur le dessus du couvercle du filtre. (Fig.16B) (Seulement pour DYM1560EDQ) 3.Enlevez la protection du filtre à air. (Fig.16A/16B) 4. Lavez les éléments du filtre à air dans de l'eau savonneuse. (Fig.16C/16D/16E/16F) NE PAS UTILISER D'ESSENCE! 5. -
Página 75: Couple De Fixation De La Lame
AVERTISSEMENT : Inspectez périodiquement si l'adaptateur de la lame ne présente pas de fissure, particulièrement si vous avez frappé un objet étranger. Remplacez si nécessaire. Pour de meilleurs résultats, votre lame doit être affutée. La lame doit être affutée en l'enlevant et soit en meulant ou en limant le rebord de coupe pour la conserver aussi proche du biseau d'origine que possible. - Página 76 Nettoyez toutes les quelques heures en conditions extrêmement poussiéreuses. Une mauvaise performance du moteur et un coulage indique généralement que le filtre à air doit être entretenu. Pour entretenir le filtre à air, consultez le manuel séparé du moteur fourni avec votre unité. La bougie doit être nettoyée et l'espace doit être redressé...
-
Página 77: Instructions De Rangement (Hors Saison)
Gardez les mains et les pieds loin des pièces en rotation. Ne démarrez le moteur en position debout devant l'ouverture d’évacuation. AVERTISSEMENT : Lors du nettoyage, toute autre action, par exemple la tonte, le paillage, etc est interdite. 11. CHARGE DE LA BATTERIE DU DÉMARREUR Pour DYM1676CD-3/DYM1678D-3/DYM162002 La batterie du démarreur est sans entretien et est normalement chargée par la tondeuse à... - Página 78 4.Rangez la tondeuse dans un endroit sec, propre et à l'abri du gel, hors de la portée des personnes non autorisées. ATTENTION ! Le moteur doit avoir complètement refroidi avant de ranger la tondeuse. REMARQUE : - Lors du rangement des équipements motorisés dans un abri de rangement non ventilé, faites bien attention à...
- Página 79 puissance. bouchon du réservoir de carburant. carburant est bouché. Un élément du filtre à air est Nettoyez le filtre à air. sale. moteur La bougie est défectueuse. Installez une nouvelle fiche avec un écartement correct : fonctionne voir MANUEL D’UTILISATION DU MOTEUR façon erratique.
- Página 80 14. GARANTIE...
-
Página 81: Déclaration De Conformité Ce
15. ENVIRONNEMENT Si votre machine doit être remplacée après une utilisation prolongée, ne la mettez pas avec les déchets ménagers, mais jetez-la de manière à respecter l’environnement. 16. DÉCLARATION DE CONFORMITÉ-CE Déclaration de conformité CE Nous déclarons par le présent Ningbo Daye Garden Machinery Co., Ltd. - Página 82 Conservare le istruzioni per l'uso in un luogo sicuro per riferimenti futuri. Produttore Importatore Ningbo Daye Garden Machinery Co., Ltd. Daye Europe GmbH No. 58 Jinfeng Road, Yuyao Parkstraße 1a Zheijiang 315403, P.R. China 66450 Bexbach, Germania www.mowox.com...
- Página 84 INDICE SEZIONE 1 SIMBOLI RIPORTATI SUL PRODOTTO ........4 SEZIONE 2 AVVERTENZE GENERALI ............. 4 SEZIONE 3 DESCRIZIONE DELLE PARTI ..........8 SEZIONE 4 SPECIFICHE TECNICHE ............9 SEZIONE 5 MONTAGGIO ................9 SEZIONE 6 “3 IN 1” ................... 11 SEZIONE 7 ISTRUZIONI OPERATIVE .............
-
Página 85: Tenere Mani E Piedi A Distanza
AVVISO: Per garantire la propria sicurezza, studiare questo manuale prima di usare l’apparecchio. Il mancato rispetto delle istruzioni può comportare seri infortuni. Ispezionare brevemente il tosaerba prima di ogni singolo uso. 1. SIMBOLI RIPORTATI SUL PRODOTTO (pannello posteriore) B1 Leggere il manuale delle istruzioni. B2 Tenere i passanti a distanza di sicurezza. - Página 86 Apprendimento Leggere con cura le istruzioni e imparare bene l’uso dei controlli e l’utilizzo dell’apparecchio; Non permettere mai ai bambini o a chi ignora queste istruzioni di usare il tosaerba; alcuni regolamenti locali potrebbero prevedere limiti di età per poter usare l’apparecchio; ...
- Página 87 I sistemi di sicurezza del motore non devono essere manomessi o disattivati. Sbloccare le lame e le frizioni di marcia prima di attivare il motore; Avviare il motore con attenzione seguendo le istruzioni e senza avvicinare i piedi alle lame; ...
- Página 88 Fig.1A PM 4645 SEHW(DYM1676CD-3) 1. Maniglia di avviamento 2. Leva di bloccaggio 3. Raccoglierba 4. Leva regolazione altezza 5. Ruota 6. Aletta laterale 7. Candela 8. Tappo dell’olio 9. Tappo del serbatoio 10. Fermacavo 11. Leva farfalla dell’aria 12. Controllo guida automatica 13. Maniglia freno 14.
-
Página 89: Specifiche Tecniche
Fig.1D PM 5157 SEHW-B(DYM1560EDQ) 4. SPECIFICHE TECNICHE Modello PM 4645SEHW PM5160SEHW PM4335SE PM5157SEHW-B (DYM1676CD-3) (DYM1678D-3) (DYM162002) (DYM1560EDQ) Tipo di Motore DYM1P64FE DYM1P70FE DYM1P56FE B&S 575IS Cilindrata 135 cm 173cm 98,5cm 150cm Potenza 2,4kW 3,6kW 1,9kW 2.2kW Larghezza Lama 460mm 510mm 430mm 510mm Velocità... - Página 90 ( A norma 2000/14/EC) 96dB (A) 98dB (A) 98 dB(A) 96dB (A) Vibrazione 3,099m/s² 3,437m/s² 7,291m/s² 5.84m/s² K=1.5 (A norma EN ISO 5395-1 Annex G & EN K=1,5 m/s² K=1,5 m/s² K=1,5 m/s² m/s² ISO 5395-2) 5. MONTAGGIO 5.1 MANIGLIA PIEGHEVOLE 1.
- Página 91 Stringicavo Stringicavo Fig 2J Fig.2K 5.2 REGOLARE L’ANGOLAZIONE PREFERITA For: DYM1676CD-3/DYM1678D3/DYM162002 A) Tirare le leve di bloccaggio, aprendole; B) Ruotare il manubrio superiore centrandolo sul dente dell’angolo desiderato scegliendo l’angolatura più adatta all’operatore da -20º a 20º come da Fig. 3; C) Spingere la leva di bloccaggio, chiudendola, per connettere il manubrio inferiore a quello superiore.
-
Página 92: Altezza Del Taglio
Fig.5A Fig.5B 5.5 ALTEZZA DEL TAGLIO Spingere verso l’esterno per sganciare la leva dalla griglia. Spostare la leva in avanti o all’indietro per regolare l’altezza (Fig.6A/6B) Fig. 6A Fig. 6B (only for DYM1560EDQ) 5.6 MONTAGGIO E RIMOZIONE DELLA BATTERIA (SOLO PER DYM1560EDQ) 5.6.1 MONTAGGIO 1. - Página 93 Fig.7C Fig. 7D AVVERTENZA: dopo l’uso, rimuovere il pacco della batteria e controllare per eventuali danni. 6. “3 IN 1” Le normali funzioni di questi tosaerba possono essere modificare in base alla destinazione d’uso: Da tosaerba con scarico posteriore a: 1.
- Página 94 Fig. 8A Fig. 8B Fig. 8C Per DYM162002: 1. Sollevare il coperchio posteriore e rimuovere il raccoglierba. 2. Inserire il cuneo di pacciamatura nella pedana. Fissare il cuneo con il tasto nell’apertura della pedana (Fig.8D/Fig.8E/Fig.8F) 3. Rimettere il coperchio (Fig.8G) Fig.8D Fig.8E Fig.8F...
-
Página 95: Istruzioni Operative
Meccanismo di bloccaggio Fig.9A Fig.9B Fig.9C Fig.9D 6.3 scarico posteriore nel contenitore di raccolta AWERTENZA: usare solo a motore fermo. Per tornare alla normale tosatura, rimuovere il cuneo di pacciamatura e l'accessorio di scarico laterale e conservarli per un uso successivo. 7. - Página 96 fine del cavo della candela (all’interno della guaina) sia ben collegato alla punta metallica della candela. 2. Prima di avviare il motore spostare l’interruttore del carburante su (Fig.10A ), solo per DYM1678D- 3. Per avviare il motore a freddo spostare la farfalla dell’aria in posizione (Fig.10B) Per il funzionamento normale o a motore caldo spostare la farfalla dell’aria in posizione (Fig.10B)
-
Página 97: Procedure Operative
4.Stando dietro al tosaerba, premere la maniglia del freno contro la maniglia superiore, come da Fig.11A/11B.. 5.Premere il tasto di avviamento (Fig.11C ) 6.Rilasciare il tasto di avviamento non appena parte il motore. Rilasciare la maniglia di controllo del freno per arrestare il motore e le lame. 7.Al termine di ogni sessione di tosatura, portare l’interruttore del carburante in posizione (Fig. -
Página 98: Per Una Tosatura Migliore
Fig. 13 7.5 CONNESSIONE PER MOVIMENTO AUTOMATICO Afferrare la maniglia di controllo per la guida automatica, il tosaerba si sposterà automaticamente in avanti a circa 3,0 km/h. Rilasciare la stessa maniglia e il tosaerba si fermerà. (Fig. 14) Fig.14 7.6 PER UNA TOSATURA MIGLIORE ... -
Página 99: Importante
l’apparecchio. 7.7 RACCOGLIERBA Per DYM1676CD-3/DYM1678D-3/DYM162002 Sul lato superiore del raccoglierba, un indicatore di livello mostra se è pieno o vuoto: - L’indicatore di livello si gonfia durante il movimento se il raccoglierba non è pieno (Fig. 15B). - Se il raccoglierba è pieno, l’indicatore si sgonfia, nel qual caso bisognerà immediatamente fermarsi e svuotarlo, accertandosi che sia pulito e che la griglia sia ben ventilata (Fig. -
Página 100: Pulizia Del Filtro Dell'ARia
1. Spegnere il tosaerba e scollegare la candela prima di regolare l’altezza del taglio. 2. La leva per la regolazione dell’altezza centrale è regolabile su 7 diverse posizioni. Per cambiare l’altezza del taglio, schiacciare la leva di regolazione verso la ruota, muovendo verso l’alto o il basso per selezionare l’altezza desiderata. - Página 101 Copertura del filtro Fig.16B (DYM1560EDQ) Fig.16A Fig.16C (DYM1676CD-3) Fig.16D (DYM1678D-3) Elemento filtrante Fig.16E (DYM162002) Fig.16F(DYM1560EDQ) 10.2 LAME PERICOLO: Accertarsi che il cavo della candela sia scollegato e isolato prima di lavorare sulle lame, così da prevenire accensioni accidentali del motore. Proteggere le mani con guanti da lavoro o uno straccio prima di afferrare le lame.
- Página 102 Prima di rimontare la lama e l’adattatore, lubrificare con olio leggero l’albero a gomiti del motore e le superfici interne dell’adattatore. Inserire la chiave nell’adattatore e fissarlo all’albero a gomiti, spingere la rondella nell’adattatore e inserire la lama, come dalla figura 17. Inserire le lame con il lato numerato verso l’esterno, lontano dell’adattatore.
- Página 103 pacciamatura. Per pulire la pedana e le lame dai residui dopo ogni uso o dopo l’ultima tosatura stagionale, fare come segue: 1. Collegare il tubo da giardino al foro connettore di pulizia della pedana, accertandosi che sia ben connesso (Fig. 18A / 18B). 2.
-
Página 104: Stoccaggio (Fuori Stagione)
Fig.19 12. STOCCAGGIO (FUORI STAGIONE) Preparare il tosaerba prima di stoccarlo secondo la seguente procedura. 1. Svuotare il serbatoio dopo l’ultima tosatura della stagione. a) Svuotare il serbatoio con una pompa di aspirazione. PERICOLO! Non svuotare il serbatoio in locali chiusi, vicino a fuochi, etc. Non fumare! I vapori di benzina possono causare esplosioni e incendi. -
Página 105: Soluzione Dei Problemi
13. SOLUZIONE DEI PROBLEMI PROBLEMA PROBABILE CAUSA AZIONE CORRETTIVA farfalla dell’aria è nella Spostare la farfalla dell’aria in posizione corretta. posizione errata per le condizioni d’uso prevalenti. Il serbatoio è vuoto. Riempire il serbatoio: consultare il MANUALE DEL MOTORE. Filtro dell’aria sporco. Pulire il filtro dell’aria: consultare il MANUALE DEL MOTORE. - Página 106 14. GARANZIA...
-
Página 107: Rispetto Dell'AMbiente
15. RISPETTO DELL’AMBIENTE Per disfarsi del prodotto al termine della sua durata di servizio complessiva, non gettarlo nella spazzatura domestica ordinaria, ma disfarsene nel rispetto dell’ambiente. 16. DICHIARAZIONE DI CONFORMITÀ CE Dichiarazione di conformità CE Noi qui di seguito Ningbo Daye Garden Machinery Co., Ltd. dichiariamo, No.58 Jinfeng Road, Yuyao, Zhejiang 315403, P. -
Página 108: Cortacésped De Gasolina
Guarde las instrucciones de funcionamiento en un lugar seguro para futuras consultas. Fabricante Importador Ningbo Daye Garden Machinery Co., Ltd. Daye Europe GmbH No. 58 Jinfeng Road, Yuyao Parkstraße 1a Zheijiang 315403, República Popular de 66450 Bexbach, Alemania China www.mowox.com... -
Página 110: Tabla De Contenido
CONTENIDO SECCIÓN 1 SÍMBOLOS MARCADOS EN EL PRODUCTO…………….….…4 SECCIÓN 2 REGLAS GENERALES DE SEGURIDAD………………….…..4 SECCIÓN 3 DESCRIPCIÓN DE LAS PIEZAS………………………….….…..7 SECCIÓN 4 DATOS TÉCNICOS………………………………………….…..9 SECCIÓN 5 MONTAJE………………………… …………………………...……9 SECCIÓN 6 “3 EN 1”…………………………………………………………..12 SECCIÓN 7 INSTRUCCIONES DE USO…………………………………..15 SECCIÓN 8 INSTRUCCIONES DE MANTENIMIENTO…………………..…20 SECCIÓN 9 INSTRUCCIONES DE LUBRICACIÓN…………………….…...20... -
Página 111: Sección 1 Símbolos Marcados En El Producto
ADVERTENCIA: Por su propia seguridad, antes de tratar de usar su nueva unidad, lea este manual. No seguir las instrucciones podría resultar en graves lesiones personales. Antes de cada uso, pase unos momentos con el equipo para familiarizarse con el cortacésped. 1. - Página 112 ADVERTENCIA: Esta máquina produce un campo electromagnético durante su uso. Este campo puede, en algunas circunstancias, interferir con los implantes médicos activos o pasivos. Para reducir el riesgo de lesiones graves o fatales, recomendamos que las personas con implantes médicos consulten con su médico y con el fabricante de los implantes médicos antes de usar está...
- Página 113 ● Tenga mucho cuidado al ir marcha atrás o tirar del cortacésped hacia usted. ● Detenga las cuchillas cuando tenga que inclinar el cortacésped para su transporte al cruzar superficies distintas al césped, y al transportar el cortacésped de una zona de segado a otra. ●...
-
Página 114: Sección 3 Descripción De Las Piezas
ADVERTENCIA: No toque una cuchilla en movimiento. ADVERTENCIA: Reposte en un área bien ventilada y con el motor apagado. 3. DESCRIPCIÓN DE LAS PIEZAS Fig.1A PM 4645 SEHW(DYM1676CD-3) 1. Asa del arrancador 9. Tapa de combustible 2. Palanca de bloqueo 10. - Página 115 Fig.1B PM 5160 SEHW(DYM1678D-3) Fig.1C PM 4335 SE(DYM162002) Fig.1D PM 5157 SEHW-B(DYM1560EDQ)
-
Página 116: Sección 4 Datos Técnicos
4. Datos técnicos Modelo PM 4645SEHW PM5160SEHW PM4335SE PM5157SEHW-B (DYM1676CD-3) (DYM1678D-3) (DYM162002) (DYM1560EDQ) Tipo de motor DYM1P64FE DYM1P70FE DYM1P56F B&S 575IS Cilindrada del motor 135 cm 173 cm 98,5 cm 150cm Potencia nominal 2,4 kW 3,6 kW 1,9 kW 2.2kW Ancho de la cuchilla 460 mm 510 mm... -
Página 117: Ajuste Para Un Ángulo Apropiado
3. Mueva la palanca de bloqueo para bloquear el manillar en posición de funcionamiento (Fig.2F/2I) 4. Ajuste la tensión girando la tuerca de bloqueo con una llave apropiada (Fig.2G) 5. Coloque la abrazadera del cable en la posición mostrada, y a continuación, coloque el cable (Fig.2J/2K). Fig.2A Fig.2B Fig.2C... -
Página 118: Montar Y Desmontar El Recogedor De Césped
C). Mueva la palanca de bloqueo para conectar el asa inferior y el superior. Fig. 3 5.3 MONTAR Y DESMONTAR EL RECOGEDOR DE CÉSPED 1. Para montarlo: Levante la cubierta trasera y enganche el recogedor de césped al cortacésped. 2. Para desmontarlo: Agarre y levante la cubierta trasera y retire el recogedor de césped. Fig. -
Página 119: Montaje Y Retirada De La Batería (Solo Para Dym1560Edq)
5.6 MONTAJE Y RETIRADA DE LA BATERÍA (solo para DYM1560EDQ) 5.6.1 MONTAJE 1. Inserte la batería en el soporte de la batería (Fig. 7A/7B). 2. Asegúrese de que el pestillo de la parte inferior de la batería encaje en su sitio y de que la batería esté completamente asentada. - Página 120 - No siegue césped húmedo. - Establezca la velocidad máxima del motor. - Solo mover a ritmo de trabajo. - Limpie regularmente la cuña para acolchado, el lado interior de la carcasa y la cuchilla de segado. Inicio de la operación UNO: Readaptar para cortador de acolchado ADVERTENCIA: Solo con el motor y la cuchilla parados.
- Página 121 Solo cuando el motor y las cuchillas están parados. 1. Levante la cubierta trasera y retire el recogedor de césped. 2. Monte la cuña para acolchado. 3. Desbloquee el mecanismo de bloqueo. (Fig. 9A) 4. Levante la aleta lateral (Fig. 9B). 5.
-
Página 122: Sección 7 Instrucciones De Uso
7. INSTRUCCIONES DE USO 7.1 ANTES DE EMPEZAR Ponga gasolina y aceite en el motor como se indica en el manual del motor independiente que viene junto con el cortacésped. Lea las instrucciones detenidamente. ADVERTENCIA La gasolina es altamente inflamable. Almacene combustible en recipientes diseñados específicamente para esto. -
Página 123: Arranque Eléctrico
Fig.10A Fig.10B Fig.10C Fig.10D Arranque el motor cuidadosamente según las instrucciones y con los pies bien alejados de la cuchilla. Fuel switch No incline el cortacésped al arrancar el motor. Arranque el cortacésped en una superficie nivelada, libre de hierba alta u obstáculos. Mantenga las manos y pies alejados de las partes giratorias. -
Página 124: Procedimientos De Uso
Fig.11A Fig.11B(solo para DYM1560EDQ) Fig.11C PARA DYM1676CD-3: 1. La unidad está equipada con una bota de goma sobre el extremo de la bujía. Asegúrese de que el lazo metálico en el extremo del cable de la bujía (dentro de la bota de goma) está bien sujeto sobre la punta metálica de la bujía. -
Página 125: Conexión Para Movimiento Automático
Fig. 13 7.5 CONEXIÓN PARA MOVIMIENTO AUTOMÁTICO Agarre el asa de autoconducción, el cortacésped se moverá hacia delante de forma automática a una velocidad aproximada de 3 km/h. Suelte el asa de autoconducción y el cortacésped se detendrá. (Fig. 14) Fig.14 7.6 PARA OBTENER LOS MEJORES RESULTADOS DURANTE LA SIEGA Limpie el césped de restos. -
Página 126: Importante
- El indicador de nivel se levanta si el recogedor no está lleno durante la siega (Fig. 15B). - Si el recogedor está lleno, el indicador caerá. Una vez que esto pase, deje de segar inmediatamente y vacíe el recogedor. Asegúrese de que está limpio y de que la malla está ventilada (Fig. 15A). IMPORTANTE: Si la zona de la apertura del indicador está... -
Página 127: Sección 8 Instrucciones De Mantenimiento
de altura solo para DYM1560EDQ). (Fig.15D/15E) 1. Detenga el cortacésped y desconecte el cable de la bujía antes de cambiar la altura de corte del cortacésped. 2. La palanca central de ajuste de altura le ofrece 7 posiciones de altura diferentes. Para cambiar la altura del corte, apriete la palanca del ajustador hacia la rueda y muévala hacia arriba o abajo para seleccionar la altura. -
Página 128: Cuchilla De Corte
3. Retire la cubierta del filtro (Fig.16A/16B) 4. Lave el elemento del filtro en agua con jabón (Fig.16C/16D/16E/16F) NO USE GASOLINA 5. Seque el elemento del filtro al aire libre. 6. Vierta unas gotas de aceite SAE30 en la espuma del filtro y escúrrala para eliminar el exceso de aceite. 7. -
Página 129: Par Motor De Montaje De La Cuchilla
importante que cada filo reciba la misma cantidad de afilado para evitar que la cuchilla se desequilibre. Un equilibrio incorrecto de la chilla resultará en una vibración excesiva que terminará causando daños en el motor y cortacésped. Asegúrese de equilibrar cuidadosamente la cuchilla tras afilarla. Puede comprobar el equilibrio de la cuchilla equilibrándola sobre un destornillador de eje redondo. -
Página 130: Sección 11 Carga De La Batería De Arranque
ADVERTENCIA: Antes de limpiar, detenga el cortacésped y desconecte el cable de la bujía. ADVERTENCIA: La cuchilla continuará girando durante unos segundos una vez que el motor se ha apagado. NOTA: Antes de limpiar, retire el recogedor de césped y el canal de descarga, y a continuación, monte la cuña para acolchado. -
Página 131: Sección 12 Instrucciones De Almacenamiento
Procedimiento de carga: 1. Inserte el cable del cargador completamente en el agujero de carga (Fig. 19). 2. Conecte el cargador a la red eléctrica. El voltaje de la red debe coincidir con el voltaje de funcionamiento del cargador. 3. El tiempo de carga requerido es de aproximadamente 8-10 horas cada vez. ADVERTENCIA: - Use solo el cargador de batería original suministrado. -
Página 132: Sección 13 Solución De Problemas
Apague el motor y permita que el motor se enfríe. A continuación, desconecte el cable de la bujía y vacíe el depósito de combustible según las instrucciones del manual del motor. Asegúrese de no doblar o dañar la cuchilla al empujar el cortacésped sobre obstáculos. 13. - Página 133 carcasa del ventilador del motor están bloqueados. El motor falla a distancia entre Ajuste el espacio entre los electrodos. Consulte el manual alta velocidad. electrodos de la bujía es del propietario del motor. demasiado pequeña. motor El flujo de refrigeración del Retire cualquier resto de las ranuras de la cubierta, sobrecalienta.
-
Página 134: Sección 14 Garantía
14. GARANTÍA... -
Página 135: Sección 15 Medioambiente
15. MEDIOAMBIENTE En caso de que su máquina necesitase ser reemplazada tras un uso extenso, no la ponga con la basura doméstica, deshágase de ella de forma segura para el medioambiente. 16. DECLARACIÓN DE CONFORMIDAD CE Declaración de conformidad CE Con esto declaramos, Ningbo Daye Garden Machinery Co., Ltd. - Página 136 Guarde o manual de instruções em local seguro para referência futura. Fabricante Importador Ningbo Daye Garden Machinery Co., Ltd. Daye Europe GmbH No. 58 Jinfeng Road, Yuyao Parkstraße 1a Zheijiang 315403, P.R. China 66450 Bexbach, Alemanha www.mowox.com...
- Página 137 : ADVERTÊNCIA Para sua própria segurança, por favor leia este manual antes de tentar operar sua nova unidade. O não cumprimento destas instruções pode resultar em sérios danos pessoais. Passe alguns momentos para se familiarizar com o seu cortador de relva antes de cada utilização. Guarde este manual em local seguro, para que a informação esteja disponível a qualquer momento.
- Página 138 CONTEÚDO SECÇÃO . 1 SÍMBOLOS MARCADOS NO PRODUTO SECÇÃO 2 REGRAS GERAIS DE SEGURANÇA SECÇÃO 3 DESCRIÇÃO DAS PEÇAS SECÇÃO 4 DADOS TÉCNICOS SECÇÃO 5 MONTAGEM SECÇÃO 6 "3 EM 1". SECÇÃO 7 INSTRUÇÕES DE OPERAÇÃO SECÇÃO 8 INSTRUÇÕES DE MANUTENÇÃO SECÇÃO 9 INSTRUÇÕES DE LUBRIFICAÇÃO SECÇÃO 10...
-
Página 139: Símbolos Indicados No Produto
1. SÍMBOLOS INDICADOS NO PRODUTO Leia o manual de instruções. Mantenha os transeuntes afastados. Risco de lesões nas mãos e nos pés. Combustível inflamável. Mantenha o fogo afastado. Não adicionar combustível na máquina em funcionamento. Fumos tóxicos. Não operem em quartos fechados. Usar óculos e tampões para os ouvidos durante a operação. - Página 140 ADVERTÊNCIA: Esta máquina produz um campo electromagnético durante a operação. Este campo pode, em algumas circunstâncias, interferir com implantes médicos activos ou passivos. Para reduzir o risco de lesões graves ou fatais, recomendamos às pessoas com implantes médicos que consultem o seu médico e o fabricante de implantes médicos antes de operarem esta máquina. FORMACAO ●...
-
Página 141: Manutenção E Armazenamento
● Tenha cuidado ao usar o cortador de relva em encostas e perto de quedas, valas ou aterragens. ● Cortar apenas à luz do dia. ● Evite o funcionamento do equipamento em relva molhada. ● Cuidado com os degraus nas encostas. ●... -
Página 142: Descrição Das Peças
● Se a lâmina não parar imediatamente ao parar o motor, por favor contacte o centro de serviço. PERIGO: Não toque na lâmina rotativa. 3. DESCRIÇÃO DAS PEÇAS Fig.1A PM 4645 SEHW(DYM1676CD-3) 1. Alavanca de arranque 9. Tampa do combustível 2. Alavanca de travagem 10. -
Página 143: Dados Técnicos
Fig.1B PM 5160 SEHW(DYM1678D-3) Fig.1C PM 4335 SE(DYM162002) Fig.1D PM 5157 SEHW-B(DYM1560EDQ) 4. DADOS TÉCNICOS Modelo PM 4645SEHW PM5160SEHW PM4335SE PM5157SEHW-B (DYM1676CD-3) (DYM1678D-3) (DYM162002) (DYM1560EDQ) Tipo de motor DYM1P64FE DYM1P70FE DYM1P56FE B&S 575IS Cilindrada 135 cm 173cm 98.5cm 150cm motor Poder nominal 2.4Kw 3.6kw... -
Página 144: Montagem
Peso líquido 39kg 41.7kg/ 33.7kg 33.7kg Ajuste de altura 25-75mm 7ajustamento 25-75mm 10 ajustamento Modelo HYCH0131380500G CU25-1124200 carregador or IS12C Dados técnicos do Entrada:AC100-240V,50-60Hz,0.32A Voltagem de Entrada:100- carregador saída 13.8Vd.c. , 0.5A 240V~,50/60Hz, 0.8A Voltagem saída:12.45Vd.c, 2.0A Modelo PM 4645SEHW PM5160SEHW PM4335SE PM5157SEHW-B... - Página 145 Fig.2A Fig.2B Fig.2C Fig.2D (para DYM1560EDQ) Fig.2E Fig.2F Fig.2G Fig.2H (para DYM1560EDQ) Fig.2I (para DYM1560EDQ) Braçadeira de cabo Braçadeira de cabo Fig 2J Fig.2K 5.2 AJUSTE PARA UM ÂNGULO APROPRIADO Para: DYM1676CD-3/DYM1678D3/DYM162002 A) .Puxe a abertura da alavanca de travagem; B) .Gire a barra superior centrada da engrenagem de ajuste de ângulo para ajustar um ângulo apropriado no âmbito -20º...
-
Página 146: Montagem E Desmontagem Do Coletor De Relva
Fig.3 5.3 MONTAGEM E DESMONTAGEM DO COLETOR DE RELVA 1. Para encaixar: Levante a tampa traseira e engate o coletor de relva na parte traseira da máquina. 2. Para remover: Segure e levante a tampa traseira, remova o coletor de relva. Fig.4A Fig.4B Fig.4C... - Página 147 Fig. 6A Fig. 6B (Apenas para DYM1560EDQ) 5.6 MONTAGEM E REMOÇÃO DA BATERIA (Apenas para DYM1560EDQ) 5.6.1 MONTAGEM 1. Insira a bateria no suporte de bateria. (Fig. 7A/7B) 2. Certifique-se de que o trinco na parte inferior da bateria encaixa-se no lugar e que a bateria esteja totalmente encaixada.
- Página 148 aplicação: 1. função normal descarga traseira no saco de captura de relva 2. mulching tampão de cobertura 3. descarga lateral cunha de descarga lateral O que é mulching? Ao aplicar o mulching, a relva é simultaneamente cortada e finamente cortada e devolvida à faixa de relva como fertilizante natural..
- Página 149 Fig.8D Fig.8E Fig.8F Fig.8G 6.2 corte por descarga lateral ADVERTÊNCIA: Operar apenas com um motor parado. 1. Levante a tampa traseira e retire o apanhador de relva #5 (ver 6.1). 2. Instale a cunha mulching #22. 3. Destranque a tampa #20 (fig. 27). 4.
-
Página 150: Instruções De Operação
7. INSTRUÇÕES DE OPERAÇÃO 7.1 ANTES DE COMEÇAR Manutenção do motor com gasolina e óleo, conforme instruído no manual do motor separado embalado na máquina de cortar relva. Leia atentamente as instruções. ATENÇÃO! A gasolina é altamente inflamável. Armazene o combustível em recipientes especificamente concebidos para este fim. Reabasteça ao ar livre apenas antes de ligar o motor e não fume enquanto reabastece ou manuseia o combustível. -
Página 151: Iniciar Eletricamente
Fig.10A Fig.10B Fig.10C Fig.10D Arranque o motor cuidadosamente de acordo com as instruções e com os pés bem longe da lâmina. Fuel switch Não incline a máquina de cortar relva quando ligar o motor. Inicie a máquina numa superfície nivelada, livre de relva alta ou obstáculos. -
Página 152: Procedimentos De Operação
(Apenas para DYM1678D-3). Fig.11A Fig.11B(apenas para DYM1560EDQ) Fig.11C PARA DYM1676CD-3: 1. A unidade está equipada com uma borracha sobre a extremidade da vela de ignição, certifique-se que a argola metálica na extremidade do cabo da vela de ignição (dentro da borracha) é fixado com segurança sobre a ponta de metal na vela de ignição. -
Página 153: Para Os Melhores Resultados Quando Mowing
1. Solte a alavanca de controlo do travão para parar o motor e as lâminas. (Fig.13) 2. Desligue e ligue o cabo da vela de ignição como indicado no manual do motor separado para evitar o arranque acidental enquanto o equipamento estiver desacompanhado. Fig.13 7.5 CONEXÃO PARA CONDUÇÃO AUTOMÁTICA Segure a alavanca de controlo de condução automática, a máquina de cortar relva irá... - Página 154 profundamente a máquina por quaisquer danos e repare os danos antes de reiniciar e operar a máquina. A vibração prolongada da máquina durante o funcionamento é uma indicação de danos. A unidade deve ser prontamente inspecionada e reparada. 7.7COLETOR DE RELVA Para DYM1676CD-3/DYM1678D-3/DYM162002 Existe um indicador de nível no topo do coletor de relva que mostra se o coletor está...
-
Página 155: Instruções De Manutenção
7.9 INSTRUÇÕES DE AJUSTE DE ALTURA CUIDADO: Nunca faça qualquer ajuste na máquina de cortar relva sem primeiro parar o motor e desconectar o cabo da vela de ignição. CUIDADO: Antes de alterar a altura de corte, pare a máquina e desconecte o cabo da vela de ignição. A máquina de cortar relva está... -
Página 156: Filtro De Ar Do Motor
1. Limpe a plataforma com um pano seco. 2. Incline a máquina de cortar relva para que a vela de ignição fique para cima. 10.1 FILTRO DE AR DO MOTOR CUIDADO: Não permita que sujidade ou poeira entupam o elemento de espuma do filtro de ar. O elemento do filtro de ar do motor deve ser reparado (limpo) após 25 horas de corte normal. - Página 157 10.2 LÂMINA CORTANTE CUIDADO: Antes de trabalhar na lâmina de corte, desligue e ligue o cabo da vela de ignição para evitar o arranque acidental do motor. Proteja as mãos usando luvas pesadas ou um pano para segurar as lâminas de corte.
- Página 158 siga as instruções cuidadosamente. Limpe o filtro de ar de acordo com o manual do motor em condições normais. Limpe a cada tempo de horas sob condições extremamente poeirentas. O fraco desempenho do motor e as inundações normalmente indicam que o filtro de ar deve ser reparado. Para reparar o filtro de ar, consulte o manual do motor separado que acompanha o aparelho.
-
Página 159: Carregar A Bateria De Arranque
Mantenha as mãos e os pés afastados das peças rotativas. Não ligue o motor quando estiver em pé na frente da abertura de descarga. AVISO: Ao limpar, proíba todas as outras ações, por exemplo, cortar relva, etc. 11. CARREGAR A BATERIA DE ARRANQUE Para DYM1676CD-3/DYM1678D-3/DYM162002 A bateria de arranque é... -
Página 160: Seção 13 Solução De Problemas
autorizadas. CUIDADO! O motor deve ter arrefecido completamente antes de armazenar a máquina de cortar relva. NOTA: - Quando armazenar qualquer tipo de equipamento de energia num local não ventilado, - Deve-se ter cuidado para criar ferrugem no equipamento. Use um óleo leve ou silicone, revista o equipamento, especialmente os cabos e todas as partes móveis. - Página 161 O elemento do filtro de ar Limpe o elemento do filtro de ar. está sujo. O motor funciona A vela de ignição está com Instale uma nova vela: consulte o MANUAL DO de forma irregular. defeito. PROPRIETÁRIO DO MOTOR A folga da vela de ignição Defina o intervalo entre elétrodos: consulte MANUAL DO está...
-
Página 162: Garantia
14. GARANTIA... -
Página 163: Ambiente
15. MEIO AMBIENTE Caso a sua máquina precise de substituição após o uso prolongado, não a coloque no lixo doméstico, mas descarte-a de uma maneira ambientalmente segura. 16. DECLARAÇÃO DE CONFORMIDADE CE Declaração de Conformidade CE Declaramos, Ningbo Daye Garden Machinery Co., Ltd. No.58 Jinfeng Road, Yuyao, Zhejiang 315403, P. - Página 164 Fabrikant Importeur Ningbo Daye Garden Machinery Co., Ltd. Daye Europe GmbH No. 58 Jinfeng Road, Yuyao Parkstraße 1a Zheijiang 315403, P.R. China 66450 Bexbach, Duitsland www.mowox.com...
-
Página 165: Beoogd Gebruik
WAARSCHUWING: Lees voor uw eigen veiligheid deze handleiding voordat u het nieuwe apparaat gaat gebruiken. Het niet opvolgen van deze instructies kan leiden tot ernstig persoonlijk letsel. Breng een paar momenten door om vertrouwd te raken met uw maaier voor elk gebruik. Bewaar deze handleiding op een veilige plaats, WAARSCHUWING zodat de informatie : is. - Página 166 INHOUDSOPGAVE HOOFDSTUK 1 SYMBOLEN EN MARKERINGEN OP HET PRODUCT ..4 HOOFDSTUK 2 ALGEMENE VEILIGHEIDSVOORSCHRIFTEN ....4 HOOFDSTUK 3 BESCHRIJVING ONDERDELEN ........7 HOOFDSTUK 4 TECHNISCHE GEGEVENS ..........8 HOOFDSTUK 5 MONTAGE ................ 9 HOOFDSTUK 6 “3 IN 1” ................11 HOOFDSTUK 7 GEBRUIKSINSTRUCTIES ..........
-
Página 167: Symbolen En Markeringen Op Het Product (Op De Achterklep)
WAARSCHUWING: Lees deze handleiding voor uw eigen veiligheid door voordat u probeert uw nieuwe apparaat te gebruiken. Het niet opvolgen van de instructies kan leiden tot ernstig persoonlijk letsel. Trek dus vóór elk gebruik wat tijd uit om weer vertrouwd te raken met uw grasmaaier. 1. - Página 168 instructies voordat u het product gebruikt en bewaar de instructies zodat u deze in de toekomst kunt teruglezen. WAARSCHUWING: Dit apparaat produceert een elektromagnetisch veld tijdens gebruik. Dit veld kan onder bepaalde omstandigheden invloed hebben op de werking van actieve of passieve medische implantaten.
- Página 169 Gebruik het apparaat indien mogelijk niet in nat gras; Let op de positie van uw voeten bij gebruik op hellingen; Loop, ren nooit; Maai met een grasmaaier met wielen altijd dwars op de helling, nooit van boven naar onder of omgekeerd;...
-
Página 170: Beschrijving Onderdelen
● Als de stopvoorziening van het snijmes niet werkt, neem dan contact op met de klantenservice voor hulp. Waarschuwing: Raak de roterende messen niet aan. Waarschuwing: Tank alleen in goed geventileerde ruimtes met uitgeschakelde motor. 3. BESCHRIJVING ONDERDELEN Fig.1A PM 4645 SEHW(DYM1676CD-3) 1. Starthendel 2. Vergrendelhendel 3. Grasopvangbak 4. Hendel instellen maaihoogte 5. -
Página 171: Technische Gegevens
Fig.1B PM 5160 SEHW(DYM1678D-3) Fig.1C PM 4335 SE(DYM162002) Fig.1D PM 5157 SEHW-B(DYM1560EDQ) 4. TECHNISCHE GEGEVENS PM 4645SEHW PM5160SEHW PM4335SE PM5157SEHW-B Model (DYM1676CD-3) (DYM1678D-3) (DYM162002) (DYM1560EDQ) Motortype DYM1P64FE DYM1P70FE DYM1P56FE B&S 575IS Cilinderinhoud 135 cm 173cm 98.5cm 150cm Nominaal vermogen(max.) 2.4Kw 3.6kw 1.9kW 2.2kW... - Página 172 uitgangsspanning 13.8Vd.c. , 0.5A 240V~,50/60Hz, 0.8A uitgangsspanning: 12.45V d.c., 2.0A Model PM 4645SEHW PM5160SEHW PM4335SE PM5157SEHW-B (DYM1676CD-3) (DYM1678D-3) (DYM162002) (DYM1560EDQ) Gegarandeerd geluidsdrukniveau op de 82dB(A) 84.9dB(A) 84.3dB(A) 88.0dB(A) positie van de bediener (Volgens EN (K=3 dB(A)) (K=3 dB(A)) K=3 dB(A) (K=3 dB(A)) ISO 5395-1 Bijlage F &...
- Página 173 Fig.2D (voor DYM1560EDQ) Fig.2E Fig.2F Fig.2G Fig.2H (voor DYM1560EDQ) Fig.2I (voor DYM1560EDQ) Kabelklem Kabelklem Fig 2J Fig.2K 5.2 HET INSTELLEN VAN DE JUISTE HOEK Voor: DYM1676CD-3/DYM1678D3/DYM162002 A). Trek aan vergrendelhendel om te openen; B). Draai het bovenste deel van de handgreep in het centrum van het scharniermechanisme naar de gewenste hoek van -20º...
- Página 174 1. Aanbrengen: Til de achterklep op en maak de grasopvangbak vast aan de achterkant van de grasmaaier. 2. Verwijderen: Grijp en til de achterklep op en verwijder de grasopvangbak. Fig.4A Fig.4B Fig.4C 5.4 STARTHENDEL Voor: DYM1676CD-3/DYM1678D3/DYM162002 Verplaats de starthendel van de motor naar de koordgeleider. Fig.5A Fig.5B 5.5 MAAIHOOGTE...
- Página 175 Fig. 7A Fig. 7B 5.6.2 VERWIJDEREN 1. Houd de knoppen voor de batterijvergrendeling aan beide zijden van het batterijpakket ingedrukt. (Fig.7C) 2. Verwijder de batterij uit het product. (Afb. 7D) Fig.7C Fig. 7D WAARSCHUWING: Na gebruik dient u de accu te verwijderen en te controleren op beschadigingen. 6.
- Página 176 2. Druk de mulchwig in het dek. Vergrendel de mulchwig met de knop in de opening op het dek. (Fig. 8A/Fig. 3. Laat de achterklep weer zakken. (Fig.8C) Fig.8A Fig.8B Fig.8C Voor DYM162002: 1. Til de achterklep op en verwijder de grasopvangbak. 2.
-
Página 177: Voordat U Begint
Vergrendelmechanisme Fig.9A Fig.9B Fig.9C Fig.9D DRIE: Maaien met de grasopvangbak WAARSCHUWING: alleen uitvoeren als de motor is gestopt en het maaimes volledig tot stilstand is gekomen. Om te maaien met de grasopvangbak dient u de mulchwig en uitwerpmond voor zijwaartse uitworp te verwijderen en de grasopvangbak te monteren. -
Página 178: De Motor En Het Mes Starten
brandstof. Verwijder de dop van de brandstoftank nooit en voeg geen benzine toe als de motor draait of heet is. Als er benzine is gemorst, probeer de motor dan niet te starten, maar verplaats de grasmaaier uit de buurt van de plek waar de benzine is gemorst en voorkom het creëren van een ontstekingsbron tot de benzinedampen volledig zijn vervlogen. - Página 179 Fig.10C Fig.10D Start de motor volgens de instructies en blijft met uw voeten uit de buurt van het mes. Kantel de grasmaaier niet tijdens het starten van de motor. Start de grasmaaier op een vlakke ondergrond zonder hoog gras of obstakels. Houd uw handen en voeten uit de buurt van de draaiende onderdelen.
-
Página 180: Tijdens Het Gebruik
VOOR DYM1676CD-3: 1. Bij deze grasmaaier zit het uiteinde van de bougie een rubberen mof. Zorg ervoor dat de metalen huls aan het uiteinde van de bougiekabel (binnenin de rubberen mof) goed vastzit op de metalen elektrode van de bougie. 2. - Página 181 Fig.13 7.5 CONNECTION FOR AUTO MOVE Pak de self-drive-hendel vast, de grasmaaier zal automatisch voorwaarts bewegen met een snelheid van ongeveer 3,0km/u. Laat de self-drive-hendel los, de grasmaaier stopt met bewegen. (Fig. 14) Fig.14 7.6 VOOR HET BESTE RESULTAAT BIJ HET MAAIEN Verwijder afval van het gazon.
- Página 182 Er zit een niveau-indicator aan de bovenkant van de grasopvangbak die aangeeft of de opvangbak leeg of vol - De niveau-indicator wordt tijdens het verplaatsen opgeblazen als de opvangbak niet vol is. (Fig. 15B) - Als de opvangbak vol is, zakt de indicator in; zodra dit gebeurt, moet u onmiddellijk stoppen met bewegen en de opvangbak legen.
- Página 183 losmaken. Uw grasmaaier is uitgerust met een centrale maaihoogte-regeling met 7 hoogtestanden. De hoogte (van het mes tot de grond) kan worden ingesteld van 25 mm tot 75 mm (7 hoogtestanden&10 hoogteposities alleen voor DYM1560EDQ). (Fig.15A/15B) 1.Stop de grasmaaier en koppel de bougiekabel los voordat u de maaihoogte aanpast. 2.U kunt de maaihoogte instellen op een van de zeven standen die de centrale maaihoogte-regeling u biedt.
-
Página 184: Het Luchtfilter Reinigen
droge, stoffige omstandigheden. HET LUCHTFILTER REINIGEN 1. Druk de twee lipjes aan de bovenkant van het filterdeksel in. (Fig.16A) 2. Til het lipje bovenop het filterdeksel op. (Fig.16B) (alleen voor DYM1560EDQ) 3. Verwijder het filterdeksel. (Fig.16A/16B) 4. Was het filterelement in een zeepsopje. (Fig.16C/16D/16E/16F) GEBRUIK GEEN BENZINE! 5. - Página 185 adapter op de uitgaande as van de motor zijn bevestigd. Verwijder het snijmes en de adapter vanaf de uitgaande as van de motor. WAARSCHUWING: Controleer regelmatig de snijmesadapter op scheuren, vooral na het raken van een vreemd voorwerp. Vervang indien nodig. Voor het beste resultaat moet het snijmes scherp zijn. Het snijmes kan weer scherp worden gemaakt door het te verwijderen en de snijkant te slijpen of te vijlen, waarbij de originele snijhoek zo goed mogelijk gehandhaafd moet blijven.
- Página 186 Raadpleeg de aparte motorhandleiding die is meegeleverd met het apparaat om het luchtfilter te onderhouden. Een keer per seizoen moet de bougie moet worden gereinigd en moet de elektrodeafstand opnieuw worden ingesteld. Het wordt aanbevolen om de bougie aan de start van elk maaiseizoen te vervangen; raadpleeg de motorhandleiding voor het juiste bougietype en de specificatie van de elektrodeafstand.
-
Página 187: De Startaccu Opladen
11. DE STARTACCU OPLADEN Voor DYM1676CD-3/DYM1678D-3/DYM162002 De startaccu is onderhoudsvrij en wordt normaal gesproken opgeladen door de grasmaaier. In bepaalde gevallen moet de accu echter door de gebruiker worden opgeladen: Voordat de grasmaaier voor het eerst wordt ingeschakeld. Indien ontladen, voor de start van het winterseizoen of indien de grasmaaier lange perioden (>... -
Página 188: Problemen Oplossen
ervoor zorgen dat de apparatuur bestand is tegen roest. - Gebruik een lichte olie of siliconen en coat de apparatuur, vooral kabels en alle bewegende onderdelen. - Wees voorzichtig en buig of knik geen kabels. - Als het startkoord los raakt van de koordgeleider, koppel de bougiekabel dan los en aard deze. Druk op de snijmeshendel en trek het startkoord langzaam uit de motor. - Página 189 onder de ventilatorbehuizing motor worden geblokkeerd. Motor slaat over Afstand tussen elektroden Stel elektrodenafstand raadpleeg hoog van bougie is te klein. MOTORHANDLEIDING toerental Motor raakt De luchtstroom met koele Verwijder vuil uit de sleuven in de motorafdekking, oververhit lucht wordt geblokkeerd. motorbehuizing en luchtwegen Onjuiste bougie.
- Página 190 14. GARANTIE...
-
Página 191: Eg-Conformiteitsverklaring
15. MILIEU Wanneer uw grasmaaier na langdurig gebruik moet worden vervangen, moet u het niet bij het huisvuil zetten, maar moet u het op een milieuverantwoorde wijze verwijderen. 16. EG-CONFORMITEITSVERKLARING EG Conformiteitsverklaring Hierbij verklaren wij, Ningbo Daye Garden Machinery Co., Ltd. No.58 Jinfeng Road, Yuyao, Zhejiang 315403, P. - Página 192 Zachowaj instrukcję obsługi bezpieczną i dobrą dla przyszłego odniesienia. Producent Importer Ningbo Daye Garden Machinery Co., Ltd. Daye Europe GmbH No. 58 Jinfeng Road, Yuyao Parkstraße 1a Zheijiang 315403, P. R. China 66450 Bexbach, Niemcy www.mowox.com...
- Página 193 OSTRZEŻENIE: Dla własnego bezpieczeństwa, przed rozpoczęciem używania twojej nowej jednostki, przeczytaj instrukcję obsługi. Nieprzestrzeganie instrukcji może skutkować poważnymi obrażeniami ciała. Przed każdym użyciem poświęć kilka chwil na zapoznanie się z funkcjonowaniem Twojej kosiarki. Przechowuj niniejszą instrukcję w bezpiecznym miejscu, aby informacje zawsze były dostępne.
- Página 194 SPIS TREŚCI SEKCJA 1 SYMBOLE OZNACZONE NA PRODUKCIE ........OGÓLNE ZASADY DOTYCZĄCE BEZPIECZEŃSTWA SEKCJA2 ....OPIS CZĘŚCI SEKCJA 3 ................... SEKCJA 4 DANE TECHNICZNE ................MONTAŻ SEKCJA 5 ....................SEKCJA 6 3 W 1 “ ” ...................... INSTRUKCJE OBSŁUGI SEKCJA 7 ..............
-
Página 195: Symbole Oznaczone Na Produkcie
OSTRZEŻENIE: Dla własnego bezpieczeństwa, przed rozpoczęciem używania twojej nowej jednostki, przeczytaj instrukcję obsługi. Nieprzestrzeganie instrukcji może skutkować poważnymi obrażeniami ciała. Przed każdym użyciem poświęć kilka chwil na zapoznanie się z funkcjonowaniem Twojej kosiarki. 1. SYMBOLE OZNACZONE NA PRODUKCJE (na tylnej osłonie) Rys. - Página 196 OSTRZEŻENIE: Podczas pracy ta maszyna wytwarza pole elektromagnetyczne. Pole to w pewnych warunkach może interferować z aktywnymi lub pasywnymi implantami medycznymi. Aby zredukować ryzyko poważnego lub śmiertelnego obrażenia, zalecamy, aby przed obsługą tej maszyny, osoby z implantami medycznymi skonsultowały się ze swoim lekarzem oraz producentem implantu medycznego.
- Página 197 ● Zachowaj szczególną ostrożność podczas zmiany kierunku na pochyłości. ● Nie koś nadmiernie stromych pochyłości. ● Zachowaj szczególną ostrożność podczas cofania lub przyciągania kosiarki w swoją stronę. ● Zatrzymaj noże, jeżeli kosiarka musi być przechylona lub w celu przetransportowania jej przez nawierzchnie inne niż...
-
Página 198: Opis Części
● Jeżeli urządzenie zatrzymujące nóż nie działa, skontaktuj się z centrum serwisowym w celu uzyskania pomocy. OSTRZEŻENIE: Nie dotykach obrotowych noży. OSTRZEŻENIE: Tankuj w dobrze wentylowanym miejscu z wyłączonym silnikiem. 3. OPIS CZĘŚCI Rys. 1A PM 4645 SEHW(DYM1676CD-3) 2. Dźwignia blokująca 3. Zbiornik na trawę 4. Dźwignia regulacji wysokości 1. Uchwyt startera 5. -
Página 199: Dane Techniczne
Rys. 1B PM 5160SEHW(DYM1678D-3) Rys. 1C PM 4335 SE(DYM162002) Rys. 1D PM 5157 SEHW-B( DYM1560EDQ) 4. DANE TECHNICZNE Model PM 4645 SEHW PM 5160SEHW PM 4335 SE PM 5157 SEHW- (DYM1676CD-3) (DYM1678D-3) (DYM162002) DYM1560EDQ) Typ silnika DYM1P64FE DYM1P70FE DYM1P56FE B&S 575IS Pojemność... -
Página 200: Montaż
Wejście: AC100-240V, 0,32A napięcie Wejście: 100- 50-60Hz, wyjściowe 13,8Vd.c. , 0,5A 240V~, 50/60Hz, 0,8A Wyjście: 12,45V d.c., 2,0A Model PM 4645 SEHW PM 5160SEHW PM 4335 SE PM 5157 SEHW- (DYM1676CD-3) (DYM1678D-3) (DYM162002) (DYM1560EDQ) Gwarantowany poziom ciśnienia 82dB(A) 84,9dB(A) 87,3dB(A) - Página 201 Rys 2J Rys. 2K 5.2 REGULACJA PRAWIDŁOWEGO KĄTA Dla: PM 4645 SEHW (DYM1676CD-3)/ PM 5160SEHW (DYM1678D3)/PM 4335 SE(DYM162002) A) Pociągnij za dźwignię blokującą. B) Przekręć górny uchwyt dostosowując kąt do prawidłowej wartości w zakresie -20º do 20º, jak pokazano na Rys.
- Página 202 2. Aby zdjąć: złap i unieś tylną osłonę, wyjmij zbiornik na trawę. Rys. 4A Rys. 4B Rys. 4C 5.4. UCHWYT STARTERA Dla: PM 4645 SEHW (DYM1676CD-3)/ PM 5160SEHW (DYM1678D3)/PM 4335 SE(DYM162002) Przenieś uchwyt startera z silnika do prowadnicy linki. Rys. 5A Rys. 5B 5.5 WYSOKOŚĆ KOSZENIA Zastosuj nacisk na zewnątrz, aby zwolnić...
- Página 203 Rys. 7A Rys. 7B 5.6.2 WYJMOWANIE 1. Naciśnij i przytrzymaj języczki baterii z obu stron obudowy na baterię. (Rys. 7C) 2. Wyjmij baterię z produktu. (Rys. 7D) Rys. 7C Rys. 7D OSTRZEŻENIE: Po zakończeniu używania powinieneś wyjąć baterię i sprawdzić ewentualne uszkodzenia.
- Página 204 OSTRZEŻENIE: Tylko przy wyłączonym silniku i unieruchomionym nożu. Dla PM 4645SEHW (DYM1676CD-3)/ PM 5160SEHW (DYM1678D-3)/ PM 5157 SEHW-B (DYM1560EDQ): 1. Unieś tylną osłonę i wyjmij zbiornik na trawę. 2. Wsuń klin do mulczowania w obudowę. Zablokuj klin do mulczowania przy pomocy przycisku w otworze obudowy.
-
Página 205: Instrukcje Obsługi
5. Zamontuj rynnę bocznego wyrzutu na kołku wspierającym bocznej klapy. (Rys. 9C) 6. Opuść boczną klapę - klapa opiera się na rynnie wyrzutu. (Rys. 9D) Mechanizm blokowania Rys. 9A Rys. 9B Rys. 9C Rys. 9D TRZY: Koszenie ze zbiornikiem na trawę OSTRZERZENIE: tylko z wyłączonym silnikiem i zatrzymanym nożem. -
Página 206: Ręczne Uruchamianie
7.2 WŁĄCZANIE SILNIKA I ZAŁĄCZANIE NOŻA 7.2.1 RĘCZNE URUCHAMIANIE Dla PM 4645 SEHW (DYM1676CD-3)/ PM 5160SEHW (DYM1678D-3)/ PM 4335 SE(DYM162002) 1. Jednostka wyposażona jest w gumę wokół końca świecy zapłonowej, upewnij się, że metalowa pętla na końcu przewodu świecy zapłonowej (wewnątrz gumy) jest bezpiecznie przypięta do metalowej końcówki świecy zapłonowej. - Página 207 Rys. 10C Rys. 10D Uruchamiaj silnik ostrożnie zgodnie z instrukcjami i ze stopami z dala od noży. Podczas uruchamiania silnika nie przechylaj kosiarki. Uruchom kosiarkę na płaskiej powierzchni, wolnej od wysokiej trawy lub innych przeszkód. Trzymaj ręce i narzędzia z dala od ruchomych części. Nie uruchamiaj silnika stojąc naprzeciw otworu wyrzutnika.
- Página 208 Rys. 11A Rys. 11B (tylko dla PM 5157 SEHW-B) Rys. 11C DLA PM4645SEHW(DYM1676CD-3): 1. Jednostka wyposażona jest w gumę wokół końca świecy zapłonowej, upewnij się, że metalowa pętla na końcu przewodu świecy zapłonowej (wewnątrz gumy) jest bezpiecznie przypięta do metalowej końcówki świecy zapłonowej.
-
Página 209: Wyłączanie Silnika
kontroli silnika zostanie zwolniona, musi ona powrócić do początkowej pozycji, wtedy silnik wyłącza się automatycznie. Uwaga: Wyłącznik silnika (uchwyt hamulca): Użyj dźwigni do zatrzymania silnika. Gdy zwolnisz dźwignię, silnik oraz nóż zatrzymają się automatycznie. Aby kosić, trzymaj dźwignię w pozycji pracy. Przed rozpoczęciem koszenia, sprawdź... - Página 210 7.7 ZBIORNIK NA TRAWĘ Dla PM 4645 SEHW (DYM1676CD-3)/ PM 5160SEHW (DYM1678D3)/PM 4335 SE(DYM162002) Na zbiorniku trawy znajduje się wskaźnik poziomu, który pokazuje czy zbiornik jest pusty lub piękny: - Podczas przemieszczania się wskaźnik napełnia się, jeżeli zbiornik nie jest pełny. (Rys. 15B) - Jeżeli zbiornik jest pełny, wskaźnik opadnie;...
-
Página 211: Instrukcje Dot. Konserwacji
może uniemożliwić prawidłowe mulczowanie. Obudowa może być czyszczona poprzez przechylenie kosiarki i zeskrobanie brudu do czysta odpowiednim narzędziem (upewnij się, że przewód świecy zapłonowej jest odłączony). 7.9 INSTRUKCJE DOTYCZĄCE REGULACJI WYSOKOŚCI OSTRZEŻENIE: Nigdy nie dokonuj żadnych regulacji kosiarki zanim silnik nie zostanie wyłączony i przewód świecy zapłonowej odłączony. - Página 212 UWAGA: Wymień filtr, gdy jest zużyty, uszkodzony lub nie da się go już wyczyścić. Osłona filtra Rys. 16A Rys. 16B (PM5157SEHW-B) Rys. 16C (PM 4645 SEHW) Rys. 16D (PM 5160 SEHW) Element filtra Rys. 16E (PM 4335 SE) Rys. 16F(PM5157SEHW-B)
- Página 213 OSTRZEŻENIE: Upewnij się, że przewód świecy zapłonowej jest odłączony i uziemiony przed przystąpieniem do pracy nad nożem, aby zapobiec niepożądanemu uruchomieniu silnika. Chroń ręce poprzez noszenie ciężkich rękawic lub łap noże poprzez szmatę.Przewróć kosiarkę w sposób, jaki opisano w oddzielnej instrukcji dla silnika. Odkręć śrubę oraz podkładkę, która przytrzymuje nóż oraz adapter do wału korbowego silnika.
- Página 214 Aby serwisować filtr powietrza, jak poinstruowano w oddzielnej instrukcji, dołączonej do Twojej jednostki. Świeca zapłonowa powinna być czyszczona, a przerwa resetowana raz na sezon. Zaleca się wymianę świecy zapłonowej na początku sezonu; sprawdź instrukcję obsługi w celu określenia typu świecy oraz specyfikacji przerwy.
- Página 215 11. ŁADOWANIE BATERII ROZRUSZNIKA Dla PM 4645 SEHW(DYM1676CD-3)/PM 5160 SEHW(DYM1678D-3)/PM 4335SE(DYM162002) Bateria rozrusznika nie wymaga konserwacji i jest ładowana przez kosiarkę. W szczególnych przypadkach, bateria musi być naładowana przez użytkownika: Przed pierwszym uruchomieniem kosiarki. Jeżeli się rozładuje, przed sezonem zimowym lub jeżeli pozostawiona na dłuższy okres (> 6 miesięcy).
-
Página 216: Rozwiązywanie Problemów
sprzęt, a w szczególności kable oraz wszystkie ruchome części. - Uważaj, aby nie zginać lub skręcać kabli. - Jeżeli linka rozruchowa odczepi się od prowadnicy na uchwycie, odłącz i uziem przewód świecy zapłonowej, naciśnij uchwyt kontroli noża i powoli pociągnij za linkę startową od silnika. Wsuń linkę startową do prowadnicy na uchwycie. - Página 217 Łopatki chłodzące oraz Usuń brud z łopatek chłodzących oraz przewodów przewody powietrzne pod powietrza. obudową dmuchawy silnika są zablokowane. Przerwa między elektrodami Ustawianie przerwy między elektrodami: zobacz Silnik w świecy zapłonowej jest INSTRUKCJĘ OBSŁUGI SILNIKA. przeskakuje zbyt mała. wysokich obrotach. Dopływ powietrza Usuń...
-
Página 218: Deklaracja Zgodności Ec
Dyrektywy EC w oparciu o jej projekt oraz typ, jak wprowadziliśmy ją do obrotu. W przypadku modyfikacji maszyny bez naszej zgody, niniejsza deklaracja straci swoją ważność. Opis maszyny: Kosiarka spalinowa Typ maszyny: PM 4645 SEHW PM 5160 SEHW PM 4335 SE PM 5157 SEHW-B (DYM1676CD-3) - Página 219 België +32 2 5889602 service‐be@mowox.com Čeština +420 2 28880935 service‐cz@mowox.com Danmark +45 69918028 service‐dk@mowox.com Deutschland +49 6826 93016 28 service‐de@mowox.com Eesti +372 8804101 service‐ee@mowox.com España +34 91 123 5903 service‐esp@mowox.com France +33 1 8288 4290 service‐fr@mowox.com Hrvatska +385 1 7776516 service‐hr@mowox.com Ísland +49 6831 4880 9656 service‐is@mowox.com Italia +39 0694801738 service‐it@mowox.com Luxembourg +352 27 863004 service‐lu@mowox.com Magyarország +36 1 7010793 service‐hu@mowox.com Nederland +31 20 8080 732...