Publicidad
Enlaces rápidos
Tools needed:
Outils requis :
Herramientas necesarias:
Adjustable wrench
Plumbers tape
Clé réglable
Mastic d'étanchéité
Llave ajustable
Cinta de plomería
Screwdriver
Allen wrench
Tournevis
Clé Allen
Destornillador
Llave Allen
Safety goggles
Lunettes protectrices
Gafas de seguridad
Need Help? Please call our toll-free Technical Support line at 1-800-487-8372 for additional assistance or service./
Besoin d'aide? Veuillez communiquer avec notre ligne de soutien technique sans frais à 1-800-487-8372 pour obtenir du service
ou de l'aide additionnels./¿Necesitas Ayuda? Favor de llamar a nuestro servicio de soporte técnico sin costo al 1-800-487-8372
para asistencia adicional o servicio.
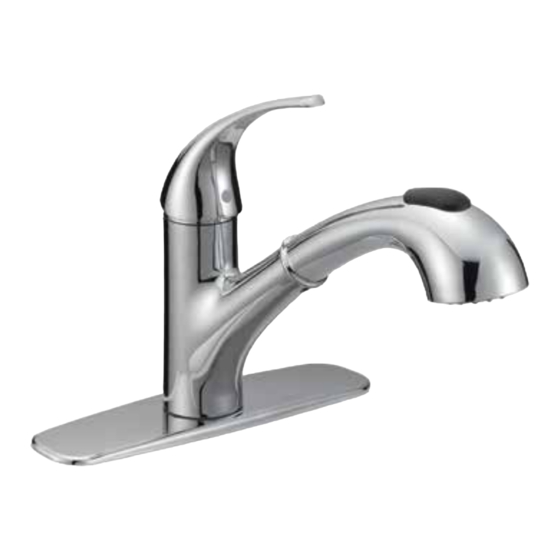
Pull-Out Kitchen Faucet
Robinet d'évier avec arroseur rétractable
Grifo de cocina con rociador retráctil
Safety Tips
• When installing flexible hose, there should be no torsion or deformation; DO NOT fold into V or L
shape; DO NOT use if there are any cracks or deformations.
• The fittings should be installed by a licensed plumber of the State.
• Cover your drain to avoid losing parts.
Conseils de sécurité
• Lorsque vous installez le tuyau flexible, il ne doit exister aucune torsion ou déformation;
NE le pliez PAS en V ou L; NE L'UTILISEZ PAS s'il existe des fissures ou déformations.
• Les raccords doivent être installés par un plombier accrédité par l'État.
• Recouvrez le drain pour éviter de perdre des pièces.
Consejos de Seguridad
• Al instalar la manguera flexible, esta no debe doblarse o torcerse; NO doblar en forma de V o L;
NO usar si está agrietada o deformada.
• Estos acoplamientos deben ser instalados por un plomero con licencia del Estado.
• Cubre el drenaje para evitar que se pierdan piezas.
1
FP4A4061
Publicidad

Manuales relacionados para Danze FP4A4061


Resumen de contenidos para Danze FP4A4061
- Página 1 FP4A4061 Pull-Out Kitchen Faucet Robinet d’évier avec arroseur rétractable Grifo de cocina con rociador retráctil Tools needed: Outils requis : Herramientas necesarias: Adjustable wrench Plumbers tape Clé réglable Mastic d’étanchéité Llave ajustable Cinta de plomería Safety Tips • When installing flexible hose, there should be no torsion or deformation; DO NOT fold into V or L shape;...
-
Página 2: Maintenance/Entretien/Mantenimiento
Maintenance/Entretien/Mantenimiento Your new faucet is designed for years of trouble-free performance. Keep it looking new by cleaning it periodically with a soft cloth. Avoid abrasive cleaners, steel wool and harsh chemicals as these will dull the finish and void your warranty. Votre nouveau robinet est conçu pour vous offrir des années de rendement sans problème. - Página 3 Includes/Comprend/Incluye : Spray head Tête de vaporisation Faucet body Cabezal de rociador Corps du robinet Cuerpo del grifo Aerator Aérateur Aireador Spout trim ring Anneau de garniture du bec Deck plate Anillo decorativo del caño Plaque décorative Placa de cubierta Water supply line Discharge tube Conduite d’eau...
- Página 4 Faucet Installation/Installation du robinet/Instalar el Grifo Continued/Suite/Continuación Without deck plate installation. With deck plate installation. Sans l’installation de plaque décorative. Avec l’installation de plaque décorative. Instalación sin la placa de la cubierta. Instalación con la placa de la cubierta. Unscrew screws on lock nut (E) until they are flush with the face Slide rubber washer (J) and metal washer (D) onto shank.
- Página 5 Faucet Installation/Installation du robinet/Instalar el Grifo Continued/Suite/Continuación Connect water supply lines (C) and tighten water supply nuts Remove cap from discharge tube (I). using two wrenches. Retirez le capuchon du tube d’évacuation (I). Raccordez les conduites d’eau (C) et serrez les écrous de Retira la tapa del tazón de descarga (I).
- Página 6 Faucet Installation/Installation du robinet/Instalar el Grifo Continued/Suite/Continuación Turn on faucet and allow water to run through the hose to flush Remove spray head (A). Hold hose tightly to prevent from retracting. out the faucet. Retirez la tête de vaporisation (A). Tenir le tuyau fermement Ouvrir le robinet et laissez l’eau couler dans le tuyau pour rincer le robinet.
- Página 7 Quick Connector Removal/Retrait du raccord rapide/Retirar el Conector Rápido Push quick connector housing upward. Hold clip and housing together and pull downward. CAUTION: Be careful in removal of quick connector to not cut hands. Poussez le boîtier du raccord rapide vers le haut. Tenez l’étrier et le boîtier ensemble et tirez vers le bas.
-
Página 8: Troubleshooting/Dépannage/Solución De Problemas
Troubleshooting/Dépannage/Solución de problemas If you’ve followed the instructions carefully and your faucet still does not work properly, take these corrective steps. Si vous avez soigneusement suivi les instructions et que votre robinet ne fonctionne toujours pas, veuillez suivre les étapes correctives suivantes.