Publicidad
Idiomas disponibles
Idiomas disponibles
Enlaces rápidos
Publicidad

Manuales relacionados para Albrecht Tectalk easy


Resumen de contenidos para Albrecht Tectalk easy
- Página 1 PMR 446 Sprechfunkgerät Tectalk easy Bedienungsanleitung...
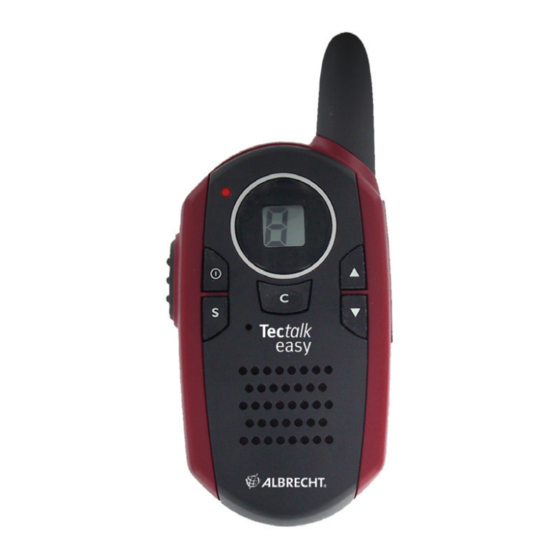
- Página 2 Bedienelemente Antenne LCD-Anzeige - zeigt den aktuellen Kanal und andere Betriebssymbole an. Aufwärts und Abwärts- Tasten - zur Einstellung von Lautstärke, Kanal usw. Ruftaste C - zum Senden von Rufsignalen.
- Página 3 Sendeanzeige - leuchtet beim Senden rot auf. Ein/Aus / Menütaste zum Wechseln der Kanäle und weiterer Programmschritte. Sendetaste (Push-to-Talk) – zum Senden diese Taste drücken. Suchlauftaste – startet einen automatischen Suchlauf über alle 8 Kanäle eingebautes Mikrofon Lautsprecher Auspacken Nehmen Sprechfunkgerät vorsichtig aus der Verpackung.
- Página 4 • Zum Wiedereinsetzen schieben Sie den Gürtelclip in den hierfür vorgesehenen Schlitz. Der Gürtelclip rastet mit einem hörbaren "Click" ein. Öffnen des Batteriefachs und Einlegen der Batterien Entriegeln Verschluß des Deckels an Rückseite des Geräts und nehmen Sie den Batteriefachdeckel ab. Legen Sie 3 Stück 1.5V Alkali-Batterien vom Typ AAA oder wieder-aufladbare Ni-MH- Zellen (Batterien gehören nicht zum...
- Página 5 Einschalten des Geräts Halten Sie die Taste gedrückt. Gerät gibt zwei akustische Signale Anzeigefeld erscheint für kurze Zeit eine Autotest-Anzeige allen Symbolen: LCD Anzeigefeld Ausschalten des Geräts (OFF) gedrückt halten. Das Die Taste Gerät gibt ein akustisches Signal ab, die Anzeigen auf dem LCD Display erlöschen.
- Página 6 Lautstärke einstellen: • Zum Erhöhen der Lautstärke drücken. • Zum Verringern der Lautstärke drücken. Es erscheint zuerst das Lautstärkesymbol Die Lautstärke lässt sich in Stufen von 1 bis 8 einstellen. Beim Tippen ertönt ein Bestätigungston, je lauter, umso höher der Ton. Empfangen eingeschaltete Gerät...
- Página 7 • Lassen Sie die PTT-Taste los, wenn Sie die Übertragung beenden möchten. Damit Ihre Sprechpartner Ihre Übertragung empfangen können, müssen diese auf dem gleichen Kanal geschaltet sein, über den Sie senden. (siehe auch Abschnitt „Kanalwechsel“ weiter unten) Aussenden eines Ruftons können eine Ruf-Melodie...
- Página 8 um einen niedrigeren Kanal zu wählen. Kanalnummern ändern sich jeweils aufsteigend von 1 bis 8 oder absteigend von 8 bis 1. • Tippen Sie kurz die Sendetaste an, um den gewählten Kanal zu bestätigen und in den normalen Betriebsmodus zurückzukehren. Die genauen Frequenzen finden Sie im Abschnitt "Frequenztabelle“...
- Página 9 Empfang von schwachen Signalen: automatische Rauschunter- drückung kann sehr schwache Signale nicht erkennen, es kann vorkommen, dass schwache Signale nur zerstückelt zu empfangen sind. In solchen Fällen können Monitor- Mode automatische Rauschunterdrückung abschalten um damit schwache Signale ggf. besser verfolgen zu können. •...
- Página 10 Funksignal aufgefunden wird. Der Suchlauf stoppt dort zunächst für etwa 3 Sekunden. Sie können jetzt über den Lautsprecher kurz in den gefundenen Kanal hineinhören. Wenn Sie nichts unternehmen, läuft der Suchlauf danach weiter und stoppt beim nächsten gefundenen Signal usw. •...
- Página 11 Gerät automatisch wieder voll eingeschaltet. Wird das Gerät nicht verwendet, schalten Sie bitte das Gerät mit aus. Schutz vor auslaufenden Batterien bei Nichtbenutzen: Nehmen Sie bitte unbedingt die Batterien oder Akkus aus dem Gerät, wenn Sie es länger als etwa 1 Monat nicht mehr brauchen sollten.
- Página 12 Audioleistung ca. 200 mW Modulationsart FM / 2.2 kHz Hub Stromverbrauch TX ca. 200 mA Empfang ca. 50 -130 mA je nach Lautstärke Energiesparmode ca. 17 mA getaktet Betriebszeiten 24 Stunden (Alkali-Batterien), bei Akkus etwa 12 Stunden (80%Standby,10% Senden, 10%Empfang) Reichweite max 5 km (im freien Gelände bei opt.
- Página 13 Tuch, Kontakte wieder metallisch glänzen. Das Tuch können Sie auch ggf. leicht vorher mit Kontaktspray einsprühen. Keineswegs sollten Sie Kontakte mit Feilen oder scharfen metallischen Gegenständen bearbeiten, ebenso sind chemische Mittel nicht angebracht. Setzen Sie die Batterien / Akkus wieder ein und versuchen Sie erneut, Gerät wieder...
- Página 14 überbrücken - sie haben damit eine Chance, das Gespräch noch weiter verfolgen zu können. Tonstörungen: Sprechen Sie beim Senden in einem normalen Tonfall und in 5 bis 7 cm Entfernung Mikrofon. Vermindern Lautstärke während des Empfangs auf eine angenehme Stufe. Funkgeräte werden oft zum Testen zu nah nebeneinander betrieben.
- Página 15 Gesetzliche Gewährleistung Der Verkäufer dieses Geräts gewährt Ihnen eine gesetzlich zugesicherte Gewährleistung zwei Jahren nach Kaufdatum des Geräts. Diese Gewährleistung umfasst alle Fehler, die durch defekte Bauteile oder fehlerhafte Funktionen innerhalb der Gewährleistungsfrist auftreten sollten, nicht jedoch Fehler, die auf normaler Abnutzung beruhen, z.B.
- Página 16 bitte aufgetretenen Fehler möglichst genau. Änderungen und aktualisierte Unterlagen Unsere technischen Unterlagen werden laufend aktualisiert. jeweils neuesten Fassungen Bedienungsanleitung (deutsch und englisch), Schaltunterlagen Konformitätserklärungen finden Sie jederzeit auf unserem Server unter http://www.hobbyradio.de zum Herunterladen. Bei Problemen mit Ihrem Gerät können Sie auch im Servicebereich nachsehen, ob es zu betreffenden Problem...
- Página 17 Allerdings wird diese Gebühr nicht von Touristen verlangt, die das Gerät nur vorübergehend z.B. im Urlaub in Italien benutzen. Wir bestätigen, dass dieses Gerät den grundlegenden Anforderungen der R&TTE Direktive, der EMV Direktive, sowie der LVD Direktive entspricht und nach den Normen EN 300 296-2 V 1.1.1, EN 301 489-1 V1.8.1, EN 301 489-05 V 1.3.1, sowie EN 60 950-1: 2006 hergestellt ist.
- Página 18 Entsorgungshinweis: Ausgediente elektronische Geräte dürfen in Europa nicht mehr über den Hausmüll entsorgt werden. Für den Fall, dass Ihr Funkgerät eines Tages nicht mehr brauchbar sein sollte, entsorgen Sie es bitte nur noch über die bei allen Gemeinden und Städten dafür eingerichteten Sammelstellen.
- Página 19 Tectalk easy User Manual...
- Página 20 Controls Antenna LC Display – shows channel and other parameters. und Down - to adjust volume, channels etc. Call Key C - to call another station via calling melody. Transmit LED – red LED on during transmit . On/ Off / Menu -to select channel and other modes.
- Página 21 PTT switch (Push-to-Talk) – press this button to transmit. Scan – starts automatic channel scan to find busy channels integrated microphone Loudspeaker Getting Started Carefully remove your radio from its packing. If there is any visible damage, do not attempt to operate this radio.
- Página 22 and remove the battery compartment cover from the battery compartment. Install 3 x1.5V AAA alkaline batteries or Ni-MH rechargeable batteries (not included). The correct polarity is marked in the battery compartment. Reinstall the battery compartment cover and lock the cover latch into correct position.
- Página 23 Empty Batteries When batteries become empty, a warning melody will be heard. Please replace the batteries as soon as possible. You can also recognize empty batteries when You observe the LC Display. When it becomes weak, especially when pressing the PTT button, the batteries need to be replaced.
- Página 24 • Press and hold the PTT button to transmit. The TX red LED Indicator will light up. • Hold the unit in a vertical position with the microphone about 5 -7 cm away from the mouth. It is important, that You and all Your partner stations have tuned their radios to the same operating channel! Sending a calling melody...
- Página 25 channel changes from 1 to 8, or from 8 to 1. • Press the enter PTT button to confirm the selected channel and return to the NORMAL mode. Refer to the "Channel and frequency table" at the end of the manual for detailed frequency listings.
- Página 26 system should no more be able to open without interruptions. • Press 3 x. This disables the automatic squelch and lets You hear everything on the channel with highest possible sensitivity. • Press again 1 x to go back to normal squelch mode. Channel Scan Channel SCAN performs automatic searches for active signals in an...
- Página 27 • Press the PTT button when You want to communicate with stations on the active channel. This will immediately stop further scanning. To charge batteries For recharging NiMH batteries (not included) you will be required to use an external AC/DC charger. It is not possible to charge batteries while they are inserted in the radio.
- Página 28 Troubleshooting No power: Check batteries. Ensure that the batteries are installed properly. If the batteries have been inserted longer time ago, the contacts may be corroded. Please clean contacts of battery and radio! T he batteries may be discharged or too weak, replace old batteries with three (3) new "AAA"...
- Página 29 a belt, will decrease range; change the location of the radio. I n clear unobstructed outdoor conditions, the communication range reach about 5 km. Distorted audio: If you are transmitting, speak in a normal, moderate voice, 5 to 7 cm away from the microphone, and do not cry! If you are receiving, lower the volume to a comfortable level.
- Página 30 Transmit RF power: max. 0.5W ERP Audio-output appr. 200 mW Modulation : FM / 2.2 kHz nominal deviation Current consumption: appr. 200 mA 50-130 mA (depending on volume), in energy save mode appr. 17 mA Battery life (alkaline) appr.24 h rechargeable batteries appr.12 h at 80%Standby,10% TX,10% RX.
- Página 31 distributor, dealer or his authorized repair center. The Company disclaims liability for communications range this product. The warranty does not apply to any product or part there of which, in the opinion of the company, has suffered or been damaged through alteration, improper installation,...
- Página 32 Legal Issues – CE- Declaration of Conformity This unit complies to all relevant European Standards Regulations radio service. This radio may be used only in EU and other states applying the R&TTE directive of the European Community. However, there is still a restriction for users in Italy: (as of date of this user manual) a one-time payment is requested before using...
- Página 33 If You should have a problem, please have a look to the service hints or frequently asked questions (FAQ) before You send Your Tectalk easy back to the service center. Disposal of defective electronic items The European WEEE Directive does...
- Página 34 © Alan Electronics GmbH Daimlerstr. 1 k D- 63303 Dreieich www.alan-electronics.de Service partner in Germany: PST GmbH Breitscheider Weg 117 a, D-40885 Ratingen Repairs and techn. inqurires: Tel: (+49) (0) 1805 012204 e-mail: alan-service@ps-tech.de...
- Página 35 Tectalk easy MANUAL DEL INSTRUCCIONES...
- Página 36 Inicio Antena Pantalla LCD: Visualiza la selección del canal corriente y otros símbolos del estado de la radio. Botón s Up, Botón t Down (VOLUMEN/CANAL): Presionarlo para regular el nivel del volumeny cambiar canales. Botón C Llamar: Presionarlo para transmitir los TONOS DE LLAMADA.
- Página 37 Indicador LED TX (Transmisión): Se Ilumina de rejo cuando está transmitiendo. - Botón Menú Permite cambiar canales. Encendido/apagamiento: Presionar y tener apretado el botón para encender o apagar la unidad. Botón PTT presionar para hablar PTT- presionarlo para transmitir. S (Scan) – Exploración canal Micrófono Altavoz Quitar con cuidado el comunicador de...
- Página 38 • Un "clic" indica que la grapa de la correa está bien colocada en su posición. Abrir el compartimiento de las pilas e introducir las pilas Quitar la retención de la tapa situada en la parte trasera unidad remover la tapa de compartimiento pilas compartimiento de las pilas.
- Página 39 Pantalla LCD: Apagamiento de la unidad Presionar y tener presionado el botón MENU . La unidad emitirá un impulso con un tono de señal y la pantalla LCD aparecerá vacía. Regulación del volumen del Altavoz 1. Presionar el botón para subir el volumen del Altavoz.
- Página 40 el botón PTT para transmitir. El indicador LED TX se iluminara de color rojo. Tener la unidad en posición vertical con el microfono a 5 o 7 cm de distancia de la boca. • Mientras se tiene presionado el botón PTT, hablar dentro de la unidad con un tono normal de voz.
- Página 41 Cambio de Canales comunicador canales dis- ponibles. Para cambiar canales: • Presionar el botón MENU 1 x hasta que el número del canal corriente no centelle en la pantalla LCD. • Mientras en número de canal centella: Presionar el botón para seleccionar un número de canal más alto/bajo.
- Página 42 señales débiles en el canal corriente. • Presionar el botón MENU 3 x para activar esta función. • Presionar otra vez el MENU 1 x para desactivar esta función. Exploración canal exploración canal realiza búsqueda de señales activas en una interación infinita de 1 a 8.
- Página 43 exploración canal se desactiva. • Cuando se detecta una señal activa (uno de los 8 canales, pero se desea otro canal, presionar 1 x veces el botón PTT para desviar el canal corriente y continuar la búsqueda de otro canal activo.
- Página 44 y/o fuera del alcance. S i ocurre esto, presionar el botón Menu 3 x. No se pueden cambiar los canales- Para cambiar los canales, presionar el botón MENU hasta que el número del canal no centelle en la Pantalla LCD.
- Página 45 interfieren con la transmisión. El alcance para hablar es de más de 5 condiciones limpias obstáculos. El alcance máximo varía según el terreno y el ambiente. Especificaciones Lista de frecuencias/canales Frecuencias (MHz) canales 446.00625 446.01875 446.03125 446.04375 446.05625 446.06875 446.08125 446.09375 Potencia de salida de los canales (TX)
- Página 46 material o en su realización dentro de 2 años a partir de la fecha de su compra original, este o estos defectos serán reparados o el producto será sustituido con uno nuevo o arreglado (según la opinión de la compañía) sin cargo de las partes o del trabajo realizado.
- Página 47 Se ruega contactar el comerciante o la persona a la que se ha comprado el PMR 446 Tectalk easy. Dónde encontrar consejos y documentación de funcionamiento La documentación técnica completa se actualiza regularmente.
- Página 48 Comunidad Europea. todas maneras, hay alguna restricción (a la fecha de redacción de este manual) para el uso de PMR 446 en los siguientes Países: Italia: No hay restricciones para los viajadores que utilizan la radio en Bélgica, libre de cargos y patentes menos meses.
- Página 49 Emetteur-récepteur radio PMR 446 Tectalk easy MODE D’EMPLOI...
-
Página 50: Informations D'oRdre Général
Informations d’ordre général 1. Antenne 2. Afficheur à cristaux liquides : affiche la voie sélectionnée et les autres symboles d’état de la radio. 3. Touche vers le haut et vers le (volume(canal) : appuyez sur cette touche pour régler le volume et changer de voie. - Página 51 (volume/canal) : appuyez sur cette touche pour régler le volume et changer de voie. 4. Touche appel C : appuyez pour transmettre les tonalités d’appel. 5. Voyant à diode d’indication TX : s’éclaire rouge pendant transmission («TX»). 6. Touche menu et marche / arrêt : : permet de changer de...
- Página 52 • En tirant sur le loquet de la boucle de ceinture, poussez sur la boucle de ceinture pour enlever l’unité. Installation de la Boucle de ceinture • Faites glisser la boucle de ceinture dans la fente de la boucle de ceinture. •...
- Página 53 l’afficheur à cristaux liquides brièvement l’écran d’auto- test. Afficheur à cristaux liquides Arrêt de l’appareil : Appuyez sans la lâcher sur la touche L’appareil émet l’afficheur à cristaux liquides se vide. Piles faibles En cas de piles faibles, L’appareil émet une mélodie. En meme temps le display palit, surtout en activant la touche PTT Réglage du volume...
- Página 54 Réception des signaux : L’appareil est toujours en mode réception lorsqu’il est en marche et qu’il ne transmet pas. Lorsque vous recevez signal voie sélectionnée, l’icône RX s‘affiche Affichage : Vous pouvez utiliser la fonctionnalité affichage pour contrôler les signaux fables de la voie active.
- Página 55 • Lâchez la touche PTT lorsque vous avez fini de transmettre. Rémarque : Pour d’autres personnes reçoivent votre transmission, ils doivent se trouver sur la même voie que vous. Envoi de tonalités d’appel Vous pouvez utiliser les tonalités d’appel pour avertir la personne que vous tentez de contacter.
- Página 56 voie passe de 1 à 8, ou de 8 à • Appuyez sur la touche de PTT pour confirmer la voie choisie et revenir au mode NORMAL. Rémarque : consultez le paragraphe « Tableau des voies » de ce manuel utilisateur pour connaître la liste détaillée des fréquences.
- Página 57 • Appuyez 1 x sur la touche S et sur les touches directionnelles pour activer la recherche des voies. Le numéro de la voie change rapidement sur l’afficheur à cristaux liquides tant qu’un signal actif n’est pas détecté. En mode recherche des voies •...
- Página 58 Circuit d’économie d’énergie L’émetteur dispose d’un système intégré d‘économie d’énergie pour faire durer le plus possible les piles. Lorsque vous n’utilisez l’émetteur, appuyez sur la touche d’arrêt pour économiser la charge des piles. Enlevez les piles si vous ne devez pas utiliser l’appareil pendant longtemps.
- Página 59 A ppuyez touches directionnelles pour changer de voie. La gamme est limitée Les piles sont peut-être faibles. R emplacez-les par des piles neuves si le niveau des piles est bas. L a gamme maximum varie en fonction du terrain et de l’environnement.
- Página 60 obstacles. La gamme maximum de transmission varie en fonction de la configuration terrain l’environnement. Liste des fréquences/voies Fréquences (MHz) Canaux 446.00625 446.01875 446.03125 446.04375 446.05625 446.06875 446.08125 446.09375 Autres spécifications Puissance produite (TX) 0,5W ERP Durée de vie des piles : 24 heures (alcaline) 12 heures (NiMH) (80% StBy, 10 %TX, 10% RX)
- Página 61 Garantie européenne de 2 ans Le distributeur, le vendeur ou le détaillant garantit à l’acheteur d’origine de cet appareil que s’il présente, dans les 2 ans qui suivent son achat, des défauts de matériaux main-d’œuvre, dans conditions d’utilisation normales, ces défauts seront éliminés ou l’appareil sera remplacé...
- Página 62 PMR 446 radio Tectalk easy ou veuillez contacter notre service directement (PST GmbH). En cas de problème, consultez notre liste d’astuces ou les réponses aux questions les plus fréquentes (FAQ) avant de retourner votre Tectalk Easy à notre service après-vente.
- Página 63 Documents légaux – Déclaration de Conformité CE Cet appareil est conforme à toutes les normes et à tous directives règlements européens radiocommunications PMR 446. Cette radio ne peut être utilisée que dans les pays de l’Union européenne et dans les autres pays qui respectent la directive R&TTE de la Communauté...
- Página 64 Où trouver les astuces de maintenance et les documents La documentation technique est mise à jour régulièrement. Vous pouvez télé-décharger les dernières versions manuels utilisateur, documents techniques déclaration de conformité actuelle, ainsi astuces maintenance ou les réponses au questions les plus fréquentes, à notre adresse Internet http://www.hobbyradio.de ©...