Tabla de contenido
Publicidad
Idiomas disponibles
Idiomas disponibles
Enlaces rápidos
296586_1901_aur_Funk-Wetterstation_Content_US.indd 3
Intended use ...........................................................................Page 6
Parts description .....................................................................Page 7
Technical data ........................................................................Page 10
Contents ..................................................................................Page 11
Safety warnings for batteries.................................................Page 14
Setting up the products ..........................................................Page 16
Starting the outdoor sensor / Changing batteries ................Page 16
Starting the main station / Changing batteries .....................Page 16
Radio signal (WWVB) ...........................................................Page 17
The clock field ........................................................................Page 21
The barometric pressure field ................................................Page 22
The indoor temperature field .................................................Page 23
The outdoor temperature field ...............................................Page 24
Basic settings ..........................................................................Page 26
Temperature alarm .................................................................Page 28
Activating the temperature alarm ..........................................Page 28
Alarm ......................................................................................Page 29
Accessing stored data ...........................................................Page 30
US-EN
3
24.06.19 11:47
Publicidad
Capítulos
Tabla de contenido
Solución de problemas

Manuales relacionados para lidl HG05124A-US-RX

Resumen de contenidos para lidl HG05124A-US-RX
-
Página 1: Tabla De Contenido
Description of signal words ........Page 5 Customer service ............Page 5 List of pictograms used ...........Page 6 Intended use ................Page 6 Parts description ..............Page 7 Technical data ................Page 10 Contents ..................Page 11 Important safety instructions ......Page 12 Safety warnings for batteries..........Page 14 Initial Use ................Page 16 Setting up the products ............Page 16... - Página 2 Manually activating signal reception ..Page 31 Activating WWVB signal reception ........Page 31 Activating reception from the outdoor sensor ......Page 31 Backlight .................Page 32 Reset function .................Page 32 Troubleshooting ............Page 32 Cleaning and care ............Page 33 Disposal ................Page 33 Three year limited warranty ......Page 34 US-EN 296586_1901_aur_Funk-Wetterstation_Content_US.indd 4...
-
Página 3: Description Of Signal Words
(e.g. messages related to property damage). CUSTOMER SERVICE Call customer service at 1 (844) 543-5872 Visit the Website Customer Service Platform at www.lidl.com/contact-us Visit a LIDL store for further assistance. Please have your IAN number IAN 296586_1901 ready. US-EN 296586_1901_aur_Funk-Wetterstation_Content_US.indd 5... -
Página 4: List Of Pictograms Used
List of pictograms used Direct current Radio controlled Alternating Splash-proof current Safety class II Fused Wireless weather station Introduction Congratulations on your purchase. You have selected a quality product. The instructions for use are a part of the product. They contain import- ant information about the safety, use and disposal of the product. -
Página 5: Parts Description
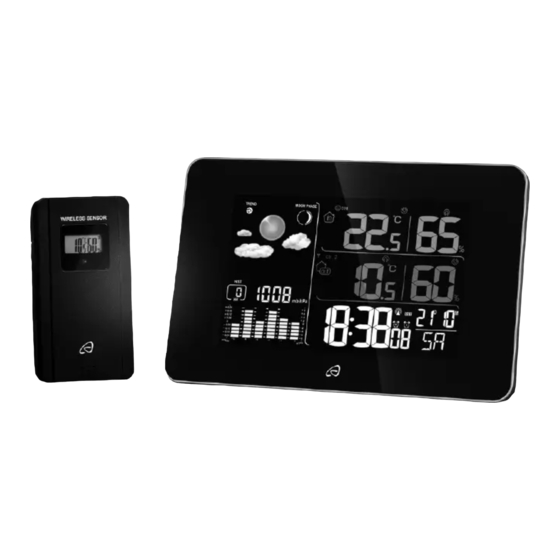
Parts description Main station Display DOWN / button SNOOZE- / LIGHT field ALARM / SET button Keypad Reset button Main station eyebolt °C / °F button Battery compartment cover MEM button Stand ALERT button SET / HISTORY button CH button UP button Battery compartment US-EN... -
Página 6: Outdoor Sensor
Outdoor sensor Signal LED Outdoor sensor stand Battery compartment cover Outdoor sensor battery Outdoor sensor eyebolt compartment US-EN 296586_1901_aur_Funk-Wetterstation_Content_US.indd 8 24.06.19 11:47... - Página 7 Display Indoor temperature field Barometric pressure field Outdoor temperature field Outdoor sensor display Clock field Outdoor sensor buttons next to battery compartment °C / °F button Channel selector switch TX button (channel reset button) US-EN 296586_1901_aur_Funk-Wetterstation_Content_US.indd 9 24.06.19 11:47...
-
Página 8: Technical Data
Optional Power Supply Mains adapter Mains adapter socket Mounting materials: Screw (Dia. 0.125 in / 3 mm) Dowel (Dia. 0.3 in / 8 mm) Technical data Main station: Temperature measurement range: 0 °C to 50 °C 32 °F to 122 °F Humidity measurement range: 20 % to 95 % Radio-controlled clock:... -
Página 9: Mains Adapter
Model: HG05124A-US-RX, HG05124B-US-RX, FCCID: 2AJ9O-HG05124RX Mains adapter: Input: 100–240 V ~ (alternating current), 50–60 Hz, 200 mA MAX Output: 5.0 V (direct current), 500 mA Model no: HX06-0500500-AU-001 Protection class: Outdoor sensor: Temperature measurement range: -20 °C to +50 °C -4.0°F to + 122 °F... -
Página 10: Important Safety Instructions
IMPORTANT SAFETY INSTRUCTIONS READ ALL INSTRUCTIONS. KEEP FOR FUTURE REFERENCE. INCLUDE ALL DOCUMENTATION WHEN PASSING THIS PRODUCT ON TO OTHERS. Failure to observe the following warnings may result in death or serious injuries. This product may be used by children 8 years and up and persons with reduced physical, sensory or mental capabilities or lacking experience and knowledge when supervised or instructed on the safe use of the product and the... - Página 11 generates, uses and can radiate radio frequency energy and, if not installed and used in accordance with the instructions, may cause harmful interference to radio communications. However, there is no guarantee that interference will not occur in a particular installation. If this product causes harmful interference to radio or television reception, which can be determined by turning the product off and on, the user is encouraged to try and correct the interference by one or more of the following measures:...
-
Página 12: Safety Warnings For Batteries
Safety warnings for batteries When used correctly, cells and batteries provide a safe and depend- able source of portable power. However, if they are misused or abused, this may result in leakage, burns, fire, or explosion. Store batteries in a dry place at room temperature. Batteries are sensitive to high and low temperatures. - Página 13 Always take care to correctly insert batteries observing (+) and (-) polarity marks on the battery and the product for which it is intended. Proper polarity must be observed to avoid damage to either product or batteries. Always replace the whole set of batteries at one time, taking care not to mix old and new ones, or batteries of different types, capaci- ties, or manufacturers.
-
Página 14: Initial Use
Initial Use Note: First insert the batteries in the outdoor sensor, then the main station. Setting up the products ATTENTION: First start the outdoor sensor, then the main station. If possible, do not expose the outdoor sensor or main station to direct sunlight. -
Página 15: Radio Signal (Wwvb)
Insert the new batteries, type LR06, in the battery compartment Please note the battery polarity. This is indicated in the battery compartment. Close the battery compartment cover. The display will briefly light up and run a brief check of all display elements. Alternatively, first remove the batteries from the battery compartment. - Página 16 If the signal is detected the clock display will show the current Central European Time, date and day of the week. A static radio tower symbol appears. For more details please refer to section Basic Settings. If the attempts to receive a signal fail the main station will stop attempting to receive a signal after 7 minutes and the radio tower symbol will disappear.
-
Página 17: Temperature Station
Temperature station Note: Before mounting the temperature station, please remove the stand from the back. Mark the location of the hole (D 0.3 in / 8 mm) on the wall. Note: Use the included drilling template intended for marking the drill holes. - Página 18 0.125 in/3 mm 0.125in / 0.3mm Drill the hole with an electric drill. Push the dowel into the drilled hole. Using a crosshead screwdriver, screw the screw into the wall anchor. Hang the outdoor sensor by placing the hanging slot on the screw.
-
Página 19: Information In Base Mode
Information in base mode The clock field Time: The default time display is 24 hour format. When selecting 12 hour mode in basic settings, the time from 12:00 o‘clock in the afternoon until 11:59 o‘clock at night will show PM (Latin for “post meridiem“ = afternoon) in front of the time. -
Página 20: The Barometric Pressure Field
The barometric pressure field Barometric pressure display: At the top right is the barometric pressure at the time shown in the HIST field (history). If LLL (or LL.LL when setting the unit inHg), the display range is below 850 hPa (25.1 inHg), if HHH (or HH.HH), it is above. -
Página 21: The Indoor Temperature Field
Available graphic forecasts are: partly cloudy sunny cloudy rain snow The indoor temperature field The indoor temperature: The indoor temperature measured by the main station is displayed with indexing up to a tenth of a degree. The temperature unit °C (for de- grees Celsius) appears at the top right. -
Página 22: Low Battery
Indoor climate rating: The main station will rate the indoor climate based on the indoor humidity and temperature using the following key: DRY humidity below 40 % COMFORT humidity between 40 and 70 %, and a temperature range between 20 °C–28 °C (68 °F–82.4 °F). - Página 23 The relative humidity: This displays the relative humidity the outdoor sensor is exposed to. The temperature- or humidity trend: The trend will appear as rising (or dropping), when the temperature changes by 2 °C (= 3.6 °F) or more within an hour and will maintain the direction for one hour even when it remains steady.
-
Página 24: Settings
Settings ATTENTION: Firmly touching the top of the housing will turn on the backlight (Fig. E). 10 seconds after releasing it the display backlight will turn off again. Please note, the main station does not respond to two buttons being pressed at once. - Página 25 Language setting for displaying the weekday at the bottom right of the clock display. The following codes will flash and can be changed in the following sequence by pressing the UP / DOWN button: GE (German), DA (Danish), ES (Spanish), NE (Dutch), FR (French), IT (Italian), EN (English) Clock format: select from 24 Hr for 24-hour format (0:00 o‘clock –23:59 o‘clock).
-
Página 26: Temperature Alarm
mercury (inHg). When changing the unit at this time the indicated value will automatically be converted to the new unit. Temperature alarm You have the option to set a temperature range for the outdoor sensor. With the temperature alarm activated, the main station will sound an alarm if the outdoor sensor measures a temperature outside of this temperature range. -
Página 27: Alarm
direction of the temperature deviation. Press the ALERT button to turn the alarm off. Alarm The main station features two alarms which can be set and activated separately. Weekday Alarm, Single Alarm Weekday alarm: Mo to Fr weekday alarm Single Alarm: one time alarm This alarm will not repeat. -
Página 28: Turning The Alarm Off
Turning the Alarm Off The alarm will go off at the set time and the backlight will be acti- vated. If you do not turn off the alarm, it will sound for 2 minutes before stopping automatically. Press the SNOOZE / LIGHT field to snooze the alarm. -
Página 29: Manually Activating Signal Reception
TIP: Min / Max Temperature are measured from the history (after in- serting batteries/connecting to power). To erase the stored Min / Max Temperature, hold the MEM button for 3 seconds. Barometric Pressure History Repeatedly briefly pressing the SET / HISTORY button will display the barometric pressure over the past 12 hours. -
Página 30: Backlight
Backlight Touch the SNOOZE / LIGHT field . The backlight will light up for 10 seconds. With the mains adapter plugged in there are 3 backlight levels. Reset function Pressing the reset key will reset the product, which will then need to be set up again. -
Página 31: Cleaning And Care
Cleaning and care Never immerse the product in water or other liquids. These can damage the product. Use a dry, soft cloth for eyewear for cleaning and care. Disposal Dispose of the packaging through your local recycling facilities and in compliance with all federal, state and local regulations. -
Página 32: Three Year Limited Warranty
Three year limited warranty What does this warranty cover? The warranty covers: · Damage, breakage or inoperability due to defect. · Damage not caused by normal wear and tear or failure to follow the safety and maintenance instructions provided in the user manual. What is not covered by the warranty? The warranty does not cover damage caused by: ·... - Página 33 · Call customer service at 1 (844) 543-5872 · Visit the Website Customer Service Platform at www.lidl.com/contact-us · Visit a LIDL store for further assistance To ensure the quickest warranty return process, please have the following available: · The original sales receipt that includes the date purchased;...
- Página 34 Descripción de las palabras de advertencia ............Página 38 Servicio al cliente ............. Página 38 Lista de pictogramas utilizados ....Página 39 Introducción ..............Página 39 Uso previsto ................ Página 39 Descripción de las piezas ..........Página 40 Información técnica ............Página 43 Alcance de suministro ............
- Página 35 Alarma ................Página 63 Acceder a los datos almacenados ........Página 65 Activar la recepción de señal de forma manual ............. Página 66 Activar la recepción de señal de la WWVB ....Página 66 Activar la recepción del sensor exterior ......Página 66 Retroiluminación ..............
-
Página 36: Descripción De Las Palabras De Advertencia
Llame al Servicio de atención al cliente al 1 (844) 543-5872 Visite el Portal de atención al cliente en www.lidl.com/contact-us Visite una de nuestras tiendas LIDL en caso de cualquier inquietud. Por favor tenga su número IAN a IAN 296586_1901 la mano. -
Página 37: Lista De Pictogramas Utilizados
Lista de pictogramas utilizados Corriente directa Controlado por radio A prueba de Corriente alterna salpicaduras Clase de Protección con fusibles seguridad II Estación meteorológica inalámbrica Introducción Felicidades por la compra de su nuevo producto. Usted ha seleccio- nado un producto de calidad. Las instrucciones de uso son parte del producto. -
Página 38: Descripción De Las Piezas
Descripción de las piezas Estación principal Pantalla Botón ARRIBA Campo de SNOOZE- / LUZ Botón ABAJO Teclado Botón ALARMA / AJUSTE Cáncamo de la estación Botón de restablecimiento principal Botón °C / °F Cubierta del compartimiento Botón MEM de las baterías Botón ALERTA Pedestal Botón CH... -
Página 39: Sensor Exterior
Sensor exterior LED indicador Pedestal del sensor exterior Cubierta del compartimiento Compartimiento de las de las baterías baterías del sensor exterior Cáncamo del sensor exterior US-ES 296586_1901_aur_Funk-Wetterstation_Content_US.indd 41 24.06.19 11:47... -
Página 40: Botones Del Sensor Exterior Junto Al Compartimiento De Las Baterías
Pantalla Campo de temperatura Campo del reloj interior Campo de presión Campo de temperatura barométrica exterior Pantalla del sensor exterior Botones del sensor exterior junto al compartimiento de las baterías Botón °C / °F Interruptor de selección Botón TX (botón de de canal restablecimiento del canal) 42 US-ES... -
Página 41: Fuente De Alimentación Opcional
Fuente de alimentación opcional Adaptador de corriente Conexión del adaptador de corriente Material de montaje: Tornillo (diá. 0.125 in / 3 mm) Taquete (diá. 0.3 in / 8 mm) Información técnica Estación principal: Rango de medición de temperatura: 0 °C a 50 °C 32 °F a 122 °F Rango de medición de humedad:... -
Página 42: Adaptador De Corriente
850 hPa a 1050 hPa 25.1 inHg a 31.1 inHg Banda de frecuencias: 60 kHz, 433.050 MHz a 434.790 MHz Modelo: HG05124A-US-RX, HG05124B-US-RX, FCCID: 2AJ9O-HG05124RX Adaptador de corriente: Entrada: 100–240 V ~ (corriente alterna), 50–60 Hz, 200 mA MAX Salida: 5.0 V... -
Página 43: Alcance De Suministro
Potencia transmitida máxima de radiofrecuencia: 433.92 MHz, -10.77 dBm Alcance de suministro 1 estación principal 3 tornillos 1 sensor exterior 3 taquetes 4 baterías, tipo LR06, 1.5 V 1 instrucciones de uso 1 adaptador de corriente INSTRUCCIONES IMPORTANTES DE SEGURIDAD LEA TODAS LAS INSTRUCCIONES. - Página 44 Antes de usar el producto, asegúrese de que el voltaje de alimen- tación disponible corresponde al voltaje de operación de la fuente de alimentación (120 V∼, 50–60 Hz). ¡Antes de usar el producto, verifique que el producto y la fuente de alimentación y la conexión del cable no estén dañados! ¡Nunca use el producto si está...
-
Página 45: Advertencias De Seguridad Para Baterías
• Solicite ayuda a su proveedor o a algún técnico experto de radio / TV. No exponga la estación principal a la humedad o a la luz solar directa. Este producto no contiene piezas que requieran el mantenimiento del usuario. Los LED no son reemplazables. Para apagar completamente el producto, desconecte el adaptador de corriente de la toma de corriente. - Página 46 Mantenga las celdas o las baterías limpias y secas durante su uso y almacenamiento. Limpie las terminales metálicas con un trapo suave y seco si se ensucian. Busque ayuda médica inmediata si se ha tragado una celda o batería. De igual forma, póngase en contacto con el centro local para el control de intoxicaciones.
-
Página 47: Puesta En Marcha
Nunca recargue una batería a menos que la etiqueta de la bate- ría indique específicamente que se trata de una batería recarga- ble. Cargar una batería no recargable puede hacer que las se chorreen, se incendien o exploten. Use solo el cable de alimentación proporcionado con el pro- ducto. -
Página 48: Configurar Los Productos
Configurar los productos ATENCIÓN: primero encienda el sensor exterior y luego la estación principal. De ser posible, no exponga el sensor exterior o la estación principal directamente a la luz solar. Colóquela en una superficie horizontal y nivelada o móntela en una pared vertical. La estación principal se puede colgar del cáncamo o desplegar el pedestal... - Página 49 Cierre la cubierta del compartimiento de las baterías. La pantalla encenderá brevemente y ejecutará una pequeña revisión de todos los elementos de la pantalla. De forma alterna, primero retire las baterías del compartimiento de las baterías. Conecte el enchufe de bajo voltaje del adaptador de corriente en la conexión del adaptador de corriente en la estación prin- cipal y conecte el adaptador de corriente en una toma de corriente...
-
Página 50: Señal De Radio (Wwvb)
Señal de radio (WWVB) La señal de la WWVB (transmisor de señal de tiempo) consiste en pulsos de tiempo emitidos por uno de los relojes más precisos del mundo en Fort Collins, Colorado. Si la señal se detecta la pantalla del reloj mostrará... -
Página 51: Estación Meteorológica
Estación meteorológica Nota: Antes de montar la estación meteorológica, retire el soporte de la parte trasera. Marque el lugar a taladrar (D 0.3 in / 8 mm) en la pared. Nota: Use la plantilla para taladrar incluida y diseñada para marcar el orificio a taladrar. - Página 52 0.125 in/3 mm 0.125in / 0.3mm Introduzca el taquete en el orificio taladrado. Atornille el tornillo usando un desarmador de cruz en el so- porte de pared. Cuelgue el sensor exterior colocando la ranura para colgar en el tornillo. Nota: Nunca sumerja el sensor exterior en agua y protéjalo de la luz directa del sol.
-
Página 53: Información En Modo Básico
Información en modo básico El campo del reloj Hora: La hora se mostrará en formato de 24 horas de acuerdo con la configuración predeterminada. Al seleccionar el for- mato de 12 horas en la configuración básica, la hora de las 12:00 de la tarde hasta las 11:59 de la noche mostrará... -
Página 54: El Campo De Presión Barométrica
La fase lunar: La fase lunar actual se indica como sigue: La porción de la luna no iluminada estará oscura en la pantalla. El campo de presión barométrica Pantalla de presión barométrica: En la parte superior derecha está la presión barométrica a la hora mos- trada en el campo HIST (historial). -
Página 55: El Campo De Temperatura Interior
barométrica. Naturalmente, este pronóstico no es comparable al de los servicios profesionales del clima, que se basan en información de satélites y computadoras de alto desempeño, pero ofrece simplemente una indicación aproximada de los desarrollos actuales. Los pronósticos gráficos disponibles son: parcialmente nublado soleado... -
Página 56: El Campo De Temperatura Exterior
La tendencia de temperatura o humedad: La tendencia aparecerá como en ascenso (o descenso), si la temperatura cambia en 2 °C (= 3.6 °F) o o más en una hora y mantiene la dirección durante una hora, incluso sin cambio adicional. La tendencia de humedad responderá acordemente con un cambio de 2 % en humedad. -
Página 57: Indicación De Canal
aparece en la parte superior derecha. La unidad de temperatura tam- bién se puede ajustar en la unidad actualmente poco frecuente de °F (grados Fahrenheit). Para cambiar a esta unidad presione el botón °C / F Si LL.L aparece, está debajo del rango de medición de -20 °C a 50 °C (o - 4 °F a 122 °F), si aparece HH.H, está... -
Página 58: Configuración
- 3: sensor exterior en canal 3 - : cambio automático de canal Batería baja: Si aparece el símbolo de batería, las baterías en el sen- sor exterior se deben reemplazar lo más pronto posible. Consulte las instrucciones en la sección Encender el sensor exterior / reemplazar las baterías. - Página 59 Nota: si la estación principal recibió la señal de la WWVB, perma- necerán sin cambio el año, mes, día, hora y minuto. Si se encuentra en una zona horaria distinta a la de Alemania, puede ajustar su hora local en zona horaria. Año Día Ajuste de idioma para mostrar el día de la semana en la...
-
Página 60: Alarma De Temperatura
Ajustar la presión barométrica: la presión barométrica in- dicará la presión barométrica absoluta en mb o hPa de acuerdo con el ajuste predeterminado. Ahora puede ajustar la indicación a la presión barométrica en relación con la altitud de su ubicación. Obtenga los datos actuales de internet o del pronóstico del clima local. -
Página 61: Alarma
Presione el botón ARRIBA o el botón ABAJO / para establecer la temperatura mínima para el rango de temperatura deseado. Confirme el valor presionando el botón ALERTA. El rango de tem- peratura está ahora ajustado. Presione brevemente el botón ALERTA para activar o desactivar la alarma de temperatura. -
Página 62: Activar La Alarma
hora parpadeando. La marca aparecerá a la derecha de la hora de alarma. Ajuste la hora para alarma W (día de la semana) o alarma S (in- dividual) usando el botón ARRIBA o el botón ABAJO / CONSEJO: mantenga presionado el botón ARRIBA o el botón ABAJO / para avanzar rápidamente hacia adelante o atrás. -
Página 63: Acceder A Los Datos Almacenados
Acceder a los datos almacenados Temperaturas máximas Presione el botón MEM nuevamente y se mostrarán ambos campos de temperatura junto a la temperatura, y MAX junto a la hu- medad. Se mostrará el valor máximo interior y exterior, respectivamente. Presione el botón MEM dos veces y MIN aparecerá junto a la tempe- ratura, y se mostrará... -
Página 64: Activar La Recepción De Señal De Forma Manual
indica hace cuántas horas era actual la presión barométrica que se muestra. Activar la recepción de señal de forma manual Activar la recepción de señal de la WWVB La estación principal sincroniza el reloj interno con la señal de la WWVB toda las noches. -
Página 65: Resolución De Problemas
Resolución de problemas El producto contiene componentes electrónicos delicados. Por tanto, es posible que los equipos de transmisión de radio en los alrededores inmediatos puedan provocar interferencia en el producto. Si la pantalla muestra interferencia, aleje estos objetos del producto. Las descargas electrostáticas pueden provocar mal funcionamiento. -
Página 66: Eliminación
Eliminación Deshágase del empaque mediante sus instalaciones de reciclaje loca- les y de acuerdo con las regulaciones federales, estatales y locales. Observe las señales del material de empaque para la separación de residuos, los cuales están señalados con abreviaturas (a) y números (b) que significan lo siguiente: 1–7: plásticos / 20–22: papel y tablero de fibra / 80–98: materiales mixtos. -
Página 67: Garantía Limitada De 3 Años
Garantía limitada de 3 años Lo que cubre la presente garantía La garantía incluye: · Daños, quebraduras o incapacidad para funcionar debido a defectos. · Daños que no hayan sido causados por el desgaste propio del uso o por no seguir las instrucciones de seguridad y mantención incluidas en el manual para el usuario. - Página 68 · Llame al Servicio de atención al cliente al 1 (844) 543-5872. · Visite el Portal de atención al cliente en www.lidl.com/contact-us · Visite una de nuestras tiendas LIDL en caso de cualquier inquietud. A fin de acelerar el trámite de la garantía, tenga a bien contar con lo siguiente: ·...