Tabla de contenido
Publicidad
Idiomas disponibles
Idiomas disponibles
Enlaces rápidos
USER MANUAL
MODEL:B0367WST2H2R-V1
RADIO-CONTROLLED WEATHER
STATION CLOCK
We hereby thank you for purchasing Baldr Radio-Controlled Weath-
er Station Clock.We design and manufacture the item using innova-
tive components and techniques to enable the perfect display of
time by this device.It is also equipped with backlight & projection
functions.Please read the instructions carefully to become familiar
with the properties and functions properly before usage.
English
Deutsche
Français
Italiano
Español
Publicidad
Tabla de contenido
Solución de problemas

Manuales relacionados para BALDR B0367WST2H2R-V1


Resumen de contenidos para BALDR B0367WST2H2R-V1
- Página 1 MODEL:B0367WST2H2R-V1 RADIO-CONTROLLED WEATHER STATION CLOCK We hereby thank you for purchasing Baldr Radio-Controlled Weath- er Station Clock.We design and manufacture the item using innova- tive components and techniques to enable the perfect display of time by this device.It is also equipped with backlight & projection functions.Please read the instructions carefully to become familiar...
- Página 2 CONTENTS English - - - - - - - - - - - - - - - - - - - - - - - - - - - - - - - - - - - - - - - - - - - 03~19 Deutsche - - - - - - - - - - - - - - - - - - - - - - - - - - - - - - - - - - - - - - - - - - - 20~38 Français - - - - - - - - - - - - - - - - - - - - - - - - - - - - - - - - - - - - - - - - - - - 39~57 Italiano...
-
Página 3: Product Overview
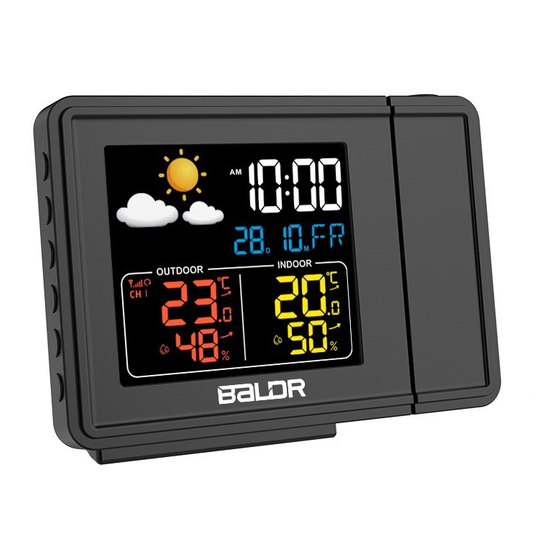
PRODUCT OVERVIEW Front View 1. Time Zone 13.Outdoor Temperature &Humidity 2. AM/PM Selectable 14.Max/min records for 3. Current Time outdoor temperature 4. RCC indicator & humidity 5. DST 15.Indoor Temperature 6. Snooze indicator &Humidity 7. Alarm Indicator 16.Max/min records for 8. - Página 4 PRODUCT OVERVIEW Back View 1. Focus Adjustment 4. Projection On/Off 2. Battery Compartment 5. DC Hole 3. Alarm On/Off Top View 1. Focus Adjustment 2. Snooze/Dimmer...
-
Página 5: Side View
Side View 1. “SETC/F”Button 4. “ ”Button Short press to switch In normal display ,short between Celsius and press to check alarm time Fahrenheit In alarm display ,short Long press to enter into press to turn on/off alarm time setting Long press to enter into alarm setting 2. -
Página 6: Outdoor Sensor
Note: The default year is 2020, if the weekday display is incorrect . Please confirm year was set correctly. (for manual setting only) The CR2032 cell battery is for memory function (included).Please do not used as power supply. If you need to replace the cell bat- tery, please take out the part device as shown in the figure below, load new battery matching the polarity (... -
Página 7: Package Content
1. Signal light 2. Hanging hole 3. Battery compartment 4. Channel 1-2-3 switch FEATURES Time(12/24H), alarm and snooze function RCC in WWVB/DCF Projection function Measures indoor&outdoor temperature(C/F) and humidity Projection focus adjustable Projection rotate function Calendar function Weekdays in 7 languages: GER (German), ENG (English), FRE (French),ITA(Italian), SPA(Spanish),DUT(Dutch),DRN(Denmark) Up to 3 RF channels(channel scan or fixed to one channel)for outdoor sensors (only one sensor included in the package) -
Página 8: Getting Started
1xUser Manual 1xRemote Sensor 1xAc Adaptor 1xCR2032 Cell battery GETTING STARTED BALDR recommends high quality alkaline or lithium batteries for the best product performance. Heavy duty or rechargeable batteries are not recommended. Main Unit Instrallation Power Supply Connect the power adaptor with DC hole on back of the unit and... - Página 9 Auto synchronization: after power on both units, the receiving ● status will last for max 3 minutes,the receiving antenna signal will flash, if no signal received in 3 minutes, the antenna signal will disappear and stop receiving outdoor signal. If the main unit is out of 3 minutes’ signal receiving window, you ●...
- Página 10 Date Date Time zone Alarm Format Format Time (WWVB) (DCF) (WWVB) AM7:00 -5 EST (OFF) Set Automatic Time RCC Receiving Conditions: After RF signal receiving, it will start searching radio signal for 7 minutes with the antenna symbol “ ’’displaying on screen There are daily automatic DCF receiving at 1:00AM,2:00AM, 3:00AM, 4:00AM, 5:00AM.
- Página 11 SET MANUAL TIME After signal received, if there is no need for other settings, you can just finish reading here. If there is other setting requirements. Please check the following steps. Or if there is no signal received, you can follow bellow steps for manual setting. Press and hold “SETC/F”...
- Página 12 Press “SETC/F” button to select time display mode. Press “CH/▲” or “MEM/▼” button to select 12hr or 24hr.Default setting : 24hr format(DCF) 12hr format(WWVB) Press “SETC/F” button to select Hours. Press “CH/▲” or “MEM/▼”button to adjust the value. Press “SETC/F” button to select Minutes. Press “CH/▲” or “MEM/▼”...
-
Página 13: Alarm Function
German English French Italian Spanish Dutch Denmark Language Friday Saturday ALARM FUNCTION SET ALARM TIME: Press and hold “ ” button to enter into alarm time setting mode. Press “CH/▲” or “MEM/▼” button to adjust data; press and hold “CH/▲” or “MEM/▼” button will quickly change the data by 8 steps. -
Página 14: Backlight Function
” button to switch backlight brightness among 100%, ● 50% and off Placement Instruction BALDR sensors are sensitive to surrounding environmental condi- tions. Proper placement of both the main unit and outdoor sensor are critical to the accuracy and performance of this product. Main Unit Placement Place main unit in a dry area free of dirt and dust. - Página 15 outdoor use, however, to extend its life place the sensor in an area protected from direct weather elements. The best location is 4 to 8 feet(1.2 to 2.4 meters) above the ground with permanent shade and plenty of fresh air to circulate around the sensor. Important placement guidelines The distance between main unit and transmitter should be at least ●...
- Página 16 Arrow indication for humidity changes: ● will display when the reading increase by 5% RH within one hour or compared with last reading. will display when the reading decrease by 5% RH within one hour or compared with last reading. Arrow indication for humidity changes: ●...
-
Página 17: Troubleshooting
5 Weather Modes Sunny Sunny to Cloudy Rainy Snow Cloudy TROUBLE SHOOTING Problem Possible Solution Outdoor reading is Flashing of the outdoor reading is generally flashing or an indication of wireless interference. showing dashes 1. Bring both the sensor and display indoors, side by side and remove batteries from each. - Página 18 LL will temperature display on screen for indication. If your BALDR product does not operate properly after trying the troubleshooting steps, contact the seller on your order page or shoot an email to: service@baldr.com.
- Página 19 Do not dispose of this product as unsorted municipal waste. Collec- tion of such waste separately for special treatment is necessary. WARRANTY BALDR provides a 1-year limited warranty on this product against manufacturing defects in materials and workmanship. Warranty service can only be performed by our authorized service center.
- Página 20 PRODUKT-ÜBERSICHT Vorderansicht 1.Zeitzone 13.Außentemperatur & Luftfeuchtigkeit 2.AM / PM wählbar 14.Max/min Aufzeichnungen 3.Aktuelle Zeit für Außentemperatur & 4.RCC-Anzeige Luftfeuchtigkeit 5.DST 15.Innentemperatur & 6.Schlummeranzeige Luftfeuchtigkeit 7.Alarmanzeige 16.Max/min Aufzeichnungen 8.Wochentags Anzeige für Raumtemperatur & 9.Kalenderanzeige Luftfeuchtigkeit 10.Wettervorhersage 17.Niedrige Batterieanzeige 11.Anzeige des Sensorsignals des Hauptgeräts 12.Sensorkanal Außen 18.Niedrige Batterieanzeige...
- Página 21 Rückansicht 1. Fokus-Anpassung 4. Projektion ein/aus 2. Batteriefach 5. DC-Loch 3. Alarm ein/aus Ansicht von oben 1. Projektionslinse 2. Snooze/Dimmer...
- Página 22 Seitenansicht 1. “SETC/F” Taste 4. “ ” Taste Kurzes Drücken zum In normaler Anzeige, kurzes Drücken, um die Alarmzeit Umschalten zwischen zu überprüfen Celsius und Fahrenheit In Alarmanzeige, kurzes Langes Drücken, um in die Drücken zum Ein-/Auss- Zeiteinstellung einzutreten chalten des Alarms 2.
- Página 23 Anmerkung: 1. Das Standardjahr ist 2020, wenn die Wochentagsanzeige nicht korrekt ist. Bitte bestätigen Sie, dass das Jahr korrekt eingestellt wurde. (nur bei manueller Einstellung) 2. Die CR2032-Zellenbatterie ist für die Speicherfunktion (im Lieferumfang enthalten). Bitte nicht als Stromversorgung verwenden. Wenn Sie die Zellenbatterie austauschen müssen, nehmen Sie bitte das Teilgerät wie in der Abbildung unten gezeigt heraus, legen Sie eine neue Batterie passend zu polarity (...
- Página 24 Außensensor 1. Signalleuchte 2. Aufhängeloch 3. Batteriefachabdeckung 4. Kanal 1-2-3 Schalter EIGENSCHAFTEN Zeit (12 / 24H), Alarm- und Schlummerfunktion RCC in WWVB/DCF Projektionsfunktion 4. Misst Innen- und Außentemperatur (C/F) und Luftfeuchtigkeit 5. Projektionsfokus einstellbar 6. Projektionsdrehfunktion 7. Kalendarfunction Wochentage in 7 Sprachen: GER (Deutsch), ENG (Englisch), FRE (Französisch),ITA(Italienisch), SPA(Spanisch),DUT(Nieder- ländisch),DRN(Dänemark) Bis zu 3 HF-Kanäle (Kanalscan oder an einem Kanal befestigt)
-
Página 25: Erste Schritte
1x Digitale Wetterstation Uhr 1x Benutzerhandbuch 1x Fernbedienungssensor 1xAC-Adapter 1xCR2032 Zellenbatterie ERSTE SCHRITTE BALDR empfiehlt qualitativ hochwertige Alkali- oder Lithiumbat-terien für die beste Produktleistung. Hochleistungsbatterien oder wiederaufladbare Batterien werden nicht empfohlen. Hauptgerät-Installation Energieversorgung Schließen Sie das Netzteil mit der Gleichstrombohrung an der Rückseite des Geräts an und Stecken Sie den Adapter in eine... - Página 26 2. Legen Sie 2xAA-Batterien passend zu Polarität (+und-) ein. 3. Setzen Sie den Batteriefachdeckel wieder auf Sensor-Einrichtung Schalten Sie die Haupteinheit ein, bevor Sie die Batterie des ● Sensors laden. Schalten Sie den Kanal 1-2-3 des Senors auf einen beliebigen ●...
- Página 27 Einrichtung Der Haupteinheit Beim Einschalten oder Zurücksetzen wird die LCD-Anzeige 3 Sekunden lang mit einem "BI"-Ton voll angezeigt. Der Standardwert ist : WochentagSprache Wochentag Zeit-Anzei Zeit-Anzeige Tastenton (WWVB/MSF) Sprache(DCF) ge(WWVB (DCF) /MSF) 12HR 24HR Temperatur-Einheit Temperatur RCC- Zeit zone Datum- (DCF/MSF) -Einheit Funktion...
- Página 28 3. Drücken Sie im normalen Zeitmodus die SET-Taste, um den RCC-Signalempfang zu aktivieren. 4. Drücken Sie während des RCC-Empfangs die Taste"SET '', um den RCC-Empfang zu beenden. 5. Die Zeit wird nach Erhalt der RCC in die aktuelle Zeit der entsprechenden Zeitzone umgewandelt (außer Zeitzone 0).
- Página 29 Drücken Sie “SETC/F” Taste , um den Ton on/OFF auszuwählen, drücken Sie “CH/▲” or “MEM/▼” Taste auszuwählen. Standardein- stellung : Ton taste ON Drücken Sie “SETC/F” Taste , um Temperatureinheit auszu- wählen.Drücken Sie “CH/▲” oder “MEM/▼” um ℃ oder ℉ zu wählen.
-
Página 30: Alarmzeit Einstellen
Drücken Sie “SETC/F” Taste zu bestätigen und zu beenden. Während der Einstellung, wenn kein Betrieb für 20 Sekunden, wird es automatisch speichern und beenden Einstellung. * Tipps: Halten Sie gedrückt “CH/▲” oder “MEM/▼” Taste ändert den Wert schnell um 8 Schritte. Bemerkung: Es gibt 7 Sprachen, die für die Wochentagsanzeige wählbar sind: FRE-SPA-ENG-GER-ITA-DUT-DRN Englisch Französ... - Página 31 4. Berühren Sie während der Einstellung die obere Taste, um die Einstellung zu speichern und zu beenden. 5. Während der Einstellung,Wenn 20 Sekunden lang keine Bedienung erfolgt, wird die Einstellung automatisch gespeichert und beendet. 6. Der Alarm ist nach der Einstellung der Alarmzeit standardmäßig auf EIN gestellt.
- Página 32 ● Hintergrundbeleuchtung zwischen 100%, 50% und aus zu schalten Platzierungsanweisung BALDR-Sensoren sind empfindlich gegenüber den Umgebungsbe- din-gungen. Die richtige Platzierung sowohl der Haupteinheit als auch des Außensensors sind entscheidend für die Genauigkeit und Leis- tung dieses Produkts. Platzierung Der Haupteinheit Stellen Sie die Haupteinheit an einem trockenen, schmutz- und staubfreien Ort auf.
- Página 33 Wichtige Platzierungsrichtlinien Der Abstand zwischen Hauptgerät und Sender sollte mindestens ● 1,5 bis 2 Meter (5~6,5 Fuß) von jeglichen Störquellen wie Com- putermoni-toren oder Fernsehgeräten entfernt sein. Um die Reichweite zu maximieren, stellen Sie die Geräte nicht in ● derNähe von großen Metallgegenständen, dicken Wänden, Metallober-flächen oder anderen Objekten auf, die die drahtlose Kommunikation einschränken könnten.
- Página 34 Pfeilanzeige für Temperaturänderungen: ● wird angezeigt, wenn der Messwert innerhalb einer Stunde um 1°C ansteigt oder mit dem letzten Messwert verglichen wird. wird angezeigt, wenn der Messwert innerhalb einer Stunde um 1°C abnimmt oder mit dem letzten Messwert verglichen wird. Bemerkung: Die Lektüre wird genauer stehen stehen für eine halbe Stunde nach dem Einschalten.
-
Página 35: Fehlersuche
Außentemperatur und Luftfeuchtigkeit sowie Barometerdaten. Die Prognose gilt für die nächsten 12 Stunden mit einer Genauigkeit von 70% bis 75% nach 48 Stunden Stunden Datenak- kumulation. 5 Wettermodi Sonnig Sonnig bis Bewölkt Regnerisch Schnee wolkig FEHLERSUCHE Problem Mögliche Lösung Die Außenablesung Das Blinken der Außenlesung ist im Allgem- blinkt oder zeigt einen ein Hinweis auf Funkstörungen. - Página 36 Außentemperatur niedriger als der Erfassungsbereich, wird LL auf dem Bildschirm als Hinweis angezeigt. Wenn Ihr BALDR-Produkt nach dem Ausprobieren der Fehlerbehebungsschritte nicht ordnungsgemäß funktioniert, wenden Sie sich an den Verkäufer auf Ihrer Bestellseite oder senden Sie eine E-Mail an: service@baldr.com.
- Página 37 Entsorgen Sie dieses Produkt nicht als unsortierten Siedlungsabfall. Die getrennte Sammlung solcher Abfälle zur Sonderbehandlung ist notwendig. Garantie BALDR bietet eine 1-jährige beschränkte Garantie auf dieses Produkt gegen Herstellungsfehler in Material und Verarbeitung. Der Garantieservice kann nur von unserem autorisierten Servicezentrum durchgeführt werden. Der datierte Original- Kaufbeleg muss uns oder unserem autorisierten Servicezentrum auf Anfrage als Kaufbeleg vorgelegt werden.
- Página 38 Angaben des Verkäufers oder Leistungsabweichungen, die sich aus installationsbedingten Umständen ergeben. Um Garantieleistungen zu erhalten, muss sich der Käufer mit dem von BALDR benannten Servicezentrum in Verbindung setzen, um das Problem zu ermitteln und das Serviceverfahren durchzuführen. Vielen Dank für Ihre Wahl der BALDR-Produkte!
-
Página 39: Aperçu Des Produits
APERÇU DES PRODUITS Vue de face 1.Fuseau horaire 13.Température et humidité extérieures 2.AM/PM Sélectionnable 14.Enregistrements Max/min 3.Heure actuelle pour la température et 4.Indicateur RCC l'humidité extérieures 5.DST 15.Température et humidité 6.Indicateur de sommeil intérieures 7.Indicateur d'alarme 16.Enregistrements Max/min 8.Affichage des jours de pour la température et la semaine l'humidité... -
Página 40: Vue De Dessus
Vue de dos 1. Ajustement de la focalisation 4. Projection activée/ 2. Compartiment des piles désactivée 3. Alarme activée/désactivée 5. DC Hole Vue de dessus 1. Lentille de projection 2.Snooze/Dimmer... -
Página 41: Vue De Côté
Vue de côté 1. Bouton "SETC/F ‘’ 4. Bouton“ ” Brève pression pour passer En affichage normal, brève pression pour vérifier l'heure de Celsius à Fahrenheit de l'alarme Longue pression pour régler Dans l'affichage de l'alarme, l'heure une courte pression permet 2. - Página 42 Note : 1. L'année par défaut est 2020, si l'affichage du jour de la semaine est incorrect . Veuillez confirmer que l'année a été définie correctement. (uniquement pour le réglage manuel) 2. La pile CR2032 est destinée à la fonction mémoire (incluse), mais ne doit pas être utilisée comme source d'alimentation.
-
Página 43: Capteur Extérieur
CAPTEUR EXTÉRIEUR 1. Signal lumineux 2. Trou de suspension 3. compartiment à piles 4. Commutateur de canal 1-2-3 CARACTÉRISTIQUES Heure (12/24H), alarme et fonction de sommeil RCC dans WWVB/DCF Fonction de projection 4. Mesure la température (C/F) et l'humidité intérieures et extérieures 5. -
Página 44: Contenu Du Paquet
1xCapteur à distance 1xAc Adaptateur 1xCR2032 Batterie portable PRISE EN MAIN BALDR recommande des piles alcalines ou au lithium de haute qualité pour obtenir les meilleures performa- nces du produit. Les piles lourdes ou rechargeables ne sont pas recommandées. Unité Principale D'instrumentation Source de courant Branchez l'adaptateur secteur avec le trou CC à... -
Página 45: Réception De Signaux Rf
2.Insérez 2 piles AA correspondant à polarity ( +and-) 3.Remettre le couvercle de la pile en place Configuration Des Capteurs Alimentez l'unité principale avant de charger la batterie du ● capteur Assez le canal 1-2-3 du señor à la chaîne de votre choix. Par ●... - Página 46 La valeur par défaut est : Jour de lasemaine Jour de la Affichage Affichage Tonalité Langue(WWVB/ semaine de l'heure de l'heure MSF) Langue(DCF) (WWVB/MSF) (DCF) 12HR 24HR Affichage Unité de Unité detempé Fonction Time zone de la date température rature(WWVB) (DCF) (DCF/MSF) 2020.01.01...
- Página 47 Remarque : ● Il quittera automatiquement la réception RCC lorsq l'alarme est effectuée pendant la réception RCC, vous pouvez répéter l'étape 3 pour entrer la réception du signal RCC après avoir éteint l'alarme. Affichage du symbole RCC : a. Lors de la réception du signal, l'icône RCC clignote avec "1HZ" b.
- Página 48 Appuyez sur la touche "SETC/F" pour sélectionner DST. Appuyez sur la touche "CH/▲" ou "MEM/▼" pour sélectionner le mode DST, de DST ON à DST ALWAYS à DST OFF. Appuyez sur la touche "SETC/F" pour sélectionner le fuseau horaire. Appuyez sur la touche "CH/▲" ou "MEM/▼" pour sélec- tionner le fuseau horaire de -12 H à...
- Página 49 Remarque : Il est possible de sélectionner 7 langues pour l'affichage en semaine : 、ITA、DRN、DRN、ITA、GER, FRE, SPA Anglais Français Italien Espagnol Néerl Langue Vendredi Dane andais mark Dimanche Lundi Mardi Mercredi Jeudi Vendredi Samedi FONCTION D'ALERTE RÉGLER L'HEURE DU RÉVEIL : 1.
-
Página 50: Activer/Désactiver L'ALarme
6. L'alarme est activée par défaut après avoir réglé l'heure de l'alarme. Le symbole de l'alarme s'affiche à l'écran. ACTIVER/DÉSACTIVER L'ALARME : 1. En mode d'affichage de l'heure, appuyez sur le bouton " " pour vérifier l'heure de l'alarme et le calendrier. 2. -
Página 51: Fonction De Rétro-Éclairage
● rétroéclairage entre 100%, 50% et éteint. Instruction De Placement Les capteurs BALDR sont sensibles aux conditions environnemental- es environnantes. Le placement correct de l'unité principale et du capteur extérieur est essentiel pour la précision et les performances de ce produit Placement De L'unité... -
Página 52: Température Et Humidité
Veuillez ne pas utiliser d'autres produits é lectriques tels que des ● é couteurs ou des haut-parleurs fonctionnant sur la même fréquence de signal. Les voisins qui utilisent des appareils électriques fonctionnant sur ● la même fréquence de signal peuvent également causer des interférenc-es. - Página 53 Indication par des flèches des variations d'humidité : ● s'affiche lorsque le relevé augmente de 5 % d'humidité rela- tive en une heure ou par rapport au dernier relevé s'affiche lorsque le relevé diminue de 5 % d'humidité relative en une heure ou par rapport au dernier relevé. Remarque : la lecture sera plus précise en restant immobile pen- dant une demi-heure après la mise sous tension.
- Página 54 5 modes météorologiques Ensoleillé Ensoleillé Nuageux Pluvieux Neige ànuageux LE DÉPANNAGE Problème Solution possible La lecture en plein Le clignotement de la lecture en plein air est air est clignotante géné ralement un indication d'interférence ou montre des tirets sans fil. 1.
- Página 55 LL s'affiche à l'é cran pour extérieure indication. Si votre produit BALDR ne fonctionne pas correctement après avoir essayé les étapes de dépannage, contactez le vendeur sur votre page de commande ou envoyez un courriel à : service@baldr.com.
- Página 56 Garantie BALDR offre une garantie limitée d'un an sur ce produit contre les défauts de fabrication des matériaux et de la main-d'œuvre. Le service de garantie ne peut être effectué que par notre centre de service agréé.
- Página 57 à l'installation. Pour bénéficier du service de garantie, l'acheteur doit contacter le centre de service désigné par BALDR pour la détermination du problème et la procédure de service. Merci d'avoir choisi les produits BALDR !
-
Página 58: Panoramica Del Prodotto
PANORAMICA DEL PRODOTTO Visione anteriore 1.Fuso Orario 13.Temperatura e umidità esterna 2.AM/PM selezionabile 14.Record max / min per 3.Ora corrente temperatura e umidità 4.Indicatore RCC esterne 5.DST 15.Temperatura e umidità 6.Indicatore Snooze interne 7.Indicatore Sveglia 16.Record max / min per 8.Visualizzazione Giorno temperatura e umidità... -
Página 59: Vista Posteriore
Vista posteriore 1. Regolazione della messa 3. Alarm On/Off a fuoco 4. Proiezione On/Off 2. Vano batteria 5. DC Foro Vista dall'alto 1. Obiettivo di proiezione 2. Snooze/Dimmer... -
Página 60: Vista Laterale
Vista laterale 1. Pulsante "SETC / F" 4. Pulsante " " Premere brevemente per INella visualizzazione normale, premere brevemente passare da Celsius a per controllare l'ora della Fahrenheit Premere a lungo sveglia Nella visualizzazione per accedere all'impostazi- della sveglia, premere one dell'ora brevemente per attivare / 2. - Página 61 Nota: 1. L'anno di default è il 2020, se la visualizzazione dei giorni della settimana non è corretta. 2. Si prega di confermare che l'anno è stato impostato correttamente. (solo per l'impostazione manuale) 2. La batteria a celle CR2032 è per la funzione di memoria (inclusa). 3.
-
Página 62: Sensor Exterior
SENSOR EXTERIOR 1. Luce segnaletica 2. Buco appeso 3. Compartimento della batteria 4. Interruttore canale 1-2-3 CARATTERISTICHE Ora (12/24H), sveglia e funzione snooze RCC in WWVB/DCF Funzione di previsioni meteo 4. Misura la temperatura interna ed esterna (C/F) e l'umidità 5. -
Página 63: Contenuto Della Confezione
1x Adattatore AC 1x Cell Battery CR2032 PER INIZIARE BALDR consiglia di utilizzare batterie alcaline o agli ioni di litio di alta qualità per garantire la massima prestazione del prodotto. Si sconsiglia l'uso di batterie ricaricabili o ad alta resistenza. -
Página 64: Installazione Del Sensore
Installazione Del Sensore 1. Rimuovere il coperchio del vano batteria. 2. Inserire 2 batterie AA secondo la polarità (+ e -) 3. Riposizionare il coperchio delle batterie Impostazione Del Sensore Accendere l'unità principale prima di inserire le batterie del ● sensore Modificare il canale del sensore su 1, 2 o 3 come desiderato. - Página 65 Impostazione Dell’unità Principale All'accensione o al ripristino dell'alimentazione, il display LCD most- rerà per 3 secondi il suono "BI".I l valore predefinito è: Giornoferiale Giorno feriale Visualizza Visua Tonodei Lingua(WWVB/ Lingua(DCF) zione del tempo lizzazione tasti MSF) (WWVB/MSF) deltempo(DCF) 12HR 24HR Visualizzazi Unità...
- Página 66 3. Nel modo orario normale, premere il tasto "SET" per entrare nella ricezione del segnale RCC. 4. Durante la ricezione RCC, premere il pulsante "SET'' per uscire dalla ricezione RCC. 5. L'ora sar à convertita nell'ora corrente del fuso orario corrispondente dopo aver ricevuto l'RCC .(eccetto 0 fuso orario) Osservazione: Uscirà...
- Página 67 Premere il pulsante "SETC/F" per selezionare il tono dei tasti ON/OFF, premere il pulsante "CH / ▲" o "MEM / ▼". Impostazione predefinita: tono dei tasti ON Premere il pulsante "SETC/F" per selezionare l'unità di temperatura. Premere il pulsante "CH / ▲" o "MEM / ▼" per selezionare ℃ o ℉. Impostazione predefinita: ℃.
-
Página 68: Funzione Di Allarme
Premere il pulsante "SETC/F" per selezionare Weather. Premere il pulsante "CH / ▲" o "MEM / ▼" per regolare il valore. Premere il pulsante “SETC / F” per confermare e uscire. Durante l'impostazione, se non si azionerà un’ operazione per 20 secondi, l’unità... -
Página 69: Attivare/Disattivare L'ALlarme
2. Premere il pulsante "CH / ▲" o "MEM / ▼" per regolare i dati; tenere premuto il pulsante "CH / ▲" o "MEM / ▼" per cambiare rapidamente i dati di 8 passi. 3. L'ordine di impostazione è: Ora → Minuto → Uscita. 4. -
Página 70: Funzione Di Retroilluminazione
● retroilluminazione tra 100%, 50% e spento Istruzioni Per il Posizionamento I sensori BALDR sono sensibili alle condizioni ambientali circostanti. Il corretto posizionamento sia dell'unità principale che del sensore esterno è fondamentale per la precisione e le prestazioni di questo prodotto. - Página 71 Linee guida importanti per il posizionamento La distanza tra l'unità principale e il trasmettitore deve essere di ● almeno 1,5~2 metri (5~6,5 metri) da qualsiasi fonte di interferen- za, come monitor di computer o televisori. UPer massimizzare la portata wireless, posizionare le unità lonta- ●...
-
Página 72: Barometro E Previsione Del Tempo
Indicazione della freccia per i cambiamenti di umidità: ● verrà visualizzato quando la lettura aumenta del 5% di umidità relativa entro un'ora o rispetto all'ultima lettura verrà visualizzato quando la lettura diminuisce di 1 ℃ entro un'ora o rispetto all'ultima lettura. Nota: la lettura sarà... -
Página 73: Risoluzione Di Problemi
5 Modo di tempo Soleggiato Soleggiato Nuvoloso Piovoso Neve a Nuvoloso RISOLUZIONE DI PROBLEMI Problema Possibile Soluzione La lettura esterna Il lampeggiamento della lettura esterna è di lampeggia o mostra solito un Indicazione di interferenza wireless. dei trattini 1. Prendere il sensore e il display all'interno, fianco a fianco, e rimuovere le batterie da ciascuno. - Página 74 è al di sotto del range di rilevamento, interna e/o esterna sul display verrà visualizzato l'LL. Se il tuo prodotto BALDR non funziona correttamente dopo aver provato le fasi di risoluzione dei problemi, contatta il venditore sulla pagina dell'ordine o invia un'e-mail a: service@baldr.com.
- Página 75 È necessario raccogliere questi rifiuti separatamente per un trattamento speciale. Garantie BALDR offre una garanzia limitata di 1 anno per questo prodotto contro difetti di fabbricazione nei materiali e nella lavorazione. Il servizio di garanzia può essere eseguito solo dal nostro centro di assistenza autorizzato.
- Página 76 Per ricevere il servizio di garanzia, l'acquirente deve contattare il centro di assistenza designato da BALDR per la determinazione del problema e la procedura di assistenza. Grazie per aver scelto i prodotti BALDR!
-
Página 77: Descripción Del Producto
DESCRIPCIÓN DEL PRODUCTO Vista anterior 1.Zona horaria 13.Temperatura y humedad exterior 2.AM / PM seleccionable 14.Registro máximo / mínimo 3.Hora actual de temperatura y humedad 4.Indicador RCC externas 5.DST 15.Temperatura y humedad 6.Indicador de repetición internas 7.Indicador de alarma 16.Registro máximo / mínimo 8.Vista de día de temperatura y humedad 9.Vista de calendario... -
Página 78: Vista Trasera
Vista trasera 1. Ajuste de enfoque 3. Alarma On/Off 2. Compartimiento de la 4. Proyección On/Off batería 5. Agujero DC Vista superior 1. Lente de proyección 2. Snooze/Dimmer... -
Página 79: Vista Lateral
Vista lateral 1. Botón "SETC / F" 4. Botón“ ” Presionar brevemente para En vista normal, presionar brevemente para verificar la alternar entre Celsius y hora de la alarma En la FahrenheitMantenga vista de alarmas, presionar presionado para ingresar a brevemente para activar / la configuración de tiempo desactivar la alarma... - Página 80 Nota: 1. El año por defecto es 2020, si la visualización del día de la semana es incorrecta. Por favor, confirme que el año fue configurado correctamente. (sólo para el ajuste manual) 2. La batería de la celda CR2032 es para la función de memoria (incluida).
-
Página 81: Sensore Esterno
SENSORE ESTERNO 1. Luz de señal 2. Orificio para colgar 3. Compartimento de la batería 4. Interruptor de canal 1-2-3 CARACTERISTICAS Función de hora (12/24 H), alarma y repetición RCC en WWVB / DCF Función de pronóstico del tiempo 4. Mida la temperatura (C / F) interior y exterior y la humedad 5. -
Página 82: Contenido Del Envase
1x Adaptador de CA 1x Batería de celda CR2032 CONFIGURACIÓN INICIAL BALDR recomienda pilas alcalinas o de litio de alta calidad para obtener un mejor rendimiento del producto. No se recomienda el uso de pilas recargables o de alta potencia. -
Página 83: Configuración Del Sensor
2.Inserte 2 pilas AA acorde a la polaridad (+ y -) 3.Vuelva a colocar la cubierta de las baterías CONFIGURACIÓN DEL SENSOR Encienda la unidad principal antes de colocar las baterías del ● sensor Cambie el Canal del sensor al 1, 2 o 3 según lo desee. Por ejem- ●... - Página 84 El valor predeterminado es: Día de la semana Día de la Visualizac Pantalla Tono de Lenguaje semana ión de la hora de tiem po tecla (WWVB/MSF) Lenguaje(DCF) (WWVB/MSF) (DCF) 12HR 24HORAS Visualizaci ó Unidad de Unidad de Funció Tiempo n de la fecha temperatura temperatura n RCC...
-
Página 85: Configuración Manual De La Hora
5. La hora se convertirá en la hora actual del huso horario correspondiente después de recibir el CCR. (Excepto el huso horario 0) Observación: ● Saldrá de la recepción RCC automáticamente cuando la alarma se realice durante la recepción RCC , puede repetir el paso 3 para entrar en la recepción de la señal RCC después de apagar la alarma. - Página 86 Presionar el botón "SETC / F" para seleccionar RCC. Presione el botón "CH / ▲" o "MEM / ▼" para seleccionar OFF u ON. Predeter- minado: RCC ON. Presionar el botón “SETC / F” para seleccionar DST. Presione el botón “CH / ▲” o “MEM / ▼” para seleccionar el modo DST de DST ON a DST SIEMPRE a DST OFF.
-
Página 87: Función De Alarma
* Consejos: Mantenga presionado el botón "CH / ▲" o "MEM / ▼" para cambiar rápidamente el valor en 8 niveles. Nota: 7 idiomas seleccionables están disponibles para mostrar el día de la semana: FRE, SPA, ENG, GER, ITA, DUT, DRN Francés Italiano Español La Inglés Idioma... -
Página 88: Función De Repetición
6. La alarma se activa por defecto después de ajustar la hora de la alarma. El símbolo de la alarma aparecerá en la pantalla. ENCENDER/APAGAR LA ALARMA: 1. Cuando esté en el modo de visualización de la hora, presione el botón " "... -
Página 89: Función De Retroiluminación
100%, el 50% y el apagado INSTRUCCIONES PARA EL POSICIONAMIENTO Los sensores BALDR son sensibles a las condiciones ambientales circundantes. El correcto posicionamiento tanto de la unidad principal como del sensor exterior es crítico para la precisión y el rendimiento de este producto. -
Página 90: Directrices De Funcionamiento
Para maximizar el alcance inalámbrico, coloca las unidades lejos ● de grandes objetos metálicos, paredes gruesas, superficies metálicas u otros objetos que puedan limitar la comunicación inalámbrica Por favor, no uses otros productos eléctricos como auriculares o ● altavoces que funcionen con la misma frecuencia de señal. Los vecinos que utilizan aparatos eléctricos que funcionan con la ●... - Página 91 Nota: la lectura será más precisa si la unidad permanece estacionaria durante media hora después de encenderse. Indicación de la flecha para cambios de humedad: ● se mostrará cuando la lectura aumente un 5% de HR en una hora o desde la última lectura se mostrará...
-
Página 92: Resolución De Problemas
5 Modos de Clima Soleado Soleado a Nublado Lluvioso Nieve Nublado RESOLUCIÓN DE PROBLEMAS Problema Posible Solución La lectura en el El parpadeo de la lectura exterior es general- exterior está mente una indicación de interferencias parpadeando o inalámbricas. mostrando guiones 1. - Página 93 LL en la pantalla. Si tu producto BALDR no funciona correctamente después de intentar los pasos de solución de problemas, ponte en contacto con el vendedor en tu página de pedido o envía un correo electrónico a: service@baldr.com.
-
Página 94: Garantía
Es necesario recoger estos residuos por separado para un tratamiento especial. GARANTÍA BALDR ofrece una garantía limitada de 1 año para este producto contra defectos de fabricación en materiales y mano de obra. El servicio de garantía solo puede ser efectuado por nuestro centro de servicio autorizado. - Página 95 Para recibir el servicio de garantía, el comprador debe comuni- carse con el centro de servicio designado por BALDR para la determinación del problema y el procedimiento de servicio. ¡Gracias por elegir los productos BALDR!
- Página 96 service@baldr.com...