Tabla de contenido
Publicidad
Idiomas disponibles
Idiomas disponibles
Enlaces rápidos
Publicidad
Tabla de contenido

Manuales relacionados para Fullwat CMF-7C Serie


Resumen de contenidos para Fullwat CMF-7C Serie
- Página 1 cargador con batería de 7 etapas 7 stage battery charger spanish cargador con batería de 7 etapas english 7 stage battery charger Por favor, lea detenidamente las instrucciones antes de su uso Please read user manual carefully before use...
-
Página 2: Características
Avisos * Se pueden escapar gases explosivos de la batería durante el proceso de carga. * Evite llamas y chispas. * Proporcione una ventilación adecuada. * Antes de cargar la batería lea detenidamente estas instrucciones. * Sólo para uso en interiores. No exponga el producto a la lluvia. * SOLO se puede utilizar para cargar baterías de plomo de 12V o 24V. -
Página 3: Carga De Absorción (Tensión Constante)
Tensión Corriente 1.Desulfatación 2.Arranque 3.Carga 4.Carga de 5.Comprob. 6.Reacondic. 7.Carga en suave masiva absorción de la batería flotación La etapa masiva carga la batería al máximo de corriente constante, introduciendo una gran cantidad de energía en la batería en un corto periodo de tiempo. Esta etapa cargará... -
Página 4: Tecnología Conmutada
Carga en flotación La etapa de flotación mantiene la batería al 100% de su capacidad sin sobrecargar o dañar la batería. Esto significa que el cargador se puede dejar conectado a la batería de forma indefinida. El cargador de batería tiene un ciclo de carga automático de 7 etapas. Este ciclo se repite de forma indefinida. -
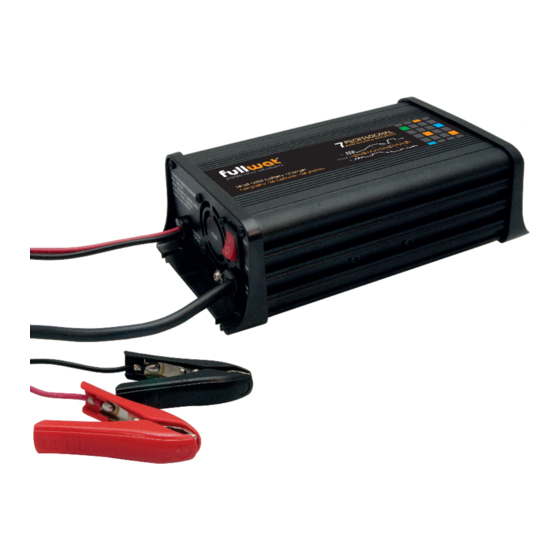
Página 5: Descripción Del Producto
Descripción del producto El cargador automático con 7 etapas de carga consta de los siguientes componentes: Ventilador de refrigeración controlado por termostato Interruptor de conexión/desconexión LEDs indicadores del estado de carga (CHARGING y FULLY CHARGED). Indican los distintos estados de carga y carga finalizada carga automática 7 etapas 7-stage automatic charge Aleta de montaje... -
Página 6: Indicadores Del Estado De Carga
Indicadores del estado de carga Los diodos LED CHARGING y FULLY CHARGED se encienden o parpadean para indicar los distintos estados de carga. Led Power On Led Charging Led Fully Charged Led Fault (rojo) (amarillo) (verde) (rojo) Alimentación Cargando Carga finalizada Fallo Alimentación desconectada Alimentación conectada... -
Página 7: Especificaciones
Especifi caciones Referencia CMF-7C12-05 CMF-7C12-07 CMF-7C12-10 CMF-7C12-12 Tipo de cargador Automático de 7 etapas Tensión de entrada 220~240VAC 50/60Hz Potencia de entrada 154W 215W 307W 332W Tensión de la batería 12VDC 12VDC 12VDC 12VDC Corriente de carga Tensión mínima de inicio 250VAC 250VAC 250VAC... - Página 8 Referencia CMF-7C12-15 CMF-7C12-20 CMF-7C24-05 CMF-7C24-10 Tipo de cargador Automático de 7 etapas Tensión de entrada 220~240VAC 50/60Hz Potencia de entrada 415W 554W 295W 547W Tensión de la batería 12VDC 12VDC 24VDC 24VDC Corriente de carga Tensión mínima de inicio 250VAC 250VAC 250VAC 250VAC...
-
Página 9: Instrucciones De Carga
Instrucciones de carga Paso 1: Comprobar el nivel de electrolito. Antes de cargar la batería retire las tapas de ventilación y compruebe el nivel de electrolito. El electrolito debe estar como mínimo 6mm por encima de las placas de la batería. Si el nivel está por debajo, rellene con agua destilada hasta alcanzar el nivel correcto y vuelva a colocar las tapas de ventilación. -
Página 10: Conexión Del Cargador A Tierra
Conexión del cargador a tierra El conector de puesta a tierra del chasis del cargador se debe conectar a un punto de tierra que dependerá de donde esté instalado el cargador. En un vehículo, conecte la tierra del cargador al chasis del vehículo. -
Página 11: Montaje Pemanente Del Cargador Y Batería
Montaje pemanente del cargador y batería Es posible conectar de forma permanente el cargador de baterías a una batería. Para ello se necesitarán 2 terminales redondos, un portafusible en línea y un fusible con un valor igual o superior al doble de la corriente máxima de carga del cargador. 5A = fusible 10A 10A = fusible 20A 15A = fusible 30A... -
Página 12: Códigos De Fallo
Códigos de fallo LED fully Código de LED fault charging charged Causa Solución error (rojo) (amarillo) (verde) Compruebe que las pinzas no se están Cortocircuito o tocando una con Polaridad invertida conexiób con la otra o que esta, / cortocircuito polaridad cambiada correctamente conectadas a la... -
Página 13: Garantía
FULLWAT. Tampoco se cubren daños debidos a un mal uso del usuario o instalador, como el conectar el equipo a fuentes de potencia inadecuadas para el mismo, o someterlo a condiciones climáticas adversas e inapropiadas. - Página 14 Warnings * Explosive gases may escape from the battery during charging. Prevent flames and sparks. Provide adequate ventilation. * Before charging read carefully this instruction manual. * For indoor use. Do not expose to rain. * For charging 12V or 24V lead acid batteries ONLY. * Disconnect the 220-240V AC mains supply before making or breaking the connections to the battery.
- Página 15 Voltage Current (AMPS) 1.Desulphation 2.Soft start 3.Bulk charge 4.Absortion 5.Battery test 6.Recondition 7.Float Absorption charging (constant voltage) The charge rate slows down so the battery can absorb more power and reach 100% charge. The voltage remains at a constant 14.4V for 12V charger or 28.8V for 24V charge while the current is gradually reduced until no more power can be added without over-charging the battery.
-
Página 16: Protective Features
Switchmode technology Using the latest technology in battery chargers, switch mode chargers convert 220-240VAC power to 12V/24V DC power using electronic components unlike traditional battery chargers that rely on heavy transformers. This allows the charger to be light weight and compact without sacrificing on performance. Protective features Polarity protection This protection prevents the output leads from sparking due to accidental reverse connection or short circuit,... -
Página 17: Charge Status Indicator
Charge status indicator The CHARGING and FULLY CHARGED LEDs will illuminate and flash in various patterns to indicate the different stages of charging. See below for flash patterns. Led Power On Led Charging Led Fully Charged Led Fault (rojo) (amarillo) (verde) (rojo) Alimentación... - Página 18 Specifi cations Part number CMF-7C12-05 CMF-7C12-07 CMF-7C12-10 CMF-7C12-12 Charger type 7-stage automatic Input Voltage 220~240VAC 50/60Hz Input power 154W 215W 307W 332W Battery voltage 12VDC 12VDC 12VDC 12VDC Maximum charging current Minimum start voltage 250VAC 250VAC 250VAC 250VAC Input current fuse rating T3.15A T3.15A T3.15A...
- Página 19 Part number CMF-7C12-15 CMF-7C12-20 CMF-7C24-05 CMF-7C24-10 Charger type 7-stage automatic Input Voltage 220~240VAC 50/60Hz Input power 415W 554W 295W 547W Battery voltage 12VDC 12VDC 24VDC 24VDC Maximum charging current Minimum start voltage 250VAC 250VAC 250VAC 250VAC Input current fuse rating T3.15A Current nominal capacity Desulphation...
- Página 20 Chargins instructions Step 1: Check the electrolyte level Prior to charging the battery, remove the vent caps and check the electrolyte level. The electrolyte should be 6mm above the battery’s plates. If level is below this limit, top up with distilled water to the correct level and refit the vent caps.
-
Página 21: Mounting Instructions
Chassis earthing The chassis earthing lug should be connected to an earting point which will be depending on where the battery charger is installed. In a vehicle, connect the chassis ground lug to the chassis of the vehicle. In a boat, connect to the boat’s grounding systems. - Página 22 Permanent wiring to battery It is possible to hard wire the DC charging leads to the battery for permanent installations. You will need 2 ring terminals, an inline fuse holder and a fuse with a rating equal to or more than twice of the chargers output.
- Página 23 Códigos de fallo Fully Charging Error code charged Fault LED Cause Remedy Check clips are not Short circuit or touching each other Polarity reverse / reverse connection or check the clips are output short circuit of the clips correctly connected to the battery Please choose the Non battery link...
- Página 24 Solid Flash Warrantee FULLWAT CMF range chargers are electronic devices equipped with a complex technology that requires professional installation or assisted by trained personnel installation. This device must be purchased in a professional distributor of electronics or electricity devices. Warranty period is prescribed by the laws in force in each country.