Tabla de contenido
Publicidad
Idiomas disponibles
Idiomas disponibles
Enlaces rápidos
Publicidad
Tabla de contenido

Manuales relacionados para universalblue UCPC9901-20


Resumen de contenidos para universalblue UCPC9901-20
- Página 1 MANUAL DE INSTRUCCIONES INSTRUCTION MANUAL UCPC9901-20 / UCPC9902-20 / UCPC9904-20 / UCPC9905-20 Panel de cristal Glass panel heater www.universalblue.es P.I. Media Legua C/Decenio,1 30565 Las Torres de Cotillas (Murcia)
-
Página 2: Tabla De Contenido
Panel de cristal Glass panel heater ÍNDICE ESPAÑOL 1. INSTRUCCIONES DE SEGURIDAD ..........3 2. CARACTERÍSTICAS ................. 6 3. INSTALACIÓN .................. 6 4. FUNCIONAMIENTO ................. 8 5. LIMPIEZA Y MANTENIMIENTO ........... 17 6. INFORMACION INHERENTE MEDIOAMBIENTE ......17 7. SERVICIO POSTVENTA ..............18 ENGLISH 1. -
Página 3: Español
ESPAÑOL Felicidades por haber adquirido este producto. recomendamos dedique algún tiempo leer cuidadosamente este Manual de Instrucciones / Instalación con el fin de hacer un buen uso del mismo. Lea cuidadosamente todas las instrucciones de seguridad antes de utilizar el aparato y conserve este Manual de Instrucciones / Instalación para poder consultarlo en el futuro. - Página 4 • Evite el uso de un cable prolongador, ya que esto puede recalentar el mismo y causar riesgo de incendio. • Evite el uso de un programador o temporizador con el aparato. • No utilice este radiador en un entorno húmedo, como por ejemplo un cuarto de baño o piscina.
-
Página 5: Tenga Especial Cuidado
TENGA ESPECIAL CUIDADO • Los niños deben ser supervisados para asegurarse de que no juegan con el aparato. • Los niños de menos de 3 años deben mantenerse alejados menos estén supervisados continuamente. • Los niños de edades comprendidas entre 3 años y 8 años sólo deben encender / apagar el aparato siempre que estén bajo supervisión y entiendan los peligros involucrados en el uso de este aparato. -
Página 6: Características
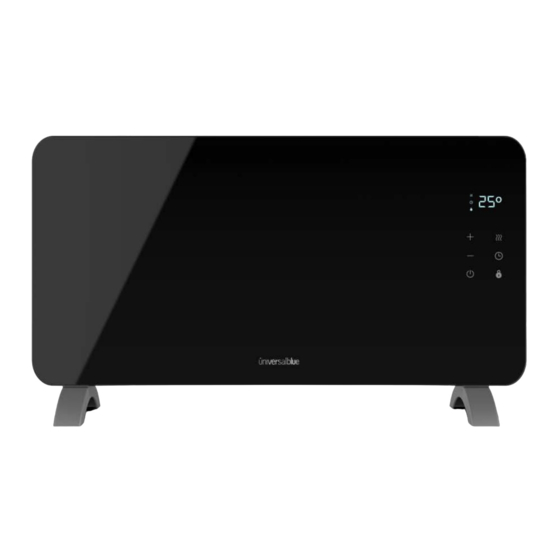
Con display LED Con control remoto incluido Temporizador semanal Instalación libre o en pared Dimensión del producto: 760 x 65 x 380mm Color: Negro (UCPC9901-20) / Blanco (UCPC9904-20) MODELO UCPC9902-20 // UCPC9905-20 Potencia máxima 2000W 2 velocidades (1000W / 2000W) Cristal templado... - Página 7 utilizando los tornillos ST4x12mm provistos (8 unidades). SI EL APARATO VA A SER UTILIZADO CON INSTALACIÓN EN LA PARED Tenga en cuenta que el producto debe instalarse al menos a 15 cm del suelo y a 50 cm del techo. Si desea montar el aparato a la pared considere las siguientes notas de instalación: Desinstale el soporte del cuerpo, tal y como muesta la...
-
Página 8: Funcionamiento
4. FUNCIONAMIENTO Inserte el enchufe en una toma de corriente adecuada. Asegúrese que el voltaje coincide voltaje necesario para operar este aparato. aparato puede operado utilizando el display LED ubicado en el cristal del aparato o bien con el control remoto. -
Página 9: Display Del Aparato
DISPLAY DEL APARATO ICONO BOTÓN Temporizador Programador Modo Temperatura Subir Bajar PANTALLA DEL DISPLAY Los iconos que aquí se indican se encenderán cuando se haya seleccionado dicha función. 1. Modos 2. Temperatura 3. Tiempo 4. Bloqueo 5. Receptor 6. Temperatura/horas y minutos 7. -
Página 10: Control Remoto
CONTROL REMOTO El aparato puede controlarse a través del display o bien haciendo uso del control remoto. ICONO FUNCIÓN Para seleccionar el modo P, W o S y establecer el día de la semana. Bloqueo de seguridad infantil Establecer el periodo del temporizador y programador semanal Selección de la temperatura... -
Página 11: Modo Espera
Jueves Viernes Sábado Domingo Bloqueo TEMPERATURA BLOQUEO (en el mando a distancia) Modo calor MODO Modo programar MODO aparato semanalmente Modo espera MODO Temperatura alta TEMPERATURA Temperatura baja TEMPERATURA Encendido Del lateral del aparato MODO ESPERA Antes de comenzar a utilizar el aparato, conéctelo a la corriente y presione el botón de encendido, en el lateral del aparato. -
Página 12: Temporizador
Si en cualquier otro momento se desea programar el modo espera bastará con pulsa el botón MODO una vez. El display mostrará entonces el indicador en la pantalla. ESTABLECER LA HORA ACTUAL Para establecer la fecha y hora actual en el aparato, este debe estar en el modo , por lo que debe pulsar el botón MODO hasta que... -
Página 13: Modo Calor
MODO CALOR Presione el botón MODO para cambiar al modo calor. Presione el botón tantas veces como sea necesario hasta que aparezca en el display el icono Presione el botón de TEMPERATURA una o dos veces para establecer la temperatura en calor mínimo o máximo. En el display aparecerá... -
Página 14: Temporizador Semanal
TEMPORIZADOR SEMANAL Presione el botón MODO para cambiar el modo temporizador semanal. Presionelo tantas veces como sea necesario hasta que aparezaca en el display el símbolo Presione el botón PROGRAMADOR tantas veces como sea necesario para establecer el temporizador en cualquiera de los periodos de tiempo indicados en la siguiente tabla: ICONO EN LA PANTALLA DEL DÍAS ESTABLECIDOS... - Página 15 1. Días de la semana 2. Modo programador semanal 3. Tiempo de inicio y de Una vez seleccionado el día o los días a programar, debe establecer el temporizador. Se debe realizar una programación de todas las horas del día, indicando aquellas en las que el aparato debe permanecer encendido y aquellas en las que debe apagarse.
-
Página 16: Bloqueo De Seguridad Infantil
BLOQUEO DE SEGURIDAD INFANTIL Presione durante algunos segundos el botón TEMPERATURA hasta que el símbolo de bloqueo aparezca en la pantalla. Una vez activado, el aparato no responderá ante ningún comando. Para desbloquear aparato presione nuevamente botón TEMPERATURA Para activar / desactivar esta función desde el control remoto, presione el botón de BLOQUEO TEMPERATURA La temperatura de la estancia se muestra en la pantalla cada vez... -
Página 17: Limpieza Y Mantenimiento
5. LIMPIEZA Y MANTENIMIENTO Este producto no requiere un gran mantenimiento. Para limpiarlo, por favor, siga las siguientes notas: • Desenchufe primero el radiador y espere hasta que se enfrie completamente. • Use sólo un paño húmedo suave y seque posteriormente. •... -
Página 18: Servicio Postventa
Los materiales del embalaje de este producto son reciclables. Puede depositar estos materiales en un lugar público de recogida para su reciclaje. Para aquellos aparatos que contengan pilas o baterías recargables, estas partes se deben extraer y depositar contenedores reciclaje claramente identificados a tal fin. - Página 19 • Para hacer uso de la garantía acuda al centro donde compró este producto o bien contacte con nosotros de cualquiera de las siguientes formas: o A través del email sat@universalblue.es, adjuntando la factura de compra e indicando sus datos de contacto y brevemente qué problema presenta su producto.
-
Página 20: English
ENGLISH Congratulations on the purchase of your product. We recommend you to spend some time to read this Instruction Manual in order to fully understand how to use it correctly.. Read all the safety instructions carefully before use and keep this Instruction / Installation Manual for future reference. - Página 21 • The device is designed for home use. Do not use it outdoors. • Do not cover or obstruct heat output or heater air inlet openings. • If the power cable is damaged, it must be replaced by the manufacturer or a qualified person in order to avoid a hazard.
-
Página 22: Features
2. FEATURES MODEL UCPC9901-20 // UCPC9904-20 Maximum power 1500W 2 speeds (750W / 1500W) Tempered glass With LED display Remote control included Weekly timer Free or wall installation Product dimension: 760 x 65 x 380mm Color: Black (UCPC9901-20) / White (UCPC9904-20) -
Página 23: Wall Installation
MODEL UCPC9902-20 // UCPC9905-20 Maximum power 2000W 2 speeds (1000W / 2000W) Tempered glass With LED display Remote control included Weekly timer Free or wall installation Product dimension: 920 x 65 x 380mm Color: Black (UCPC9902-20) / White (UCPC9905-20) 3. INSTALLATION FREE INSTALLATION Before using... -
Página 24: Operation
Place the device in the appropriate position so that the holes are aligned with the bracket (Picture 3). Tighten the screws on the top of the bracket to make it firm. 4. OPERATION Insert the plug into a suitable outlet. Make sure that the voltage matches the voltage required to operate this device. -
Página 25: Display Screen
icons before using the appliance. DISPLAY ICON BUTTON Timer Weekly timer Mode Temperature Increase Decrease DISPLAY SCREEN Signs showed here will turn on when that function is selected. 1. Modes 2. Temperature 3. Timer 4. Safety Lock 5. Reiver 6. Temperature/time 7. -
Página 26: Remote Control
REMOTE CONTROL The device can be controlled either through the display or by using the remote control. If you wish to use the remote control, please read carefully the following buttons and main functions: ICON FUNCTION To select the mode P, W or S and set the day of the week. - Página 27 Tuesday Wednesday Thursday Friday Saturday Sunday Safety lock TEMPERATURE SAFETY LOCK (remote control) Heat Mode MODE Weekly programming MODE mode Standby mode MODE High temperature TEMPERATURE Low temperature TEMPERATURE On the side of the appliance...
-
Página 28: Standby Mode
STANDBY MODE Before using the device, turn on the power and press power button on the side of the device. The display will show the signal indicating standby mode. In this mode the device does not heat. If heater is running in a different mode and you wish to set standby mode, press MODE button . - Página 29 1. Day 2. Mode 3. Minutes 4. Hour HEAT MODE Press MODE button to switch to heat mode. Press the button as many times as necessary until the display shows the indicator on the screen. Press TEMPERATURE button once or twice to set the temperature to minimum or maximum heat.
-
Página 30: Weekly Timer
Heat mode 6. Setting temperature 7. Current temperature 8. High temperature 9. Low temperature WEEKLY TIMER Press MODE button to change to weekly timer mode. Press MODE button as many times as necessary until the display shows the indicator on the screen. Press WEEKLY TIMER button as many times as necessary to set the timer for any of the time periods below:... - Página 31 Monday to Wednesday From Thursday to Saturday If only one week day is illuminated schedule illuminated day. Pressing P button, you will be able to set the desired day. Example: Pressing WEEKLY TIMER button 11 times will activate the timer on Monday, Wednesday and Friday. 1.
-
Página 32: Child Safety Lock
• DECREASE : to select the hours when the device should remain switched on. Let's imagine we want to program the device to turn on from 9:00 to 12:00. In this case we will have to use the DOWN button to set the time among 00:00 and 9:00. -
Página 33: Cleaning And Maintenance
OPERATING SOUND The device will beep when a button on the remote control is pressed. 5. CLEANING AND MAINTENANCE This product does not require much maintenance. To clean it, please follow the notes below: • Unplug the heater first and wait until it cools down completely. -
Página 34: After Sales Service
For more detailed information about treatment, recovery and recycling of this product, please contact your local city office, your household waste disposal service or the shop where you purchased the product. packaging materials are recyclable product. These materials can be deposited in public collection point for recycling. - Página 35 • To make use of the guarantee go to the store where you purchased this product or contact us by: o By email, sat@universalblue.es. Please, attach the invoice, add your contact details and explain briefly what the issue is.
- Página 36 www.universalblue.es...