Tabla de contenido
Publicidad
Idiomas disponibles
Idiomas disponibles
Enlaces rápidos
Publicidad
Capítulos
Tabla de contenido

Manuales relacionados para auna Splash


Resumen de contenidos para auna Splash
-
Página 3: Tabla De Contenido
Sehr geehrter Kunde, wir gratulieren Ihnen zum Erwerb Ihres Gerätes. Lesen Sie die folgenden Hinweise sorgfältig durch und befolgen Sie diese, um möglichen Schäden vorzubeugen. Für Schäden, die durch Missachtung der Hinweise und unsachgemäßen Gebrauch entstehen, übernehmen wir keine Haftung. Scannen Sie den QR-Code, um Zugriff auf die aktuellste Bedienungsanleitung und weitere Informationen rund um das Produkt zu erhalten. -
Página 4: Technische Daten
TECHNISCHE DATEN Artikelnummer 10037795, 10037796, 10037797 Stromversorgung 5 V⎓ (1 A) Anschluss über Netzadapter Akku Lithium-Ionen-Akku (2000 mAh) (fest installiert) CD-DA / CD-R / CD-RW / MP3 / WMA CD-Player US-Eingang Wiedergabe von MP3 und WMA Datein UKW-Radio Frequenzbereich 87,5 MHz–108 MHz Senderspeicher DAB-Radio Frequenzbereich... -
Página 5: Sicherheitshinweise
SICHERHEITSHINWEISE Erklärung der Symbole auf dem Gerät CAUTION RISK OF ELECTRIC SHOCK DO NOT OPEN WARNUNG: GEFAHR EINES STROMSCHLAGS EINER PERSONENVERLETZUNG ZU VERRINGERN, DAS GEHÄUSE NICHT ÖFFNEN. KEINE FÜR DEN BENUTZER ZU WARTENDEN TEILE IM GERÄT. WENDEN SIE SICH IM FALLE EINER REPARATUR NUR AN QUALIFIZIERTES PERSONAL. - Página 6 • Lesen, beachten und bewahren Sie diese Anweisungen auf. - Alle Sicherheits- und Bedienungshinweise müssen vor der Verwendung dieses Produkts gelesen und zum späteren Nachschlagen aufbewahrt werden. Alle Warnhinweise auf dem Gerät und in den Anweisungen müssen beachtet werden. • Wird das Gerät nicht gemäß...
- Página 7 Wenn das Gerät nicht ordnungsgemäß verwendet wird, kann Wasser in das Gerät eindringen und zu Bränden, Stromschlägen oder Fehlfunktionen führen. Beachten Sie die folgenden Sicherheitshinweise sorgfältig und verwenden Sie das Gerät richtig. IPX 4: Geschützt gegen Spritzwasser aus allen Richtungen. Flüssigkeiten, für die die Spezifikationen für die Wasserbeständigkeit gelten •...
-
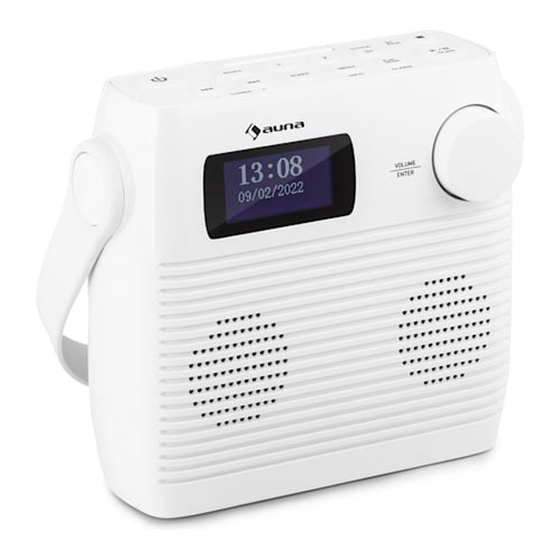
Página 8: Geräteübersicht
GERÄTEÜBERSICHT... - Página 9 Standby-Taste CD/BT: vorheriger Titel oder eingestellte Zeit verringern/ vorheriger Sender SOURCE – Quelle CD/BT nächsten Titel überspringen TUNE+ Taste Speicherplatz 1 SLEEP – Automatisches Ausschalten Speicherplatz 2 MENU/INFO CLOCK/ 3+ - Uhrzeiteinstellung/ Speicherplätze 10 PLAY MODE/ ALARM – Wiedergabemodus/ Alarm 11 ⏯...
-
Página 10: Erste Schritte
ERSTE SCHRITTE 1. Verbinden Sie das im Lieferumfang enthaltene Typ-C-Kabel mit dem Typ-C-Anschluss. 2. Schließen Sie das andere Ende des Typ-C-Kabels mit einem USB- Netzadapter an eine Steckdose an. Sie können den Akku auch aufladen, indem Sie das Gerät mit dem USB-Anschluss eines Computers verbinden. -
Página 11: Cd Operation
CD OPERATION Drücken Sie mehrfach die Taste SOURCE, bis auf dem Bildschirm „CD“ angezeigt wird. CD einlegen 1. Öffnen Sie die zunächst die CD-Fach-Sicherung und anschließend das CD-Fach. 2. Legen Sie die CD mit der Beschriftung nach oben in das CD-Fach ein. Achten Sie darauf, dass die CD auf die Mittelspindel gelegt wird. - Página 12 Drücken und halten Sie die Tasten ⏮ oder ⏭ , um schnell vor- oder • zurückzuspulen. Wiedergabe wiederholen und Zufallswiedergabe 1. Drücken Sie während des Betriebsmodus die Taste PLAY MODE. Auf dem Bildschirm wird angezeigt. Der aktuelle CD-Titel wird in Dauerschleife wiederholt.
-
Página 13: Usb
1. An der Vorderseite des Geräts befindet sich ein USB-Anschluss. Drücken Sie, sobald ein USB-Stick angeschlossen wurde, mehrfach die Taste SOURCE, um den USB-Modus auszuwählen. 2. Auf dem Gerät wird automatisch die Anzahl der auf dem USB-Stick befindlichen Titel angezeigt. 3. -
Página 14: Dab-Radio/Bedienung
DAB-RADIO/BEDIENUNG Vollständiger Sendersuchlauf 1. Drücken Sie, zum Aktivieren des automatischen Sendersuchlaufs, die Taste SCAN und der Bildschirm wird „Scanning…“ (Suche) und einen größer werdenden Balken anzeigen. 2. Alle gefundenen Sender werden automatisch eingespeichert. Zum Erkunden der gefunden Sender drücken Sie die Tasten ⏮ oder ⏭. Drücken Sie anschließend die Bestätigungstaste ENTER. - Página 15 Softwareinformationen 1. Drücken Sie während des DAB-Modus die Taste MENU, um das Menü anzuzeigen. 2. Drücken Sie die Tasten ⏮ oder ⏭ zur Auswahl von „System“ und drücken Sie zum Bestätigen die Taste ENTER. 3. Drücken Sie die Taste ENTER der Fernbedienung, um die Softwareversion anzeigen zu lassen.
- Página 16 Sender in der Speicherliste speichern 1. Wählen Sie den Radiosender aus, welchen Sie speichern möchten. ③ 2. Halten Sie die Taste + so lange gedrückt, bis die Speicherliste angezeigt wird. Wählen Sie mit dem Drehregler einen gewünschten Speicherplatz zwischen 3 und 20 aus. Bereits gespeicherte Sender können überschrieben werden.
-
Página 17: Fm-Radio
Signalfehler Zeigt die Signalfehlerrate an. Wenn die Zahl „0“ ist, bedeutet das, dass das empfangene Signal fehlerfrei ist und eine starke Signalstärke hat. Audio-Bit-Rate Der Bildschirm zeigt die empfangene Audio Bit Rate an. Zeit/ Datum Zeigt die aktuelle Zeit und das Datum, welche vom Sender zur Verfügung gestellt werden, an. - Página 18 Audioeinstellungen Dieses Gerät wird automatisch zwischen Stereo- und Monomodus hin- und her wechseln. Sie können dies umgehen, indem Sie den gewünschten Modus manuell einstellen. Dies kann vor allem bei schlechtem Signal sehr hilfreich sein. 1. Drücken Sie die Taste MENU und wählen Sie mit den Tasten ⏮ oder ⏭ „Audio setting“...
-
Página 19: Alarm- Und Timereinstellung
ALARM- UND TIMEREINSTELLUNG Automatische Uhrzeiteinstellung Die Uhrzeit kann automatisch aktualisiert werden, wenn Sie ein DAB+- Signal an Ihrem aktuellen Standort empfangen. Uhrzeiteinstellung 1. Drücken Sie die Taste CLOCK. Die Digitalanzeige blinkt auf dem Bildschirm auf. 2. Drücken Sie zur Einstellung der aktuellen Jahreszahl die Tasten ⏮ oder ⏭... - Página 20 5. Wählen Sie durch Drücken der Taste SOURCE den gewünschten Modus aus (FM, USB, DAB oder CD-Modus) und drücken Sie zum Bestätigen die Taste ENTER. 6. Drücken Sie zur Auswahl von „Timer On“ die Taste ALARM. Der Wecker ist dann aktiv. ◷...
-
Página 21: Bt-Bedienung
3. Aktivieren Sie das externe BT-Gerät und wählen Sie den Suchmodus aus. 4. Splash wird in der BT-Geräteliste Ihres externen Geräts angezeigt werden. 5. Wählen Sie Splash aus und geben Sie, falls notwendig, das Passwort „0000“ ein. 6. Zum Deaktivieren der BT-Funktion, drücken Sie die Taste SOURCE, um in einen anderen Modus zu wechseln oder deaktivieren Sie die Funktion auf Ihrem externen BT-Gerät. -
Página 22: Spezielle Entsorgungshinweise Für Verbraucher In Deutschland
SPEZIELLE ENTSORGUNGSHINWEISE FÜR VERBRAUCHER IN DEUTSCHLAND Entsorgen Sie Ihre Altgeräte fachgerecht. Dadurch wird gewährleistet, dass die Altgeräte umweltgerecht verwertet und negative Auswirkungen auf die Umwelt und menschliche Gesundheit vermieden werden. Bei der Entsorgung sind folgende Regeln zu beachten: • Jeder Verbraucher ist gesetzlich verpflichtet, Elektro- und Elektronikaltgeräte (Altgeräte) sowie Batterien und Akkus getrennt vom Hausmüll zu entsorgen. - Página 23 • Bei einem Vertrieb unter Verwendung von Fernkommunikationsmitteln ist die unentgeltliche Abholung am Ort der Abgabe auf Elektro- und Elektronikgeräte der Kategorien 1, 2 und 4 gemäß § 2 Abs. 1 ElektroG, nämlich „Wärmeüberträger“, „Bildschirmgeräte“ (Oberfläche von mehr als 100 cm²) oder „Großgeräte“ (letztere mit mindestens einer äußeren Abmessung über 50 Zentimeter) beschränkt.
-
Página 24: Hinweise Zur Entsorgung
Berlin Brands Group UK Limited PO Box 42 272 Kensington High Street London, W8 6ND United Kingdom Hiermit erklärt Chal-Tec GmbH, dass der Funkanlagentyp Splash der Richtlinie 2014/53/ EU entspricht. Der vollständige Text der EU- Konformitätserklärung ist unter der folgenden Internetadresse verfügbar: use.berlin/10037797... - Página 25 Dear Customer, Congratulations on purchasing this device. Please read the following instructions carefully and follow them to prevent possible damages. We assume no liability for damage caused by disregard of the instructions and improper use. Scan the QR code to get access to the latest user manual and more product information.
-
Página 26: Technical Data
TECHNICAL DATA Item number 10037795, 10037796, 10037797 Power supply 5 V⎓ (1 A) Main unit DC Built-in battery (DC) Lithium-ion rechargeable battery (2000 mAh) CD-DA / CD-R / CD-RW / MP3 / WMA CD player USB inpu Playing MP3 and WMA files FM radio Tuning range 87.5 MHz–108 MHz... -
Página 27: Safety Instructions
SAFETY INSTRUCTIONS Explanation of the symbols on the appliance CAUTION RISK OF ELECTRIC SHOCK DO NOT OPEN WARNING: TO REDUCE THE RISK OF ELECTRIC SHOCK; DO NOT REMOVE THE COVER OR BACK. NO USER-SERVICEABLE PARTS INSIDE: REFER SERVICING TO QUALIFIED PERSONNEL. - Página 28 • Read, heed and retain these instructions – All the safety and operating instructions should be read before this product is used and retained for future reference. All warnings on the appliance and in the operating instructions should be followed •...
- Página 29 To maintain water resistant performance Carefully note the precautions below to ensure proper use. • Do not splash water forcibly into the sound output holes. • Do not fall into the water, and do not use underwater. • Do not allow the this product to remain wet in a cold environment, as the water may freeze.
-
Página 30: Product Description
PRODUCT DESCRIPTION... - Página 31 STANDBY button CD/BT SKIP PREVIOUS/TUNE- button SOURCE BUTTON CD/BT SKIP NEXT/TUNE+ button PRESET 1 button SLEEP button PRESET 2 button MENU/INFO button Clock set/ preset 3+ button 10 Play mode /alarm set buttoN CD/BLUETOOTH PLAY/PAUSE/DAB/FM SCAN BUTTON 12 CD STOP button/ BT PAIR BUTTON 13 LCD display 14 Volume control knob /snooze/enter button 15 Carrying handle...
-
Página 32: Getting Started
GETTING STARTED 1. Connect the Type-C cable to the Type-C port. 2. Connect the other end of the Type-C cable to a power outlet, using a USB power adapter. You can also charge the battery by connecting Type-C cable to a computer's USB port. The charging indicator shows the battery charging. -
Página 33: Cd Operation
CD OPERATION Press the SOURCE button repeatedly on the unit Inserting a CD While the Secpress the fuselage, to remove the CD door-lock lever, opening the CD door, CD is set to the CD applied part with the printing aspect as forward. - Página 34 Press and hold the ⏮ or ⏭ buttons to perform fast forward/reverse • playback. Repeat playback 1. During playback mode, press the PLAY MODE button will show on the display. The CD will play the current track repeatedly. 2. Press the PLAY MODE button twice, will show on the display.
-
Página 35: Usb Operation
USB OPERATION 1. There is an USB socket located at the front of the unit. When a USB device is connected to the unit, press the SOURCE button select USB mode. 2. The unit will automatically display the total number of tracks. 3. -
Página 36: Dab+ Operation
DAB+ OPERATION Full scan 1. To activate auto scan, press the SCAN button and the display will show "Scanning …" and a progressing slide bar. 2. All the stations that have been found will be stored automatically. To explore and listen to the found stations, press the or buttons to select. - Página 37 5. Press the MENU button to exit. Language selection In DAB or FM mode press the menu button, select with the ⏮ or ⏭ buttons or "SYSTEM" and press enter to confirm then select" language" and choose the desired language from English/Danish/Dutch/French/German/Polish/ Italian/Spanish.
- Página 38 To recall a preset when listening to DAB radio or FM radio 1. To tune to Presets 1 to 2, press the corresponding numbered button on the front panel. 2. To access presets 3 to 20 on the front panel press the 3+ button, turn the Select dial right or left to scroll through the list of presets, then push and release the Select dial to tune to the selected preset.
-
Página 39: Fm Operation
Time / Date This displays the current time and date provided automatically by the broadcaster. DLS (Dynamic Label Segment) Dynamic label segment is a scrolling message that the broadcaster may include with their transmissions. The message usually includes information, such as program me details etc. FM OPERATION To switch the unit to FM mode, press the SOURCE button repeatedly to select FM mode. - Página 40 FM display modes Press the INFO button on the remote control, the display will switch through the display modes. • Radio text: The broadcaster can include a scrolling text that displays information about the current program. • Programme type: This describes the "style" or "genre" of the programme that is being broadcast.
-
Página 41: Setting Alarms And Timers
SETTING ALARMS AND TIMERS Auto clock setting The clock can be updated automatically if you can receive a DAB+ signal in your location. Clock setting 1. Press the CLOCK button .The data digits flash on the display. 2. Press the ⏮ or ⏭ buttons to adjust the year digits, and then press the CLOCK button to confirm. - Página 42 Notes 1. If “Wake to CD of USB ”is selected but a CD of USB is not inserted, the alarm will default to the DAB automatically when the alarm wake time is reached. 2. For ‘Wake to Radio”, the system will default to the last FM radio station listened to before switching off.
-
Página 43: Bt Operation
3. Activate your Bluetooth device and select the search mode. 4. “Splash” will appear on your Bluetooth device list. 5. Select “Splash” and enter “0000” for the password if necessary. 6. To disconnect the Bluetooth function, press the SOURCE button to switch to another mode or disconnect the function from your Bluetooth device. -
Página 44: Disposal Considerations
For Great Britain: Hereby, Chal-Tec GmbH declares that the radio equipment type Splash is in compliance with the relevant statutory requirements. The full text of the declaration of conformity is available at the following... - Página 45 Cher client, chère cliente, Toutes nos félicitations pour l’acquisition de ce nouvel appareil. Lisez attentivement les indications suivantes et suivez-les pour éviter d'éventuels dommages. Nous ne saurions être tenus pour responsables des dommages dus au non-respect des consignes et à la mauvaise utilisation de l’appareil.
-
Página 46: Fiche Technique
FICHE TECHNIQUE Numéro d'article 10037795, 10037796, 10037797 Alimentation 5 V⎓(1 A) Connexion par adaptateur secteur Batterie lithium-ion (2000 mAh) (non amovible) Batterie CD-DA / CD-R / CD-RW / MP3 / WMA Lecteur CD Lecture de fichiers MP3 et WMA Entrée US Radio FM Plage de fréquence 87,5 –... -
Página 47: Consignes De Sécurité
CONSIGNES DE SÉCURITÉ Explication des symboles sur l'appareil ATTENTION RISQUE DE CHOC ÉLECTRIQUE NE PAS OUVRIR MISE EN GARDE : POUR RÉDUIRE LE RISQUE DE CHOC ÉLECTRIQUE ET DE BLESSURE CORPORELLE, N'OUVREZ PAS LE BOÎTIER. L'APPAREIL NE CONTIENT AUCUNE PIÈCE RÉPARABLE PAR L'UTILISATEUR. - Página 48 • Lisez, suivez et conservez ces instructions - Toutes les instructions de sécurité et d'utilisation doivent être lues avant d'utiliser ce produit et conservées pour référence ultérieure. Tous les avertissements figurant sur l'appareil et dans les instructions doivent être respectés. •...
- Página 49 Remarques sur l'étanchéité de cet appareil Les spécifications d'étanchéité pour ce produit sont IPX4 basées sur la norme IEC 60529 « Niveau de protection contre la pénétration de l'eau (code IP) » qui indique le degré de protection contre la pénétration de l'eau. Ce produit ne peut pas être utilisé...
-
Página 50: Aperçu De L'aPpareil
APERÇU DE L'APPAREIL... - Página 51 Touche de mise en veille CD/BT: Titre précédent ou diminuer le réglage de l'heure / station précédente SOURCE CD/BT sauter au titre suivant Touche TUNE+ Emplacement mémoire 1 SLEEP - Arrêt automatique Emplacement mémoire 2 Menu/Info CLOCK/ 3+ - Réglage de l'heure/ emplacements de mémoire 10 PLAY MODE/ ALARM - Mode de lecture/ Alarme 11 ⏯...
-
Página 52: Premiers Pas
PREMIERS PAS 1. Connectez le câble Type-C fourni au connecteur Type-C. 2. Connectez l'autre extrémité du câble de type C à une prise de courant avec un adaptateur d'alimentation USB. Vous pouvez également charger la batterie en connectant l'appareil au port USB d'un ordinateur. Le témoin de charge clignote pendant la charge de la batterie. -
Página 53: Fonctionnement Du Cd
FONCTIONNEMENT DU CD Appuyez plusieurs fois sur la touche SOURCE jusqu'à ce que l'écran affiche « CD ». Insérer le CD 1. Ouvrez d'abord le fusible du compartiment CD, puis le compartiment CD. 2. Placez le CD avec la face imprimée vers le haut et la face brillante vers le bas dans le compartiment CD. - Página 54 Répétition des pistes et lecture aléatoire 1. Appuyez sur la touche PLAY MODE en mode de fonctionnement. L'écran affiche . La piste actuelle du CD est répétée en boucle. 2. Appuyez à nouveau sur la touche PLAY MODE en mode de fonctionnement.
-
Página 55: Usb
1. Un port USB se trouve à l'avant de l'appareil. Après avoir branché une clé USB, appuyez plusieurs fois sur la touche SOURCE pour sélectionner le mode USB. 2. L'appareil affiche automatiquement le nombre de titres sur la clé USB. 3. -
Página 56: Radio Dab/Fonctionnement
RADIO DAB/FONCTIONNEMENT Recherche complète de stations 1. Pour activer la recherche automatique des stations, appuyez sur la touche SCAN et l'écran affiche « Scanning...» (Recherche) et une barre croissante. 2. Toutes les stations trouvées sont automatiquement sauvegardées. Pour parcourir les stations trouvées, appuyez sur les touches ⏮ ou ⏭. Appuyez ensuite sur la touche de confirmation ENTER. - Página 57 Informations sur les logiciels 1. En mode DAB, appuyez sur la touche MENU pour afficher le menu. 2. Appuyez sur ⏮ ou ⏭ pour sélectionner « System » et appuyez sur ENTER pour confirmer. 3. Appuyez sur la touche ENTER de la télécommande pour afficher la version du logiciel.
- Página 58 Sauvegarde des stations dans la liste de mémoire 1. Sélectionnez la station que vous voulez sauvegarder. ③ 2. Maintenez la touche + jusqu'à ce que la liste des mémoires s'affiche. Utilisez la commande rotative pour sélectionner l'emplacement de mémoire souhaité entre 3 et 20. Les stations déjà enregistrées peuvent être écrasées.
-
Página 59: Radio Fm
Débit binaire audio L'écran affiche le débit binaire audio numérique reçu. Heure / Date Affiche l'heure et la date actuelles fournies par la station. DLS (Dynamic Label Segment) Le segment d'étiquette dynamique est un message textuel défilant qui peut être intégré à la transmission par la station. Ce message contient des informations ordinaires, telles que les détails sur l'émission. - Página 60 1. Appuyez sur la touche MENU et utilisez les touches ⏮ ou ⏭ pour sélectionner « Audio settings » (Réglage audio). Appuyez sur la touche ENTER pour confirmer. 2. Appuyez sur les touches ⏮ ou ⏭ pour sélectionner « Stéréo autorisé » ou «...
-
Página 61: Réglage De L'aLarme Et De La Minuterie
RÉGLAGE DE L'ALARME ET DE LA MINUTERIE Réglage automatique de l'heure L'heure peut être mise à jour automatiquement lorsque vous recevez un signal DAB+ à votre emplacement actuel. Réglage de l'heure 1. Appuyez sur la touche CLOCK. L'affichage numérique clignote à l'écran. 2. - Página 62 Désactiver le réveil quotidien Désactivez le réveil en cours en appuyant plusieurs fois sur la touche ◷ ALARM. Le symbole disparaît de l'écran. Remarques 1. Si, par exemple, vous avez sélectionné « CD » comme source d'alarme et qu'aucun CD n'a été inséré, la source d'alarme passe automatiquement à «...
-
Página 63: Fonctionnement Du Bt
4. Splash sera affiché dans la liste des périphériques BT de votre périphérique externe. 5. Sélectionnez Splash et, si nécessaire, saisissez le mot de passe « 0000 ». 6. Pour désactiver la fonction BT, appuyez sur la touche SOURCE pour passer à... -
Página 64: Conseils Pour Le Recyclage
272 Kensington High Street London, W8 6ND United Kingdom Le soussigné, Chal-Tec GmbH, déclare que l’équipement radioélectrique du type Splash est conforme à la directive 2014/53/UE. Le texte complet de la déclaration UE de conformité est disponible à l’adresse internet suivante : use.berlin/10037797... - Página 65 Estimado cliente: Le felicitamos por la adquisición de este producto. Lea atentamente el siguiente manual y siga cuidadosamente las instrucciones de uso con el fin de evitar posibles daños. La empresa no se hace responsable por los daños causados por el incumplimiento de las instrucciones y el uso indebido.
-
Página 66: Datos Técnicos
DATOS TÉCNICOS Número del artículo 10037795, 10037796, 10037797 Suministro eléctrico 5 V⎓ (1 A) Conexión mediante adaptador de red Batería Batería de iones de litio (2000 mAh) (instalada permanentemente) CD-DA / CD-R / CD-RW / MP3 / WMA Reproductor de CD Reproducción de archivos MP3 y WMA Entrada US Radio FM... -
Página 67: Indicaciones De Seguridad
INDICACIONES DE SEGURIDAD Explicación de los símbolos presentes en el aparato ATTENCIÓN: RIESGO DE DESCARGA ELÉCTRICA NO ABRIR ADVERTENCIA: PARA REDUCIR EL RIESGO DE UNA DESCARGA ELÉCTRICA Y DE LESIONES PERSONALES, NO ABRIR LA CARCASA. NO EXISTE NINGUNA PIEZA QUE EL USUARIO PUEDA REPARAR. - Página 68 • Lea, siga y conserve estas instrucciones - Todas las instrucciones de seguridad y funcionamiento deben leerse antes de utilizar este producto y conservarse para futuras consultas. Deben respetarse todas las advertencias que aparecen en el aparato y en las instrucciones. •...
- Página 69 Notas sobre la impermeabilidad de esta unidad Las especificaciones de impermeabilidad de este producto son IPX4 según la norma IEC 60529 "Grados de protección contra la entrada de agua (código IP)", que especifica el grado de protección contra la entrada de agua.
-
Página 70: Descripción General Del Aparato
DESCRIPCIÓN GENERAL DEL APARATO... - Página 71 Botón de espera CD/BT: Disminuir la pista anterior o fijar la hora/estación anterior SOURCE – fuente CD/BT salta la pista siguiente Botón TUNE+ Posición de memoria 1 SLEEP - Apagado automático Posición de memoria 2 MENU/INFO CLOCK/ 3+ - Ajuste de la hora/ posiciones de memoria 10 MODO DE REPRODUCCIÓN/ ALARMA - Modo de juego/ Alarma 11 ⏯...
-
Página 72: Primeros Pasos
PRIMEROS PASOS 1. Conecte el cable Type-C incluido en el volumen de suministro al conector Type-C. 2. Conecta el otro extremo del cable Type-C a una toma de corriente con un adaptador de corriente USB. También puedes cargar la batería conectando la unidad al puerto USB de un ordenador. -
Página 73: Operación Cd 10
OPERACIÓN CD 10 Pulse el botón SOURCE repetidamente hasta que aparezca "CD" en la pantalla. Insertar CD 1. Primero abra el fusible del compartimento del CD y luego el compartimento del CD. 2. Introduzca un CD con la cara estampada hacia arriba dentro del compartimento. - Página 74 Repetir una pista y reproducción aleatoria 1. Pulse el botón PLAY MODE durante el modo de funcionamiento. En pantalla aparece . La pista actual del CD se repite en un bucle continuo. 2. Pulse el botón PLAY MODE durante el modo de funcionamiento. En pantalla aparece .
-
Página 75: Usb
1. Hay un puerto USB en la parte delantera de la unidad. Una vez conectada la memoria USB, pulse repetidamente el botón SOURCE para seleccionar el modo USB. 2. La unidad muestra automáticamente el número de títulos de la memoria USB. -
Página 76: Radio Dab/Operación
RADIO DAB/OPERACIÓN Exploración completa de canales 1. Para activar la búsqueda automática de canales, pulse el botón SCAN y la pantalla mostrará "Scanning..." (Búsqueda) y una barra creciente. 2. Todas las emisoras encontradas se almacenan automáticamente. Para explorar las estaciones encontradas, pulse las teclas ⏮ o ⏭. A continuación pulse la tecla ENTER. - Página 77 Información sobre el software 1. Pulse el botón MENU del mando a distancia para mostrar el menú principal. 2. Pulse las teclas para seleccionar "System"⏮o ⏭, y para confirmar pulse la tecla ENTER. 3. Pulse la tecla ENTER del mando a distancia para mostrar la versión del software.
- Página 78 Guardar las emisoras en la lista de la memoria 1. Seleccione la emisora de radio que desea guardar. ③+ 2. Mantenga pulsada la tecla hasta que aparezca la lista de emisorias guardadas. Utilice el mando giratorio para seleccionar una posición de memoria deseada entre 3 y 20.
-
Página 79: Radio Fm
Tasa de bits de audio La pantalla muestra la tasa de bits de audio digital. Hora/fecha Muestra la hora y la fecha actuales proporcionadas por el transmisor. DLS (segmento dinámico de etiquetas) El segmento de la etiqueta dinámica es un mensaje de texto desplazable que el emisor puede integrar en la transmisión. - Página 80 1. Pulse el botón MENÚ y utilice los botones ⏮ o ⏭ para seleccionar "Audio Setting" (Ajuste de audio). Finalmente, pulse la tecla ENTER para confirmar. 2. Pulse las teclas ⏮ o ⏭ para seleccionar "Estéreo permitido" o "Mono forzado" y confirme su selección con la tecla ENTER. Nota: El asterisco en la esquina superior derecha de la pantalla indica la selección actual.
-
Página 81: Configuración Del Temporizador Y Alarma
CONFIGURACIÓN DEL TEMPORIZADOR Y ALARMA Ajuste automático de la hora La hora puede actualizarse automáticamente cuando recibas una señal DAB+ en tu ubicación actual. Ajuste de la hora 1. Pulse la tecla CLOCK. El indicador digital parpadea en la pantalla. 2. - Página 82 6. Pulse el botón ALARM para seleccionar "Timer on". El despertador se activa. ◷ 7. En el modo Standby aparece el símbolo , que indica que el despertador se ha activado. Desactivar el despertador diario Desactive el despertador actual pulsando varias veces el botón ALARM. El ◷...
-
Página 83: Funcionamiento Bt
3. Active su dispositivo BT y seleccione el modo de búsqueda. 4. Splash aparecerá en la lista de dispositivos BT de su dispositivo externo. 5. Seleccione Splash e introduzca, si fuera necesario, la contraseña "0000". -
Página 84: Declaración De Conformidad
London, W8 6ND United Kingdom Por la presente, Chal-Tec GmbH declara que el tipo de equipo radioeléctrico Splash es conforme con la Directiva 2014/53/UE. El texto completo de la declaración UE de conformidad está disponible en la dirección Internet siguiente: use.berlin/10037797... - Página 85 Gentile cliente, la ringraziamo per l'acquisto del dispositivo. La preghiamo di leggere attentamente le seguenti istruzioni per l’uso e di seguirle per evitare possibili danni. Non ci assumiamo alcuna responsabilità per danni scaturiti da una mancata osservanza delle avvertenze di sicurezza e da un uso improprio del dispositivo.
-
Página 86: Dati Tecnici
DATI TECNICI Numero articolo 10037795, 10037796, 10037797 Alimentazione 5 V⎓ (1 A) Connessione tramite adattatore Batteria Batteria agli ioni di litio (2000 mAh) (installazione permanente) CD-DA/CD-R/CD-RW/MP3/WMA Lettore CD Riproduzione di file MP3 e WMA Ingresso USB Radio FM Gamma di frequenza 87,5-108 MHz Memoria delle emittenti Radio DAB... -
Página 87: Avvertenze Di Sicurezza
AVVERTENZE DI SICUREZZA Spiegazione dei simboli sul dispositivo ATTENZIONE RISCHIO DI SCOSSE ELETTRICHE NON APRIRE AVVERTENZA: PER RIDURRE IL RISCHIO DI SCOSSE ELETTRICHE E LESIONI A PERSONE, NON APRIRE L'ALLOGGIAMENTO. IL DISPOSITIVO NON CONTIENE COMPONENTI CHE NECESSITANO DI MANUTENZIONE DA PARTE DELL'UTENTE. PER EVENTUALI RIPARAZIONI, RIVOLGERSI ESCLUSIVAMENTE A PERSONALE QUALIFICATO. - Página 88 • Leggere, seguire e conservare questo manuale. Tutte le avvertenze di sicurezza e le informazioni sul funzionamento devono essere lette prima di usare questo prodotto e conservate per future consultazioni. È necessario rispettare tutte le avvertenze presenti sul dispositivo e nel manuale.
- Página 89 Note sull'impermeabilità di questo dispositivo Le specifiche di impermeabilità di questo prodotto sono conformi a IPX4 secondo la norma IEC 60529 "Gradi di protezione contro l'ingresso di acqua (codice IP)", che specifica il grado di protezione contro la penetrazione di acqua nel dispositivo.
-
Página 90: Descrizione Del Dispositivo
DESCRIZIONE DEL DISPOSITIVO... - Página 91 Tasto standby CD/BT: Traccia precedente o riduzione del tempo impostato/emittente precedente +SOURCE - Fonte CD/BT: saltare la traccia successiva Tasto TUNE+ Posizione di salvataggio 1 SLEEP - Spegnimento automatico Posizione di salvataggio 2 MENU/INFO CLOCK/ 3+ - Impostazione dell'ora/Posizioni di salvataggio 10 PLAY MODE/ ALARM - Modalità...
-
Página 92: Primi Passaggi
PRIMI PASSAGGI 1. Collegare il cavo di tipo C in dotazione alla connessione corrispondente. 2. Collegare l'altra estremità del cavo di tipo C a un adattatore USB che viene poi inserito in una presa elettrica. È anche possibile caricare la batteria collegando il dispositivo alla porta USB di un computer. L'indicatore lampeggia mentre la batteria è... -
Página 93: Modalità Cd
MODALITÀ CD Premere più volte SOURCE fino a quando sullo schermo appare "CD“. Inserire il CD 1. Aprire prima il blocco del vano CD e poi il vano. 2. Inserire il CD nel vano con il lato stampato verso l'alto. Assicurarsi che il CD sia posizionato sul perno centrale. - Página 94 Tenere premuto il tasto ⏮ o ⏭ per avanzare o tornare indietro • velocemente. Ripetizione e riproduzione casuale 1. Premere il tasto PLAY MODE in modalità di funzionamento. Sullo schermo appare . La traccia corrente del CD viene ripetuta in loop. 2.
-
Página 95: Usb
1. Sul lato anteriore del dispositivo si trova una connessione USB. Una volta collegata una chiavetta USB, premere ripetutamente il tasto SOURCE per selezionare la modalità USB. 2. Il dispositivo mostra automaticamente il numero di titoli sulla chiavetta USB. 3. Tutti i tasti di riproduzione sono gli stessi della modalità MP3/CD. Note •... -
Página 96: Radio Dab/Utilizzo
RADIO DAB/UTILIZZO Ricerca emittenti completa 1. Per attivare la scansione automatica delle emittenti, premere il tasto SCAN e lo schermo mostrerà "Scanning..." (Ricerca) e una barra crescente. 2. Tutte le emittenti trovate vengono salvate automaticamente. Per scorrere tra le emittenti trovate, premete i tasti ⏮ o ⏭. Premere poi il tasto di conferma ENTER. - Página 97 Informazioni sul software 1. Premere MENU in modalità DAB per visualizzare il menu principale. 2. Premere ⏮ o ⏭ per selezionare "System" e premere ENTER per confermare. 3. Premere il tasto ENTER sul telecomando per visualizzare la versione del software. 4.
- Página 98 Salvare le emittenti nella lista 1. Selezionare l'emittente da salvare. ③+ 2. Tenere premuto il tasto finché non viene mostrata la lista di salvataggio. Usare la manopola per selezionare una posizione di salvataggio tra 3 e 20. Le emittenti che sono già state salvate possono essere sovrascritte.
-
Página 99: Radio Fm
Audio-Bit-Rate Lo schermo mostra l'audio bit rate digitale che viene ricevuto. Ora/Data Indica l'ora e la data attuali fornite dall'emittente. DLS (Dynamic Label Segment) Il segmento dell'etichetta dinamica è un messaggio di testo scorrevole che può essere integrato nella trasmissione dall'emittente. Questo messaggio contiene informazioni ordinarie, come i dettagli del programma. - Página 100 1. Premere il tasto MENU e usare i tasti ⏮ o ⏭ per selezionare "Audio setting" (impostazioni audio). Premere ENTER per confermare. 2. Premere ⏮ o ⏭ per selezionare "Stereo allowed" (stereo consentito) o "Forced mono" (solo mono) e confermare la selezione con ENTER. Nota: l'asterisco nell'angolo superiore destro dello schermo indica la selezione attuale.
-
Página 101: Impostazione Sveglia E Timer
IMPOSTAZIONE SVEGLIA E TIMER Impostazione dell'ora automatica L'ora può essere aggiornata automaticamente quando si riceve un segnale DAB+ nella località attuale. Impostare l'ora 1. Premere il tasto CLOCK. L'indicazione digitale lampeggia sullo schermo. 2. Premere ⏮ o ⏭ per selezionare l'anno corrente e premere CLOCK per confermare. - Página 102 Note 1. Se, per esempio, è stato selezionato "CD" come fonte audio della sveglia e non è stato inserito alcun CD, la fonte della sveglia passerà automaticamente a "DAB" non appena viene raggiunta l'ora impostata. 2. Se si sceglie "FM" come fonte audio della sveglia, verrà utilizzata l'ultima emittente FM ascoltata prima dello spegnimento.
-
Página 103: Modalità Bt
3. Attivare il dispositivo BT e selezionare la modalità di ricerca. 4. "Splash" comparirà nell'elenco dei dispositivi BT del dispositivo esterno. 5. Selezionare "Splash" e, se necessario, inserire la password "0000". 6. Per disattivare la funzione BT, premere SOURCE per passare a un'altra modalità... -
Página 104: Smaltimento
272 Kensington High Street London, W8 6ND United Kingdom Il fabbricante, Chal-Tec GmbH, dichiara che il tipo di apparecchiatura radio Splash è conforme alla direttiva 2014/53/UE. Il testo completo della dichiarazione di conformità UE è disponibile al seguente indirizzo Internet: use.berlin/10037797... - Página 105 Geachte klant, gefeliciteerd met de aanschaf van dit apparaat. Lees de hierna volgende handleiding aandachtig door en volg de instructies op om schade te voorkomen. Voor schade veroorzaakt door het niet in acht nemen van de instructies of door onjuist gebruik nemen wij geen verantwoordelijkheid.
-
Página 106: Technische Gegevens
TECHNISCHE GEGEVENS Artikelnummer 10037795, 10037796, 10037797 Stroomvoorziening 5 V⎓ (1 A) Aansluiting via stroomstekker Accu Lithium-ion accu (2000 mAh) (vast geïnstalleerd) CD-DA / CD-R / CD-RW / MP3 / WMA CD-speler Weergave van MP3 en WMA bestanden USB-ingang FM radio Frequentiebereik 87,5 MHz–108 MHz Zenderopslag... -
Página 107: Veiligheidsinstructies
VEILIGHEIDSINSTRUCTIES Verklaring van de symbolen op het apparaat CAUTION RISK OF ELECTRIC SHOCK NIET OPENEN WAARSCHUWING: OPEN DE BEHUIZING NIET OM HET RISICO VAN ELEKTRISCHE SCHOKKEN EN PERSOONLIJK LETSEL TE BEPERKEN. GEEN ONDERDELEN IN HET TOESTEL DIE DOOR DE GEBRUIKER KUNNEN WORDEN GEREPAREERD. NEEM VOOR REPARATIES CONTACT OP MET HIERVOOR GEKWALIFICEERD PERSONEEL. - Página 108 • Schakel het toestel uit als u het langere tijd niet zult gebruiken. Trek de stekker uit het stopcontact. Trek de stekker altijd aan de stekker zelf eruit. • Deze aanwijzingen lezen, opvolgen en bewaren. - Alle veiligheids- en bedieningsaanwijzingen moeten voor het gebruik van het product gelezen en worden bewaard om later na te slaan.
- Página 109 indringen van water aangeeft. Dit product kan niet in het water worden gebruikt. Als het apparaat niet volgens de voorschriften wordt gebruikt, kan water in het apparaat binnendringen en tot branden, elektrische schokken of foutieve functies leiden. Let zorgvuldig op de volgende veiligheidsaanwijzingen en gebruik het apparaat op de juiste wijze.
-
Página 110: Overzicht Apparaat
OVERZICHT APPARAAT... - Página 111 Stand-by toets CD/BT: vorige titel of ingestelde tijd verminderen / vorige zender SOURCE – bron CD/BT volgende titel overslaan TUNE+ toets Geheugen 1 SLEEP - automatisch uitschakelen Geheugen 2 Menu/ INFO CLOCK/3+ - tijdinstelling/geheugens 10 PLAY MODE/ ALARM - weergavemodus/ alarm 11 ⏯...
-
Página 112: Eerste Stappen
EERSTE STAPPEN 1. Verbind de meegeleverde type-C kabel met de type-C aansluiting 2. Sluit het andere einde van de type-C kabel aan een met een USB- netstekker aan een stopcontact aan. U kunt de accu ook opladen door het apparaat met de USB-aansluiting van een computer te verbinden. De oplaadindicator knippert, terwijl de accu wordt opgeladen. -
Página 113: Cd Handeling
CD HANDELING Druk meermaals op de toets SOURCE tot op het beeldscherm „CD“ wordt weergegeven. CD inleggen 1. Open vervolgens de cd-vak beveiligingsklep en aansluitend het cd-vak. 2. Leg de cd met het opschrift naar boven in het cd-vak. Let erop dat de cd op de middenas wordt gelegd. - Página 114 Weergave herhalen en random play 1. Drukt u tijdens de gebruiksmodus de toets PLAY MODE. Op het beeldscherm wordt weergegeven. De actuele cd-titel wordt ononderbroken herhaald. 2. Drukt u tijdens de gebruiksmodus opnieuw de toets PLAY MODE. Op het beeldscherm wordt weergegeven.
-
Página 115: Usb
1. Aan de voorkant van het apparaat bevindt zich een USB-aansluiting. Druk, zodra een USB-stick word aangesloten, meermaals op de toets SOURCE, om de USB-modus uit te kiezen. 2. Op het apparaat wordt automatisch het aantal titels van de USB-stick weergegeven. -
Página 116: Dab-Radio/Bediening
DAB-RADIO/BEDIENING Zenders zoeken 1. Om het automatisch zoeken naar radiozenders te activeren, drukt u op de toets SCAN en het beeldscherm zal „Scanning…“ (zoeken) en een groter wordende balk weergeven. 2. Alle gevonden zenders worden automatisch opgeslagen. Om de gevonden zenders te verkennen drukt u op de toetsen ⏮ of ⏭. Druk vervolgens de bevestigingstoets ENTER. - Página 117 1. Druk in de DAB modus op de toets MENU om het menu te openen. 2. Druk op de toetsen ⏮ of ⏭ om „System“ te kiezen en druk om te bevestigen op de toets ENTER. 3. Druk op de toets ENTER van de afstandsbediening om de softwareversie te laten weergeven.
- Página 118 ③ 2. Houd de toets + zo lang ingedrukt totdat de geheugenlijst wordt weergegeven. Kies met de draaiknop een gewenste opslagplaats tussen 3 en 20 uit. Reeds opgeslagen zenders kunnen worden overschreven. Opgeslagen zenders oproepen ① 1. Druk om een zender op opslagplaats 1 of 2 te beluisteren de toetsen ②...
-
Página 119: Fm Radio
Signaalsterkte Toont signaalsterkte aan Als het getal „0“ is, betekent dit dat het ontvangen signaal foutloos is en een sterke signaalsterkte heeft. Audio-Bit-Rate Het beeldscherm toont de ontvangen audio bitrate. Tijd/datum Geeft de actuele tijd en datum weer, die automatisch door de zender ter beschikking wordt gesteld. - Página 120 Audio-instellingen Dit toestel schakelt automatisch tussen stereo en mono. U kunt dit omzeilen door de gewenste modus handmatig in te stellen. Dit kan vooral heel nuttig zijn wanneer het signaal slecht is. 1. Druk op de toets MENU en selecteer met de toetsen ⏮ of ⏭ „Audio setting“...
-
Página 121: Alarm- En Timerinstelling
ALARM- EN TIMERINSTELLING Automatische tijdinstelling De tijd kan automatisch geactualiseerd worden als u een DAB+ signaal op uw actuele locatie ontvangt. Tijdinstelling 1. Druk op de toets CLOCK. De digitale weergave knippert op het beeldscherm 2. Druk om het actuele jaartal in te stellen de toetsen ⏮ of ⏭en druk vervolgens ter bevestiging op de toets CLOCK. -
Página 122: Belangrijke Informatie
5. Kies door het drukken op de toets SOURCE de gewenste modus uit (FM, USB, DAB of CD-modus) en druk ter bevestiging op de toets ENTER. 6. Druk om „Timer On“ te kiezen de toets ALARM. De wekker is dan actief. ◷... -
Página 123: Bt Bediening
4. Splash wordt in de BT-apparatenlijst van uw externe apparaat weergegeven. 5. Kies Splash uit en voer, indien noodzakelijk, het wachtwoord „0000“ in. 6. Om de BT-functie te deactiveren drukt u op de toets SOURCE om naar een andere modus te schakelen of u deactiveert de functie op uw externe BT-apparaat. -
Página 124: Instructies Voor Afvoer
Berlin Brands Group UK Limited PO Box 42 272 Kensington High Street London, W8 6ND United Kingdom Hierbij verklaart Chal-Tec GmbH dat de radioapparatuur Splash voldoet aan de richtlijn 2014/53/EU. De volledige tekst van de EU- conformiteitsverklaring is beschikbaar via het volgende internetadres: use.berlin/10037797...