Tabla de contenido
Publicidad
Idiomas disponibles
Idiomas disponibles
Enlaces rápidos
Publicidad
Tabla de contenido

Manuales relacionados para La Crosse Technology 53147130


Resumen de contenidos para La Crosse Technology 53147130
- Página 1 155*155mm WETTERSTATION WEATHER STATION STATION MÉTÉO WEERSTATION STAZIONE METEOROLOGICA ESTACIÓN METEOROLÓGICA Betriebsanleitung Instruction Manual Manuel d'Instructions Handleiding Manuale delle istruzioni Manual de instrucciones...
- Página 2 Wetterstation und optimale Ausnutzung aller ihrer Vorzüge diese Betriebsanleitung trotzdem aufmerksam durch. « Instant Transmission+» ist die neueste, exklusiv von LA CROSSE TECHNOLOGY entwickelte und realisierte Technologie für die drahtlose Fernübertragung. “IT +” bietet Ihnen die sofortige Aktualisierung aller durch Ihre Außensender erhobenen Messdaten.
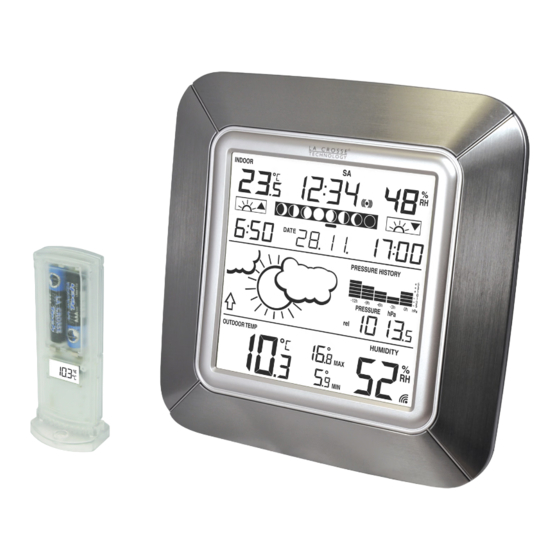
- Página 3 Anzeige der Raumemperatur mit Speicherung der MIN-/MAX-Werte Anzeige der Außentemperatur mit Speicherung der MIN-/MAX-Werte und deren Zeit und Datum Alle gespeicherten MIN/ MAX-Werte können auf die aktuellen Werte zurückgesetzt werden Anzeige von Raum- und Außenbereichsluftfeuchtigkeit in RH% Relativer und absoluter Luftdruck in hPa Statistik des Relativen Luftdrucks für die letzten 12 Stunden Anzeige von Sonnenaufgang, Sonnenuntergang und Sonnenscheindauer für 193 europäische Städte Anzeige von 8 Symbolen zur Darstellung der aktuellen Mondphasen während des ganzen Jahres.
- Página 4 Hinweis: Es ist ferner darauf zu achten, dass nach der Entnahme der Batterien immer mindestens 2 Minuten bis zum erneuten Einlegen verstreichen muss, da andernfalls Start- und Übertragungsproblemen auftreten können. Im Falle eines Batteriewechsels bei einer der Einheiten muss bei allen Einheiten eine neue Grundeinstellung vorgenommen werden.
-
Página 5: Lcd-Bildschirm
SET-Taste (Einstellung) Drücken Sie die Taste zum Eintritt in die Einstellmodi für folgende Funktionen: LCD-Kontrast, Sommer- /Winterzeit, Referenzeinstellung des Relativen Luftdrucks, manuelle Zeit- und Kalendereinstellung Beendigung des Weckalarms Zum Verlassen des Alarm- und Länder/Städte-Einstellmodus Wechsel zwischen Absoluter und Relativer Luftdruckanzeige + -Taste (Plus) ... -
Página 6: Manuelle Einstellungen
Wochenta Zeit Alarm-Symbol Raum- temperatur in °C Raumluft-feuchtigkeit in RH% Mondphasen-Anzeige Kalender Sonnen-aufgangszeit Sonnen-untergangszeit Wetter- vorhersage- Balkengrafik der symbol Relativen Luftdruckstatistik Wetter-tendenz- anzeige Luftdruck Batterietiefstandsanzeige (relativ/absolut) (Wetterstation) Batterietiefstandsanzeige (Außensender) Außen- temperatur in °C Außen-tempfangs- signal MIN/MAX Außen-luftfeuchtigkeit Außentemperatur in RH% * Wenn das Signal korrekt empfangen wird, bleibt das Symbol dauerhaft an. -
Página 7: Manuelle Zeiteinstellung
EINSTELLUNG DES LCD-KONTRASTS blinkend Der LCD-Kontrast kann nach den Ansprüchen des Anwenders in 8 Stufen eingestellt werden (Voreinstellung LCD 3). Einstellung wie folgt: Die obige Darstellung kommt zur Anzeige. Drücken Sie die + -Taste zur Einstellung der gewünschten Kontraststufe. Benutzen Sie die MIN/MAX- Taste zur Verminderung der Werte. - Página 8 Die Jahresstellen blinken. Stellen Sie mit der + -Taste das gewünschte Jahr ein. Benutzen Sie die MIN/MAX-Taste zur Verminderung der Werte. Die Einstellung reicht von 2011 bis 2025. Drücken Sie die SET-Taste, um in den Einstellmodus für den Monat zu gelangen. Die Monatsstellen werden blinken.
- Página 9 Ist das gewünschte Land gewählt, so drücken Sie zum Einstritt in den Städte-Einstellmodus die SUN- Taste. Der Städte-Code wird beginnen zu blinken. Benutzen Sie nun zur Auswahl der Stadt die + -Taste oder die MIN/MAX-Taste. Stetes Drücken der Tasten bewirkt eine schnelle Weiterschaltung. Städte-Code (blinkend) Bestätigen Sie die Einstellung mit der SUN-Taste.
- Página 10 Hinweis: Die Signaldauer des Weckalarms beträgt etwa 120 Sekunden. Das Alarmsignal kann durch Drücken jeder beliebigen Taste abgebrochen werden. VERLASSEN DES MANUELLEN EINSTELLMODUS Um den Modus Manuelle Einstellungen zu verlassen, ist während der manuellen Einstellungen so lange zu warten, bis automatische Abschaltung erfolgt. Der Modus kehrt damit zur normalen Zeitanzeige zurück. WETTERVORHERSAGE UND WETTERTENDENZ WETTERVORHERSAGESYMBOLE Die Wettervorhersagesymbole in der zweiten Sektion des LCD-Bildschirms werden in einer der folgenden...
- Página 11 WETTERTENDENZANZEIGE Die Wettertendenzanzeigen in Pfeilform arbeiten im Zusammenhang mit den Wettervorhersagesymbolen. Zeigt ein Pfeil nach oben, bedeutet dies einen Luftdruckanstieg und somit eine zu erwartende Wetterbesserung. Zeigt ein Pfeil nach unten, sinkt der Luftdruck und eine Wetterverschlechterung ist zu erwarten. Zieht man dies in Betracht, kann man ersehen, wie sich das Wetter verändert hat und welche Veränderungen zu erwarten sind.
- Página 12 Hinweis: Der Absolute Luftdruck liefert die Anzeige des wahren gemessenen Luftdrucks zum aktuellen Zeitpunkt am aktuellen Ort. Er ist nicht programmierbar. Der absolute Luftdruckbereich der Wetterstation reicht von 300 hPa bis 1099 hPa (300 hPa entspricht dem Standard-Luftdruck in einer Höhe von etwa 9100 m über dem Meeresspiegel).
- Página 13 Zeitpunkt der Spei-cherung der MIN/MAX Außen-bereichs-daten Datum der Spei-cherung der MIN/MAX Außen-bereichs-daten MAX Außen- MAX-Symbol (Außentemperatur) temperatur RÜCKSTELLUNG DER MIN/MAX-TEMPERATURDATEN Drücken und halten Sie zur Rückstellung aller gespeicherten Raum- und Außentemperaturen auf deren aktuelle Werte für 3 Sekunden die MIN/MAX-Taste. MONDPHASENSYMBOL Die Sonnen &...
- Página 14 Der Abstand von Wetterstation und Außensender(n) zu Störquellen wie z. B. Computermonitoren oder Fernsehgeräten sollte mindestens 1,5 – 2 Meter betragen. Vermeiden Sie, die Geräteeinheiten direkt an oder in die Nähe von metallischen Türen oder Fensterrahmen zu platzieren. Die Benutzung anderer, auf derselben Frequenz (868 MHz) arbeitender Geräte wie z. B. Kopfhörer oder Lautsprecher kann die korrekte Signalübertragung verhindern.
-
Página 15: Pflege Und Instandhaltung
PLATZIERUNG DES THERMO-HYGRO-AUSSENSENDERS Montage bitte an einem geschützten Ort zur Vermeidung von Beeinflussung durch Regen oder direkte Sonneneinstrahlung. Der Thermo-Hygro-Außensender kann mithilfe des Montagehalters, der als Tischständer oder Wandhalter benützt werden kann, auf eine ebene Fläche gestellt oder an eine Wand montiert werden. - Página 16 (Anzeige “- -” bei Temperatur im Überlauf (OF.L); Anzeige 19% bei < 20% und 96% bei > 95%) Außenluftfeuchtigkeitsbereich : 1% bis 99% mit 1% Au ösung (Anzeige “- -” bei Temperatur im Überlauf (OF.L); Anzeige 1% bei < 1% und 99% bei >...
- Página 17 « Instant Transmission+» is the up and coming state - of - the - art new wireless transmission technology, exclusively designed and developed by LA CROSSE TECHNOLOGY. “IT +” o ers you an immediate update of all your outdoor data measured from the...
- Página 18 Temperature display in degree Celsius (°C) Indoor temperature display with MIN/MAX recordings Outdoor temperature display with MIN/MAX recordings, time and date All MIN/MAX temperature recordings can be reset Indoor and outdoor relative humidities display in RH% ...
-
Página 19: Battery Change
Insert batteries, observing the correct polarity (see marking). Replace the compartment cover. Note: Always wait for 2 minutes after removing the batteries before reinserting, otherwise start up and transmission problems may occur. In the event of changing batteries in any of the units, all units need to be reset by following the setting up procedures. -
Página 20: Lcd Screen
SUN key ALARM key SET key + key MIN/MAX key SET key Press and hold for 3 seconds to enter manual setting modes: LCD contrast, DST ON/OFF, manual time, calendar and relative air pressure reference value To stop the alarm sound To exit alarm setting mode and country/city setting mode To toggle between relative and absolute air pressure display + key... -
Página 21: Manual Settings
Weekday Alarm Time icon Indoor Temperature in °C Indoor humidity display in RH% Moon phase indicator Calendar Sunrise Time Sunset Time Weather forecast icon Air pressure history bar graph Weather Tendency indicator Air pressure in hPa (relative or absolute) Low battery indicator (Weather Station) Low battery indicator (Outdoor... -
Página 22: Lcd Contrast Setting
LCD CONTRAST SETTING Digit flashing The LCD contrast can be set within 8 levels, from LCD 0 to LCD 7 (Default is LCD 3): The digit starts flashing Press the + key or MIN/MAX key to set the level of contrast desired. Press the SET key to confirm and enter the “Daylight Saving Time On/Off setting,”... - Página 23 The year digits will start flashing. Use the + key to increase or MIN/MAX key to decrease the value. The range runs from 2011 to 2025. Press the SET key to confirm and enter the month setting mode. The month digit will be flashing. Use the + key to increase or MIN/MAX key to decrease the value. Press the SET key to enter date setting, or exit the setting mode by pressing the ALARM key or SUN key.
-
Página 24: Alarm Setting
The City code will start flashing. Use the + key or MIN/MAX key to select the City. Keep holding the key allows the value to advance faster. City Code (flashing) Confirm with the SUN key, or exit the setting mode by pressing the SET key or ALARM key without saving the changes. - Página 25 TO EXIT SETTING MODE To exit the setting mode anytime without saving the changes, user can wait for automatic timeout to return to normal display. WEATHER FORECASTING ICONS Weather icons can be displayed in any of the following combinations: Cloud with Sun with cloud rain For every sudden or significant change in the air pressure, the weather icons will update accordingly to represent...
- Página 26 Note: Once the weather tendency indicator has registered a change in air pressure, it will remain permanently visualized on the LCD. AIR PRESSURE HISTORY (ELECTRONIC BAROMETER WITH BAROMETRIC PRESSURE TREND) The right side of the second section of the LCD shows the air pressure history bar graph. Air pressure trend over the last 12 hours The bar graph indicates the air pressure history trend over the last 12 hours in 5 intervals: 0h, -3h, -6h, -9h and -...
- Página 27 DISPLAY OF INDOOR TEMPERATURE AND HUMIDITY The indoor temperature and humidity data are automatically updated and displayed on the first section of the LCD screen. Indoor temperature Indoor relative humidity in ºC in RH% DISPLAY OF OUTDOOR TEMPERATURE AND HUMIDITY The last LCD section shows the outdoor temperature, MIN/MAX temperature records, humidity and the signal reception indicator.
- Página 28 THE MOON PHASE ICONS The weather station displays 8 different moon phase icons. The current moon phase is indicated with a bar segment according to the set calendar. A bar segment indicates the current moon phase Waxing First Waxing Full Waning Last Waning...
-
Página 29: Care And Maintenance
Foldout table stand: The foldout table stand leg is located on the backside. Pull the stand out from the bottom center edge of the weather station, below the battery compartment. Once the foldout table stand is extended, place the weather station in an appropriate location. POSITIONING THE THERMO-HYGRO TRANSMITTER: The thermo-hygro transmitter can be placed onto any at surface or wall mount using the bracket which doubles as a stand or wall mount base. -
Página 30: Liability Disclaimer
SPECIFICATIONS Temperature measuring range: Indoor -9.9ºC to +59.9ºC with 0.1ºC resolution 14.2ºF to 139.8ºF with 0.2ºF resolution (“ OF.L ” displayed if outside this range) Outdoor -39.9ºC to +59.9ºC with 0.1ºC resolution -39.8ºF to +139.8ºF with 0.2ºF resolution (“OF.L ” displayed if outside this range, “ --.- ” displayed if no transmitter signal) Relative humidity measuring range: Indoor 20% to 95% with 1% resolution... - Página 31 Instant Transmission » est une exclusivité mise au point et développée par La Crosse Technology. « IT+ » vous garantit une mise à jour instantanée des données relevées par vos capteurs extérieurs : suivez vos variations climatiques en temps réel ! FONCTIONNALITÉS :...
- Página 32 Affichage des températures en °C Affichage de la température intérieure avec des enregistrements MIN/MAX Affichage de la température extérieure avec des enregistrements MIN/MAX, l'heure et la date Tous les relevés MIN/MAX peuvent être réinitialisés Affichage de l'humidité ambiante et extérieure en %RH ...
-
Página 33: Remplacement Des Piles
Retirez le couvercle du compartiment à piles au dos de la station météo. Insérez les piles en respectant la polarité (voir le marquage). Replacez le couvercle du compartiment à piles. Remarque : Attendez toujours 2 minutes entre le retrait des piles et leur réinsertion, a n d’éviter des problèmes d'initialisation et de transmission. - Página 34 Touche SUN Touche + Touche SET Touche ALARM Touche MIN/MAX Touche SET (réglages) Permet d’accéder aux di érents réglages des fonctions suivantes : contraste LCD, activation de l'heure d'été (DST), réglage manuel de l'heure, de l’année et de la date, pression atmosphérique relative Permet d’arrêter la sonnerie Permet de sortir des réglages “Alarme”...
-
Página 35: Réglage Manuel
Jour de la semaine Icône Heure alarme Température Intérieure Hygrométrie Intérieure en °C en % RH Indicateur des phases lunaires Calendrier Heure de lever du soleil Heure de coucher du soleil Icône météo Histogramme de pression Indicateur atmosphérique de tendance météo Pression atmosphérique relative ou absolue... -
Página 36: Contraste De L'ÉCran Lcd
CONTRASTE DE L’ÉCRAN LCD clignote Huit niveaux de contraste de l'écran LCD sont programmables. Par défaut : niveau LCD 3. Pour régler le niveau du contraste : L'écran ci-dessus s'affiche. Appuyez sur la touche + pour sélectionner le niveau du contraste. Utilisez la touche MIN/MAX pour réduire les valeurs. - Página 37 CALENDRIER Jour de la semaine Année (clignote) Date. Mois. Pour ce faire, procédez comme indiqué ci-dessous : Après le réglage de l’heure, appuyez sur la touche SET pour passer au réglage du calendrier. L’année va clignoter. Réglez l'année désirée à l'aide de la touche +. Utilisez la touche MIN/MAX pour réduire les valeurs.
- Página 38 SELECTION PAYS/VILLE POUR L'HEURE DE LEVER ET DE COUCHER DU SOLEIL : La station météo actualise automatiquement la durée de lever et de coucher du soleil à 00h00 en fonction de la ville, de la date, de l'heure et des réglages DST. Appuyez et maintenez la touche SUN pendant 3 secondes pour accéder à...
-
Página 39: Réglage De L'ALarme
L'AFFICHAGE DE LA DURÉE D’ENSOLEILLEMENT : A partir de l’affichage prinicipal de la date, appuyez sur la touche SUN deux fois pour afficher la durée d’ensoleillement (le nombre total d'heures de soleil de la journée). Appuyez sur la touche SUN une nouvelle fois pour afficher la ville sélectionnée. (Voir « SELECTION PAYS/VILLE POUR L'HEURE DE LEVER ET DE COUCHER DU SOLEIL ») Appuyez à... -
Página 40: Indicateur De Tendance
météo. Notez que dans le cas des icônes soleil et pluvieux, elles ne changeront pas en cas d'amélioration (soleil) ou de détérioration (pluvieux) du temps car elles représentent déjà les extrêmes. Les icônes prévoient les changements de temps en termes d'amélioration ou de détérioration, et ne prévoient pas forcément la pluie ou le soleil comme chaque icône l'indique. - Página 41 L'histogramme représente l'historique de la tendance de la pression atmosphérique des 12 dernières heures en 5 étapes : 0h, -3h, -6h, -9h, et -12h. Le relevé “0h” représente la pression atmosphérique pour l'heure complète en cours. Les colonnes représentent les “hPa” (0, ±1, ±3, ±5) à l'heure spécifique. Le “0” au milieu de l'échelle est égal à...
-
Página 42: Phases De La Lune
AFFICHAGE DE LA TEMPÉRATURE ET DE L’HYGROMETRIE EXTÉRIEURES La dernière section de l'écran LCD affiche la temperature et l’hygrométrie extérieures et un symbole de réception. Hygrométrie extérieure en % RH Température extérieure en °C Indicateur de réception du signal extérieur POUR VOIR LES DONNÉES DE TEMPERATURE MIN/MAX Appuyez sur la touche MIN/MAX plusieurs fois de suite pour consulter les températures MIN/MAX intérieure et extérieure enregistrées. -
Página 43: Temoin De Piles Faibles
TEMOIN DE PILES FAIBLES : Un témoin de piles faibles s’affiche sur l’écran quand il est nécessaire de changer les piles, soit dans la Station météo, soit dans l’émetteur. ÉMETTEUR DE TEMPÉRATURE ET D’HYGROMETRIE EXTERIEURES La portée de l'émetteur de température et d’hygrométrie extérieures peut être influencée par la température ambiante. Des températures froides peuvent en effet réduire le rayon d'émission. -
Página 44: Soin Et Entretien
Fixation sur socle : Le socle rabattable est situé au dos du boîtier. Dépliez le socle et soulevant sa partie basse. Une fois le socle déplié, placez la station météo dans un emplacement approprié. POSITIONNEMENT DE L’EMETTEUR DE TEMPERATURE ET D’HYGROMETRIE EXTERIEURES L’émetteur est fourni avec un support qui peut se xer au mur à... -
Página 45: Caractéristiques Techniques
CARACTÉRISTIQUES TECHNIQUES : Plage de mesure des températures Intérieur -9,9ºC à +59,9ºC (résolution de 0,1ºC) (14,2°F à 139,8°F (résolution de 0,2°F) “OF.L ” a ché en dehors de cette plage Extérieur -39,9ºC à +59,9ºC (résolution de 0,1ºC) (-39,8°F à +139,8°F (résolution de 0,2°F) “OF.L ”... - Página 46 Ce produit ne doit pas être utilisé à des fins médicales ou à titre d'information du public. Les caractéristiques de ce produit peuvent être modifiées sans préavis. Ce produit n'est pas un jouet ; tenir hors de la portée des enfants. ...
- Página 47 “Instant Transmission+” is de nieuwste “state of the art” draadloze transmissie techniek, exclusief ontworpen en ontwikkeld door La Crosse Technology. “IT+” bied u een directe update van de data gemeten door de alle buitensensoren: volg de...
- Página 48 Weergave van de buitentemperatuur met MIN/MAX-registraties, tijd en datum Alle MIN/MAX waarden kunnen worden teruggesteld Weergave binnen- en buitenvochtigheid in RV% Relatieve en absolute luchtdruk in hPa Verloop relatieve luchtdruk van afgelopen 12 uur Weergave van tijdstip van zonsopgang, zonsondergang en daglengte Weergave van 8 maanfase-pictogrammen met indicator gedurende het hele jaar Instelbaar schermcontrast Indicator lege batterijen...
-
Página 49: Batterijen Vervangen
zendproblemen voordoen. Als de batterijen in een van de toestellen vervangen moeten worden, dienen alle toestellen opnieuw te worden opgestart volgens de opstartprocedure. BATTERIJEN VERVANGEN: Het is aanbevolen de batterijen in alle toestellen jaarlijks te vervangen om optimale precisie van deze toestellen te garanderen (voor levensduur batterij, zie Speci caties hieronder). -
Página 50: Lcd-Scherm En Instellingen
SET-toets (Instellen) Voor betreden van regelstand van volgende functies: schermcontrast, zomertijd (DST) functie, regelstand relatieve luchtdruk, handbediend instellen, jaar, datum Alarm uitschakelen Om de alarminstelmodus en de instelmodus voor land/stad te verlaten Wisselen tussen waarden van absolute en relatieve luchtdruk + toets ... - Página 51 Weekdag Tijd Alarm-pictogram Binnen- temperatuur Weergave in °C binnenvochtigheid in RV% Maanfase-indicator Calendrier Tijdstip zonsop- gang Tijdstip zonsonder-gang Pictogram weer- voorspelling Staafdiagram met verlo op van de relatieve luchtdruk Weervoorspelling Luchtdruk (relatieve of Pictogram batterij- absolute) indicator van ontvanger Pictogram batterij-indicator (buitenzender) Buiten- temperatuur...
- Página 52 REGELSTAND SCHERMCONTRAST knippert Het schermcontrast kan naar wens ingesteld worden op een van 8 mogelijke standen (standaard contrastwaarde is LCD 3). Stel het gewenste contrastniveau als volgt in: Bovenstaand scherm verschijnt. Druk op de toets + om het gewenste contrast in te stellen. Gebruik de MIN/MAX-toets om waarde te verlagen.
- Página 53 Het jaartal gaat knipperen. Stel met de toets + het jaar in. Gebruik de MIN/MAX-toets om waarde te verlagen. Het bereik loop van 2011 t/m 2025. Druk de SET-toets in om verder te gaan naar de regelstand van de maand. De cijfers van de maand gaan knipperen.
- Página 54 Met het gewenste land geselecteerd, drukt u op de SUN-toets om naar de stad-instelmodus te gaan. De stadcode begint te knipperen. Gebruik de + toets of de MIN/MAX-toets om de stad te selecteren. Door de knop ingedrukt te houden verspringen de waarden sneller. Stadcode (knippert) Bevestig met de SUN-toets.
-
Página 55: De Handmatige Methode Afsluiten
Let op: Het alarm houdt 120 seconden lang aan. Eenmaal drukken op een willekeurige toets zal het alarm stopzetten. DE HANDMATIGE METHODE AFSLUITEN: Om de handmatige modus op elk gewenst moment af te sluiten, a.u.b. op de automatische time out wachten. De modus zal weer naar de normale display terug keren. -
Página 56: Relatieve En Absolute Luchtdruk
De weerplaatjes werken in combinatie met de prognosepijltjes. Wanneer de indicator naar boven wijst betekent dit dat de luchtdruk stijgt en het weer verwacht wordt te verbeteren. Wijst het pijltje echter naar beneden, dan betekent dit dat de luchtdruk daalt en het weer verwacht wordt te verslechteren. Zo kunnen we aflezen in welke mate het weer veranderd is en nog verwacht wordt te zullen veranderen. - Página 57 Relatieve luchtdruk is de enige waarde die gerelateerd wordt aan het zeeniveau van de plaatselijke absolute luchtdruk en kan dus gebruikt worden als referentie voor weersomstandigheden en de weersontwikkelingen van het hele land. Het kan dusdanig geprogrammeerd worden dat het representatief is voor uw plaatselijke omgeving.
-
Página 58: Over De Buitenzender
ANNULEREN VAN DE MIN/MAX DATA Houd de MIN/MAX-toets 3 seconden ingedrukt om alle gegevens van de binnen- en buitentemperatuur te wissen. DE MAANFASE: De Zon-Maan-klok geeft 8 verschillende maanfase-pictogrammen weer. De huidige maanstand wordt aangegeven met een streepje volgens de ingestelde kalender. Nieuwe Wassende Volle... -
Página 59: Verzorging En Onderhoud
POSITIONEREN VAN HET WEERSTATION: Het weerstation biedt de keuze op tafel te worden gezet of aan de muur te worden opgehangen. Alvorens aan de muur op te hangen a.u.b. controleren of de buitengegevens van de gewenste posities kunnen worden ontvangen. Ophangen aan de muur: Draai een schroef (niet meegeleverd) in de muur en laat de kop ongeveer 5mm uitsteken. -
Página 60: Specificaties
Bij het schoonmaken van het scherm en de bekapping een zacht vochtig doekje gebruiken. Gebruik geen oplossingen of schuurmiddelen omdat deze krassen op het scherm en het omhulsel kunnen veroorzaken. Toestel niet onderdompelen in water. Onmiddellijk alle lege batterijen verwijderen om lekkage en schade te voorkomen. Alleen vervangen met nieuwe batterijen van het aanbevolen formaat. - Página 61 Neem contact op met politie of rijkswaterstaat voor adressenlijst met vuilstortplaatsen en toegestane afvalstoffen. Alle elektronische apparatuur moet zoveel mogelijk te worden hergebruikt. Neem actief deel in het kringloopgebruik van elektrisch en elektronisch afval. Het ongecontroleerde dumpen van elektronisch afval kan gevaar opleveren voor de bevolkingsgezondheid en de kwaliteit van ons leefmilieu.
-
Página 62: Caratteristiche
« Instant Transmission+» è la nuovissima tecnologia di trasmissione a distanza, esclusivamente progettata e sviluppata da LA CROSSE TECHNOLOGY. “IT +” consente l’aggiornamento immediato di tutti i dati meteo registrati dai vostri sensori :... - Página 63 Visualizzazione della temperatura in °C Visualizzazione della temperatura interna con registrazioni della minima e della massima Visualizzazione della temperatura esterna con registrazioni della minima e della massima, dell'ora e della data Tutte le registrazioni dei valori minimi e massimi MIN/MAX possono essere resettate Visualizzazione dell'umidità...
-
Página 64: Sostituzione Delle Batterie
Nota: Aspettare sempre almeno 2 minuti prima di togliere le batterie e reinserirle, altrimenti si potrebbero veri care dei problemi d’avvio o di trasmissione. Quando si sostituiscono le batterie in una qualsiasi delle unità, tutti gli apparecchi devono essere resettati, seguendo le procedure d’impostazione. SOSTITUZIONE DELLE BATTERIE Si raccomanda di sostituire le batterie regolarmente in tutte le unità, per assicurare la precisione ottimale degli apparecchi (per la durata delle batterie consultare il paragrafo... - Página 65 Tasto SET (impostazione) Per entrare nel modo impostazione per le seguenti funzioni: contrasto del display LCD, dell'ora legale (DST), impostazione dell'ora manuale, calendario, valore della pressione relativa Per interrompere l'allarme Per uscire dal modo impostazione allarme e dal modo impostazione paese/città ...
-
Página 66: Impostazioni Manuali
Giorno della settimana Icona dell'all arme Temperatura interna Visualizzazione in °C dell'umidità interna in RH% Indicatore delle fasi lunari Calendario Ora dell'alba Ora del tramonto Icona delle previsioni del tempo Grafico a barre della cronologia della pressione Icona delle dell'aria relativa tendenze meteorologiche Pressione relativa o assoluta... - Página 67 Il contrasto del display a cristalli liquidi LCD può essere impostato su 8 livelli diversi secondo la necessità dell'utente (impostazione del contrasto predefinita del display a cristalli liquidi è LCD 3). Per impostare il livello del contrasto desiderato: si visualizza il display di cui sopra. Premere il tasto + per selezionare il livello del contrasto desiderato. Usare il tasto MIN/MAX per diminuire il valore.
- Página 68 Le digitazioni dell'anno iniziano a lampeggiare. Usare il tasto + per impostare l'anno desiderato. Usare il tasto MIN/MAX per diminuire il valore. La gamma spazia dal 2011 al 2025. Premere il tasto SET per entrare nel mondo impostazione del mese. Le digitazioni del mese iniziano a lampeggiare.
-
Página 69: Impostazione Dell'ALlarme
Il codice della città inizia a lampeggiare. Usare il tasto + o il tasto MIN/MAX per selezionare la città. Tenere premuto il tasto per far avanzare le digitazioni velocemente. Codice della città (lampeggianti) Confermare con il tasto SUN. L'utente può uscire dal modo Impostazione premendo il tasto SET o il tasto ALARM senza salvare i cambiamenti. - Página 70 Nota: la durata dell'allarme è di 120 secondi. Premere un tasto qualsiasi per interrompere il suono dell'allarme. PER USCIRE DAL MODO IMPOSTAZIONE MANUALE Per uscire dal modo impostazione manuale, aspettare che l'apparecchio torni automaticamente a modo display normale. PREVISIONI DEL TEMPO E TENDENZE DEL TEMPO: ICONE DELLE TENDENZE METEOROLOGICHE Sulla seconda sezione del display a cristalli liquidi si trovano le icone meteorologiche che possono essere in una qualsiasi delle combinazioni seguenti:...
- Página 71 come un possibile cambiamento della pressione dell’aria quando invece il cambiamento è dovuto ad una scarsa differenza di altitudine. INDICATORI DELLE TENDENZE METEOROLOGICHE Gli indicatori delle tendenze meteorologiche lavorano insieme alle icone meteorologiche. Quando l'indicatore punta verso l'alto, significa che la pressione dell'aria è in aumento e che il tempo dovrebbe migliorare, e quando punta verso il basso, la pressione dell'aria è...
- Página 72 Nota : La pressione assoluta rileva la misurazione reale e corrente di tale dato, non è programmabile. La pressione atmosferica relativa è calcolata in relazione al livello del mare e alla pressione atmosferica assoluta locale, sono quindi parametri validi per descrivere le condizioni del meteo e i suoi sviluppi. Per esempio se la pressione atmosferica assoluta è...
- Página 73 PER RESETTARE I DATI DELLA TEMPERATURA MIN/MAX Tenere premuto il tasto MIN/MAX per tre secondi, per resettare tutti i dati delle temperature interne ed esterne sulle temperature attuali. SIMBOLI DELLE FASI LUNARI Lo sveglia sole-luna visualizza otto icone diverse delle fasi lunari. La fase lunare attuale è indicata con un segmento a barre, secondo il calendario impostato.
- Página 74 nonostante che si sia tenuto conto di tutti questi fattori, tutte le unità del sistema devono essere resettate (consultare il paragrafo Impostazione ). SISTEMAZIONE DELLA STAZIONE METEOROLOGICA La stazione meteorologica dispone di un supporto staccabile da tavolo, con cui si ha la possibilità di sistemare l'unità...
-
Página 75: Cura E Manutenzione
trovare un'altra sistemazione per i trasmettitori o spostarli leggermente, per favorire la ricezione del segnale. CURA E MANUTENZIONE Non è consigliabile esporre l’apparecchio a condizioni di temperatura estreme, vibrazioni e shock violenti, pena il danneggiamento o letture poco precise dell’apparecchio. ... -
Página 76: Limitazione Di Responsabilità
Stazione meteorologica 190.4 x 37 x 190.4 mm Trasmettitore igrotermico : 36 x 16 x 102,6 mm (supporto non incluso) LIMITAZIONE DI RESPONSABILITÀ I ri uti derivanti da apparecchi elettrici o elettronici contengono sostanze nocive. L'eliminazione dei ri uti di apparecchi elettronici in aperta campagna e/o su terreni non adibiti all'eliminazione, danneggia l'ambiente in maniera considerevole. -
Página 77: Introduccion
ESTACIÓN METEOROLÓGICA INALÁMBRICA DE 868MHz Manual de Instrucciones INTRODUCCION Felicitaciones por haber adquirido esta avanzada estación meteorológica, que se destaca por combinar un diseño innovador con la alta calidad. Incluye funciones tales como hora, fecha, calendario, temperatura interior y exterior, humedad relativa interior y exterior e historial de presión atmosférica. Entre otras funciones destaca también la hora de la salida del sol/ puesta del sol/ horas de sol, así... -
Página 78: Cómo Instalar Y Sustituir Las Pilas En El Transmisor Termo-Higro
Puede ver los datos de la temperatura en interiores con los MIN/MAX registros Puede ver los datos de la temperatura en interiores con los MIN/MAX registros, con la hora y fecha de registro de los mismos. Todos los registros MIN/MAX pueden ser ajustados nuevamente Muestra la humedad en interiores y exteriores en %RH Presión absoluta y relativa en hPa Historial de presión atmosférica relativa para las últimas 12 horas... -
Página 79: Puesta En Funcionamiento
Nota: Después de retirar las pilas, espere al menos 2 minutos antes de volver a instalarlas; de lo contrario, podrán producirse problemas de puesta en funcionamiento y transmisión. En caso de cambiar las pilas en cualquiera de las unidades, todas las unidades deben ser reajustadas/recon guradas siguiendo el procedimiento descrito para la puesta en funcionamiento. -
Página 80: Pantalla Lcd
Tecla SET (Ajuste) Sirve para entrar en los modos de ajuste manual de los siguientes formatos: contraste de la pantalla LCD, horario de verano, ajuste manual de la hora, calendario, valor de presión relativa Para apagar la alarma durante el timbre ... -
Página 81: Ajustes Manuales
Día de la semana Icono de la Hora alarma Humedad en Temperatura interiores en Interior en °C Indicador de las fases de la luna Calendario Hora de salida del sol Hora de puesta del sol Icono pronóstico del tiempo Gráfico de barras de presión atmosférica relativa Icono tendencia... -
Página 82: Ajuste Del Nivel De Constraste De La Pantalla Lcd
AJUSTE DEL NIVEL DE CONSTRASTE DE LA PANTALLA LCD parpadeando El contraste de la pantalla puede ser ajustado en 8 niveles diferentes, para acomodarse a las necesidades del usuario (El ajuste del nivel de contraste de la pantalla esta en LCD 3). Para ajustar el nivel de contraste deseado: Se verá... -
Página 83: Ajuste De Valor De Presión Atmosférica Relativa
Para hacerlo: La posición del año comenzará a parpadear. Utilice la tecla + para ajustar el año. Use la tecla MIN/MAX para disminuir los valores. El rango está desde el año 2011 al 2025. Pulse la tecla SET para entrar en el modo de ajuste del mes. El mes empezará... -
Página 84: Visualizacion Del Tiempo De Duracion De La Luz Solar
Nota: Puede seleccionar entre 10 países europeos/y 193 ciudades. El nombre de cada país/ciudad es mostrado de forma abreviada por ejemplo (el país preajustado es Francia y aparece con la inicial = F). Consulte la lista de países/ciudades que aparece al principio de este manual de instrucciones para ver todos los códigos de los diferentes países/ciudades. -
Página 85: Pronóstico Meteorológico Y Tendencia Meteorológica: Iconos De Pronóstico Meteorológico
Para ajustar la alarma: Pulse y sostenga la tecla ALARM por cerca de 3 segundos hasta que la hora de la alarma aparezca parpadeando. El digito de la hora relampagueará. Pulse la tecla + para ajustar la hora. Use la tecla MIN/MAX para disminuir los valores. -
Página 86: Indicador De Tendencia Meteorológica
a las diversas zonas climáticas para las cuales la estación meteorológica ha sido diseñada. La estación meteorológica será más precisa en zonas donde se producen cambios meteorológicos repentinos (por ejemplo, de soleado a lluvioso) que en zonas donde las condiciones meteorológicas se mantienen constantes la mayor parte del tiempo (por ejemplo, en zonas que generalmente presentan tiempo soleado). -
Página 87: Presión Del Aire
Presión del aire Oprima SET para causar un flip-flop (maromeo) entre los displays de presión relativa y absoluta. Presión absoluta Notes para la presión relativa y absoluta: La presión absoluta del aire provee la verdadera presentación de la medida de la presión del aire del tiempo y la ubicación vigentes. -
Página 88: Para Ver Los Regitsros De La Min/Max Temperatura
PARA VER LOS REGITSROS DE LA MIN/MAX TEMPERATURA Pulse el botón MIN/MAX varias veces para ver secuencialmente los registros de la MIN/MAX temperatura en interiores y exteriores respectivamente. Nota: los MIN/MAX registros de la temperatura en exteriores se visualizarán con la hora y fecha de su grabación. -
Página 89: Instalación De La Estación Meteorológica
CHEQUEO DE LA SEÑAL DE RECEPCION DE 868MHz La estación meteorológica debe recibir los datos de temperatura dentro de un período de 2 minutos después de haber puesto en funcionamiento la unidad. Si esos datos de temperatura no son recibidos en ese lapso (la pantalla muestra el símbolo “--.-”... -
Página 90: Instalación Del Transmisor Termo-Higro
INSTALACIÓN DEL TRANSMISOR TERMO-HIGRO Coloque en un lugar cubierto. Evite exponer la unidad a la lluvia y sol directos. El transmisor thermo-higro puede ser colocado en cualquier superficie plana usando el soporte que se desdobla como un stand o como la base para fijarlo en la pared. Para colgar en la pared Asegure el soporte en la pared deseada utilizando los tornillos y las anclas plásticas. -
Página 91: Exclusion De Responsabilidades
(Muestra este símbolo “- -” si la temperatura esta por fuera del intervalo OF.L ; muestra 19% si es < 20% y 96% si es > 95%) Rango de medición de la humedad exterior: 1% a 99% con una resolución del 1% í...