Tabla de contenido
Publicidad
Enlaces rápidos
Publicidad
Tabla de contenido

Manuales relacionados para Singer 8090


Resumen de contenidos para Singer 8090
- Página 1 INSTRUCTION MANUAL BROCHURE D’INSTRUCTIONS MANUAL DE INSTRUCCIONES 8090...
-
Página 2: Important Safety Instructions
INSTRUCTION MANUAL This sewing machine is intended for household use. IMPORTANT SAFETY INSTRUCTIONS When using a sewing machine, basic safety precautions should always be followed, including the following. Read all instructions before using. DANGER - To reduce the risk of electric shock: 1. - Página 3 - To reduce the risk of burns, fire, electric shock, or injury WARNING to persons: 1. Do not allow to be used as a toy. Close attention is necessary when this sewing machine is used by or near children. 2. Use this sewing machine only for its intended use as described in this manual. Use only attachments recommended by the manufacturer as contained in this manual.
- Página 4 10. Keep fingers away from all moving parts. Special care is required around the sewing machine needle. 11. Always use the proper needle plate. The wrong plate can cause the needle to break. 12. Do not use bent needles. 13. Do not pull or push fabric while stitching. It may deflect the needle causing it to break. 14.
- Página 5 MODEL 8090 Copyrigh © 2002 THE SINGER COMPANY PREFACE All Rights Reserved Throughout The World. Thank you for your purchase of this sewing machine. This machine intended for household use will provide you with excellent performance in sewing from light to heavy material (lawn to denim). Please refer to this booklet for proper use and optimum service.
-
Página 6: For European And Similar Territories
FOR EUROPEAN AND SIMILAR TERRITORIES: This product is suppressed for radio and television interference with the International Electrotechnical Commission requirements of the CISPR. Machine for Great Britain and some other countries having similar wiring standards are shipped from the factory without a plug for connection to the mains. The wires in this mains lead are colored in accordance with the following code. -
Página 7: Tabla De Contenido
CONTENTS FOR EUROPEAN AND SIMILAR D.REVERSE STITCH BUTTON ..16 TERRITORIES: ........4 E.DROP FEED LEVER ..... 16 MAIN PARTS ........... 8 FOOT CONTROLLER ......18 ACCESSORIES ........10 CONTROL BUTTON FUNCTIONS ... 18 A.REMOVING THE EXTENSION TO SELECT A PATTERN ...... 20 TABLE .......... - Página 8 INSERTING THE BOBBIN ....26 FABRIC, THREAD AND NEEDLE THREADING THE MACHINE ....27 TABLE ..........37 THREADING THE UPPER THREAD 27 STRAIGHT STITCH SEWING ....38 THREADING THE NEEDLE EYE ..28 ZIGZAG STITCH SEWING ....40 DRAWING UP THE BOBBIN SATIN STITCHING ......
- Página 9 LAPPED INSERTION ......52 TO RECALL THE MEMORIZED TO OPEN THE ZIPPER WHILE PATTERNS OR LETTERS ....68 STITCHING ........53 TO ADJUST THE BALANCE OF STITCH69 MULTI-STITCH ZIGZAG ......54 MAINTENANCE ........71 ELASTIC STITCH SEWING ....55 TO CHANGE THE LIGHT BULB ..71 PATCH WORK ........
-
Página 10: Main Parts
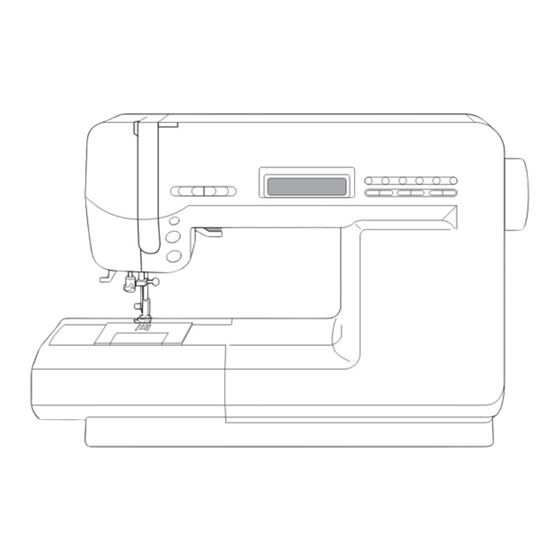
MAIN PARTS 1.Face Plate (with Thread 7.Buttonhole Lever 14.Reverse Stitch Button Cutter) 8.Needle Threader Lever 15.Start/Stop Button 2.Thread Take-Up Lever 9.Needle Threader 16.Needle Clamp Screw 3.Handle 10.Needle 17.Needle Thread Guide 4.Presser Foot Lifter 11.Presser Foot Thumb 18.Presser Foot Holder 5.Hand Wheel Screw 19.Needle Plate 6.Extension Table... - Página 11 23.Top Cover 31.Liquid Crystal Display (L.C.D.) 39.Pattern Select Buttons 24.Pattern Chart 32.L.C.D. Contrast Control 40.Stitch Width Buttons 25.Thread Tension Regulator 33.Group Select Button 41.Stitch Length Buttons 26.Bobbin Winder Thread Guide 34.Pattern Jump Button 42.Power Switch 27.Thread Guide 35.Style Change Button 43.Controller Plug 28.Spool Stand 36.Memory Enter Button...
-
Página 12: Accessories
ACCESSORIES Accessories are provided in the accessory case. 6.Driver for Needle Plate 1.Needle Pack (#11, #14, #16, Needle for knit and synthetic fabric #11, #14) 7.Thread Cap 2.Bobbin 8.Satin Foot 3.Seam Ripper 9.Overcasting Foot 4.Oiler 10.Zipper Foot 11.Blind Foot 5.Screw Driver 12.Buttonhole Foot 13.General Purpose Foot (On machine ACCESSOIRES... -
Página 13: A.REmoving The Extension Table
DUST COVER (OPTION) A. REMOVING THE EXTENSION TABLE Cover the machine with dust cover Hook your finger to the bottom of when it is not to be used. extension table and slide it to the left. To attach, insert to the right. C. -
Página 14: Changing The Presser Foot
CHANGING THE PRESSER FOOT The presser foot must be changed according to the stitch you sew, or work you do. CAUTION: To prevent accidents. Turn off the power switch before you change the presser foot. 1. Turn the hand wheel toward you until the needle is at its highest point. 2. -
Página 15: Inserting The Needle
INSERTING THE NEEDLE Select a needle of the right type and size for the fabric to be sewn. CAUTION: To prevent accidents. Turn off the power before removing the needle. 1. Turn the hand wheel toward you until the 5. Tighten the needle clamp screw. needle is at its highest point. -
Página 16: Connecting The Machine
CONNECTING THE MACHINE Place the machine on a stable table. 1. Connect the power line cord to the machine by inserting the 2-hole plug into the terminal box. 2. Connect the power line plug to the electric outlet. 3. Turn on the power switch. 4. -
Página 17: Brancher La Machine
BRANCHER LA MACHINE Placez la machine sur une table stable. 1. Raccordez le cordon d’alimentation à la machine. 2. Raccordez la prise secteur au réseau électrique. 3. Mettez l’interrupteur sur marche. 4. Un voyant lumineux s’allume lorsque l’interrupteur est sur marche. Pour débrancher, mettez l’interrupteur sur arrêt puis retirez la prise du secteur. -
Página 18: Control Buttons
CONTROL BUTTONS A. START/STOP BUTTON C. NEEDLE UP/DOWN BUTTON The machine will start running when start/stop Needle position can be changed by pressing button is pressed and will stop when pressed this button. Pressing this button will permit the second time. one stitch sewing. -
Página 19: Boutons De Contrôle
BOUTONS DE CONTROLE C. Bouton de positionnement de l’aiguille A. Marche/arrêt Il est possible de changer la position de l’aiguille en La machine commencera à fonctionner appuyant sur ce bouton. Il est également possible de lorsque vous appuyerez sur le bouton réaliser un seul point en appuyant sur ce bouton. -
Página 20: Foot Controller
FOOT CONTROLLER CONTROL BUTTON FUNCTIONS Use of foot controller will permit control of start, stop and speed with your foot. The control button functions described in previous page will change when the foot CAUTION: To prevent accidents. control is connected. 1. -
Página 21: Botones De Control De Funciones
DANGER: - To reduce the risk of electric shock. Never leave unattended when plugged in. Always unplug this machine from the electric outlet immediately after using and before maintenance. WARNING: - To reduce the risk of burns, fire, electric shock, or injury to persons. 1. -
Página 22: To Select A Pattern
TO SELECT A PATTERN 4. The GRP-C (Letter patterns) has two The pattern chart inside of the top cover indicates the all patterns and pattern styles (Block and Script). The style is numbers of this machine. changed by pressing the Style change These patterns are separated to three button (A- ) alternately. -
Página 23: Selectionner Un Motif
SELECTIONNER UN MOTIF 4. Le GRP-C (motif lettres) comporte deux Le chéma à l’intérieur du couvercle supérieur indique tous les points et leurs numéros. styles (manuscules et minuscules). Les motifs sont divisés en trois groupes : Pour changer de style en appuyez GRP-A: Motifs utilitaires successivement sur le bouton de GRP-B: Motifs décoratifs... -
Página 24: To Regulate The Stitch Width And Length
TO REGULATE THE STITCH WIDTH AND LENGTH Generally, the stitch width and length are preset to most optimum to suit the pattern. A. STITCH WIDTH B. STITCH LENGTH The stitch width of GRP-A and GRP-B The stitch length of GRP-A and GRP-B can be regulated by pressing the Stitch can be regulated by pressing the Stitch width buttons. -
Página 25: Guide For Stitch Width And Length
GUIDE FOR STITCH WIDTH AND LENGTH GRP-A GRP-B GRP-C patterns can not change the stitch width and length. CONTRAST OF THE LIQUID CRISTAL DISPLAY The contrast of L.C.D. is adjusted by turning L.C.D. contrast control dial located inside of the top cover. GUIDE DE LARGEUR ET DE LONGUEUR DE POINT GRP-A GRP-B... -
Página 26: Bobbin Winding
BOBBIN WINDING REMOVING THE BOBBIN WINDING THE BOBBIN 1. Remove the slide cover plate by sliding it 1.Place a spool of thread onto the spool pin toward you. and set the spool cap on it. 2. Lift up the bobbin from the machine. 2.Pass thread through the thread guide. - Página 27 5.Place the bobbin on bobbin winder 8.Start the machine again. spindle and push to the right to engage Set the speed to maximum. bobbin winder. 9.The bobbin winding will stop when bobbin is full. “ ” will appear on the L.C.D. when Stop the machine.
-
Página 28: Inserting The Bobbin
NB : n’utilisez que des canettes SINGER. 2. Tirez le fil dans l’encoche (A) INSERCION DE LA BOBINA 3. Tire del hilo hacia le izquierda y a lo largo del interior de la curva (B) hasta que se 1. -
Página 29: Threading The Machine
THREADING THE MACHINE THREADING THE UPPER THREAD 5. Pass thread along the arrow marks on machine. 1. Raise the presser bar lifter. 6. To thread the take-up lever, draw thread 2. Press the needle up/down button and set up against mark and bring thread back needle in up position. -
Página 30: Enfilage De L'AIguille
THREADING THE NEEDLE EYE 6. Hold thread loosely and release the lever. Hook will turn and pass thread through 1. Lower the presser foot. needle eye while making a ring. 2. Set needle in up position. 7. Pull thread out about 10 cm from needle 3. -
Página 31: Drawing Up The Bobbin Thread
DRAWING UP THE BOBBIN THREAD 3. Pull upper thread lightly. Bobbin thread 1. Raise the presser foot. will come up in a loop. 2. Hold thread loosely and press needle up/ 4. Pull both upper and bobbin threads about down button twice. 10 cm toward the back of presser foot. -
Página 32: Starting To Sew
STARTING TO SEW The machine will be set to ( ) automatically to sew straight stitches when power switch is turned on. START AND END OF SEAM 1. Check the presser foot (General Purpose 5. Regulate the speed while sewing. Presser Foot). -
Página 33: Demarrage De La Couture
DEMARRAGE DE LA COUTURE La machine se trouve automatiquement réglée pour piquer au point droit dès sa mise sous tension. DEBUT ET FIN D’UNE COUTURE 1. Vérifiez le type du pied presseur (pied 5. Contrôlez toujours la vitesse pendant la presseur universel). -
Página 34: Reverse Stitching
REVERSE STITCHING TURNING CORNERS Reverse stitching is used for reinforcing the ends of the seams. 1. Stop the machine when 1. Place the fabric in position where back stitching is to be you reach a corner. made and lower the presser foot. 2. -
Página 35: Sewing Heavy Fabric
SEWING HEAVY FABRIC SEWING OVER OVERLAPPED When sewing heavy fabrics, the toe end of 4. Use the needle AREAS presser foot tends to lift up and sewing can not as a pivot and be started smoothly. In such case, place a Guide the fabric with turn fabric. -
Página 36: Adjusting The Thread Tensions
ADJUSTING THE THREAD TENSIONS Normally, when upper thread regulating dial A. Correct Thread Tensions is set to “ AUTO ”, thread tensions will Upper and bobbin threads should lock automatically adjust to correct tensions. approximately in the middle of fabric. If it is difficult to obtain correct tensions B. - Página 37 C. When upper thread appears on the Note: bottom side of fabric. The bobbin thread tension is correctly Turn the tension dial to the right (+). adjusted at the factory and normally it would not be necessary for you to make D.
-
Página 38: Tabla De Tejido, Hilo Y Aguja
Syn 50 - 80 • Elástico- punta doble, Longitud de puntada: Aguja para tricot Seda50 tricot, spandex, jersey Pre-Programada y tejido sintético Hilo para tricot Utilice una aguja Singer para mejores resultados en la costura. Para cambiar la aguja, ver página 13. -
Página 39: Fabric, Thread And Needle Table
Synth 50-80 11/80-14/90 Longueur de point • Tissu Extensible - tricot, Soie Aiguille pour Réglage auto spandex, jersey tricot Fil à tricoter Utilisez une aiguille de marque SINGER pour de meilleurs résultats de couture. Pour changer l’aiguille, voir page 13. -
Página 40: Straight Stitch Sewing
STRAIGHT STITCH SEWING Straight stitch patterns should be selected to 1. Position the fabric for reverse stitching suit the type of fabric being sewn. and lower the presser foot. Left needle position is most suited for sewing Hold the upper thread and bobbin thread light weight fabrics. - Página 41 3. Press start button to start sewing. (When foot controller is 5. Raise the presser foot and used, release reverse stitch button.) cut thread. Place hand lightly on the fabric while sewning. A. Refer to page 55 for 4. Press reverse stitch button and reverse stitch at end of reinforcing knit fabrics.
-
Página 42: Zigzag Stitch Sewing
ZIGZAG STITCH SEWING Your machine can sew zigzag stitches of SATIN STITCHING various widths and lengths by changing the When machine is set to satin stitch “ ”, it will settings of the stitch width and stitch length. preset to closer stitches than the normal Zigzag stitches are very good for joining two zigzag stitch “... -
Página 43: Free Arm Sewing
FREE ARM SEWING By simply removing the extension table, machine becomes a free arm machine making hard to reach areas readily accessible. • Refer to page 11 for Removing The Extension Table. LA COUTURE AVEC LE BRAS-LIBRE En retirant simplement la tablette d’extension, la machine se transforme en bras-libre qui rend accessible les zones difficiles à... -
Página 44: Overcasting-Overlocking
OVERCASTING-OVERLOCKING (Preset width), , =Overcasting Foot / (Narrower Width), =General Purpose Foot USING THE OVERCASTING FOOT A. “ (Preset width)” is used for preventing ravelling of fabrics. Press fabric against the guide plate of the overcasting foot so that needle B. -
Página 45: Using The General Purpose Foot
CAUTION: To prevent USING THE GENERAL PURPOSE FOOT accidents. Place fabric so that needle will fall nearest to edge of Overcasting foot should be used fabric when using the General Purpose Foot. for sewing patterns “ , , ” C. Use “ (Narrower width)” when sewing thin fabrics. only and do not change the stitch width from pre-set. -
Página 46: Blind Hem Stitching
BLIND HEM STITCHING This stitch will sew without stitches showing 1. Fold the fabric as shown on drawing. on right side of fabric. 2. The guide (A) on the blind foot ensures even feeding of the fabric when blind hem Blind Foot stitching. - Página 47 turning the adjusting screw (B). touches the folded edge of fabric. 3. Place fabric so that stitches fall on the 4. Lower the presser foot and sew hem, edge of folded part of fabric. The needle guiding fabric evenly along the guide. will move to the left when pattern is 5.
-
Página 48: Buttonhole Sewing
BUTTONHOLE SEWING This machine can sew 3 type buttonholes. 1. Mark position and length of buttonhole on fabric. Buttonhole Foot 2. Set button on the base. • If button does not fit on the base, adjust slide on base to diameter of button plus thickness of button. - Página 49 3. Position fabric under presser foot so that Note: the center line mark is in the center of the A red warning lamp will light up and machine buttonhole foot. will not start to sew if buttonhole lever is not Lower the foot.
- Página 50 6. Machine will sew the buttonhole in the 7. Raise the presser foot and cut thread. order as shown. • To sew over same buttonhole, raise • When a buttonhle is completed, indicator presser foot (will return to original lamp will change to red. position).
-
Página 51: When Sewing Stretch Fabrics49
8. Cut center of buttonhole. WHEN SEWING STRETCH FABRICS • Cut center of buttonhole being careful not It is suggested that you use interfacing on to cut stitches on either side. Use a pin as the backside of the fabric. a stopper at bar tack so that you do not cut too much. -
Página 52: Inserting Zippers
INSERTING ZIPPERS Zipper Foot CENTERED INSERTION 2. Press open the seam allowance. Baste the zipper tape. 1. Baste the zipper opening to the seam line. • Place the open zipper face down on the A: Top stitch, B: End of opening, seam allowance with the teeth against the C: Basting seam line. - Página 53 3. Attach the zipper foot. 5. Stitch across the lower end and right side • Attach the left side of the presser foot pin of zipper. to the presser foot holder when sewing Remove the basting and press. the right side of the zipper, and right side of the presser foot pin to the holder when CAUTION: To prevent accidents.
-
Página 54: Lapped Insertion
LAPPED INSERTION 1. Baste the zipper opening to the seam line. 3. Attach the zipper foot. A: Top stitch, B: End of opening, • Attach the left side of the presser foot pin C: Basting to the presser foot holder when sewing the right side of the zipper, and right side 2. -
Página 55: To Open The Zipper While Stitching
TO OPEN THE ZIPPER WHILE STITCHING 5. Turn the fabric right side out stitch across 1. Stop stitching before you reach the slider. the lower end and right side of zipper. 2. Lower the needle into fabric. 3. Raise the presser foot and open the 6. -
Página 56: Puntada Multiple Zig-Zag
MULTI-STITCH ZIGZAG General Purpose Foot B. Overcast Stitching Used for easy to ravel and knit fabrics. Used for sewing on elastic band and Needle should fall on extreme edge of overcast stitching on knit fabrics. fabric. A. Elastic Band Sewing Pull elastic band in front and back of needle while sewing. -
Página 57: Elastic Stitch Sewing
ELASTIC STITCH SEWING General Purpose Foot We recommend that you use a needle for knit and synthetic fabrics to prevent stitch It assures you of a stitch that is strong and skippings and thread breakages. flexible and will give with the fabric without breaking. -
Página 58: Patchwork
PATCH WORK General or Satin Foot 1. Place two pieces of fabric right sides together and sew a basting stitch. For additional decorative purposes, use 2. Press the seam open. different kind of materials. 3. Be sure that stitches fall on both sides of fabric. -
Página 59: Applique
APPLIQUE General or Satin Foot A. When sewing sharp angles Bring needle to lowest position and raise 1. Fix applique on fabric with either satin the presser foot. stitch or basting stitches. Use needle as pivot and turn fabric. 2. Sew edge of applique as you would with overcast stitching. -
Página 60: Satin, Decorative And Letter Stitch Sewing
SATIN, DECORATIVE AND LETTER STITCH SEWING Satin Foot A. The letter stitches (GRP-C) have two styles. Use the satin foot for satin stitching and The style is changed alternately by sewing decorative or letter stitch patterns. pressing the style change button. This foot has a full indentation on the As the letter stitches have a built-in tack underside to permit easy over closely... -
Página 61: Sewing Thin Fabrics
B. The other patterns (GRP-B) don’t have a built- SEWING THIN FABRICS in tack stitch, therefore the machine will When sewing very thin fabrics, it is repeat pattern sewing until you stop the suggested that you use interfacing on the machine. -
Página 62: Stitch Memory
STITCH MEMORY COMBINING THE DECORATIVE PATTERNS (GRP-B) A. To enter patterns into memory 1. Set the group to GRP-B. 4. According to these procedure, select and 2. Select a first pattern you want to enter. enter next patterns you desire. 3. - Página 63 B. To clear the memorized pattern a. If you entered undesired pattern, press b. If you want to clear all entered patterns, the Clear (CLR) button short time (less press the (CLR) button long time (over 0.5 than 0.5 sec.). The last pattern entered sec.).
- Página 64 C. To check the entered patterns You can check the entered patterns as follows. 1. Press the Memory Check (MRC) button. 3. By pressing “+” button, entered patterns The first entered pattern will appear on will be indicated in order. By pressing “–”...
- Página 65 D. To sew memorized patterns E. One unit of pattern 1. Attach the satin presser foot when sewing memorized When you have pressed the patterns. (ENT) button, one unit of selected 2. Lower the presser foot and start to sew. pattern will be memorized.
-
Página 66: Combinaison Des Motifs Lettres
STITCH MEMORY COMBINING THE LETTER PATTERNS (GRP-C) A. To enter letters into memory 1. Set the group to GRP-C. 4. According to these procedure, select and 2. Select a first letter you want to enter. enter next letters you desire. 3. - Página 67 B. To clear the memorized pattern a. If you entered undesired letter, press the b. If you want to clear all entered letters, Clear (CLR) button short time (less than press the (CLR) button long time (over 0.5 0.5 sec.). The last letter entered will be sec.).
- Página 68 C. To check the entered patterns If you entered letters more than 12 3. By pressing “+” button, entered letter will patterns, you can check the entered be indicated from right side. patterns as follows. By pressing “–” button, entered letter will 1.
- Página 69 D. To sew memorized patterns 1. Attach the satin presser foot when sewing 4. Machine will stop automatically after memorized patterns. sewing memorized letters. 2. Lower the presser foot and start to sew. 5. Cut off the excess of thread and treat 3.
-
Página 70: To Recall The Memorized Patterns Or Letters
STITCH MEMORY TO RECALL THE MEMORIZED PATTERNS OR LETTERS You can recall the memorized patterns or letters after you have changed the group. 1. Select the group you heve entered and 2. You can operate entering or sewing press the (MRC) button. continuously. -
Página 71: Como Ajustar El Balance De Puntada
TO ADJUST THE BALANCE OF STITCH Depending on the type of fabric you sew, it may be necessary to adjust balance of the forward and reverse stitches. This adjustment is needed when the decorative or letter stitch pattern is misformed. Turn Stitch balance control screw in either direction as may required. -
Página 72: Points De Motifs Decoratifs
A. Decorative stitch pattern B. Letter stitch pattern a. If patterns are misformed as illustration a. If patterns are misformed as illustration (a), turn screw to “+”. (a), turn screw “+”. b. If patterns are misformed as illustration b. If patterns are misformed as illustration (b), turn screw to “-”. -
Página 73: To Adjust The Balance Of Stitch69 Maintenance
MAINTENANCE DANGER: To reduce the risk of electric shock. Disconnect the power line plug from electric outlet before carrying out any maintenance or changing the sewing light bulb. Replace the bulb with same type rated 2.4 W. TO CHANGE THE LIGHT BULB 1. -
Página 74: Cleaning
CLEANING If lint and bits of thread accumulate in the hook, this will interfere with the smooth operation of the machine. Check regularly and clean the stitching mechanism when need. A. Bobbin Holder B. Hook Race and Feed Dog Remove the slide cover plate and 1. - Página 75 3. Clean the hook race, feed dog and bobbin 4. Replace the bobbin holder into the hook holder with a brush. Also clean them, race so that the tip (A) fits to using a soft, dry cloth. the stopper (B) as shown. 3.
-
Página 76: Helpful Hints
HELPFUL HINTS PROBLEM CAUSE CORRECTION PAGE • Machine not properly Re-thread machine. threaded. • Thread entwined around Remove entwined thread. Upper thread bobbin. breaks • Needle inserted incorrectly. Re-insert needle. • Thread tension too tight. Readjust thread tension. • Thread of incorrect size or Choose correct thread. - Página 77 • Needle inserted incorrectly. Re-insert needle. • Bent or blunt needle. Insert new needle. Machine skips Choose correct size • Incorrect size of needle. stitches needle for fabric. (use stretch needle) (on stretch fabric) • Machine not properly Re-thread machine. threaded.
- Página 78 PROBLEM CAUSE CORRECTION PAGE Threader does not • Needle is not raised. Raise the needle. thread needle eye • Needle inserted incorrectly. Re-insert needle. • Bent needle. Insert new needle. Machine does not • Stitch length not suitable for Regulate stitch length. feed properly fabric.
- Página 79 Remove the needle plate Machine runs with • Dirt or lint accumulated in the and bobbin case and difficulty hook race and feed dog. clean the hook race and feed dog. Machine will • Cord not plugged into Insert plug fully into outlet. not run electrical outlet.
- Página 80 HP32688 8040 (English/French/Spanish) D2...