Tabla de contenido
Publicidad
Idiomas disponibles
Idiomas disponibles
Enlaces rápidos
Originalbetriebsanleitung
Gebrauchsanweisung
Original instructions
Instruction manual
Notice originale
Instructions d'emploi
Manual original
Manual del usario
Istruzioni originali
Istruzioni d'impiego
Oorspronkelijke gebruiksaanwijzing
Gebruiksaanwijzing
Achtung!
Lesen Sie vor der ersten Inbetriebnahme diese
Gebrauchsanweisung gründlich durch und
beachten Sie unbedingt die
Sicherheitsvorschriften!
Important!
Read this instruction manual carefully before
first operation and strictly observe the safety
regulations!
Attention!
Lire attentivement ce manuel avant la première
mise en service et observer absolument
les prescriptions de sécurité!
¡Atención!
Es indispensable leer con mucha
atención las instrucciones de
manejo antes de utilizarla por
primera vez. ¡Preste
especial atención a las
recomendaciones de
seguridad!
Attenzione!
Prima della prima messa in
funzione leggere a fondo le
presenti istruzioni per l'uso e
osservare assolutamente le
norme di sicurezza.
Attentie!
Lees deze gebruiksaanwijzing aandachtig door
voordat u de machine in gebruik neemt en sla
acht op de veiligheidsvoorschriften!
Laubbläser
Leaf blower
Souffleur de feuilles
Soplador de hojas
Soffiatori di
fogliame
Bladblazer
70240
468
de
en
fr
es
it
04/2020
Publicidad
Tabla de contenido

Manuales relacionados para Solo 468


Resumen de contenidos para Solo 468
- Página 1 Originalbetriebsanleitung Laubbläser Gebrauchsanweisung Leaf blower Original instructions Instruction manual Souffleur de feuilles Notice originale Instructions d'emploi Soplador de hojas Manual original Soffiatori di Manual del usario fogliame Istruzioni originali Istruzioni d'impiego Bladblazer Oorspronkelijke gebruiksaanwijzing Gebruiksaanwijzing Achtung! Lesen Sie vor der ersten Inbetriebnahme diese Gebrauchsanweisung gründlich durch und beachten Sie unbedingt die Sicherheitsvorschriften!
- Página 2 Betriebs- und Wartungshinweise genau einhalten. Sollten Sie nach dem Studium dieser Vorschriftsmäßige Schutzkleidung tragen. Gebrauchsanweisung noch weitergehende Fragen haben, steht Ihnen Ihr SOLO-Händler gerne zur Zur Vermeidung von Gehörschäden sind Verfügung. geeignete persönliche Schallschutzmittel zu tragen (wie z.B. Gehörschutz, Kapseln, Informationen zu Inhaltsstoffen (VO (EG) Wachswatte etc.).
-
Página 3: Sicherheitsvorschriften
Sicherheitsvorschriften 3. Sicherheitsvorschriften Die Zündanlage dieser Maschine erzeugt beim Betrieb ein elektromagnetisches Feld. Dieses Feld kann sich unter bestimmten Bedingungen auf die Funktionsweise von Herzschrittmachern auswirken. Personen mit einem Herzschrittmacher müssen vor der Nutzung dieser Maschine unbedingt ihren Arzt und den Hersteller des Herzschrittmachers konsultieren. 3.1 Bestimmungsgemäßer Gebrauch / Allgemeine Sicherheitshinweise Während der Arbeit sind die Sicherheitshinweise unbedingt zu beachten. -
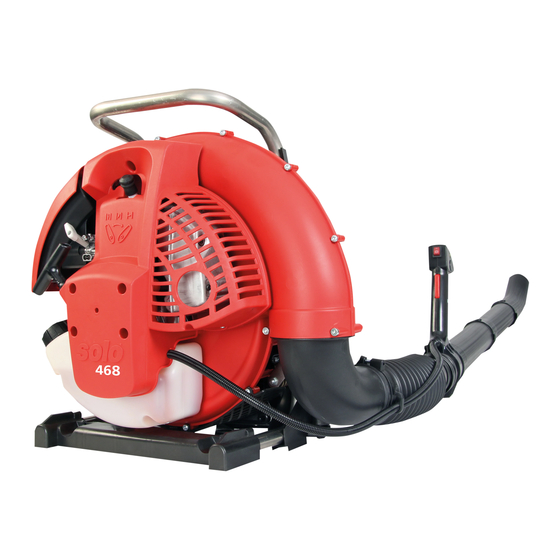
Página 4: Wichtige Bauteile
Wichtige Bauteile 4. Wichtige Bauteile Fig. 1 Kurzschluss-Schalter Gashebel Gashebelsperre Primer Chokehebel Luftfilter-Abdeckung Kraftstofftank-Deckel Startergriff Zündkerze Auspuff Vergaser-Einstellschrauben Tragegurt Klickverschluss Tragegurt Tragegestell Gebläsegehäuse Gebläsekrümmer Faltenschlauch Blasrohr I Verlängerungsrohr II Krümmerdüse DEUTSCH 4... - Página 5 Zusammenbau 5. Zusammenbau Vor der ersten Inbetriebnahme muss das Gerät komplettiert werden: Fig. 2 Der Gebläsekrümmer (16) ist bereits mit den beiden Schrauben (A+B) im Gebläsegehäuse (15) fixiert. Auf leichte Drehbeweglichkeit achten. Fig. 3 Faltenschlauch (17) auf Gebläsekrümmer (16) stecken und mit Schelle (C) befestigen. Gasgriff (D) auf das Blasrohr I (18) stecken und auf der gewünschten Position mit 2 Schrauben festschrauben.
-
Página 6: Kraftstoff Tanken
Superbenzin (Oktanzahl 92 ROZ) Marken 2-Takt-Motoröl, das der Norm ISO-L-EGD oder JASO FD entspricht Empfehlung: Verwenden Sie "SOLO Profi 2T-Motoröl" in einem Mischungsverhältnis Öl:Benzin von 1:50 (2 %). Lagern Sie das Kraftstoffgemisch nicht länger als 3 Wochen. DEUTSCH 6... -
Página 7: Motor Starten / Motor Abstellen
Motor starten / Motor abstellen Sobald der Motor rund, läuft die Starterklappe 7. Motor starten / Motor abstellen auf geöffneter Position stellen. Starten bei betriebswarmem Motor: bzw. nach Starten bei kaltem Motor kurzzeitigem Abstellen. Fig. 4 Mit Starterklappe in geöffneter Position, den Motor starten. -
Página 8: Funktionsteile An Der Griffeinheit
Arbeitshinweise 8. Arbeitshinweise 8.2 Funktionsteile an der Griffeinheit Fig. 7 Vor jedem Arbeitsbeginn und vor jedem Startvorgang das Blasgerät auf einwandfreie Funktion und vorschriftsmäßigen Zustand überprüfen (Gasbetätigung, Kurzschlussschalter, Schutzvorrichtung, Tragegurt, und Kraftstoff- Leckstellen untersuchen). Achten Sie bei der Arbeit darauf, dass Sie die Abgase des Motors nicht einatmen. -
Página 9: Wartung Und Pflege
Andere Wartungsarbeiten, als die in dieser Wenn der Leerlauf zu hoch ist, drehen Sie die Gebrauchsanweisung beschriebenen, dürfen Leerlauf-Anschlagschraube "T" entgegen dem nur von einer autorisierten SOLO Fachwerkstatt Uhrzeigersinn etwas auf. vorgenommen werden. Dabei dürfen nur Original-Ersatzteile verwendet werden. ... -
Página 10: Luftfilter Wartung
Wartung und Pflege Luftfiltergehäuse mit einem trockenen oder nur 9.3 Luftfilter Wartung leicht feuchten Tuch sauber abwischen. Vor dem Einsetzen des Filters müssen das Gehäuse und der Filter wieder vollständig trocknen Der Luftfilter hält den mit der Verbrennungsluft sein. angesaugten Schmutz zurück und vermindert Auf keinen Fall feuchte oder nasse damit den Verschleiß... - Página 11 Wartung und Pflege 9.6 Wartungsplan Die folgenden Hinweise beziehen sich auf normale Einsatzverhältnisse. Bei besonderen Bedingungen, wie z.B. besonders langer, täglicher Arbeitszeit, müssen die angegeben Wartungsintervalle entsprechend verkürzt werden. Führen Sie die Wartungsarbeiten regelmäßig durch. Beauftragen Sie eventuell eine Fachwerkstatt, wenn Sie nicht alle Arbeiten selber durchführen können. Der Gerätebesitzer ist auch verantwortlich für: ...
- Página 12 Wartung und Pflege; Garantie 9.7 Ersatzteile Der zuverlässige Betrieb und die Sicherheit Ihres Gerätes hängt auch von der Qualität der verwendeten Ersatzteile ab. Nur Original Ersatzteile verwenden. Nur die Originalteile stammen aus der Produktion des Gerätes und garantieren daher höchstmögliche Qualität in Material, Maßhaltigkeit, Funktion und Sicherheit. Original Ersatz- und Zubehörteile erhalten Sie bei Ihrem Fachhändler.
-
Página 13: Technische Daten
Unsicherheit K gemäß EG-Richtlinie 2006/42/EG: 2 m/s ohne Blasrohr 12. EG-Konformitätserklärung SOLO Kleinmotoren GmbH, Industriestraße 9, 71069 Sindelfingen, DEUTSCHLAND erklärt, dass nachfolgend benannte Maschine in der gelieferten Ausführung den Vorschriften in Umsetzung folgender Richtlinie entspricht: 2006/42/EG, 2000/14/EG, 2014/30/EU und 2011/65/EU Das Blasgerät wurde in Übereinstimmung mit den jeweils zum Produktionsdatum gültigen Fassungen der... -
Página 14: Type Plate
Your emission control system includes parts such as choke closed the carburetor, the ignition system, and the exhaust system. Where a warrantable condition exists, Solo will repair 2. Type plate your small non-road power equipment engine at no cost to you including diagnosis, parts, and labor. -
Página 15: Safety Regulations
Safety regulations 3. Safety regulations This machine produces an electromagnetic field during operation. This field may under some circumstances interfere with active or passive medical implants. Persons with medical implants have to consult their physician and the medical implant manufacturer before operating this machine. You should request and receive instructions from the vendor on the safe operation if you are using this type of product for the first time. -
Página 16: Important Components
Important Components 4. Important Components Fig. 1 On/Off Switch Throttle Lever Throttel control lock Primer Choke Lever Air Filter Cover Fuel Tank Lid Starter Handle Spark Plug Muffler Carburetor Adjustment Screws Carrying Strap Quick-Release Carrying Strap Carrying Frame Blower Housing Blower Elbow Pleated Elbow Tube Blower Tube I... - Página 17 Assembly 5. Assembly Completely assembly the leaf blower before its first use: Fig. 2 The blower elbow (16) is already fixed in the blower housing (15) with the two screws (A+B). Ensure the elbow can swivel easily. Fig. 3 Push pleated elbow tube (17) onto blower elbow (16) and secure with clamp (C). Push multi-function handle (D) onto blower tube l (18) and fix with 2 screws in the required, comfortable position.
-
Página 18: Fuel Information
Branded 2-stroke engine oil corresponding to the standard ISO-L-EGD or JASO FD Recommendation: Use the "SOLO Profi 2-stroke engine oil" at a mixing ratio of oil:petrol of 1:50 (2 %). Store the fuel mix no longer than 3 weeks. -
Página 19: Starting / Stopping The Engine
Starting / Stopping the engine Starting with warm engine after short stop 7. Starting / Stopping the engine Start the engine with choke in open position. Starting with cold engine Should the engine refuse to start despite several Fig. 4 starting attempts, the combustion chamber is most likely flooded. -
Página 20: Adjustment Of Shoulder Straps
Operating Hints 8. Operating Hints 8.2 Active components of the operating handle Fig. 7 Prior to operating and prior to each start, check the blower unit's condition with regard to throttle activation, on/off switch, protective covers, carrying straps and also for any fuel leaks. Take care not to inhale exhaust fumes. -
Página 21: Maintenance And Care
Thus SOLO recommends that you speed given in the specification can be adjusted as have a specialized SOLO workshop carry out all follows, via the idling end-stop screw "T" (the use work that is not described in these operating of a rev counter is recommended): instructions. -
Página 22: Air Filter Maintenance
Maintenance and care housing and the filter must be completely dry 9.3 Air Filter Maintenance again. Never insert moist or wet foam filters! Immediately replace damaged filter parts. The air filter separates and retains dirt before the air reaches the combustion chamber. This reduces When re-fitting, ensure the filter is positioned and seated properly. -
Página 23: Scheduled Maintenance
Dependable operation and the safety of your device also depend on the quality of the replacement parts that you use. Use only original SOLO replacement parts. Only original parts come from the production of the device and thus guarantee the highest possible material quality, dimensional accuracy, function, and safety. -
Página 24: Technical Specifications
[78.7 "/s * without Tube 11. EC declaration of conformity SOLO Kleinmotoren GmbH, Industriestraße 9, 71069 Sindelfingen, GERMANY, declares that the following machine as delivered complies with the provisions in implementation of the following EC directives: 2006/42/EG, 2000/14/EC, 2014/30/EU and 2011/65/EU... - Página 25 • Damages caused by overheating due to dirt build up on the ventilator casing. • Intervention by non-specialized persons, or improper repair attempts. • The use of unsuitable replacement parts or parts other than SOLO original parts to the extent that they cause damage.
-
Página 26: Plaque Signalétique
Portez une protection du visage (comme (VO (EC) No.1907/2006 „REACh“) des lunettes de protections). peut être trouvé sur notre page d'accueil sous: https://de.solo.global/de/content/12-service Portez des gants de protection Le niveau d'émission d'échappement La valeur de CO2 déterminée lors de la procédure Utiliser un masque respiratoire si de réception UE par type est disponible sur notre... -
Página 27: Vetements De Securite
Consignes de sécurité 3. Consignes de sécurité Le système d’allumage de cette machine génère un champ électromagnétique durant le fonctionnement de la machine. Ce champ peut dans certains cas perturber le fonctionnement des pacemakers. Pour réduire le risque de blessures graves ou mortelles, les personnes portant des pacemakers doivent consulter leur médecin et le fabricant de leur pacemaker avant d’utiliser cette machine. -
Página 28: Parties Principales
Parties principales 4. Parties principales Fig. 1 Bouton marche-arrêt Poignée d’accélérateur Blocage de l'accélérateur Pompe d’amorçage Starter Couvercle filtre à air Bouchon réservoir essence Poignée lanceur Bougie Echappement Vis de réglage du carburateur Sangle Fermeture de la sangle Châssis Carter de soufflerie Coude Tube annelé... - Página 29 Montage 5. Montage Avant la première utilisation, l’appareil doit être complété de la façon suivante: Fig. 2 Le coude (16) doit être enfilé sur le carter de soufflerie (15) et fixé à l’aide des 2 vis (A+B). Veillez à ce que le coude tourne librement.
-
Página 30: Remplissage Du Réservoir
(taux d'octane 92 RON) L'huile 2 temps de marque conforme aux normes ISO-L-EGD ou JASO FD. Recommandation : utilisez " Huile de moteur 2 T SOLO Profi " avec une proportion de mélange huile-essence de 1:50 (2 %). FRANÇAIS 6... -
Página 31: Démarrage / Arrêt Du Moteur
Démarrage / Arrêt du moteur Dès que le moteur tourne correctement, 7. Démarrage / Arrêt du moteur mettre le starter en position ouverte. Démarrage du moteur à froid Démarrage à chaud ou après Fig. 4 un arrêt de courte durée Avec un starter en position ouverte démarrer le moteur. -
Página 32: Eléments De Commande À La Poignée
Conseils d’utilisation 8. Conseils d’utilisation 8.2 Eléments de commande à la poignée Fig. 7 Avant chaque mise en route, il est important de vérifier le bon fonctionnement de l’appareil (accélérateur, bouton d’arrêt, dispositif de protection, sangles, vérifiez le bon état des différents passages de carburant). -
Página 33: Réglage Du Carburateur
Selon la région d’utilisation (montagne, plaine), on atelier disposant d’outils spéciaux et d’appareils de peut corriger le régime de ralenti moyen indiqué contrôle. SOLO recommande donc de faire appel dans les caractéristiques techniques au moyen de à un atelier SOLO spécialisé pour toute la vis de butée du ralenti «... -
Página 34: Nettoyage Du Filtre À Air
Entretien Essuyer le carter du filtre à air avec un chiffon sec 9.3 Nettoyage du filtre à air ou légèrement humide. Le carter et ke filtre doivent impérativement être secs avant la réinsertion du filtre. Il arrête la poussière et autres particules aspirées vers le cylindre et réduit ainsi l’usure du moteur. -
Página 35: Plan D'eNtretien
Entretien 9.6 Plan d'entretien Les informations suivantes se réfèrent aux conditions d'utilisation normales. En cas de conditions particulières telles qu'une forte production de poussière ou un temps de travail quotidien très long, les intervalles d'entretien doivent être réduits à l'avenant. Effectuer régulièrement les interventions d'entretien indiquées. -
Página 36: Pièces De Rechange
• Dommage dû à la surchauffe en raison d’un encrassement du carter du ventilateur • Interventions de personnes non qualifiées ou essais de remise en état incorrects • Utilisation de pièces de rechange inappropriées ou de pièces qui ne sont pas d’origine de SOLO, dans la mesure où elles sont responsables du dommage •... -
Página 37: Caractéristiques Techniques
* sans tuyau 12. Déclaration de conformité UE La société SOLO Kleinmotoren GmbH, Industriestraße 9, 71069 Sindelfingen, ALLEMAGNE, déclare que la machine définie ci-dessous est conforme dans la version livrée aux directives européennes suivantes : 2006/42/CE, 2000/14/CE, 2014/30/EU et 2011/65/EU Désignation du produit : Souffleur de feuilles,... -
Página 38: Soplador De Hojas
Información sobre los ingredientes oídos. (VO (EC) No.1907/2006 „REACh“) se puede encontrar en nuestra página de inicio en: Usar protección facial (p.ej. gafas de https://de.solo.global/de/content/12-service protección). Utilice guantes para cualquier trabajo con Nivel de emisión de escape esta máquina. El valor de CO2 determinado en el proceso de aprobación de tipo de la UE se puede encontrar... -
Página 39: Instrucciones De Seguridad
Instrucciones de seguridad 3. Instrucciones de seguridad Esta máquina genera un campo electromagnético durante el funcionamiento. Este campo magnético puede, en determinadas circunstancias, interferir con implantes médicos activos o pasivos. Para reducir el riesgo de lesiones graves o letales, las personas que utilizan implantes médicos deben consultar a su médico y al fabricante del implante antes de emplear esta máquina. -
Página 40: Elementos Importantes
Elementos importantes 4. Elementos importantes Fig. 1 Mando Arranque/parada Acelerador Bloqueo del acelerador Cebador Aire Tapa de filtro del aire Tapa del depósito de combustible Tirador de arranque Bujía Silencio Tuercas del carburador - ajuste Correa de transporte Cinturón Asa de transporte Armazón del escape Codo pulverizador Tubo ondulado... - Página 41 Armado 5. Armado Antes de su primer uso el equipo debe ser completado: Fig. 2 El codo pulverizador (16) se fija en dirección del pulverizado hacia adelante con ambos tornillos (A+B) en la carcaza de pulverizado (15). Poner atención que pueda rotarse fácilmente.
-
Página 42: Repostar Combustible
Gasolina regular sin plomo o gasolina súper sin plomo (octanos 92 RON). Marcas de aceite de motor de 2-tiempos, que cumple las normas ISO-L-EGD o JASO FD. Recomendación: Use "SOLO Profi 2T-Motoröl" en ESPAÑOL 6... -
Página 43: Arrancar El Motor / Apagar El Motor
Arrancar el motor / Apagar el motor posición media (parcialmete abierto) hasta se 7. Arrancar el motor / Apagar el motor caliente el motor brevemente. Tan pronto como el motor funcione suavemente, coloque la tapa del choke en la Encendido con motor frío posición abierta. -
Página 44: Recomendaciones Para Trabajar
Recomendaciones para trabajar 8. Recomendaciones para trabajar 8.2 Componentes activos del manillar Fig. 7 Antes de cada trabajo, revise las condiciones del soplador con especial atención al acelerador, el interruptor On/Off, las carcasas, correas y también siempre a las posibles pérdidas de combustible. Cuide de no inhalar los gases de la combustión. -
Página 45: Manutención Y Cuidados
Es por los datos técnicos mediante el tornillo de tope de ello que SOLO recomienda mandar ejecutar todos ralentí “T”, con ayuda de un velocímetro, del los trabajos que no vienen descritos en el... -
Página 46: Limpiar El Filtro De Aire
Manutención y cuidados aire con un pano seco o ligeramiente húmedo. 9.3 Limpiar el filtro de aire Antes de insertar el filtro, la carcasa y el filtro deben estar completamente secos. No coloque en ningún caso filtros de gomaespuma El filtro de aire protege contra la suciedad del aire húmedos o mojados. -
Página 47: Plan De Mantenimiento
Manutención y cuidados 9.6 Plan de mantenimiento Las indicaciones que figuran a continuación se refieren a las condiciones de funcionamiento normales. En condiciones especiales, como períodos de trabajo largos y diarios, los intervalos para realizar el mantenimiento indicados aquí se deben reducir como corresponda. Realice los trabajos de mantenimiento regularmente. -
Página 48: Piezas De Repuesto
Téngase también en cuenta que si se han utilizado piezas que no son las originales de SOLO, no se podrá reclamar nada en concepto de garantía a SOLO. -
Página 49: Datos Técnicos
* sin tubo 12. Declaración de conformidad CE SOLO Kleinmotoren GmbH, Industriestraße 9, 71069 Sindelfingen, ALEMANIA, declara que la máquina mencionada a continuación en la versión entregada cumple con los requisitos para poner en práctica las siguientes directivas comunitarias: 2006/42/CE, 2000/14/CE, 2014/30/CE y 2011/65/CE Denominación del producto:... -
Página 50: Targhetta Identificativa
(VOCE (CE) n. 1907/2006 "REACh") può essere trovato sulla nostra homepage sotto: Proteggere il volto e gli occhi con una https://de.solo.global/de/content/12-service protezione adeguata o occhiali di sicurezza. Quando si lavora con l’apparecchio o si Valore delle emissioni dei gas di scarico... -
Página 51: Sicurezza E Protezione Personale
Per motivi di spedizione, il soffiatore viene consegnato parzialmente smontato e deve essere completato prima della messa in funzione (vedere il Cap. 3 “4. Montaggio”). Il soffiatore deve essere messo in funzione solo in condizione di montaggio completo. Prima della prima messa in funzione leggere attentamente le presenti istruzioni per l'uso e conservarle in un posto sicuro. -
Página 52: Componenti Importanti
Componenti importanti 4. Componenti importanti Fig. 1 Interruttore acceso / spento Maniglia acceleratore Blocco leva del gas Pompa adescamento Insegna di tipo Filtro aria Chiusura serbatoio benzina Accensione a strappo Candela d'accenzione Marmitta Viti regolazione carburatore Cinghia a spalla Cinghia a spalla con sganciamento rapido Telaio zaino Carter ventola Tubo a gomito... - Página 53 Montaggio 5. Montaggio Provvedere al montaggio completo dell’soffiatore, prima di iniziarne l’uso. Installare il tubo a gomito (16) all’uscita del carter della Fig. 2 soffiante e fissarlo con le 2 viti (A+B). Assicurarsi che il gomito possa ruotare liberamente. Fig. 3 Inserire il tubo a soffietto (17) all’estremità...
-
Página 54: Rifornimento Di Carburante
Rifornimento benzina normale senza piombo o benzina super 6. Rifornimento senza piombo (numero di ottani 92 NORM) olio da motore a due tempi che soddisfa la norma ISO-L-EGD o JASO FD 6.1 Norme di sicurezza / Durante il ... -
Página 55: Avviare / Arrestare Il Motore
Avviare / Arrestare il motore molto basse, far riscaldare il motore un breve lasso 7. Avviare / Arrestare il motore di tempo con la valvola dello starter in posizione centrale (parzialmente aperta). Impostare la valvola dello starter posizione Avviamento a freddo del motore aperta non appena il motore funziona senza Fig. -
Página 56: Componentistica Della Maniglia Di Comando
Consigli per l’uso 8. Consigli per l’uso 8.2 Componentistica della maniglia di comando Fig. 7 Prima di ogni inizio di lavoro e di agni avviamento occorre verificare il corretto funzionamento del soffiatore e la sua condizione. Assicurarsi di non inalare i gas di scarico durante l’uso della macchina. -
Página 57: Cura E Manutenzione
“T” SOLO tutti i lavori che non sono descritti nella come segue: presente istruzione d’uso. Lo specialista dispone della formazione necessaria, di profonda esperienza Fig. -
Página 58: Filtro Aria
Ciò è l'alloggiamento del filtro dell'aria con un panno essenziale per salvaguardare il motore dall’usura. asciutto o solo leggermente inumidito. Una regolare manutenzione prolunga la durata Prima di inserire il filtro, l'alloggiamento e il filtro d’esercizio del motore. -
Página 59: Schema Di Manutenzione
Cura e manutenzione 9.6 Schema di manutenzione Le seguenti istruzioni si riferiscono a normali condizioni di impiego. Nel caso di condizioni speciali, come per es. forte produzione di polvere o un periodo di lavoro particolarmente lungo e giornaliero si dovranno ridurre in modo conforme gli intervalli prescritti di manutenzione. -
Página 60: Parti Soggette A Usura
• Danni imputabili a surriscaldamento a causa di insudiciamento nella scatola del ventilatore. • Interventi di persone inesperte o tentativi di riparazione non appropriati. • Impiego di ricambi non adatti o di parti non originali della SOLO, in quanto che causano danni. • Impiego di materiali di esercizio non idonei o sovrapposti. -
Página 61: Dati Tecnici
* senza turbo soffiatore 12. Dichiarazione di conformità CE SOLO Kleinmotoren GmbH, Industriestraße 9, 71069 Sindelfingen, Germania, dichiarano che la macchina indicata di seguito, nella versione fornita di fabbrica soddisfa le disposizioni nell'attuazione delle direttive CE riportate di seguito: 2006/42/CE, 2000/14/CE, 2014/30/EU e 2011/65/EU... - Página 62 (VO (EC) No.1907 / 2006 "REACh") oorkappen of oorpluggen. is te vinden op onze homepage onder: https://de.solo.global/de/content/12-service Bescherm uw gezicht en ogen met een gelaatsscherm of een veiligheidsbril . Uitlaatgas-emissiewaarde De CO2-waarde bepaald in de EU-...
-
Página 63: Veiligheidsvoorschriften
Veiligheidsvoorschriften 3. Veiligheidsvoorschriften Het ontstekingssysteem van deze machine produceert tijdens bedrijf een elektromagnetisch veld. Dit veld kan onder bepaalde omstandigheden pacemakers storen. Om het risico van ernstig of fataal letsel te verminderen, raden wij aan dat personen met een pacemaker contact opnemen met hun arts en de fabrikant van de pacemaker voor ze deze machine gaan bedienen. -
Página 64: Belangrijke Componenten
Belangrijke componenten 4. Belangrijke componenten Fig. 1 Aan/-uitschakelaar Gashendel Gashendelblokkering Primer Chokehendel Luchtfilterafdekkap Tankdop Startergreep Bougie Uitlaat Afstelschroeven carburateur Draagriem Snelontsluiting Draagframe Ventilatorbehuizing Gebogen blaaspijp Flexibele bocht Blaaspijp I Verlengde blaaspijp II Gebogen mondstuk NEDERLANDS 4... - Página 65 Opbouw 5. Opbouw Bouw de bladblazer eerst volledig op alvorens u deze gaat gebruiken: Fig. 2 De gebogen blaaspijp (16) wordt in de sproeirichting naar voren met de beide schroeven (A+B) in het blazerhuis (15) gefixeerd. Op lichte draaibeweeglijkheid letten. Fig.
- Página 66 Loodvrije normale benzine of loodvrije superbenzine (octaangehalte 92 RON) Merken 2-takt-motorolie dat overeenkomt met de norm ISO-L-EGD of JASO FD Aanbeveling: Gebruik "SOLO Profi 2T motorolie" in een mengverhouding olie:benzine van 1:50 (2 %). Bewaar het brandstofmengsel niet langer dan 3 weken.
- Página 67 Starten / Stoppen van motor Starten bij bedrijfswarme motor: 7. Starten / Stoppen van motor of na kortstondige stilstand. Start de motor met de startklep in geopende positie. Starten van een koude motor Fig. 4 Zou de motor niet willen starten ondanks enige startpogingen is meest waarschijnlijk de motor verzopen.
-
Página 68: Functiedelen Aan De Greepeenheid
Gebruikerstips 8. Gebruikerstips 8.2 Functiedelen aan de greepeenheid Fig. 7 Iedere keer dat u met de machine gaat werken, controleer de conditie van de blazer, in bijzonder gaswerking, aan-/uitschakelaar, beschermende kappen, draagriemen en op eventuele lekkage. Pas op dat u geen uitlaatgassen inademt. Werk niet met de blazer in afgesloten ruimten. -
Página 69: Onderhoud En Behoud
Daarom adviseert SOLO in specificatie als volgt aangepast worden, via de onderhoud bij de erkende SOLO dealer voor alle stationair schroef "T" (het gebruik van een werkzaamheden die niet tot de dagelijkse routine toerenteller is aanbevolen): behoren. -
Página 70: Onderhoud Luchtfilter
Onderhoud en behoud afdrogen. 9.2 Onderhoud luchtfilter Voordat het filter wordt geplaatst, moeten de behuizing en het filter weer helemaal droog zijn. In geen geval vochtige of natte schuimrubberfilter Het luchtfilter filtert en bindt vuil en voorkomt dat gebruiken! deze de cilinderkamer bereikt. Zodoende wordt Let bij het monteren vooral op de juiste overmatige slijtage voorkomen. - Página 71 Onderhoud en behoud 9.5 Onderhoudsschema De volgende informatie is van toepassing op normale werkomstandigheden. Voor andere situaties, zoals continu-gebruik, de voorgeschreven service-intervallen zouden overeenkomstig frequenter moeten worden doorgevoerd. Voer alle inspecties regelmatig uit . Indien gewenst laat uw machine onderhouden bij de erkende servicedealer.
- Página 72 10. Garantie SOLO waarborgt een perfecte kwaliteit en draagt de kosten voor de verbetering achteraf door beschadigde onderdelen te vervangen in geval van materiaal- of fabricagefouten die binnen de garantieperiode na de verkoopdatum optreden. Let op dat in bepaalde landen specifieke garantievoorwaarden van toepassing kunnen zijn.
-
Página 73: Technische Specificaties
Onzekerheid K in overeenstemming EG-richtlijn 2006/42/EG: 2 m/s * zonder blaasbuizen 12. EG-conformiteitsverklaring SOLO Kleinmotoren GmbH, Industriestraße 9, 71069 Sindelfingen, DUITSLAND, verklaart hierbij dat de hieronder genoemde machine in gesloten uitvoering overeenstemt met de voorschriften van de volgende EG-richtlijnen: 2006/42/EG, 2000/14/EG, , 2014/30/EG en 2004/108/EG... - Página 74 ______________________________________________________________________________ ______________________________________________________________________________ ______________________________________________________________________________ ______________________________________________________________________________ ______________________________________________________________________________ ______________________________________________________________________________ ______________________________________________________________________________ ______________________________________________________________________________ ______________________________________________________________________________ ______________________________________________________________________________ ______________________________________________________________________________ ______________________________________________________________________________ ______________________________________________________________________________ ______________________________________________________________________________...
- Página 75 ______________________________________________________________________________ ______________________________________________________________________________ ______________________________________________________________________________ ______________________________________________________________________________ ______________________________________________________________________________ ______________________________________________________________________________ ______________________________________________________________________________ ______________________________________________________________________________ ______________________________________________________________________________ ______________________________________________________________________________ ______________________________________________________________________________ ______________________________________________________________________________ ______________________________________________________________________________ ___________________________________________________________________________...
- Página 76 Made in Germany SOLO Kleinmotoren GmbH Industriestraße 9 D-71069 Sindelfingen Postfach / PO Box 60 01 52 D-71050 Sindelfingen DEUTSCHLAND / GERMANY Tel.: +49 (0)7031 301-0 Fax: +49 (0)7031 301-149 info@solo-germany.com http://solo.global/...