Tabla de contenido
Publicidad
Idiomas disponibles
Idiomas disponibles
Enlaces rápidos
Owner's Manual
Audio/Video with RS-232
and IR Control over IP Extenders
Extender Kit Models:
B160-101-DPSI
B160-101-DPHDSI
B160-101-HDSI
B160-103-HDSI
B160-201-HSI
B160-202-HDSI
B160-301-HDSI
Español 25 • Français 50 • Русский 75
Register your product today and be automatically entered to win
an ISOBAR surge protector in our monthly drawing!
1111 W. 35th Street, Chicago, IL 60609 USA • www.tripplite.com/support
Copyright © 2019 Tripp Lite. All trademarks are the sole property of their respective owners.
Transmitter Models:
B160-001-CSI
B160-001-DPSI
B160-001-HDSI
B160-001-VSI
WARRANTY REGISTRATION
www.tripplite.com/warranty
1
Receiver Models:
B160-100-CSI
B160-100-DPSI
B160-100-HDSI
B160-100-VSI
B160-200-HSI
Publicidad
Tabla de contenido

Manuales relacionados para Tripp-Lite B160-101-DPSI


Resumen de contenidos para Tripp-Lite B160-101-DPSI
- Página 1 Owner’s Manual Audio/Video with RS-232 and IR Control over IP Extenders Extender Kit Models: Transmitter Models: Receiver Models: B160-101-DPSI B160-001-CSI B160-100-CSI B160-101-DPHDSI B160-001-DPSI B160-100-DPSI B160-101-HDSI B160-001-HDSI B160-100-HDSI B160-103-HDSI B160-001-VSI B160-100-VSI B160-201-HSI B160-200-HSI B160-202-HDSI B160-301-HDSI Español 25 • Français 50 • Русский 75...
-
Página 2: Package Contents
Package Contents Transmitter (T), R R R R R K K K K K K K Receiver (R), Kit (K) External Power Supply 1 1 1 1 1 1 1 1 1 2 2 2 4 2 4 4 IR-In Cable 0 0 0 0 1 1 1 1 1 1 1 1 1 1 2 3 IR-Out Cable 1 1 1 1 0 0 0 0 0 1 1 1 3 1 2 1... -
Página 3: Optional Accessories
Optional Accessories • A008-006 Component Video Gold Cable – 6 ft. • N202-Series Cat6, 24 AWG, Solid-Wire Patch Cables • NSS-G16D2 16-Port Gigabit L2 Managed Switch with 8-Outlet PDU • NSS-G24D2 24-Port Gigabit L2 Managed Switch with 12-Outlet PDU • P502-Series VGA Cables with RGB Coax •... -
Página 4: Product Features
Product Features • Extends and distributes audio/video, serial and IR control signals over Cat5/Cat6 cabling. • Models available with Component Video + Stereo Audio, DisplayPort, HDMI**, and VGA + Stereo Audio. • Converts source video to an IP-based signal that can be transmitted to and distributed through a network switch. - Página 5 Product Features • Component video models support video resolutions up to 1080i. • Each transmitter features an HDMI output port for connecting a local monitor. • HDCP and 3D compatible. • Includes mounting hardware for wall-mount, rack mount or pole mount installations.
-
Página 6: Mounting Instructions
Mounting Instructions Audio/Video over IP extenders include mounting hardware that allows for a variety of mounting options. The following images demonstrate these mounting methods. Note: Model B126-1A1 is shown for illustrative purposes; installation for Audio/Video over IP extender units is the same. Wall-mount 19”... - Página 7 Point-to-Point Installation Notes: • Test to ensure the entire installation works properly before pulling cables through ceilings/walls. • To achieve maximum distance and performance, use 24 AWG solid wire Cat5e/6 cable. Using stranded wire cable or cable with a gauge (AWG) size higher than recommended will result in a shorter extension distance.
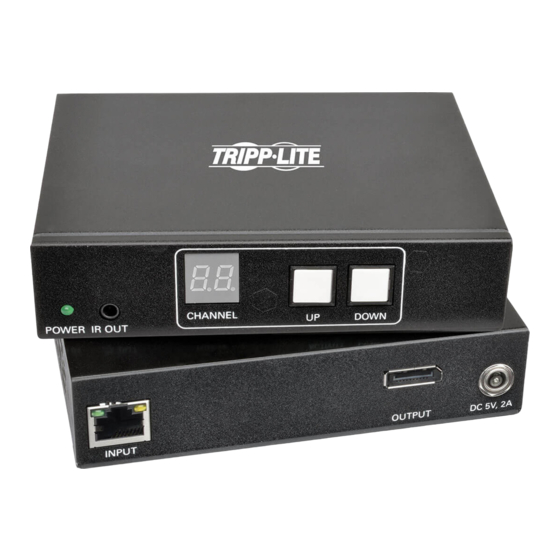
- Página 8 Point-to-Point Installation 7. Press the Up / Down buttons to set the Channel Number (0-63) on the front of the transmitter unit to a number that will also be used on the receiver unit. Note: A locking mechanism prevents the Channel Number from being unintentionally changed.
- Página 9 Point-to-Point Installation 13. Press the Up / Down buttons to set the Channel Number (0-63) on the front of the receiver unit to a number also used on the transmitter unit. Note: A locking mechanism prevents the Channel Number from being unintentionally changed.
- Página 10 Point-to-Multipoint Installation – Managed Switch with IGMP Notes: • Test to ensure the entire installation works properly before pulling cables through ceilings/walls. • To achieve maximum distance and performance, use 24 AWG solid wire Cat5e/6 cable. Using stranded wire cable or cable with a gauge (AWG) size higher than recommended will result in a shorter extension distance.
- Página 11 Point-to-Multipoint Installation – Managed Switch with IGMP Installation Overview (All Models) Media Media Center Center Laptop Blu-ray Blu-ray Blu-ray CHANNEL CHANNEL CHANNEL CHANNEL CHANNEL CHANNEL CHANNEL CHANNEL DOWN DOWN DOWN DOWN DOWN DOWN DOWN DOWN POWER IR OUT POWER IR OUT POWER IR OUT POWER IR OUT POWER IR OUT...
- Página 12 Point-to-Multipoint Installation – Managed Switch with IGMP B160-103-HDSI Kit Blu-ray Local Monitor OUTPUT OUTPUT INPUT DC 5V IGMP Managed Hub NSS-G16D2 Blu-ray Local Monitor OUTPUT OUTPUT INPUT DC 5V INPUT OUTPUT DC 5V Blu-ray Local Monitor OUTPUT OUTPUT INPUT DC 5V B160-301-HDSI Kit INPUT OUTPUT...
- Página 13 Point-to-Multipoint Installation – Managed Switch with IGMP 1. Ensure all equipment to be connected is powered off. 2. Connect the audio/video source to the transmitter unit’s input port (see Optional Accessories for available Tripp Lite audio/video cables). 3. (Optional) Connect the computer’s DB9 port to the transmitter unit’s serial port.
- Página 14 Point-to-Multipoint Installation – Managed Switch with IGMP Do not connect the external power supply to the transmitter at this time. The transmitter should not be powered on until all audio/video equipment is connected and powered on. 8. To connect additional transmitter(s), repeat steps 2 through 7. 9.
- Página 15 Point-to-Multipoint Installation – Managed Switch with IGMP Do not connect the external power supply to the receiver at this time. The receiver should not be powered on until all audio/video equipment is connected and powered on. 14. To connect additional receivers, repeat steps 9 through 13. 15.
- Página 16 Operation of Point-to-Multipoint Installation – Managed Switch with IGMP Notes: • B160-Series Audio/Video over IP Extenders are designed for use with a dedicated network switch. Connecting IP Extenders to a switch used with other networking equipment will result in degraded or non-functional product performance. •...
- Página 17 Operation of Point-to-Multipoint Installation – Managed Switch with IGMP 3. In the VLAN Management section, create a new VLAN for each transmitter in the installation. The transmitter port number should always be the first number in the VLAN, followed by the port numbers (separated by commas) of all receiver units that will be transmitting audio/video to and from the selected transmitter.
- Página 18 Point-to-Multipoint Installation – Unmanaged Switch Notes: • Unmanaged switch installations are limited to two transmitter units. The number of receiver units is limited to the number of ports remaining on the unmanaged switch. • Test to ensure the entire installation works properly before pulling cables through ceilings/walls.
- Página 19 Point-to-Multipoint Installation – Unmanaged Switch Installation Overview (All Models) Monitors Blu-ray CHANNEL CHANNEL CHANNEL CHANNEL CHANNEL CHANNEL CHANNEL CHANNEL DOWN DOWN DOWN DOWN DOWN DOWN DOWN DOWN POWER IR OUT POWER IR OUT POWER IR OUT POWER IR OUT POWER IR OUT POWER IR OUT POWER IR OUT POWER IR OUT...
- Página 20 Point-to-Multipoint Installation – Unmanaged Switch 4. (Optional) Connect the included IR-OUT cable to the transmitter unit’s IR-OUT port. Place the sensor on the IR-OUT cable in an unobstructed area within clear view of the device being controlled. Note: The IR-OUT cable receives the signal from the remote control and sends it to the device being controlled (e.g.
- Página 21 Point-to-Multipoint Installation – Unmanaged Switch 11. (Optional) Connect the included IR-IN cable to the receiver unit’s IR-IN port. Place the sensor on the IR-IN cable in an unobstructed area within clear view of the remote control. Note: The IR-IN cable accepts a signal from a remote control and sends it to a device being controlled on the other end of the installation.
- Página 22 Troubleshooting If unable to receive an acceptable image after following the installation instructions, try the following troubleshooting tips: 1. Are the included external power supplies connected and plugged into a working power source? For the product to function properly, it must be connected to and receiving power from the external power supply.
- Página 23 Troubleshooting 7. Check cabling for any damages that may have occurred during installation. If a cable connector is loosened from pulling through ceilings/wall or the cable jacket is damaged with the wiring exposed, maximum performance will not be achieved. 8. Are the transmitter(s) and/or receiver(s) located in an area with exposure to higher temperatures? If the product is overheated, it will not function properly.
-
Página 24: Warranty And Product Registration
Warranty and Product Registration 1-Year Warranty Tripp Lite warrants its products to be free from defects in materials and workmanship for a period of one (1) year from the date of initial purchase. Tripp Lite’s obligation under this warranty is limited to repairing or replacing (at its sole option) any such defective products. -
Página 25: Extensores De Audio Y Video Con Rs-232 Y Control Ir Sobre Ip
Manual del Propietario Extensores de Audio y Video con RS-232 y Control IR sobre IP Modelos de Juego Modelos de Modelos de Extensor: Transmisor: Receptor: B160-101-DPSI B160-001-CSI B160-100-CSI B160-101-DPHDSI B160-001-DPSI B160-100-DPSI B160-101-HDSI B160-001-HDSI B160-100-HDSI B160-103-HDSI B160-001-VSI B160-100-VSI B160-201-HSI B160-200-HSI B160-202-HDSI B160-301-HDSI English 1 •... -
Página 26: Contenido Del Empaque
Contenido del Empaque Transmisor (T), R R R R R K K K K K K K Receptor (R), Juego (K) Fuente de Alimentación 1 1 1 1 1 1 1 1 1 2 2 2 4 2 4 4 Externa Cable de IR-IN 0 0 0 0 1 1 1 1 1 1 1 1 1 1 2 3... -
Página 27: Accesorios Opcionales
Accesorios Opcionales • A008-006 – Cable de Oro para Video Componente – 1.83 m [6 pies] • Cables Patch Cat6 de Alambre Sólido 24 AWG, Serie N202 • NSS-G16D2 – Switch Administrado de 16 Puertos L2 Gigabit con PDU de 8 Tomacorrientes •... -
Página 28: Características Del Producto
Características del Producto • Extienda y distribuya señales de audio y video, seriales y de control IR sobre cableado Cat5 / Cat6. • Modelos disponibles con Video Componente + Audio Estéreo, DisplayPort, HDMI** y VGA + Audio Estéreo. • Convierte el video fuente a una señal basada en IP que pueda ser transmitida y distribuida mediante un switch de red. - Página 29 Características del Producto • Los modelos DisplayPort y HDMI soportan resoluciones de video de hasta 1920 x 1080 (1080p). • Los modelos de video componente soportan resoluciones de video de hasta 1080i. • Cada transmisor cuenta con un puerto de salida HDMI para conectar un monitor local.
-
Página 30: Instalación En La Pared
Instrucciones de Instalación Los extensores de Audio y Video sobre IP incluyen los accesorios de instalación que permiten una variedad de opciones de instalación. Las siguientes imágenes demuestran estos métodos de instalación. Nota: Para fines ilustrativos se muestra el modelo B126-1A1; la instalación para unidades extensoras de Audio y Video sobre IP es la misma. -
Página 31: Instalación Punto A Punto
Instalación Punto a Punto Notas: • Pruebe para asegurarse de que toda la instalación trabaje correctamente antes de jalar los cables a través de techos y paredes. • Para conseguir la distancia y rendimiento máximos, use un cable Cat5e / Cat6 de Alambre Sólido 0.2 mm (24 AWG). - Página 32 Instalación Punto a Punto 5. (Opcional) Mediante un cable HDMI, conecte un monitor local al puerto de salida de la unidad transmisora HDMI (para consultar los cables HDMI disponibles de Tripp Lite, vea Accesorios Opcionales). 6. Conecte la fuente de alimentación externa a la unidad transmisora local y enchúfela en un Supresor de Sobretensiones, Sistema de Respaldo Ininterrumpible (UPS) o Unidad de Distribución de Energía (PDU) de Tripp Lite.
- Página 33 Instalación Punto a Punto 11. (Opcional) Conecte el cable IR-IN incluido al puerto IR-IN en la unidad receptora. Coloque el sensor en el cable IR-IN en una zona sin obstrucciones dentro de la línea de visión del dispositivo controlado. Note: El cable IR-IN acepta una señal de un control remoto y la envía a un dispositivo que sea controlado en el otro extremo de la instalación.
-
Página 34: Instalación Punto A Multipunto - Switch Administrado Con Igmp
Instalación Punto a Multipunto – Switch Administrado con IGMP Notas: • Pruebe para asegurarse de que toda la instalación trabaje correctamente antes de jalar los cables a través de techos y paredes. • Para conseguir la distancia y rendimiento máximos, use un cable Cat5e / Cat6 de Alambre Sólido 0.2 mm (24 AWG). - Página 35 Instalación Punto a Multipunto – Switch Administrado con IGMP Resumen de Instalación (Todos los Modelos) Centro multimedia Computadora portátil Blu-ray Blu-ray Blu-ray CHANNEL DOWN CHANNEL DOWN CHANNEL DOWN CHANNEL DOWN CHANNEL DOWN CHANNEL DOWN CHANNEL DOWN CHANNEL DOWN POWER IR OUT POWER IR OUT POWER IR OUT POWER IR OUT...
- Página 36 Instalación Punto a Multipunto – Switch Administrado con IGMP Juego B160-103-HDSI Blu-ray Monitor Local OUTPUT OUTPUT INPUT DC 5V Hub Administrado IGMP NSS-G16D2 Blu-ray Monitor Local OUTPUT OUTPUT INPUT DC 5V INPUT OUTPUT DC 5V Blu-ray Monitor Local OUTPUT OUTPUT INPUT DC 5V Juego B160-301-HDSI...
- Página 37 Instalación Punto a Multipunto – Switch Administrado con IGMP 1. Asegúrese de que todos los equipos a conectar estén apagados. 2. Conecte la fuente de audio y video al puerto de entrada de la unidad transmisora (Ver Accesorios Opcionales para consultar los cables disponibles de audio y video de Tripp Lite).
- Página 38 Instalación Punto a Multipunto – Switch Administrado con IGMP 7. Conecte el puerto de Salida RJ45 en la unidad transmisora a un puerto RJ45 en el switch de red usando cable Cat5e / Cat6. Nota: La máxima longitud de cable permitida del transmisor al switch es de 100 m [328 pies].
- Página 39 Instalación Punto a Multipunto – Switch Administrado con IGMP 12. Establezca el número de canal (0 a 63 están disponibles) en la parte frontal del receptor a un número deseado presionando los botones arriba / abajo. Este número debe ser el mismo en todas las unidades transmisoras y receptoras en la instalación.
-
Página 40: Instalación Para Operación De Punto A Multipunto - Switch Administrado Con Igmp
Instalación para Operación de Punto a Multipunto – Switch Administrado con IGMP Notas: • Los Extensores de audio y video sobre IP de la Serie B160 están diseñados para uso con un switch de red dedicado. Conectar Extensores IP a un switch usado con otro equipo de red resultará... - Página 41 Instalación para Operación de Punto a Multipunto – Switch Administrado con IGMP 3. En la sección de Administración de VLAN, cree una nueva VLAN para cada transmisor en la instalación. El número de puerto del transmisor debe ser siempre el primer número de la VLAN, seguido por el número de puerto (separado por comas) de todas las unidades receptoras que estarán transmitiendo audio y video hacia y desde el transmisor seleccionado.
-
Página 42: Instalación Punto A Multipunto - Switch No Administrado
Instalación Punto a Multipunto – Switch no Administrado Notas: • Las instalaciones con switch no administrado están limitadas a dos unidades. El número de unidades receptoras está limitado al número de puertos restantes en el Switch no Administrado. • Pruebe para asegurarse de que toda la instalación trabaje correctamente antes de jalar los cables a través de techos y paredes. -
Página 43: Resumen De Instalación (Todos Los Modelos)
Instalación Punto a Multipunto – Switch no Administrado Resumen de Instalación (Todos los Modelos) Monitors Monitores Blu-ray CHANNEL CHANNEL CHANNEL CHANNEL CHANNEL CHANNEL CHANNEL CHANNEL DOWN DOWN DOWN DOWN DOWN DOWN DOWN DOWN POWER IR OUT POWER IR OUT POWER IR OUT POWER IR OUT POWER IR OUT POWER IR OUT... - Página 44 Instalación Punto a Multipunto – Switch no Administrado 3. (Opcional) Conecte el puerto DB9 de la computadora al puerto serial de la unidad transmisora. Dependiendo del modelo, el puerto serial será DB9 o 3.5 mm. Modelos con conectores de 3.5 mm incluyen un adaptador de 3.5 mm a DB9.
- Página 45 Instalación Punto a Multipunto – Switch no Administrado 7. Conecte el puerto de salida RJ45 en la unidad transmisora a un puerto RJ45 en el switch de red usando cable Cat5e / Cat6. Nota: La máxima longitud de cable permitida del receptor al switch es de 100 m [328 pies].
- Página 46 Instalación Punto a Multipunto – Switch no Administrado 12. Establezca el número de canal (0 a 63 están disponibles) en la parte frontal del receptor para que coincida con el número de canal del transmisor cuyo audio o video desea recibir presionando los botones arriba / abajo.
-
Página 47: Solución De Problemas
Solución de Problemas Si no puede recibir una imagen aceptable después de seguir las instrucciones de instalación, pruebe los siguientes consejos: 1. ¿Están conectadas las fuentes de alimentación externa y enchufadas a una fuente de alimentación que trabaje adecuadamente? Para que el producto funcione correctamente, debe estar conectado y recibiendo energía de la fuente de alimentación externa. - Página 48 Solución de Problemas 6. Pruebe los cables para asegurarse de que funcionen correctamente. Por ejemplo, conecte el cable de audio y video entre una fuente y un monitor que funcione para asegurar que el cable no esté defectuoso. Para cable de Cat5e / Cat6, conéctelo entre una computadora y una red para verificar que establece una conexión de red.
-
Página 49: Garantía
Garantía Garantía de 1 Año Tripp Lite garantiza por un (1) año desde la fecha de compra inicial que este producto no tiene defectos de materiales ni de mano de obra. La obligación de Tripp Lite bajo esta garantía está limitada a la reparación o reemplazo (A su entera discreción) de cualquier producto defectuoso. - Página 50 Manuel de l'utilisateur Audio/vidéo avec RS-232 et prolongateurs de contrôle IR sur IP Modèles de trousse Modèles de Modèles de de prolongateurs : transmetteur : récepteur : B160-101-DPSI B160-001-CSI B160-100-CSI B160-101-DPHDSI B160-001-DPSI B160-100-DPSI B160-101-HDSI B160-001-HDSI B160-100-HDSI B160-103-HDSI B160-001-VSI B160-100-VSI B160-201-HSI...
-
Página 51: Contenu De L'eMballage
Contenu de l'emballage Transmetteur (T), récepteur (R), R R R R R K K K K K K K trousse (K) Alimentation externe 1 1 1 1 1 1 1 1 1 2 2 2 4 2 4 4 Câble IR-In 0 0 0 0 1 1 1 1 1 1 1 1 1 1 2 3 Câble IR-Out 1 1 1 1 0 0 0 0 0 1 1 1 3 1 2 1... -
Página 52: Accessoires En Option
Accessoires en option • Câble doré vidéo composante A008-006 – 1,8 m (6 pi) • Cordons de raccordement à fils rigides 24 AWG Cat6 de série N202 • Commutateur administré à 16 ports gigabit L2 NSS-G16D2 avec PDU à 8 sorties •... -
Página 53: Caractéristiques Du Produit
Caractéristiques du produit • Prolongent et distribuent des signaux audio/vidéo de série et des signaux de contrôle IR sur du câblage Cat5/Cat6. • Modèles offerts avec vidéo composante + audio-stéréo, DisplayPort, HDMI** et VGA + audio-stéréo. • Convertit la source vidéo en un signal IP qui peut être transmis à et distribué... - Página 54 Caractéristiques du produit • Les modèles vidéo VGA prennent en charge des résolutions vidéo jusqu'à 1 920 x 1 440, y compris 1 080 p. • Les modèles DisplayPort et HDMI prennent en charge des résolutions vidéo jusqu'à 1 920 x 1 080 (1 080 p). •...
-
Página 55: Montage Mural
Instructions de montage Les prolongateurs audio/vidéo sur IP incluent la quincaillerie de montage qui permet une variété d'options de montage. Les images suivantes illustrent ces méthodes de montage. Remarque : Le modèle B126-1A1 est montré pour des fins d'illustration uniquement; l'installation de prolongateurs audio/vidéo sur IP est la même. - Página 56 Installation point à point Remarques : • Effectuer un essai pour s'assurer que l'ensemble de l'installation fonctionne correctement avant de tirer les câbles à travers les plafonds/murs. • Pour obtenir la distance et la performance maximales, utiliser un câble Cat5e/6 à...
- Página 57 Installation point à point 6. Brancher le bloc d'alimentation externe au transmetteur et le brancher à un parasurtenseur, à l'onduleur ou à l'unité de distribution de puissance (PDU) Tripp Lite. 7. Appuyer sur les boutons Up/Down (haut/bas) pour configurer le numéro du canal (0-63) sur l'avant du transmetteur à...
- Página 58 Installation point à point 12. Brancher le bloc d'alimentation externe au récepteur et le brancher à un parasurtenseur, à l'onduleur ou à l'unité de distribution de puissance (PDU) Tripp Lite. 13. Appuyer sur les boutons Up/Down (haut/bas) pour configurer le numéro du canal (0-63) sur l'avant du récepteur à...
- Página 59 Installation point à multipoint – Commutateur géré avec IGMP Remarques : • Effectuer un essai pour s'assurer que l'ensemble de l'installation fonctionne correctement avant de tirer les câbles à travers les plafonds/murs. • Pour obtenir la distance et la performance maximales, utiliser un câble Cat5e/6 à...
- Página 60 Installation point à multipoint – Commutateur géré avec IGMP Aperçu de l’installation (tous les modèles) Centre multimédia Ordinateur portable Blu-ray Blu-ray Blu-ray CHANNEL CHANNEL CHANNEL CHANNEL CHANNEL CHANNEL CHANNEL CHANNEL DOWN DOWN DOWN DOWN DOWN DOWN DOWN DOWN POWER IR OUT POWER IR OUT POWER IR OUT POWER IR OUT...
- Página 61 Installation point à multipoint – Commutateur géré avec IGMP Trousse B160-103-HDSI Blu-ray Moniteur local OUTPUT OUTPUT INPUT DC 5V Concentrateur géré avec IGMP NSS-G16D2 Blu-ray Moniteur local INPUT INPUT OUTPUT DC 5V OUTPUT OUTPUT DC 5V Blu-ray Moniteur local OUTPUT OUTPUT INPUT DC 5V...
- Página 62 Installation point à multipoint – Commutateur géré avec IGMP 1. S'assurer que tout l'équipement à connecter est hors tension. 2. Raccorder la source audio/vidéo au port d'entrée du transmetteur (consulter Accessoires en option pour les câbles audio/vidéo Tripp Lite disponibles). 3.
- Página 63 Installation point à multipoint – Commutateur géré avec IGMP 7. Raccorder le port de sortie RJ45 sur le transmetteur à un port RJ45 sur le commutateur de réseau en utilisant le câble Cat5e/6. Remarque : La longueur maximale permise du câble du transmetteur au récepteur est de 100 m (328 pi).
- Página 64 Installation point à multipoint – Commutateur géré avec IGMP 12. Configurer le numéro du canal (0 à 63 sont disponibles) sur l'avant du récepteur au chiffre voulu en appuyant sur les boutons Up/Down (haut/ bas). Ce numéro DOIT être le même sur tous les transmetteurs et tous les récepteurs faisant partie de l'installation.
- Página 65 Utilisation de l'Installation point à multipoint – Commutateur géré avec IGMP Remarques : • Les prolongateurs audio/vidéo de série B160 sur IP sont conçus pour être utilisés avec un commutateur de réseau dédié. Le raccordement de prolongateurs IP à un commutateur utilisé avec d'autres équipements de réseautage entraînera une dégradation de la performance du produit ou le rendra non fonctionnel.
- Página 66 Utilisation de l'Installation point à multipoint – Commutateur géré avec IGMP 3. Dans la section Gestion du réseau local virtuel, créer un nouveau réseau local virtuel pour chaque transmetteur faisant partie de l'installation. Le numéro du port du transmetteur devrait toujours être le premier chiffre du réseau local virtuel, suivi des numéros des ports (séparés par des virgules) de tous les récepteurs qui transmettront de l'audio/vidéo vers et à...
- Página 67 Installation point à multipoint – Commutateur non géré Remarques : • Les installations avec commutateur non géré sont limitées à deux transmetteurs. Le nombre de récepteurs est limité au nombre de ports restants sur le commutateur non géré. • Effectuer un essai pour s'assurer que l'ensemble de l'installation fonctionne correctement avant de tirer les câbles à...
- Página 68 Installation point à multipoint – Commutateur non géré Aperçu de l’installation (tous les modèles) Ecrans Blu-ray CHANNEL CHANNEL DOWN DOWN CHANNEL DOWN CHANNEL DOWN CHANNEL DOWN CHANNEL DOWN CHANNEL DOWN CHANNEL DOWN POWER IR OUT POWER IR OUT POWER IR OUT POWER IR OUT POWER IR OUT POWER IR OUT...
- Página 69 Installation point à multipoint – Commutateur non géré 3. (Facultatif) Raccorder le port DB9 de l'ordinateur au port sériel du transmetteur. Selon le modèle, le port sériel sera DB9 ou 3,5 mm. Les modèles avec des prises de 3,5 mm incluent un adaptateur de 3,5 mm à...
- Página 70 Installation point à multipoint – Commutateur non géré 8. Pour raccorder un transmetteur supplémentaire, répéter les étapes 2 à 7. 9. Raccorder un moniteur au port de sortie audio/vidéo du récepteur (Consulter Accessoires en option pour les câbles audio/vidéo Tripp Lite disponibles).
- Página 71 Installation point à multipoint – Commutateur non géré 13. Raccorder le port d'entrée RJ45 sur le récepteur à un port RJ45 sur le commutateur de réseau en utilisant le câble Cat5e/6. Remarque : La longueur maximale permise du câble du récepteur au commutateur est de 100 m (328 pi).
- Página 72 Dépannage S'il n'est pas possible d'obtenir une image acceptable après avoir suivi les instructions d'installation, suivre les conseils de dépannage ci-dessous : 1. Les blocs d'alimentation externes inclus sont-ils connectés et branchés à une source en bon état de fonctionnement? Pour que le produit fonctionne correctement, il doit être connecté...
- Página 73 Dépannage 6. Tester les câbles pour s'assurer qu'ils fonctionnent correctement. Par exemple, brancher le câble audio-vidéo entre une source et un moniteur en bon état de fonctionnement pour s'assurer qu'il n'est pas défectueux. Pour le câble Cat5e/6, le raccorder entre un ordinateur et un réseau pour vérifier qu'il s'établit une connexion réseau.
- Página 74 Dépannage 11. Ne pas raccorder d'autre équipement de réseautage au commutateur de réseau. Les prolongateurs audio/vidéo de série B160 sur IP sont conçus pour être utilisés avec un commutateur de réseau dédié. Leur raccordement à un commutateur utilisé avec d'autres équipements de réseautage entraînera une dégradation de la performance du produit ou le rendra non fonctionnel.
-
Página 75: Руководство Пользователя
Руководство пользователя Ретрансляторы аудио-/видеосигнала с разъемом RS-232 и ИК-управлением по протоколу IP Модели ретрансляторов в Модели Модели комплекте: передатчиков: приемников: B160-101-DPSI B160-001-CSI B160-001-DPSI B160-100-CSI B160-100-DPSI B160-101-DPHDSI B160-001-HDSI B160-001-VSI B160-100-HDSI B160-101-HDSI B160-100-VSI B160-200-HSI B160-103-HDSI B160-201-HSI B160-202-HDSI B160-301-HDSI English 1 • Español 25 • Français 50 1111 W. -
Página 76: Содержимое Упаковки
Содержимое упаковки Передатчик (T), Приемник (R), Комплект (K) Внешний блок питания Входной ИК-кабель Выходной ИК-кабель Кабель переходник с разъемами 3,5 мм и DB9 (штекер/гнездо) Кабель переходник с разъемами 3,5 мм и DB9 (штекер/штекер) Кабель-переходник с разъемами HDMI и DVI Монтажные приспособления ДА... - Página 77 Опциональные комплектующие • Соединительный кабель передачи компонентного видеосигнала с позолоченными выводами A008-006, длина 1,8 м • Соединительные кабели Cat6 серии N202 с одножильными проводами калибра 24 AWG • 16-портовый управляемый сетевой коммутатор Gigabit L2 мод. NSS-G16D2 с 8-розеточным PDU • 24-портовый управляемый сетевой коммутатор Gigabit L2 мод. NSS-G24D2 с 12-розеточным PDU •...
-
Página 78: Характеристики Продукта
Характеристики продукта • Обеспечивает ретрансляцию и распределение аудио-/видеосигналов, а также сигналов дистанционного управления с последовательно подключаемых и инфракрасных устройств через кабели Cat5/Cat6. • Выпускаемые модели имеют разъемы Component Video + Stereo Audio, DisplayPort, HDMI** и VGA + Stereo Audio. • Преобразует видеосигнал, поступающий от источника, в сигнал, который может передаваться на сетевой... - Página 79 Характеристики продукта • Модели с разъемами DisplayPort и HDMI поддерживают видеоразрешения до 1920 x 1080 (1080p). • Модели с разъемами Component Video поддерживают видеоразрешения до 1080i. • Каждый передатчик имеет выходной порт HDMI для подключения локального монитора. • Совместимость с системами HDCP и 3D. •...
-
Página 80: Инструкция По Монтажу
Инструкция по монтажу IP-ретрансляторы аудио-/видеосигналов комплектуются монтажной оснасткой, обеспечивающей возможность крепления различными способами. Эти способы крепления показаны на представленных ниже иллюстрациях. Примечание. На иллюстрациях показана модель B126-1A1; установка IP-ретрансляторов аудио-/видеосигналов осуществляется аналогичным способом. Настенный монтаж Монтаж в 19-дюймовой стойке Монтаж на мачте... - Página 81 Установка с двухточечной топологией Примечания: • Перед протягиванием кабелей через стены/потолки необходимо проверить правильность функционирования всей установки. • Для достижения максимальной дистанции и производительности используйте кабель Cat5e/6 с одножильными проводами калибра 0,2 мм . Использование кабеля с многожильными проводами или кабеля...
- Página 82 Установка с двухточечной топологией питания (ИБП) Tripp Lite. 7. С помощью кнопок Up/Down (Вверх/Вниз) на передней панели передающего модуля установите номер канала (0-63), соответствующий тому, который будет использоваться в приемном модуле. Примечание. Для защиты от случайного изменения номера канала предусмотрен механизм фиксации. При...
- Página 83 Установка с двухточечной топологией 13. С помощью кнопок Up/Down (Вверх/Вниз) на передней панели приемного модуля установите номер канала (0-63), соответствующий тому, который используется в передающем модуле. Примечание. Для защиты от случайного изменения номера канала предусмотрен механизм фиксации. При зафиксированном номере канала удерживайте кнопки Up (Вверх) и Down (Вниз) нажатыми до тех пор, пока...
- Página 84 Установка с многоточечной топологией ― Управляемый коммутатор с использованием протокола IGMP Примечания: • Перед протягиванием кабелей через стены/потолки необходимо проверить правильность функционирования всей установки. • Для достижения максимальной дистанции и производительности используйте кабель Cat5e/6 с одножильными проводами калибра 0,2 мм .
- Página 85 Установка с многоточечной топологией ―Управляемый коммутатор с использованием протокола IGMP Краткое описание установки (для всех моделей) Blu-ray Blu-ray Blu-ray CHANNEL CHANNEL CHANNEL CHANNEL CHANNEL CHANNEL CHANNEL CHANNEL DOWN DOWN DOWN DOWN DOWN DOWN DOWN DOWN POWER IR OUT POWER IR OUT POWER IR OUT POWER IR OUT POWER IR OUT...
- Página 86 Установка с многоточечной топологией ―Управляемый коммутатор с использованием протокола IGMP Комплект B160-103-HDSI Blu-ray OUTPUT OUTPUT INPUT DC 5V NSS-G16D2 Blu-ray OUTPUT OUTPUT INPUT DC 5V INPUT OUTPUT DC 5V Blu-ray OUTPUT OUTPUT INPUT DC 5V Комплект B160-301-HDSI INPUT OUTPUT DC 5V Blu-ray NSS-G16D2 INPUT...
- Página 87 Установка с многоточечной топологией ―Управляемый коммутатор с использованием протокола IGMP 1. Перед началом установки все подключенное оборудование должно быть обесточено. 2. Подключите источник аудио-/видеосигнала к входному порту передающего модуля (выпускаемые модели аудио-/видеокабелей Tripp Lite перечислены в разделе Опциональные комплектующие). 3. (Необязательно) Соедините порт DB9 компьютера с последовательным портом передающего модуля.
- Página 88 Установка с многоточечной топологией ―Управляемый коммутатор с использованием протокола IGMP В этот момент передатчик не должен быть подключен к внешнему блоку питания. Передатчик не следует запитывать до подключения и запитывания всех элементов аудио-/видеооборудования. 8. Для подключения дополнительного(-ых) передатчика(-ов) повторите действия, описанные в пп.
- Página 89 Установка с многоточечной топологией ― Управляемый коммутатор с использованием протокола IGMP В этот момент приемник не должен быть подключен к внешнему блоку питания. Приемник не следует запитывать до подключения и запитывания всех элементов аудио-/видеооборудования. 14. Для подключения дополнительных приемников повторите действия, описанные в пп. 9-13. 15.
- Página 90 Работа установки с двухточечной топологией ― Управляемый коммутатор с использованием протокола IGMP Примечания: • IP-ретрансляторы аудио-/видеосигналов серии B160 предназначаются для использования с выделенным сетевым коммутатором. Подключение IP-ретрансляторов к коммутатору, используемому с другим сетевым оборудованием, приведет к ухудшению характеристик изделия или его полной неработоспособности.
- Página 91 Работа установки с двухточечной топологией ― Управляемый коммутатор с использованием протокола IGMP 3. В разделе VLAN Management создайте новую виртуальную ЛВС (VLAN) для каждого передатчика, используемого в установке. Номер порта передатчика обязательно должен указываться первым в списке портов VLAN; вслед за ним указываются (через запятую) номера...
- Página 92 Установка с многоточечной топологией ― Неуправляемый коммутатор Примечания: • В установках с неуправляемым коммутатором число передающих модулей ограничивается двумя. Количество приемных модулей ограничивается числом свободных портов неуправляемого коммутатора. • Перед протягиванием кабелей через стены/потолки необходимо проверить правильность функционирования всей установки. •...
- Página 93 Установка с многоточечной топологией ― Неуправляемый коммутатор Краткое описание установки (для всех моделей) Blu-ray CHANNEL CHANNEL CHANNEL CHANNEL CHANNEL CHANNEL CHANNEL CHANNEL DOWN DOWN DOWN DOWN DOWN DOWN DOWN DOWN POWER IR OUT POWER IR OUT POWER IR OUT POWER IR OUT POWER IR OUT POWER IR OUT POWER IR OUT...
- Página 94 Установка с многоточечной топологией ― Неуправляемый коммутатор 3. (Необязательно) Соедините порт DB9 компьютера с последовательным портом передающего модуля. В зависимости от модели последовательный порт может иметь интерфейс DB9 или 3,5 мм. Модели с разъемами 3,5 мм комплектуются переходником 3,5 мм ― DB9. Для...
- Página 95 Установка с многоточечной топологией ― Неуправляемый коммутатор 9. Подключите монитор к аудио-/видеовыходу (Output) приемного модуля (выпускаемые модели аудио-/видеокабелей Tripp Lite см. в разделе Опциональные комплектующие). 10. (Необязательно) Соедините порт DB9 последовательно подключаемого устройства с последовательным портом приемного модуля. В зависимости от модели последовательный порт...
- Página 96 Установка с многоточечной топологией ― Неуправляемый коммутатор 16. Подключите внешние блоки питания ко всем передающим и приемным модулям установки, а затем включите внешние блоки питания в розетки сетевых фильтров, блоков распределения питания (PDU) или источников бесперебойного питания (ИБП) Tripp Lite. 17.
-
Página 97: Выявление И Устранение Неисправностей
Выявление и устранение неисправностей Если выполнение указаний по установке не позволяет получить приемлемого качества изображения, попробуйте воспользоваться приведенными ниже рекомендациями по выявлению и устранению неисправностей: 1. Подключены ли поставляемые в комплекте внешние блоки питания к работающему источнику питания? Для надлежащего функционирования данного изделия оно... - Página 98 Выявление и устранение неисправностей 7. Проверьте кабели на предмет наличия повреждений, которые могли произойти в процессе установки. В случае разбалтывания кабельного разъема при протягивании кабеля через стены/потолки или повреждения кабельной оболочки, вызывающего оголение проводов, достижение максимальных рабочих характеристик не представляется возможным. 8.
-
Página 99: Гарантийные Обязательства
Гарантийные обязательства Гарантия 1 год Компания Tripp Lite гарантирует отсутствие дефектов материалов и изготовления в течение одного (1) года с момента первоначальной покупки. Обязательства компании Tripp Lite по настоящей гарантии ограничиваются ремонтом или заменой (по ее единоличному усмотрению) любых таких дефектных изделий. Для получения услуг по данной гарантии необходимо получить номер Returned Material Authorization (RMA - разрешение...