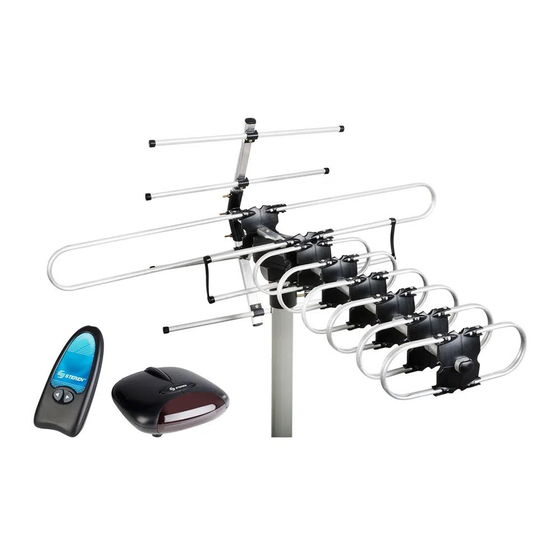
Steren ANT-UHF/12R Manual De Instrucciones
Antena con rotor controlado por control remoto
Ocultar thumbs
Ver también para ANT-UHF/12R:
- Instructivo de uso (3 páginas) ,
- Manual de instrucciones (28 páginas) ,
- Manual de instrucciones (10 páginas)
Tabla de contenido
Publicidad
Idiomas disponibles
Idiomas disponibles
Enlaces rápidos
Publicidad
Tabla de contenido

Resumen de contenidos para Steren ANT-UHF/12R
- Página 2 Antena con rotor controlado por control remoto. Por favor, revíselo completamente para estar seguro de cómo utilizar apropiadamente el producto. Para apoyo, compras y todo lo nuevo que tiene Steren, visite nuestro sitio web: www.steren.com La información que se muestra en este manual sirve únicamente como referencia sobre el producto.
-
Página 3: Características
IMPORTANTE • No instale la antena cerca de cables de alta tensión o transformadores. • No coloque el cable de la antena cerca de aparatos eléctricos. • No fije el mástil a estructuras metálicas. • Utilice cinchos de plástico para sujetar el cable. 1. -
Página 4: Control Remoto
2. CONTROLES Amplificador de señal 1. Interruptor de encendido / apagado. 2. Cable de alimentación. 3. TV1: Salida para TV. 4. TV2: Salida para TV adicional. 5. ANT: Entrada para el cable de la antena. 6. ROTATING: Gira la antena hacia la izquierda o la derecha. Control remoto 1. -
Página 5: Instrucciones
3. INSTRUCCIONES Armado 1. Desdoble los elementos de la antena. Deben quedar perpendiculares a los tubos centrales. 2. Inserte el tubo central en el rotor. Fíjelo apretando el tornillo con tuerca. - Página 6 3. Centre las varillas de los reflectores de polo y apriételas con los tornillos. Tenga cuidado de no apretarlas demasiado, ya que podrían romperse y anular la garantía. 4. Inserte los reflectores de polo en la punta del rotor. Fíjelos insertando los tornillos en los orificios correspondientes y apretándolos con las tuercas.
- Página 7 5. Inserte la base del rotor en un tubo para antena o mástil (no incluido) y asegúrelo con los tornillos. Tenga cuidado de no apretar de manera excesiva los tornillos ya que puede romper la parte plástica de la pieza y se anulará la garantía.
-
Página 8: Conexiones
4. CONEXIONES 1. Conecte el cable coaxial del rotor en la entrada ANT del amplificador de señal. 2. Conecte el otro cable coaxial a la entrada del televisor y a la salida TV1 del amplificador de señal. Si desea conectar otro televisor, utilice la salida TV2 del amplificador de señal. -
Página 9: Especificaciones
3. Conecte del amplificador de señal a un contacto eléctrico y enciéndalo. 4. Encienda su televisor y compruebe el estado de la señal. 5. Utilice el control remoto para mover la antena y mejorar la señal. 5. ESPECIFICACIONES Alimentación: 120 V ~ 60 Hz 55 mA Control remoto: 3 V (2xAAA) Rango de frecuencia VHF: 47 - 230 MHz... -
Página 10: Póliza De Garantía
1.- Para hacer efectiva la garantía, presente esta póliza y el producto, en donde fue adquirido o en Electrónica Steren S.A. de C.V. 2.- Electrónica Steren S.A de C.V. se compromete a reparar el producto en caso de estar defectuoso sin ningún cargo al consumidor. Los gastos de transportación serán cubiertos por el proveedor. - Página 12 ANT-UHF/12R Thank You on purchasing your new Steren product. This manual includes all the feature operations and troubleshooting necessary to install and operate your new Steren´s Rotating antenna controlled with IR remote control. Please review this manual thoroughly to ensure proper installation and operation of this product.
- Página 13 IMPORTANT • Do not install the antenna near power lines or transformers. • Do not place the antenna near electrical cable. • Do not attach the mast to metal structures. • Use tie wraps to secure the cable. 1. HIGHLIGHTS •...
-
Página 14: Remote Control
2. CONTROLS Signal amplifier 1. On / off switch. 2. Power cord. 3. TV1: Output for TV. 4. TV2: Output for additional TV. 5. ANT: Input for the antenna cable. 6. ROTATE: Rotates the antenna to the left or right. Remote control 1. - Página 15 3. INSTRUCTIONS Ensemble 1. Unfold the antenna elements. They should be perpendicular to the center tube. 2. Insert the center tube on the rotor. Secure it by tightening the screw with nut.
- Página 16 3. Center the reflectors of pole rods and tighten with screws. Be careful not to overtighten them, since they might break and void the warranty. 4. Insert pole reflectors on the tip of the rotor. Secure them by inserting the screws into the holes and tighten with the nuts.
- Página 17 5. Insert the rotor base into a tube for antenna or mast (not supplied) and secure it with the screws. Be careful not to overtighten the nuts, since they might break and void the warranty.
- Página 18 4. CONNECTIONS 1. Connect the coaxial cable from the rotor to the ANT input of the signal amplifier. 2. Connect another coaxial cable to the TV’s input and signal amplifier output TV1. If you want to connect another TV, use the signal amplifier TV2 output.
- Página 19 3. Connect the amplifier’s signal to an electrical outlet and turn it on. 4. Turn on your TV and check the signal status. 5. Use the remote control to move the antenna and improve the signal. 5. SPECIFICATIONS Input: 120 V ~ 60 Hz 55 mA Remote control: 3 V (2xAAA) Frequency range VHF: 47-230 MHz...
- Página 20 Part number: ANT-UHF/12R Brand: Steren WARRANTY This Steren product is warranted under normal usage against defects in workmanship and materials to the original purchaser for one year from the date of purchase. CONDITIONS 1. This warranty card with all the required information, invoice, product box or package, and product, must be presented when warranty service is required.


