Publicidad
Idiomas disponibles
Idiomas disponibles
Publicidad
Tabla de contenido

Manuales relacionados para Steren ANT-HD-100


Resumen de contenidos para Steren ANT-HD-100
-
Página 2: Caracteristicas
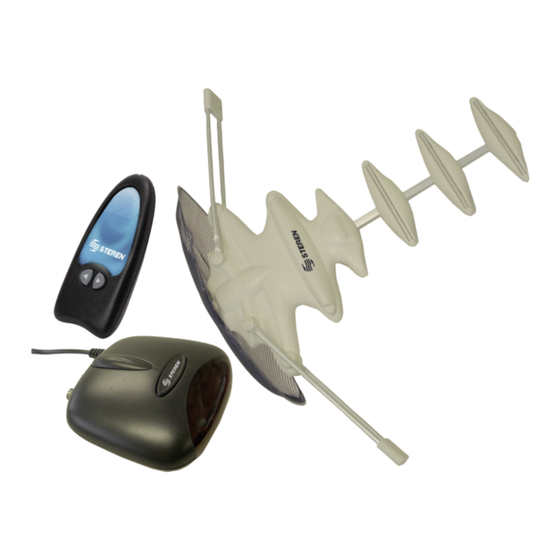
IMPORTANTE Antes de utilizar su nuevo Kit C Antes de utilizar su nueva Antena aérea HD con rotor, por favor lea las siguientes recomendaciones. • Siempre utilice un paño suave, limpio y seco para limpiar el equipo. • La garantía no es válida si trata de abrir el equipo. •... - Página 3 CONTROLES 1.- Interruptor de encendido/ apagado del amplificador de señal. 2.- Cable de alimentación eléctrica. 3.- TV2 Esta entrada le permite conectar un Segundo televisor. por medio de cable coaxial. 4.- TV1 Entrada de cable coaxial para una primera TV 5.- ANT Permite conectar el cable coaxial de la antena.
- Página 4 7.- Malla 8.- Base para el tubo donde se instalará la antena. 9.- Perilla de ajuste de la malla. 10.- Conector F coaxial Permite conectar el cable coaxial de la antena al amplificador de señal 11.- Dipolos. Ajuste los dipolos para obtener la mejor calidad de señal. Cuentan con 2 posiciones 12.- Terminal con 3 elementos.
-
Página 5: Instrucciones
INSTRUCCIONES 1.- Inserte la terminal con 3 elementos como se muestra en la figura y atornille hasta quedar firmemente sujeta. 2.- Coloque la malla y sujete con la perilla de ajuste. ESPAÑOL-05... - Página 6 3.- Saque la base para tubo y colóquela en la parte posterior de la antena, como muestra la figura. Asegúrela utilizando los tornillos incluidos en el empaque. 4.- Una vez que instaló la base, colóquela en el tubo para antena (no incluido) y asegúrela utilizando los seguros de la base.
- Página 7 5.- Extienda el cable coaxial que va a utilizar para conectar la antena con el amplificador de señal y conecte una terminal al conector coaxial de la Antena y el extremo contrario conéctelo al amplificador de señal en el conector marcado como ANT. 6.- Conecte un cable coaxial en la entrada coaxial del Televisor y el extremo contrario conéctelo a la entrada TV1 del amplificador de señal.
- Página 8 7.- Inserte el cordón de energía a un contacto eléctrico y encienda el amplificador de señal. 8.- Encienda su televisor y compruebe la recepción de los canales. 9.- Coloque los dipolos en la posición más adecuada a fin de lograr la mejor recepción (los dipolos cuentan con dos posiciones). 10.- Use el control remoto para mover la antena hacia la derecha o la izquierda para captar mejor las señales de TV ESPAÑOL-08...
-
Página 9: Especificaciones
Antes de utilizar su nuevo Kit C Esta antena le permite recibir la señal de canales de alta definición, siempre y cuando cuente con un televisor diseñado para alta definición, en caso contrario, sólo recibirá señales de vídeo estándar. ESPECIFICACIONES Entrada: 120V~ 60Hz 40mA Ganancia: 15dB Control remoto... -
Página 10: Póliza De Garantía
1.- Para hacer efectiva la garantía, presente ésta póliza y el producto, en donde fue adquirido o en Electrónica Steren S.A. de C.V. 2.- Electrónica Steren S.A de C.V. se compromete a reparar el producto en caso de estar defectuoso sin ningún cargo al consumidor. Los gastos de transportación serán cubiertos por el proveedor. -
Página 11: Datos Del Distribuidor
Biólogo MaximIno Martínez No. 3408 Int. 3 y 4, San Salvador Xochimanca, México, D.F. 02870, RFC: SPE941215H43 ELECTRONICA STEREN DEL CENTRO, S.A. DE C.V. Rep. del Salvador 20 A y B, Centro, 06000, México. D.F. RFC: ESC9610259N4 ELECTRONICA STEREN DE GUADALAJARA, S.A. - Página 13 IMPORTANT Before using your new High definition rotor antenna, please read the following recommendations. • Always use a soft and dry cloth in order to clean • Do not attempt to open this device as this could cause malfunctions or the voiding of the warranty. •...
- Página 14 CONTROLS 1.- ON / OFF switch Allows you to power on / off the signal amplifier. 2.- Power cord 3.- TV2 Use a coaxial cable to connect the signal amplifier to a second TV 4.- TV1 Use a coaxial cable to connect the signal amplifier to a first TV 5.- ANT Allows you to connect a coaxial cable from the antenna to the...
- Página 15 7.- Mesh 8.- Basis for the tube which will be installed the antenna. 9.- Adjustment knob the mesh. 10.- Connector for coaxial cable Allows you to connect a coaxial cable from the antenna to the signal amplifier 11.- Dipoles. Set the dipoles to get the best signal quality.
- Página 16 INSTRUCTIONS 1.- Insert the terminal with 3 elements as shown in Figure and screw to be firmly attached. 2.- Place the mesh and grasp the adjustment knob. ENGLISH-05...
- Página 17 3.- Release the base and place it in the rear side of the antenna, see the figure. Fasten it using the included screws. 4.- Then, place the antenna into the outdoor tube (not included), and fasten it using the base’ s secures. ENGLISH-06...
- Página 18 5.- Extend a coaxial cable (not included), one of the ends plug it into the signal amplifi er (ANT) and the other end plug it into the antenna’s coaxial connector. 6.- Connect a coaxial cable at the input coaxial of the TV and connect it to the end opposite the input of the TV1 signal amplifier.
- Página 19 7.- Plug the power cord into an AC outlet, then power on the signal amplifier. 8.- Turn the TV on and check the TV signal reception. 9.- Put the dipoles in the best position to get a good signal quality reception (dipoles has 2 positions).
- Página 20 Antes de utilizar su nuevo Kit C This antenna allows you to receive HDTV signal, however your TV must includes a HD receiver, otherwise you will only receive standard video signals. SPECIFICATIONS Input: 120V~ 60Hz 40mA Gain: 15dB Remote control Input: 3V - - - (2 x AAA) Antes de utilizar su nuevo Kit C Product desing and specifications are subject to change without...
- Página 21 Part number: ANT-HD-100 Brand: Steren WARRANTY This Steren product is warranted under normal usage against defects in workmanship and materials to the original purchaser for one year from the date of purchase. CONDITIONS 1.- This warranty card with all the required information, invoice or purchase ticket, product box or package, and product, must be presented when warranty service is required.
- Página 22 RETAILER INFORMATION Name of the retailer Address Product Brand Part number Serial number Date of delivery In case your product fails or have questions, please contact your nearest dealer. If you are in Mexico, please give a call to our Call Center. Call Center 01 800 500 9000...