Beurer BM 45 Manual De Instrucciones
Ocultar thumbs
Ver también para BM 45:
- Instrucciones de uso (140 páginas) ,
- Manual de instrucciones (250 páginas)
Tabla de contenido
Publicidad
Idiomas disponibles
Idiomas disponibles
Enlaces rápidos
DE Blutdruckmessgerät
Gebrauchsanweisung ....................................... 2
EN Blood pressure monitor
Instructions for use ......................................... 17
FR Tensiométre
Mode d'emploi ................................................ 31
ES Tensiómetro
Manual de instrucciones ................................. 46
Misuratore di pressione
IT
Istruzioni per l'uso ........................................... 62
TR Tansiyon ölçme cihazı
Kullanım kılavuzu ............................................ 77
RU Прибор для измерения кровяного давления
Инструкция по применению ......................... 90
PL Ciśnieniomierz
Instrukcja obsługi .......................................... 105
BM 45
Publicidad
Capítulos
Tabla de contenido

Manuales relacionados para Beurer BM 45


Resumen de contenidos para Beurer BM 45
- Página 1 BM 45 DE Blutdruckmessgerät Gebrauchsanweisung ........2 EN Blood pressure monitor Instructions for use ......... 17 FR Tensiométre Mode d’emploi ..........31 ES Tensiómetro Manual de instrucciones ......... 46 Misuratore di pressione Istruzioni per l’uso ........... 62 TR Tansiyon ölçme cihazı...
-
Página 2: Tabla De Contenido
Sie sie für späteren Bei eventuell vorhandenen Herzrhythmusstörungen werden Sie Gebrauch auf, machen Sie sie anderen Benutzern zugänglich gewarnt. und beachten Sie die Hinweise. Die ermittelten Werte werden eingestuft und grafisch beurteilt. Mit freundlicher Empfehlung Ihr Beurer-Team... -
Página 3: Wichtige Hinweise
2. Wichtige Hinweise Zulässige Betriebstemperatur und Operating -luftfeuchtigkeit Zeichenerklärung In der Gebrauchsanweisung, auf der Verpackung und auf dem Vor Nässe schützen Typschild des Geräts und des Zubehörs werden folgende Sym- bole verwendet: Seriennummer Vorsicht Die CE-Kennzeichnung bescheinigt die Konformität mit den grundlegenden Hinweis Anforderungen der Richtlinie 93/42/EEC für Hinweis auf wichtige Informationen... - Página 4 • Die von Ihnen selbst ermittelten Messwerte können nur zu • Verwenden Sie das Gerät nur bei Personen mit dem für das Ihrer Information dienen – sie ersetzen keine ärztliche Un- Gerät angegebenen Umfangbereich des Oberarmes. tersuchung! Besprechen Sie Ihre Messwerte mit dem Arzt, •...
- Página 5 • Die Abschaltautomatik schaltet das Blutdruckmessgerät zur • Verschluckungsgefahr! Kleinkinder könnten Batterien Schonung der Batterien aus, wenn innerhalb 3 Minuten keine verschlucken und daran ersticken. Daher Batterien für Klein- Taste betätigt wird. kinder unerreichbar aufbewahren! • Das Gerät ist nur für den in dieser Gebrauchsanweisung •...
-
Página 6: Gerätebeschreibung
• Im Interesse des Umweltschutzes darf das Gerät am • Eine Nichtbeachtung kann zu einer Minderung der Lei- Ende seiner Lebensdauer nicht mit dem Hausmüll stungsmerkmale des Gerätes führen. entfernt werden. Die Entsorgung kann über 3. Gerätebeschreibung entsprechende Sammelstellen in Ihrem Land erfolgen. Entsorgen Sie das Gerät gemäß... -
Página 7: Messung Vorbereiten
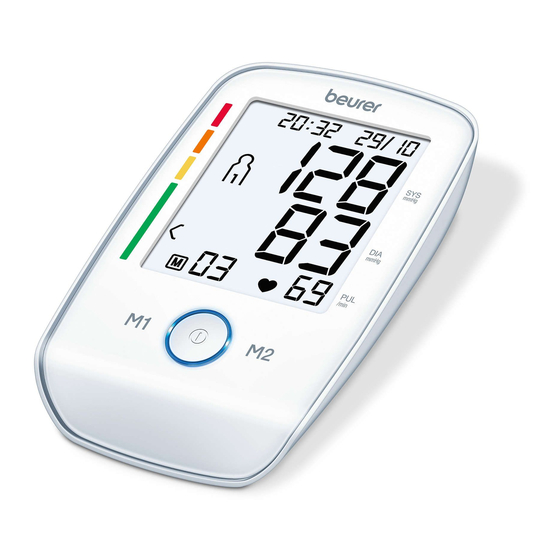
Anzeigen auf dem Display: Wenn das Symbol Batteriewechsel dauerhaft erscheint, ist keine Messung mehr möglich und Sie müssen alle Batterien 1. Datum / Uhrzeit erneuern. Sobald die Batterien aus dem Gerät entfernt werden, 2. Systolischer Druck müssen das Datum und die Uhrzeit neu eingestellt werden. Die 3. - Página 8 In diesem Menü können Sie die folgenden Einstellungen nach- Im Display blinkt die Stundenzahl. einander vornehmen: • Wählen Sie mit den Speichertasten M1/M2 Stundenformat ➔ Datum ➔ Uhrzeit Ihr gewünschte Stundenzahl und bestäti- gen Sie mit der START/STOPP-Taste Im Display blinkt die Minutenzahl. Im Display blinkt das Studenformat.
-
Página 9: Blutdruck Messen
• Schließen Sie danach den Netzstecker des Netzteils an die Stecken Sie nun den Manschetten - Steckdose an. schlauch in den Anschluss für den • Nach dem Gebrauch des Blutdruckmessgerätes trennen Sie Man schetten stecker. das Netzteil zuerst von der Steckdose und anschließend vom Blutdruckmessgerät. - Página 10 Richtige Körperhaltung einnehmen Blutdruckmessung durchführen Legen Sie, wie zuvor beschrieben, die Manschette an und nehmen Sie die Haltung ein, in der Sie die Messung durchführen wollen. • Um das Blutdruckmessgerät zu starten, drücken Sie die START/STOPP-Taste Alle Displayanzeigen leuchten kurz auf. •...
-
Página 11: Ergebnisse Beurteilen
Dies kann ein Indikator für eine Arrhythmie sein. Arrhythmie ist • erscheint wenn die Messung nicht ord- eine Krankheit, bei der Herzrhythmus aufgrund von Fehlern im nungsgemäß durchgeführt werden konnte. bioelektrischen System, das den Herzschlag steuert, anormal Beachten Sie das Kapitel Fehlermeldung/ ist. -
Página 12: Messwerte Speichern, Abrufen Und Löschen
Sollte sich der Wert von Systole und Diastole in zwei unter- • Wählen Sie nach der Vollbildanzeige innerhalb 3 Se- schiedlichen Bereichen befinden (z.B. Systole im Bereich Hoch kunden mit der Speichertaste M1 oder M2 Ihren normal und Diastole im Bereich Normal) dann zeigt Ihnen die gewünschten Benutzerspeicher ( graphische Einteilung auf dem Gerät immer den höheren Be- –... -
Página 13: Gerät Und Manschette Reinigen Und Aufbewahren
• Drücken Sie die jeweilige Speichertaste (M1 oder M2). • Um den Speicher des jeweiligen Benutzerspeichers zu löschen, wählen Sie zunächst einen Benutzerspeicher Im Display blinkt PM. aus. Es wird der Durchschnittswert der letzten 7 Tage der Abend-Messungen angezeigt • Starten Sie die Abfrage der Einzelmesswerte. (Abend: 18.00 Uhr –... -
Página 14: Technische Angaben
Batterien neu ein oder ersetzen Sie diese. Umgebungsdruck 10. Technische Angaben Stromversorgung 4 x 1,5 V AA Batterien Modell-Nr. BM 45 Batterie-Lebensdauer Für ca. 250 Messungen, je nach Höhe des Blutdrucks bzw. Aufpumpdruck M1501 Klassifikation Interne Versorgung, IPX0, kein AP oder Messmethode... -
Página 15: Netzteil
100 – 240 V, 50 – 60 Hz, 0.5 A max Bestellnummer Ausgang 6 V DC, 600 mA, nur in Verbindung mit Standardmanschette (22-36 cm) 163.388 Beurer Blutdruckmessgeräten XL-Manschette (35-44 cm) 163.387 Hersteller Shenzhen Iongxc power supply co., ltd Schutz Das Gerät ist doppelt schutzisoliert und... - Página 16 Nachweis des Kaufes zu führen. Die Garantie ist innerhalb eines Zeitraumes von 5 Jahren ab Kaufdatum gegenüber der Beurer GmbH, Ulm (Germany) geltend zu machen. Bitte wenden Sie sich im Falle von Reklamationen an un- seren Service unter folgendem Kontakt: Service Hotline: Tel.: +49 (0) 731 / 39 89-144...
-
Página 17: Getting To Know Your Instrument
Please read these instructions for use carefully and keep them The recorded values are classified and evaluated graphically. for later use, be sure to make them accessible to other users and observe the information they contain. Best regards, Your Beurer Team... -
Página 18: Important Information
2. Important information Permissible operating temperature and Operating humidity Signs and symbols The following symbols are used in these instructions for use, Keep dry on the packaging and on the type plate for the device and accessories: Serial number Caution The CE labelling certifies that the product complies with the essential requirements of Note... - Página 19 Discuss the measurements with your doctor, and never base • During the blood pressure measurement, blood circulation any medical decisions on them (e.g. medicines and their must not be stopped for an unnecessarily long time. If the administration)! device malfunctions, remove the cuff from the arm. •...
- Página 20 • If the device is not to be used for a long period, take the bat- Storage and Care teries out of the battery compartment. • The blood pressure monitor is made up of precision electron- • Use identical or equivalent battery types only. ic components.
-
Página 21: Device Description
• Avoid using this device directly next to other devices or 6. Memory buttons M1/M2 stacked on top of other devices, as this could lead to faulty 7. Start/stop button operation. If, however, it is necessary to use the device in the 8. - Página 22 that the batteries are inserted the correct way round. Do not Press and hold the START/STOP button on the device use rechargeable batteries. when switched off for approx. 5 seconds. • Close the battery compartment lid again carefully. In this menu you can adjust the following settings in succes- If the battery replacement symbol is permanently dis- sion:...
-
Página 23: Measuring Blood Pressure
the blood pressure monitor. As soon as you unplug the The hour flashes on the display. mains part, the blood pressure monitor loses the date and • Choose the desired hour with the M1/ time setting but the saved measurements are retained. M2 memory buttons and confirm with the Start/stop button The minute flashes on the display. -
Página 24: Correct Posture
This cuff is suitable for you if the index • You can perform the measurement either sitting or lying down. mark ( ) is within the OK range after Always make sure that the cuff is on a level with your heart. fitting the cuff on the upper arm. -
Página 25: Evaluating Results
Performing the blood pressure measurement • appears if the measurement could not be performed properly. Observe the As described above, attach the cuff and adopt the pos- chapter on error messages/troubleshooting ture in which you want to perform the measurement. in these instructions for use and repeat the •... -
Página 26: Saving, Displaying And Deleting Measured Values
in the bioelectrical system controlling the heart beat. The symp- Blood pressure Systole Diastole Action toms (omitted or premature heart beats, slow or excessively fast value category (in mmHg) (in mmHg) heart rate) may be caused, among other things, by heart dis- Setting 3: ≥... - Página 27 • When the relevant memory button (M1 or – To view the measurements for user memory , press M2) is pressed again, the last individual the M1 memory button. measurement is displayed (in this example, – To view the measurements for user memo- measurement 03).
-
Página 28: Cleaning And Storing The Device And Cuff
Battery life For approx. 250 measurements, depending on the blood pressure level 10. Specifications and/or pump pressure Model no. BM 45 Classification Internal supply, IPX0, no AP or APG, Type M1501 continuous operation, application part Measurement... -
Página 29: Mains Part
Output 6 V DC, 600 mA, only in connection with • This unit is in line with European Standard EN 60601-1-2 (In beurer blood pressure monitor. accordance with CISPR 11, IEC 61000-4-2, IEC 61000-4-3, Supplier Shenzhen Iongxc power supply co., ltd... -
Página 30: Warranty/Service
In case of returning the unit please add a copy of your receipt and a short report of the defect. The following warranty terms shall apply: 1. The warranty period for BEURER products is either 5 years or- if longer- the country specific warranty period from date of Purchase. -
Página 31: Premières Expériences
6. Evaluation des résultats ............40 13. Garantie / Maintenance ............45 7. Enregistrer, consulter et supprimer les valeurs mesurées ... 41 Contenu Avec nos sentiments dévoués Beurer et son équipe • Tensiomètre • Manchette 1. Premières expériences • 4 piles AA LR06 de 1,5 V Vérifiez si l’emballage extérieur de l’appareil est intact et si tous... -
Página 32: Remarques Importantes
2. Remarques importantes Température et taux d’humidité de Storage/Transport stockage et de transport admissibles Symboles utilisés Les symboles suivants sont utilisés dans le mode d’emploi, sur Operating Température et taux d’humidité d’utilisation l’emballage et sur la plaque signalétique de l’appareil et des admissibles accessoires : Attention... - Página 33 • Effectuez une nouvelle mesure si vous avez un doute sur les • Le tensiomètre ne doit pas être utilisé parallèlement à un valeurs mesurées. appareil chirurgical haute fréquence. • Les mesures que vous avez établies servent juste à vous tenir •...
- Página 34 • L’arrêt automatique permet de faire passer le tensiomètre en Remarques relatives aux piles mode économie d’énergie lorsqu’aucune touche n’est mani- • Si du liquide de la cellule de pile entre en contact avec la pulée pendant un délai de 3 minutes. peau ou les yeux, rincez la zone touchée avec de l’eau et •...
-
Página 35: Description De L'aPpareil
• Les réparations doivent être effectuées uniquement par le • L’utilisation d’accessoires autres que ceux spécifiés ou service après-vente ou des revendeurs agréés. Cependant fournis par le fabricant de cet appareil peut provoquer des avant de faire une réclamation, contrôlez d’abord les piles et perturbations électromagnétiques accrues ou une baisse de changez-les, le cas échéant. -
Página 36: Préparer La Mesure
Données affichées à l’écran : • Refermez soigneusement le couvercle du compartiment à piles. 1. Date / heure 2. Pression systolique Si le symbole de changement des piles apparaît en 3. Pression diastolique continu, il n’est plus possible d’effectuer de mesure et vous 4. - Página 37 • Lorsque les piles sont insérées : Les heures clignotent à l’écran Sur l’appareil éteint, maintenez la touche MARCHE/ARRÊT • À l’aide des touches de mémoire M1/M2, enfoncée pendant environ 5 secondes. sélectionnez l’heure souhaitée et confirmez Dans ce menu, vous pouvez régler successivement les para- avec la touche MARCHE/ARRÊT mètres suivants : Les minutes clignotent à...
-
Página 38: Mesure De La Tension Artérielle
• Après chaque utilisation du tensiomètre, débranchez d’abord Cette manchette vous convient si le l’adaptateur secteur de la prise, puis déconnectez-le du marquage de l’index ( ) se trouve tensiomètre. Dès que vous débranchez l’adaptateur secteur, dans la zone OK après la pose de la le tensiomètre perd la date et l’heure. - Página 39 • Vous pouvez effectuer la mesure en position assise ou cou- Mesurer la tension artérielle chée. Quelque soit la position, veillez à ce que le brassard se Positionnez la manchette tel que décrit plus haut et ins- trouve à la hauteur du coeur. Pour ne pas fausser le résultat, tallez-vous dans la position de votre choix pour effectuer il est important de rester tranquille durant la mesure et de ne la mesure.
-
Página 40: Evaluation Des Résultats
Ce symbole peut indiquer une arythmie. L’arythmie est une • s’affiche lorsque la mesure n’a pas pathologie lors de laquelle, du fait de défauts dans le système pu être effectuée correctement. Lisez le bioélectrique commandant les battements du cœur, le rythme chapitre Message d’erreur/Résolution des cardiaque est anormal. -
Página 41: Enregistrer, Consulter Et Supprimer Les Valeurs Mesurées
et diastole en plage « normale »), la graduation graphique • Après l’affichage en plein écran, sélectionnez la mé- indique toujours la plage la plus haute sur l’appareil, à savoir moire utilisateur voulue dans un délai de 3 secondes « normale haute » dans le présent exemple. avec la touche mémoire M1 ou M2 ( Plage des valeurs Systole... -
Página 42: Nettoyage Et Rangement De L'aPpareil Et De La Manchette
• Appuyez sur la touche mémoire correspondante (M1 • Pour effacer tous les enregistrements d’une mémoire ou M2). utilisateur donnée, sélectionnez d’abord une mémoire utilisateur. PM clignote à l’écran. La valeur moyenne des mesures du soir des • Démarrez la consultation des mesures individuelles. 7 derniers jours est affichée (soir : 18h00 –... -
Página 43: Suppression Des Erreurs
échéant, remettez les piles ou remplacez-les. admissibles 10. Fiche technique Alimentation 4 x 1,5 V piles AA N° du modèle BM 45 électrique Type M1501 Durée de vie des Environ 250 mesures, selon le niveau de piles tension artérielle ainsi que la pression de Mode de mesure Mesure de la tension artérielle au bras,... -
Página 44: Adaptateur
163.387 Entrée 100 – 240 V, 50 – 60 Hz, 0.5 A max Adaptateur secteur (UE) 071.95 Sortie 6 V DC, 600 mA, uniquement en association avec les lecteurs de tension artérielle Beurer. Fabricant Shenzhen Iongxc power supply co., ltd... -
Página 45: Garantie / Maintenance
Les conditions de garantie suivantes s’appliquent : 1. La période de garantie des produits BEURER est de 5 ans ou, si elle est plus longue, elle est applicable dans le pays concerné à compter de la date d’achat. -
Página 46: Introducción
Además, advierte de eventuales alteraciones del ritmo rese de que estén accesibles para otros usuarios y respete las cardiaco. indicaciones. Los valores medidos se clasifican y evalúan de forma gráfica. Les saluda cordialmente Su equipo Beurer... -
Página 47: Indicaciones Importantes
2. Indicaciones importantes Operating Temperatura y humedad relativa de funcionamiento admisibles Explicación de los símbolos En las presentes instrucciones de uso, en el embalaje y en la Proteger de la humedad placa de características del aparato y de los accesorios se utilizan los siguientes símbolos: Número de serie ¡Atención! - Página 48 médico. Hable de los valores que obtenga con su médico. • La medición de la presión sanguínea no debe interrumpir la Bajo ningún concepto debe tomar usted mismo decisiones circulación sanguínea más tiempo del necesario. En caso de médicas (p. ej. sobre medicamentos y su dosificación). que el aparato no funcione correctamente, retire el brazalete •...
- Página 49 toda responsabilidad por los daños y perjuicios debidos a un • Proteja las pilas de un calor excesivo. uso inadecuado o incorrecto. • ¡Peligro de explosión! No arroje las pilas al fuego. • Las pilas no se pueden cargar ni cortocircuitar. Indicaciones para el almacenamiento y limpieza •...
-
Página 50: Descripción Del Aparato
3. Descripción del aparato municipal competente en materia de eliminación de residuos. Indicaciones relativas a la compatibilidad electromagnética • El aparato está diseñado para usarse en todos los entornos que se especifican en estas instrucciones de uso, incluido el mmHg ámbito doméstico. -
Página 51: Preparar La Medición
Indicaciones en la pantalla: • Vuelva a cerrar la tapa del compartimento para pilas con cuidado. 1. Fecha / hora 2. Presión sistólica Cuando el símbolo de cambio de pilas se muestra conti- 3. Presión diastólica nuamente, no se pueden seguir realizando mediciones y se de- 4. - Página 52 • Antes del primer uso y tras cada cambio de pilas: El indicador del año parpadea en la pan- Una vez insertadas las pilas en el aparato, accederá automá- talla. ticamente al menú correspondiente. • Seleccione con las teclas de memoriza- •...
-
Página 53: Medir La Presión Sanguínea
Funcionamiento con la fuente de alimentación 5.1 Colocar el brazalete También puede utilizar este aparato con una fuente de alimen- Coloque el brazalete en el brazo des- tación (no incluida en el suministro). La fuente de alimentación cubierto. El manguito se debe colocar se puede adquirir en comercios especializados o solicitarse al de tal manera, que el margen inferior servicio de asistencia técnica con el número de pedido 071.95. -
Página 54: Colocar El Cuerpo En La Posición Correcta
Si efectúa la medición en el brazo derecho, el tubo flexible mantenga el brazo quieto durante la medición y procure no se encuentra en la parte interior del codo. Evite colocar el hablar. brazo encima del tubo flexible. • Siéntese para tomar la tensión sanguínea de manera có- moda. -
Página 55: Evaluar Los Resultados
Medición de la presión sanguínea • aparece cuando la medición no se ha podido realizar correctamente. Consulte Póngase el brazalete como se ha descrito anteriormente el apartado Aviso de errores/Solución de y colóquese en la postura en la que desea realizar la problemas de estas instrucciones de uso y medición. - Página 56 Esto puede ser un indicador de una arritmia. La arritmia es una mal alta” y la diástole en el rango “Normal”), el gráfico de la enfermedad que se caracteriza por un ritmo cardíaco anormal, clasificación del aparato indica siempre el rango más alto. En debido a trastornos en el sistema bioeléctrico que controla el co- este ejemplo, se muestra “Normal alta”.
-
Página 57: Almacenamiento, Consulta Y Borrado De Los Valores Medidos
7. Almacenamiento, consulta y borrado de los • Pulse la tecla de memorización correspondiente (M1 o valores medidos M2). Si ha seleccionado el registro de usuario1, deberá Los resultados de todas las mediciones correctamente pulsar la tecla de memorización M1. realizadas se guardan en la memoria junto con la fecha y Si ha seleccionado el registro de usuario2, deberá... -
Página 58: Limpiar Y Guardar La Unidad Y El Brazalete
8. Limpiar y guardar la unidad y el brazalete • Si vuelve a pulsar la tecla de memorización • Limpie con cuidado la unidad y el brazalete solo con un correspondiente (M1 o M2) se mostrará en paño ligeramente humedecido. la pantalla la última medición individual (en •... -
Página 59: Especificaciones Técnicas
Vida útil de las Para unas 250 mediciones, según el nivel de pilas la presión sanguínea y la presión de inflado N.º de modelo BM 45 Clasificación Alimentación interna, IPX0, sin AP/APG, fun- Tipo M1501 cionamiento continuo, pieza de aplicación Método de me-... -
Página 60: Adaptador
Aislamiento de protección / Clase de pro- compra y una breve descripción del problema. tección 2 Se aplican las siguientes condiciones de garantía: 1. El periodo de garantía para productos de BEURER es de 5 años o, si es superior, se aplica el periodo de garantía... - Página 61 vigente en el país correspondiente a partir de la fecha de compra. En caso de una reclamación de la garantía, la fecha de compra deberá demostrarse con el recibo de compra o una factura. 2. Las reparaciones (todo el aparato o solo algunas piezas) no hacen que se prolongue el periodo de garantía.
-
Página 62: Introduzione
Beauty e aria. Leggere attentamente le presenti disturbi del ritmo cardiaco l’apparecchio emette un avviso. istruzioni per l’uso, conservarle per impieghi futuri, renderle I valori rilevati vengono classificati e valutati graficamente. accessibili ad altri utenti e attenersi alle indicazioni. Cordiali saluti Il Suo team Beurer... -
Página 63: Avvertenze Importanti
2. Avvertenze importanti Temperatura e umidità di esercizio Operating consentite Spiegazione dei simboli I seguenti simboli sono utilizzati nelle istruzioni per l’uso, Proteggere dall’umidità sull’imballo e sulla targhetta dell’apparecchio e degli accessori: Attenzione Numero di serie Avvertenza Il marchio CE certifica la conformità ai requisiti di base della direttiva 93/42/EEC Indicazione di importanti informazioni sui dispositivi medici... - Página 64 • L’utilizzo del misuratore di pressione al di fuori dell’ambito • Evitare di schiacciare, comprimere o piegare meccanicamen- domestico o sotto l’influsso del movimento (ad es. durante te il tubo del manicotto. un viaggio in auto, ambulanza o elicottero nonché durante •...
- Página 65 • Le riparazioni devono essere eseguite esclusivamente dal Avvertenze sull’uso delle batterie servizio assistenza di Beurer o da ri-venditori autorizzati. Prima di ogni reclamo verificare in primo luogo lo stato delle • Se il liquido della batteria viene a contatto con la pelle e con batterie e sosti-tuirle, se necessario.
-
Página 66: Descrizione Dell'aPparecchio
3. Descrizione dell’apparecchio Avvertenze sulla compatibilità elettromagnetica • L‘apparecchio è idoneo per l‘utilizzo in qualsiasi ambiente riportato nelle presenti istruzioni per l‘uso, incluso l‘ambiente domestico. • In determinate circostanze, in presenza di disturbi elettroma- mmHg gnetici l‘apparecchio può essere utilizzato solo limitata- mente. -
Página 67: Preparazione Della Misurazione
Indicatori sul display: • Richiudere attentamente il coperchio del vano batterie. 1. Data / Ora Quando l’icona di sostituzione delle batterie è fissa, non 2. Pressione sistolica è più possibile effettuare alcuna misurazione ed è necessario 3. Pressione diastolica cambiare tutte le batterie. Quando le batterie vengono rimosse 4. - Página 68 Attraverso questo menu è possibile effettuare in successione le Sul display lampeggia il numero dell'ora. seguenti regolazioni: • Con i pulsanti per la memorizzazione M1/ M2 selezionare il numero dell'ora deside- Formato ora Data ➔ ➔ rato e confermare con il pulsante START/ STOP Sul display lampeggia il formato ora.
-
Página 69: Misurazione Della Pressione Sanguigna
• Dopo avere utilizzato il misuratore di pressione, staccare Inserire quindi il flessibile del bracciale l’alimentatore di rete prima dalla presa e poi dal misuratore nell’attacco della spina del bracciale. di pressione. Quando l’alimentatore di rete viene staccato, il misuratore di pressione perde data e ora. I valori misurati restano memorizzati. - Página 70 5.2 Assumere una posizione corretta del corpo Esecuzione della misurazione della pressione Applicare il manicotto e sistemarsi nella posizione in cui si desidera eseguire la misurazione. • Per avviare il misuratore di pressione, pre- mere il pulsante START/STOP . Tutte le spie del display si accendono brevemente.
-
Página 71: Valutare I Risultati
6. Valutare i risultati • Vengono visualizzati i valori misurati per pressione sistolica e diastolica e battito Aritmie cardiache: cardiaco. questo apparecchio è in grado di identificare disfunzioni ritmi- che del battito cardiaco durante la misurazione ed, eventual- mente, le indica sul display con l’icona •... -
Página 72: Memorizzazione, Ricerca E Cancellazione Dei Valori Misurati
7. Memorizzazione, ricerca e cancellazione dei È importante consultare regolarmente il proprio medico per sapere qual è la propria pressione normale e il limite superato il valori misurati quale il livello di pressione viene considerato pericoloso. Gli esiti di ogni misurazione corretta vengono memoriz- Il grafico a barre sul display e la scala graduata sul misuratore zati con data e ora. - Página 73 • Premere il pulsante per la memorizzazione corrispon- • Premendo nuovamente il pulsante per la dente (M1 o M2). memorizzazione corrispondente (M1 o M2), il display visualizza l'ultima misura- Una volta selezionata la memoria utente1, utilizzare il zione singola (nell'esempio la misurazione pulsante per la memorizzazione M1.
-
Página 74: Pulizia E Conservazione Dell'aPparecchio E Del Manicotto
8. Pulizia e conservazione dell’apparecchio e 10. Dati tecnici del manicotto Codice BM 45 • Pulire con attenzione l’apparecchio e il manicotto utilizzando Tipo M1501 solo un panno leggermente inumidito. Metodo di Oscillometrico, misurazione non invasiva • Non utilizzare detergenti o solventi. -
Página 75: Adattatore
Ai fini dell’aggiornamento i dati tecnici sono soggetti a modifi- Uscita 6 V DC, 600 mA, solo in abbinamento che senza preavviso. con sfigmomanometri Beurer. Produttore Shenzhen Iongxc power supply co., ltd • L’apparecchio è conforme alla norma europea EN60601-... -
Página 76: Pezzi Di Ricambio E Parti Soggette A Usura
Si applicano le seguenti condizioni di garanzia: 1. La garanzia dei prodotti BEURER dura 5 anni oppure, se più lunga, fa fede la durata di garanzia valida dalla data di acquisto di ciascun paese. -
Página 77: Ürün Özellikleri
Eğer kalp ritim rahatsızlıkları olma ihtimali varsa, bir uyarı bil- için saklayın, diğer kullanıcıların erişebilmesini sağlayın ve için- dirilir. deki yönergelere uyun. Elde edilen değerler kademelendirilir ve grafik olarak değerlen- Dostane tavsiyelerimizle Beurer Müessesesi dirilir. -
Página 78: Önemli Bilgiler
2. Önemli bilgiler İzin verilen çalışma sıcaklığı ve nem Operating İşaretlerin açıklaması Cihazın ve aksesuarların kullanım kılavuzunda, ambalajında ve Nemden koruyunuz model etiketinde aşağıdaki semboller kullanılır: Dikkat Seri numarası CE işareti, tıbbi ürünler için 93/42/EEC yönetmeliğinin temel şartları ile uyumluluğu Önemli bilgilere yönelik notlar belgeler. - Página 79 • Tansiyon ölçme cihazının ev ortamının dışında veya hareket • Manşette sürekli basınç olmasını önleyin ve sık ölçümlerden halinde kullanılması (ör. araba, ambulans veya helikopter kaçının. Kan akışının bunun sonucunda kısıtlanması halinde kullanırken ve spor gibi fiziksel aktiviteler yaparken) ölçüm yaralanmalar meydana gelebilir.
- Página 80 Aksi halde cihazın kusursuz çalışması garanti edilemez. Pillerle temas etme durumu için uyarılar • Onarımlar sadece Beurer yetkili servisi veya yetkili satıcılar ta- • Pil hücresindeki sıvı, cilt veya gözlerle temas ettiğinde, ilgili rafından yapılmalıdır. Fakat her reklamasyondan önce, yine de yeri suyla yıkayın ve bir doktora başvurun.
-
Página 81: Cihaz Açıklaması
kullanım kesinlikle kaçınılmazsa, gerektiği gibi çalıştıklarından Ekrandaki göstergeler: emin olmak için bu cihaz ve diğer cihazlar gözlemlenmelidir. 1. Tarih / Saat • Bu cihazın üreticisinin belirttiği veya sağladığı aksesuarlar 2. Sistolik tansiyon haricindeki aksesuarların kullanılması, elektromanyetik pa- 3. Diyastolik tansiyon razit emisyonlarının artmasına veya cihazın elektromanyetik 4. - Página 82 Pil değiştirme sembolü sürekli gösteriliyorsa, artık ölçüm Ekranda saat formatı yanıp söner. yapılması mümkün değildir ve tüm pillerin değiştirilmesi gerek- • Hafıza düğmeleri M1/M2 ile istediğiniz mektedir. Piller cihazdan çıkartıldığında tarih ve saat yeniden saat formatını seçin ve BAŞLAT/DURDUR ayarlanmalıdır. Kaydedilen ölçüm değerleri kaybolmaz. düğmesi ile onaylayın.
-
Página 83: Tansiyonun Ölçülmesi
5. Tansiyonun ölçülmesi Ekranda saat göstergesi yanıp söner. Lütfen cihazı ölçümden önce oda sıcaklığına getiriniz. • Hafıza düğmeleri M1/M2 ile istediğiniz Ölçümü sol veya sağ kolda yapabilirsiniz. saati seçin ve BAŞLAT/DURDUR düğmesi ile onaylayın. 5.1 Manşetin takılması Ekranda dakika göstergesi yanıp söner. Manşeti çıplak sol üst kola takın. - Página 84 Ölçümü sağ kolun üst kısmında yaparsanız hortum dirseğin • Ölçüm sonucunun yanlış olmasını önlemek için, ölçüm esna- iç kısmına gelir. Kolunuzun hortumun üzerine gelmemesine sında sakin olunması, hareket edilmemesi ve konuşulmaması dikkat edin. önemlidir. • Yeniden ölçüm yapmadan önce en az 1 dakika bekleyin! Sol ve sağ...
-
Página 85: Sonuçların Değerlendirilmesi
• M1 veya M2 hafıza düğmelerine basarak, istediği- Ölçme işleminden sonra ekranda sembolü görüntülenirse, ölçme işlemini tekrarlayınız. Ölçme işleminden önce 5 dakika niz kullanıcı hafızasını seçin. Kullanıcı hafızası seçimi yapmazsanız, ölçüm sonucu, en son kullanılmış olan dinlenmeye ve ölçme işlemi esnasında konuşmamaya veya hareket etmemeye lütfen dikkat ediniz. -
Página 86: Ölçüm Değerlerini Kaydetme, Çağırma Ve Silme
Tansiyon Sistol Diyastol Önlem • Tam ekran görüntüsünden sonra 3 saniye içinde hafıza değerlerinin aralığı (mmHg (mmHg düğmesi M1 veya M2 ile istediğiniz kullanıcı hafızasını olarak) olarak) seçin ( Kademe 2: Orta 160 – 179 100 – 109 Bir doktora –... -
Página 87: Cihazın Ve Manşetin Temizlenmesi Ve Saklanması
• Hafıza düğmelerinin ikisini M1 & M2 5 saniyeliğine konuşmamaya dikkat edin. Gerekirse pilleri yeniden yerleştirin basılı tutun. veya değiştirin. O andaki kullanıcı hafızasındaki tüm değerler 10. Teknik bilgiler silinir. Model no. BM 45 M1501 Ölçüm yöntemi Üst koldan, osilometrik, invazif olmayan tansiyon ölçümü... -
Página 88: Adaptör
100 – 240 V, 50 – 60 Hz, 0.5 A max Sınıflandırma Dahili besleme, IPX0, AP veya APG yok, Çıkış 6 V DC, 600 mA, sadece Beurer tansiyon devamlı kullanım, uygulama parçası tip BF ölçme cihazı ile birlikte kullanılır (manşet), CLASS II (adaptör kullanılırken) Üretici... -
Página 89: Yedek Parçalar Ve Yıpranan Parçalar
çıkarılmış olmasını sağlayınız. Aşağıdaki garanti koşulları geçerlidir: Doğru akım bağlantısının kutupları 1. BEURER ürünlerinin garanti süresi 5 yıldır veya – daha uzun ise – ilgili ülkede geçerli olan satın alma tarihinden itibaren Koruyucu izolasyon / Koruma sınıfı 2 garanti süresi kabul edilir. -
Página 90: Ознакомление .................................................................... 90 8. Очистка И Хранение Прибора И Манжеты
Внимательно прочтите данную инструкцию по применению, Вы будете предупреждены о возможных нарушениях рит- сохраните ее для последующего использования, держите ма сердца. ее в доступном для других пользователей месте и следуйте Полученные результаты измерений классифицируются ее указаниям. и отображаются в графическом виде. С дружескими пожеланиями сотрудники компании Beurer... -
Página 91: Важные Указания
2. Важные указания Допустимая рабочая температура и Operating влажность воздуха Пояснения к символам В инструкции по применению, на упаковке и на типовой Хранить в сухом месте табличке прибора и принадлежностей используются следу- ющие символы: Серийный номер Осторожно! Символ CE подтверждает соответствие основным... - Página 92 • Полученные Вами самостоятельно результаты измерений ном давлении, диабете, нарушениях кровоснабжения и носят исключительно информативный характер и не сердечного ритма, при ознобе или дрожи. могут заменить медицинского обследования! Обсудите • Не используйте прибор для измерения артериального результаты Ваших измерений с врачом, но ни в коем давления...
- Página 93 батарейки разряжены или блок питания отсоединен от Обращение с элементами питания электросети. • При попадании жидкости из аккумулятора на кожу или • Прибор для измерения артериального давления отклю- в глаза необходимо промыть соответствующий участок чается автоматически, если в течение 3 минут не была большим...
-
Página 94: Описание Устройства
• Запрещается самостоятельно ремонтировать или регу- том виде, как описано выше, следует наблюдать за лировать прибор. В этом случае больше не гарантирует- ним и другими устройствами, чтобы убедиться, что они ся безупречность работы. работают надлежащим образом. • Ремонт разрешается выполнять только сервисной служ- •... -
Página 95: Подготовка К Измерению
8. Индикатор риска следите за тем, чтобы батарейки были установлены с 9. Разъем для штекера манжеты (с левой стороны) правильной полярностью в соответствии с маркировкой. Не используйте заряжаемые аккумуляторы. Индикация на дисплее: • Снова тщательно закройте крышку отделения для бата- 1. - Página 96 Меню для выполнения настроек вызывается двумя раз- На дисплее замигает год. личными способами: • С помощью кнопок сохранения M1/M2 • Перед первым использованием и после каждой замены выберите нужный год и подтвердите батареек: выбор нажатием кнопки START/STOP После установки батареек в прибор Вы автоматически попадаете...
-
Página 97: Измерение Кровяного Давления
5. Измерение кровяного давления Использование с блоком питания Прибор можно также использовать с сетевым блоком Пожалуйста, перед измерением храните прибор при ком- питания (не входит в комплект поставки). Блок питания (но- натной температуре. мер для заказа 071.95) можно приобрести в специализиро- Измерение можно осуществлять на левой или правой руке. ванном... - Página 98 Манжета Вам подходит, если после 5.2 Принять правильное положение ее наложения отметка индекса ( находится в пределах диапазона Если измерение выполняется на правом плече, шланг должен находиться на внутренней стороне локтя. Про- • Отдохните в течение пяти минут перед первым измере- следите за тем, чтобы рука не лежала на шланге. нием...
-
Página 99: Оценка Результатов
Манжета накачивается автоматически. • Выключите прибор для измерения артериального давления, нажав кнопку START/STOP . Таким Измерение можно прервать в любое время нажа- образом в выбранной пользовательской памяти со- тием кнопки START/STOP хранится результат измерения. Давление воздуха в манжете медленно снижается. Если... - Página 100 недосыпанием. Аритмия может быть обнаружена только при ческое — нормальное), то графическое деление на при- обследовании врачом. боре всегда будет отображать более высокие пределы, как Повторите измерение, если пиктограмма появляется в описанном примере: «высокое в допустимых пределах». на дисплее после измерения. Учтите, что перед измерени- Диапазон...
-
Página 101: Сохранение, Просмотр И Удаление Результатов Измерения
7. Сохранение, просмотр и удаление • Нажмите соответствующую кнопку сохранения (M1 результатов измерения или M2). Если выбрана пользовательская память1, нажми- Результаты каждого успешного измерения сохраня- те кнопку сохранения M1. ются с указанием даты и времени измерения. Когда Если выбрана пользовательская память2, нажми- количество... -
Página 102: Очистка И Хранение Прибора И Манжеты
8. Очистка и хранение прибора и манжеты • При повторном нажатии соответству- • Производите очистку прибора и манжеты с осторожно- ющей кнопки сохранения (M1 или M2) стью. Используйте только слегка увлажненную салфетку. на дисплее о отобразится результат • Не используйте чистящие средства или растворители. последнего... -
Página 103: Технические Данные
10. Технические данные Электропи- 4 x 1,5 В батарейки типа AA тание Модель № BM 45 Срок службы Для ок. 250 измерений, в зависимости от Тип M1501 батареек высоты кровяного давления или давления Метод Осциллометрическое, неинвазивное измере- накачивания измерения ние кровяного давления в плечевой артерии... -
Página 104: Блок Питания
100 – 240 В, 50 – 60 Гц, 0.5 A Максимально Название Артикульный номер Выход 6 В пост. тока, 600 мА, только в комбинации или номер заказа с приборами для измерения артериального давления Beurer Стандартная манжета (22–36 см) 163.388 Защита Прибор имеет двойную защитную изоляцию Большая манжета (35–44 см) 163.387 и... -
Página 105: Zapoznanie
że zdecydowali się Państwo na zakup naszego Naramienny aparat do mierzenia ciśnienia krwi służy do niein- produktu. Firma Beurer oferuje dokładnie przetestowane, wazyjnego pomiaru i kontroli tętniczych wartości ciśnienia krwi wysokiej jakości produkty przeznaczone do ogrzewania ciała, dorosłych ludzi. -
Página 106: Ważne Wskazówk
2. Ważne wskazówk Dopuszczalna temperatura i wilgotność Operating powietrza podczas pracy Objaśnienie symboli W instrukcji obsługi, na opakowaniu i tabliczce znamionowej Chronić przed wilgocią urządzenia oraz akcesoriów znajdują się następujące symbole: Uwaga Numer seryjny Wskazówka Oznakowanie CE potwierdza zgodność z zasadniczymi wymogami dyrektywy 93/42/ Ważne informacje EEC w sprawie wyrobów medycznych... - Página 107 wać decyzji medycznych na własną rękę (np. dotyczących • Unikaj mechanicznego zwężania, ściskania lub zaginania stosowania leków i ich dawkowania)! wężyka mankietu. • Stosowanie ciśnieniomierza poza domem lub w ruchu (np. • Unikać utrzymywania ciśnienia w mankiecie oraz częstych podczas podróży w samochodzie, karetce lub helikopterze pomiarów.
- Página 108 • Naprawy mogą być przeprowadzane jedynie przez serwis • Jeśli dojdzie do kontaktu elektrolitu ze skórą lub oczami, firmy Beurer lub autoryzowany serwis dystrybutora sprzętu. należy przemyć dane miejsce wodą i skontaktować się z Przed złożeniem reklamacji sprawdzić najpierw baterie i w lekarzem.
-
Página 109: Opis Urządzenia
3. Opis urządzenia Wskazówki dot. kompatybilności elektromagnetycznej • Urządzenie jest przeznaczone do użytkowania w każdym otoczeniu wymienionym w niniejszej instrukcji obsługi, włącznie z domem. • Przy zakłóceniach elektromagnetycznych w pewnych mmHg warunkach urządzenie może być użytkowane tylko w ograni- czonym zakresie. Wskutek tego mogą wystąpić np. komuni- mmHg katy o błędach lub awaria wyświetlacza/urządzenia. -
Página 110: Przygotowanie Do Pomiaru
Informacje na wyświetlaczu: Po wyświetleniu symbolu wymiany baterii nie będzie już można zmierzyć ciśnienia. Należy wymienić wszystkie baterie. Po 1. Data i godzina wyjęciu baterii z urządzenia konieczne jest ponowne ustawienie 2. Ciśnienie skurczowe daty i godziny. Zapisane wyniki pomiarów nie zostaną utracone. 3. - Página 111 W tym menu można kolejno wybrać następujące ustawienia: Na wyświetlaczu zacznie migać wskazanie godziny. Format godziny ➔ Data Godzina ➔ • Za pomocą przycisków pamięci M1/M2 wybierz żądana liczbę godzin i potwierdź za pomocą przycisku START/STOP Na wyświetlaczu zacznie migać wskazanie formatu godziny.
-
Página 112: Pomiar Ciśnienia Krwi
• Po zakończeniu korzystania z ciśnieniomierza odłącz zasilacz Wężyk mankietu należy wetknąć do najpierw od gniazda sieciowego, a następnie od ciśnienio- przyłącza dla wtyczki mankietu. mierza. Po odłączeniu zasilacza od sieci nastąpi skasowanie daty i godziny. Zapisane wyniki pomiarów zostaną jednak Mankiet nadaje się... - Página 113 5.2 Przyjęcie prawidłowej pozycj Pomiar ciśnienia tętniczego krwi Załóż mankiet zgodnie z powyższym opisem i przyjmij pozycję, w której ma być dokonany pomiar. • Aby włączyć ciśnieniomierz, naciśnij przy- cisk START/STOP . Na wyświetlaczu pojawią się na chwilę wszystkie symbole. •...
-
Página 114: Ocena Wyników
To może być wskazówka do arytmii serca. Arytmia jest choro- • Jeśli pomiar był nieprawidłowy, zo- bą, w której rytm serca z powodu nieprawidłowości w systemie stanie wyświetlony symbol . Przeczytaj bioelektrycznym, który steruje akcją serca, jest anormalny. rozdział dotyczący komunikatów błędów/ Symptomy (przedłużone lub przedwczesne skurcze serca, wol- usuwania błędów w niniejszej instrukcji niejszy lub za szybki puls) mogą... -
Página 115: Zapis, Odczyt I Usuwanie Wyników Pomiaru
7. Zapis, odczyt i usuwanie wyników pomiaru Zakres Ciśnienie Ciśnienie ro- Rozwiązanie wartości skurczowe zkurczowe Wyniki każdego udanego pomiaru są zapisywane łącznie ciśnienia (w mmHg) (w mmHg) z datą i godziną pomiaru. Jeśli liczba wyników przekroczy Poziom 3: ≥ 180 ≥ 110 Udaj się... - Página 116 • Naciśnij przycisk pamięci (M1 lub M2). • Jeśli ponownie naciśniesz odpowiedni przycisk pamięci (M1 lub M2), na wy- W przypadku wybrania pamięci użytkownika1 należy świetlaczu pojawi się ostatni pojedynczy nacisnąć przycisk pamięci M1. pomiar (w przykładzie pomiar 03). W przypadku wybrania pamięci użytkownika2 należy nacisnąć...
-
Página 117: Czyszczenie I Dbałość O Urządzenie Oraz Mankiet
8. Czyszczenie i dbałość o urządzenie oraz 10. Dane techniczne mankiet Nr modelu BM 45 • Urządzenie i mankiet należy czyścić ostrożnie, wyłącznie za M1501 pomocą lekko zwilżonej szmatki. Metoda pomiaru Oscylometryczny, nieinwazyjny pomiar • Nie używać środków czyszczących i rozpuszczalników. -
Página 118: Adapter
Producent zastrzega sobie prawo do zmiany danych technicz- nych z powodu aktualizacji bez konieczności powiadamiania. Wyjście 6 V DC, 600 mA tylko w połączeniu z ciśnieniomierzami firmy Beurer • Urządzenie spełnia europejską normę EN60601-1-2 (Zgod- Producent Shenzhen Iongxc power supply co., ltd ność... -
Página 119: Części Zamienne I Części Ulegające Zużyciu
(patrz lista „Service international”). Przy odsyłce urządzenia należy załączyć kopię dowodu zakupu i krótki opis usterki. Obowiązują następujące warunki gwarancji: 1. Okres gwarancji na produkty firmy BEURER wynosi 5 lat lub, jeśli jest dłuższy, obowiązuje w danym kraju od daty zakupu. - Página 120 BEURER GmbH • Söflinger Str. 218 • 89077 Ulm (Germany) • www.beurer.com www.beurer-blutdruck.de • www.beurer-gesundheitsratgeber.com • www.beurer-healthguide.com...