Publicidad
Idiomas disponibles
Idiomas disponibles
Enlaces rápidos
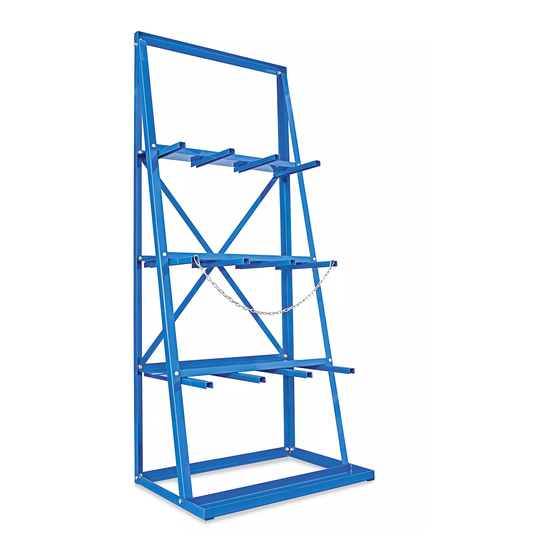
H-4888
VERTICAL BAR RACK
TOOL NEEDED
11/16" Wrench
NOTE: Back posts will have
offset holes at the top.
Offset Hole
Back Left Post x 1
Back Right Post x 1
Bolt x 22
Safety Chain x 1
PAGE 1 OF 9
1-800-295-5510
uline.com
PARTS
NOTE: Front posts will be
angled at the bottom.
Angled
Front Left Post x 1
Cross Brace x 2
Nut x 22
Washer x 22
Anchor Hardware Set x 4 (Optional)
(Each set includes Anchor Bolt, Anchor
Sleeve, Washer, Lock Washer and Nut)
Angled
Front Right Post x 1
Para Español, vea páginas 4-6.
Pour le français, consulter les pages 7-9.
Upper Beam x 1
Top Shelf x 1
Middle Shelf x 1
Bottom Shelf x 1
Base x 1
0321 IH-4888
Publicidad

Manuales relacionados para Uline H-4888


Resumen de contenidos para Uline H-4888
- Página 1 Para Español, vea páginas 4-6. Pour le français, consulter les pages 7-9. H-4888 1-800-295-5510 uline.com VERTICAL BAR RACK TOOL NEEDED 11/16" Wrench PARTS NOTE: Back posts will have NOTE: Front posts will be Upper Beam x 1 offset holes at the top.
- Página 2 ASSEMBLY NOTE: Do NOT fully tighten bolts until the last step. 4. Stand unit up and attach posts to base using bolts, nuts and washers. (See Figure 7) 1. Attach upper beam to back left and back right post using bolts, nuts and washers. (See Figure 1) NOTE: Back posts attach to outside of base.
-
Página 3: Tools Needed
Slide the washer and lock washer over the anchor bolt. Then tighten the nut with 9/16" wrench until the anchor bolt is secure. (See Figure Repeat steps 4 and 5 for the remaining holes. Base Figure 10 1-800-295-5510 uline.com PAGE 3 OF 9 0321 IH-4888... -
Página 4: Herramienta Necesaria
H-4888 800-295-5510 uline.mx RACK DE BARRAS VERTICALES HERRAMIENTA NECESARIA Llave de 11/16" PARTES NOTA: Los postes posteriores NOTA: Los postes frontales 1 Viga Superior tendrán orificios sobresalientes estarán en ángulo en la parte en la parte superior. inferior. 1 Repisa Superior... -
Página 5: Ensamble
ENSAMBLE NOTA: NO apriete los pernos completamente 4. Ponga la unidad de pie y fije los postes a la base usando pernos, tuercas y rondanas. (Vea Diagrama 7) hasta el último paso. Fije la viga superior a los postes posterior izquierdo NOTA: Los postes posteriores se fijan a la parte y posterior derecho usando pernos, tuercas y exterior de la base. -
Página 6: Herramientas Necesarias
Luego ajuste la tuerca con una Diagrama 10 llave de 9/16" hasta que el perno de anclaje quede fijo. (Vea Diagrama 10) 6. Repita los pasos 4 y 5 para los orificios restantes. 800-295-5510 uline.mx PAGE 6 OF 9 0321 IH-4888... - Página 7 H-4888 1-800-295-5510 uline.ca SUPPORT À BARRES VERTICAL OUTIL REQUIS Clé de 11/16 po PIÈCES REMARQUE : les montants arrière REMARQUE : l'extrémité Traverse de soutien supérieure x 1 ont un trou décalé sur leur inférieure des montants avant extrémité supérieure.
- Página 8 ASSEMBLAGE REMARQUE : NE serrez PAS complètement les 4. Placez l'unité à la verticale et fixez les montants à la base à l'aide de boulons, d'écrous et de rondelles. boulons avant la dernière étape. (Voir Figure 7) Fixez la traverse de soutien supérieure aux montants arrière gauche et arrière droit à...
-
Página 9: Outils Requis
Puis serrez l'écrou à l'aide d'une clé de 9/16 po jusqu'à ce que le boulon d'ancrage soit fermement fixé. (Voir Figure 10) 6. Répétez les étapes 4 et 5 pour les autres trous. 1-800-295-5510 uline.ca PAGE 9 OF 9 0321 IH-4888...