Vermeiren D200 Manual De Instrucciones
Ocultar thumbs
Ver también para D200:
- Manual de instrucciones (140 páginas) ,
- Manual de instrucciones (28 páginas)
Tabla de contenido
Publicidad
Idiomas disponibles
Idiomas disponibles
Enlaces rápidos
Publicidad
Capítulos
Tabla de contenido
Solución de problemas

Manuales relacionados para Vermeiren D200


Resumen de contenidos para Vermeiren D200
- Página 1 I N S T R U C C I O N E S I N S T R U K C J A O B S Ł U G I N Á V O D O B S L U Z E D200 D200 30°...
- Página 2 Instructions for specialist dealer All rights reserved, including translation. This instruction manual is part and parcel of the product and must accompany every product sold. Version: H, 2023-02 Tous droits réservés, y compris la traduction. Instructions pour les distributeurs Ce manuel d'instructions fait partie du produit et doit accompagner chaque produit vendu.
- Página 3 English Français Nederlands Deutch Italiano Español Polski Czech User manual Manuel d'utilisation Gebruiksaanwijzing Bedienungshandbuch Manuale di istruzioni Manual de instrucciones Instrukcja obsługi Návod k obsluze Language index...
- Página 4 This page is intentionally left blank...
-
Página 5: Tabla De Contenido
Adjusting anti-tipping (when provided) ............10 Backrest inclination (D200 30°) ..............11 Mounting or removing the push bar (D200 30°) .......... 11 Push handle height (not for D200 Split) ............12 Transfer in and out of the wheelchair ............12 Riding the wheelchair .................. -
Página 6: Preface
To ensure your safety, and to prolong the lifetime of your product, please take good care of it and have it checked and serviced on a regular basis. This manual reflects the latest product developments. Vermeiren has the right to implement changes to this type of product without any obligation to adapt or replace similar products previously delivered. -
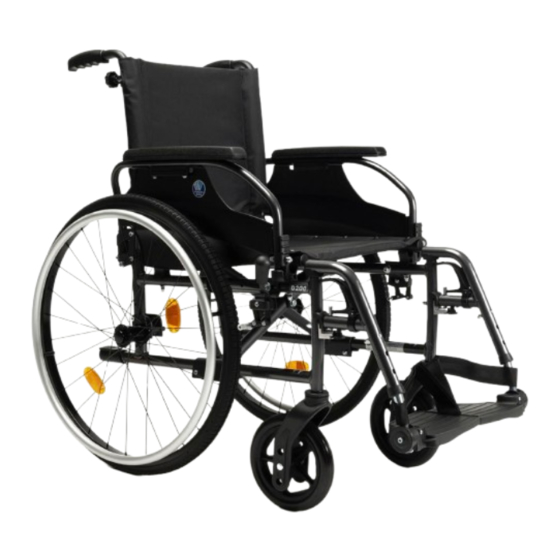
Página 7: Your Product
Only for D200 30°: 15. Lever backrest inclination 16. Push bar Accessories The following accessories are available for the D200: Anterior pelvic belt (B20) Anti-tipping device (B78) The following accessories are available for the D200 30°: Drum brakes (B74) -
Página 8: Before Use
Be aware that your wheelchair may interfere with some types of anti-theft systems, depending on the settings used. This may cause the shop's alarm to go off. In case a serious incident has occurred involving your product, notify Vermeiren or your specialist dealer as well as the competent authority in your country. -
Página 9: Transport
2.4.2 Use of the wheelchair as seat in a motor vehicle (only D200) Risk of injuries WARNING For D200 30°: Do NOT use your wheelchair as a seat in a vehicle, see the following symbol. The wheelchair has passed the crash test of ISO 7176-19: 2008 and, as such, has been designed and tested for use only as forward-facing seat in a motor vehicle. - Página 10 D200, D200 30° 2023-02 Before use 7. Mount the front securement straps according to the instructions of the strap-system manufacturer at the indicated place (figure 3). This place is marked on the wheelchair with a symbol (figure 4). 8. Roll back the wheelchair until the front straps are tight.
-
Página 11: Folding/Unfolding
Fold the footplates or remove the footrests (see § 3.1). 2. Take the seat on the front side and backside and pull it up. 2.5.3 Folding / Unfolding the backrest (D200 Split Risk of injury – Check that the backrest is securely locked in place before WARNING use. -
Página 12: Mounting The Rear Wheels
D200, D200 30° 2023-02 Before use 2.5.4 Mounting the rear wheels 1. Take the rear wheel and push button (1). 2. Keep the button pushed in and mount the rear wheel axle until it stops. 3. Release the button. 4. Check that the wheel is secured. -
Página 13: Using Your Wheelchair
D200, D200 30° 2023-02 Using your wheelchair Using your wheelchair Risk of injuries WARNING First read previous chapters and inform yourself about the intended use. Do NOT use your wheelchair unless you have read and fully understood all instructions. -
Página 14: Mounting Or Removing The Armrests
3. To remove the armrest, press button (4) and pull the rear of the armrest from tube hood (1). Adjusting anti-tipping (when provided) Risk of injuries CAUTION For D200 30°: Anti-tipping should always be installed and lowered. Adjust the height of the anti-tipping in 7 positions (range 120 mm: steps 20 mm): 1. -
Página 15: Backrest Inclination (D200 30°)
Do not place your fingers, clothes between the adjustment mechanism. For model D200 30°, it is possible to set the backrest backwards with a maximum inclination of 30° (4 different positions: steps of 10°). Make sure that the patient sits in the chair when the attendant adjusts the backrest inclination and that the wheelchair does not tip over. -
Página 16: Push Handle Height (Not For D200 Split)
To take off the push bar: 1. Loosen the star knob Ⓐ on the right handgrip. 2. Remove hook Ⓒ from the right handgrip Ⓓ. Push handle height (not for D200 Split The push handles can be adjusted steplessly over a distance of 60 1. -
Página 17: Riding Your Wheelchair
D200, D200 30° 2023-02 Using your wheelchair Always stay on the pavement when riding on public roads. Pay attention if the road has holes or gaps that may cause entrapment of the wheels. Avoid stones and other objects that may block the wheels. - Página 18 D200, D200 30° 2023-02 Using your wheelchair An experienced user can negotiate higher kerbs by himself. This is best done backwards. Turn the wheelchair to have the rear wheels facing the kerb. Lean forward to move your centre of gravity forward.
-
Página 19: Maintenance
Seat, backrest, arm pads, calf pads and head rest (if applied): No excessive wear (like dented spots, damage or tears). Brakes: Undamaged and functioning. For D200 30°: Backrest inclination: Undamaged and functioning well (locking, load, no deformation or wear). Contact your specialist dealer for possible repairs or part replacements. -
Página 20: Troubleshooting
D200, D200 30° 2023-02 Maintenance The upholstery can be cleaned with lukewarm water and a mild soap. Do not use abrasive cleaning agents to clean. 4.2.3 Disinfection Risk of damage CAUTION Disinfections may only be undertaken by trained persons. Consult your specialist dealer. -
Página 21: Technical Specifications
D200 8,5 kg D200 30° 10 kg Masses of parts that can be dismantled or Footrests: 1,50 kg; Armrests: 1,20 kg (D200) or 2 kg(D200 30°); removed Rear wheels: 4,40 kg Static stability downhill 16° (in standard configuration) Static stability uphill D200 12°... - Página 22 D200, D200 30° 2023-02 Technical specifications Frame material Aluminium Upholstery material Nylon Storage and use temperature + 5 °C + 41 °C Storage and use humidity We reserve the right to introduce technical changes. Measurement tolerance ± 15 mm / 1,5 kg / 1,5°...
- Página 23 Montage ou retrait des accoudoirs ..............9 Réglage de l'anti-bascule (lorsque prévu) ........... 10 Inclinaison du dossier (D200 30°) ............... 11 Montage ou démontage de la barre de poussée (D200 30°) ..... 11 Hauteur de la poignée de poussée (pas pour D200 ) ......12 Split Transfert dans et hors du fauteuil roulant ............
-
Página 24: Préface
élevées, appliquées par Vermeiren. Merci de la confiance que vous accordez aux produits de Vermeiren. Ce manuel est destiné à vous aider dans l’utilisation de ce fauteuil roulant et de ses options de fonctionnement. Veuillez le lire attentivement. -
Página 25: Votre Produit
15. Levier d'inclinaison du dossier 16. Barre de poussée Accessoires Les accessoires suivants sont disponibles pour le D200: Sangle pelvienne antérieure (B20) Anti-bascule (B78) Les accessoires suivants sont disponibles pour le D200 30°: Freins à tambour (B74) -
Página 26: Avant L'uTilisation
130 kg. Il n'est pas destiné au transport de marchandises ou d'objets, ni à tout autre usage que celui décrit précédemment. Utilisez uniquement des accessoires et des pièces de rechange approuvés par Vermeiren. Consultez également les détails techniques et les limites de votre fauteuil au chapitre 5. -
Página 27: Transport
Risque de blessures AVERTISSEMENT Pour D200 30°: N’utilisez PAS votre fauteuil roulant comme siège dans un véhicule, voir symbole suivant. Le fauteuil roulant a passé le crash test ISO 7176-19: 2008, et donc a été conçu et testé... - Página 28 D200, D200 30° 2023-02 Avant l’utilisation Figure 2 Figure 1 7. Fixez les sangles avant de sécurité comme indiqué par le fabricant (figure 3). Les points d’accroches sont indiqués sur le fauteuil roulant par un symbole (figure 4). 8. Reculez le fauteuil de façon à ce que les sangles avant soient tendues.
-
Página 29: Pliage/Dépliage
1. Pliez les palettes vers le haut ou démontez les repose-pieds (voir § 3.1). 2. Saisissez l'avant et l'arrière du siège et tirez vers le haut. 2.5.3 Plier / déplier le dossier (D200 Split Risque de blessures – Vérifiez que le dossier sont fermement installés AVERTISSEMENT avant d'utiliser le fauteuil transfert. -
Página 30: Montage Des Roues Arrière
D200, D200 30° 2023-02 Avant l’utilisation 2.5.4 Montage des roues arrière 1. Prenez la roue arrière et poussez sur le bouton . 2. Maintenez le bouton enfoncé et montez l'essieu arrière jusqu'à ce qu'il soit bloqué. 3. Relâchez le bouton. -
Página 31: Utilisation De Votre Fauteuil Roulant
D200, D200 30° 2023-02 Utilisation de votre fauteuil roulant Utilisation de votre fauteuil roulant Risque de blessures AVERTISSEMENT Lisez d'abord les chapitres précédents et informez-vous à propos de l'usage visé. N’utilisez PAS votre fauteuil roulant sans avoir d'abord lu et bien compris toutes les instructions. -
Página 32: Réglage De L'aNti-Bascule (Lorsque Prévu)
Réglage de l'anti-bascule (lorsque prévu) Risque de blessures ATTENTION Pour D200 30°: Il faut toujours installer l’anti-bascule et l'abaisser . Réglez la hauteur de l'anti-bascule en 7 positions de la manière suivante (portée 120 mm: plages de 20 mm): 1. -
Página 33: Inclinaison Du Dossier (D200 30°)
Ne placez pas vos doigts, les vêtements entre du mécanisme de réglage. Avec le modèle D200 30°, il est possible de basculer le dossier vers l'arrière avec un angle maximum de 30° (4 positions différentes: palier de 10°). Assurez-vous que le patient est assis dans le fauteuil lorsque l'accompagnateur fait basculer le dossier vers l'arrière et s'assure que le... -
Página 34: Hauteur De La Poignée De Poussée
1. Détachez la vis Ⓐ au niveau de la poignée droite. 2. Enlevez le crochet Ⓒ de la poignée droite Ⓓ. Hauteur de la poignée de poussée (pas pour D200 Split Les poignées de poussée peuvent être réglées en continu sur une distance de 60 mm: 1. -
Página 35: Déplacements En Pente
D200, D200 30° 2023-02 Utilisation de votre fauteuil roulant Ne roulez PAS sur des pentes, obstacles, marches ou bordures plus larges que la dimension décrite au § 5. Lorsque vous vous arrêtez sur une (petite) pente, utilisez vos freins. - Página 36 D200, D200 30° 2023-02 Utilisation de votre fauteuil roulant Descente de marches ou de bordures de trottoirs Il est possible de descendre de petites bordures de trottoirs en avançant. Assurez-vous que le support de pied ne touchent pas le sol.
- Página 37 D200, D200 30° 2023-02 Utilisation de votre fauteuil roulant 4. Franchissez la bordure de trottoir avec les roues avant. 5. Penchez-vous vers l'avant pour plus de stabilité. 6. Franchissez la bordure de trottoir avec les roues arrière. 3.9.4 Passage d'escaliers...
-
Página 38: Entretien
(bosses, dommages ou déchirures). Freins : Non endommagés et fonctionnant. Pour D200 30°: Système de réglage du dossier : en bon état de fonctionnement (verrouillage, charge, pas de déformation ou usure) Contactez votre commerçant spécialisé pour les réparations et les remplacements de pièces éventuels. -
Página 39: Résolution Des Problèmes
D200, D200 30° 2023-02 Entretien Essuyez toutes les parties rigides du fauteuil roulant avec un chiffon humide (pas détrempé). Si nécessaire, utilisez un savon doux, approprié pour les laques et les synthétiques. Le rembourrage peut être nettoyé à l’eau tiède additionnée de savon doux. N'utilisez pas de produits de nettoyage abrasifs. -
Página 40: Spécifications Techniques
8,5 kg D200 30° 10 kg Des masses de pièces qui peuvent être Repose-pieds : 1,50 kg; Accoudoirs : 1,20 kg (D200) ou 2 kg démontés ou retirées (D200 30°); Roues arrières : 4,40 kg Stabilité statique en descente 16° (en configuration standard) Stabilité... - Página 41 D200, D200 30° 2023-02 Spécifications techniques Diamètre de braquage minimum 1500 mm Diamètre des roues arrières PU 22" 24" Pression des pneus, roues arrière Max. 3,5 bar (motrices) Diamètre des roues directrices PU 200 mm Pression des pneus, roues directrices Max.
- Página 43 De remmen bedienen ..................9 De armsteunen plaatsen of verwijderen ............9 De anti-tipping verstellen (indien verstrekt) ..........10 Inclinatie van de rug (D200 30°) ..............10 De duwstang plaatsen of verwijderen (D200 30°) ........11 Handvathoogte (niet voor D200 ) ............12 Split Transfer in en uit de rolstoel ................
-
Página 44: Voorwoord
Deze rolstoel werd vervaardigd door gekwalificeerd en toegewijd personeel. Hij werd ontworpen en geproduceerd volgens hoge kwaliteitsnormen, bewaakt door Vermeiren. Bedankt voor uw vertrouwen in de producten van Vermeiren. Om u te ondersteunen bij het gebruik van deze rolstoel en zijn bedieningsmogelijkheden, bieden we u deze handleiding aan. -
Página 45: Uw Product
14. Identificatieplaat D200 30° Enkel voor D200 30°: 15. Hendel voor ruginclinatie 16. Duwstang Accessoires Volgende accessoires zijn beschikbaar voor de D200: Anterior bekkengordel (B20) Anti-tipping (B78) Volgende accessoires zijn beschikbaar voor de D200 30°: Trommelremmen (B74) -
Página 46: Voor Gebruik
Hierdoor kan het winkelalarm in werking gesteld worden. Indien zich een ernstig incident heeft voorgedaan met uw product, breng dan Vermeiren of uw gespecialiseerde dealer op de hoogte, evenals de bevoegde autoriteit in uw land. Symbolen op de rolstoel... -
Página 47: Transport
2.4.2 Gebruik van de rolstoel als zit in een motorvoertuig (enkel D200) Gevaar voor letsel WAARSCHUWING Voor D200 30°: Gebruik de rolstoel NIET als zit in een voertuig, zie het symbool. De rolstoel heeft de crashtest volgens ISO 7176-19: 2008 doorstaan en is zodanig ontworpen en getest om alleen te worden gebruikt als een naar voren gerichte zit in een motorvoertuig. - Página 48 D200, D200 30° 2023-02 Voor gebruik Figuur 2 Figuur 1 7. Maak de voorste veiligheidsgordels vast volgens de instructies van het op de aangegeven plaats riem-systeem van de fabrikant (figuur 3). Deze plaats is gemarkeerd op de rolstoel door een symbool (figuur 4).
-
Página 49: Opvouwen/Ontvouwen
1. Klap de voetplaten omhoog, of verwijder de voetsteunen (zie § 3.1). 2. Neem de zit aan de voor- en achterzijde vast en trek deze naar boven. 2.5.3 Op- / openvouwen van de rug (D200 Split Gevaar voor letsel – Controleer dat de rug goed is vastgemaakt voor WAARSCHUWING de transferstoel te gebruiken. -
Página 50: De Achterwielen Monteren
D200, D200 30° 2023-02 Voor gebruik 2.5.4 De achterwielen monteren 1. Neem het achterwiel en druk naafknop in. 2. Houd de naafknop ingedrukt en plaats het achterwiel in de asbus tot deze niet meer verder kan. 3. Laat de naafknop los. -
Página 51: Uw Rolstoel Gebruiken
D200, D200 30° 2023-02 Uw rolstoel gebruiken Uw rolstoel gebruiken Gevaar voor letsel WAARSCHUWING Lees eerst de voorgaande hoofdstukken en informeer uzelf over het beoogde gebruik. Gebruik uw rolstoel NIET voordat u alle instructies gelezen en begrepen heeft. Als u nog vragen heeft of als u ergens aan twijfelt, aarzel dan niet om contact op te nemen met uw lokale vakhandelaar, zorgverlener, of technisch adviseur om u te helpen. -
Página 52: De Anti-Tipping Verstellen (Indien Verstrekt)
(1). De anti-tipping verstellen (indien verstrekt) Gevaar voor letsel VOORZICHTIG Voor D200 30°: De anti-tipping moet steeds gemonteerd en neergelaten zijn. Verstel de hoogte van de anti-tipping in 7 posities als volgt (bereik 120 mm: stappen van 20 mm): 1. -
Página 53: De Duwstang Plaatsen Of Verwijderen (D200 30°)
Plaats uw vingers, kledij niet tussen het verstelmechanisme. Bij model D200 30° is het mogelijk om de rug, met een maximale inclinatie van 30° (4 verschillende posities: stappen van 10°), naar achteren te kantelen. Zorg ervoor dat de patiënt in de rolstoel zit wanneer de begeleider de ruginclinatie verstelt, en dat de rolstoel niet achterover kantelt. -
Página 54: Handvathoogte (Niet Voor D200 Split )
Om de duwstang te verwijderen: 1. Maak de sterknop Ⓐ aan de rechtse handgreep los. 2. Verwijder de haak Ⓒ van de rechtse handgreep Ⓓ. Handvathoogte (niet voor D200 Split De handvatten kunnen traploos versteld worden over een afstand van 60 mm: 1. -
Página 55: Rijden Op Hellingen
D200, D200 30° 2023-02 Uw rolstoel gebruiken Pas op als de weg gaten of spleten heeft waardoor de wielen kunnen vastlopen. Vermijd stenen en andere objecten die de wielen kunnen blokkeren. Zorg ervoor dat de voetplaten de grond niet raken bij het nemen van een obstakel. - Página 56 D200, D200 30° 2023-02 Uw rolstoel gebruiken Hogere trottoirs kunnen met een begeleider voorwaarts genomen worden: 1. Laat de begeleider de rolstoel lichtjes naar achter kantelen. 2. Rijd op de achterwielen het trottoir af. 3. Zet de rolstoel terug op de vier wielen.
- Página 57 D200, D200 30° 2023-02 Uw rolstoel gebruiken 3.9.4 Nemen van trappen Gevaar voor letsel WAARSCHUWING Voor het nemen van trappen zijn altijd 2 begeleiders nodig. Het nemen van trappen terwijl u in de rolstoel zit doet u als volgt.
-
Página 58: Onderhoud
(bijv. gedeukte plekken, schade of scheuren). Remmen: onbeschadigd en werkend Voor D200 30°: Systeem voor ruginclinatie: Onbeschadigd en correct functionerend (vergrendeling, belasting, geen vervorming of slijtage) Contacteer uw vakhandelaar voor eventuele reparaties of vervanging van onderdelen. -
Página 59: Probleemoplossing
D200, D200 30° 2023-02 Onderhoud Veeg alle harde onderdelen van de rolstoel schoon met een vochtig doek (niet doorweekt). Indien nodig, gebruik een milde zeep die geschikt is voor vernis en synthetische materialen. De bekleding kan schoon worden gemaakt met lauw water en een milde zeep. Gebruik geen agressieve schoonmaakmiddelen. - Página 60 Gewicht zwaarste onderdeel D200 8,5 kg D200 30° 10 kg Massa van afneembare onderdelen Voetsteunen: 1,50 kg; Armsteunen: 1,2 kg (D200) of 2 kg (D 200 30°); Achterwielen: 4,40 kg Statische stabiliteit bergaf 16° (in standaard configuratie) Statische stabiliteit bergop D200 12°...
-
Página 61: Technische Specificaties
D200, D200 30° 2023-02 Technische specificaties Bandendruk, stuurwielen Max. 2,5 bar Materiaal frame Aluminium Materiaal bekleding Nylon Opslag en gebruikstemperatuur + 5 °C + 41 °C Opslag en gebruiksluchtvochtigheid We behouden ons het recht voor om technische wijzigingen te introduceren. - Página 63 Betätigen der Bremsen ................. 9 An-/Abbauender Armlehnen ................9 Verstellung Kippschutz (wenn vorhanden) ..........10 Rückenkantelung (D200 30°) ..............10 Mounting or removing the push bar (D200 30°) .......... 11 Höhe des Schiebegriffes (nicht für D200 ) ..........12 Split Setzen in den Rollstuhl ................
-
Página 64: Inhalt
Dieser Rollstuhl wurde von versierten und engagierten Mitarbeitern gefertigt. Es entspricht hinsichtlich Konstruktion und Fertigung den hohen Qualitätsstandards von Vermeiren. Vielen Dank für Ihr Vertrauen in Produkte von Vermeiren. Dieses Handbuch soll Ihnen bei der Benutzung dieses Rollstuhls und seiner Bedienmöglichkeiten helfen. Lesen Sie es daher bitte aufmerksam durch, um sich mit der Bedienung, den Fähigkeiten und Beschränkungen Ihres... -
Página 65: Ihr Produkt
D200 30° Nur für D200 30°: 15. Hebel für Rückenneigung 16. Schiebestange Zubehör Für den D200 ist das folgende Zubehör erhältlich: Vorderer Beckengurt (B20) Anti-Kippvorrichtung (B74) Für den D200 30° ist das folgende Zubehör erhältlich: Trommelbremsen (B74) -
Página 66: Vor Der Benutzung
Diebstahlsicherungssystemen beeinträchtigen kann. Dies kann dazu führen, dass der Sicherungsalarm des Shops ausgelöst wird. Sollte sich ein schwerwiegender Zwischenfall mit Ihrem Produkt ereignet haben, benachrichtigen Sie Vermeiren oder Ihren Fachhändler sowie die zuständige Behörde in Ihrem Land. Symbole am Rollstuhl Maximalgewicht des Benutzers (in kg) -
Página 67: Transport
2.4.2 Nutzung des Rollstuhls als Sitz in einem PKW (nur für D200) Verletzungsgefahr WARNUNG Für D200 30° : Benutzen Sie Ihren Rollstuhl NICHT als Sitz in einem Fahrzeug (siehe nächstes Symbol). Der Rollstuhl hat den Crash-Test gemäß ISO 7176-19: 2008 bestanden und ist konstruiert und ausgelegt zur Nutzung als Sitz in einem PKW nur in Blickrichtung nach vorne. - Página 68 D200, D200 30° 2023-02 Inhalt Abb. 2 Abb. 1 7. Montieren Sie die vorderen Gurte des Rollstuhl-Gurtsystems gemäß den Angaben des jeweiligen Herstellers an den angegebenen Positionen am Rollstuhl (Abb. 3). Diese Stellen sind am Rollstuhl mit einem Symbol markiert (Abb. 4).
-
Página 69: Falten / Entfalten
1. Klappen Sie die Fußplatten hoch oder nehmen Sie die Beinstützen ab (siehe § 3.1). 2. Fassen Sie den Sitz an der Vorder- und Hinterseite an, und ziehen Sie ihn nach oben. 2.5.3 Zusammen-/Auseinanderklappen der Rücken (D200 Split Verletzungsgefahr – Achten Sie darauf, dass die Rücken vor Gebrauch WARNUNG des Stuhls fest arretiert sind. -
Página 70: Montage Der Hinterräder
D200, D200 30° 2023-02 Inhalt 2.5.4 Montage der Hinterräder 1. Nehmen Sie das Hinterrad in die Hand und drücken Sie auf den Arretierstift . 2. Halten Sie den Arretierstift gedrückt und schieben Sie das Hinterrad bis zum Anschlag auf die Achse. -
Página 71: Benutzung Des Rollstuhls
D200, D200 30° 2023-02 Inhalt Benutzung des Rollstuhls Verletzungsgefahr WARNUNG Lesen bitte zunächst vorhergehenden Abschnitte, sich über Benutzungsbedingungen zu informieren. Benutzen Sie den Rollstuhl NICHT, bevor Sie alle Anweisungen aufmerksam gelesen und vollständig verstanden haben. Bei Zweifeln oder Fragen wenden Sie sich bitte zwecks Hilfe an Ihren Fachhändler, Pflegedienst oder Fachberater. -
Página 72: Verstellung Kippschutz (Wenn Vorhanden)
Teil der Armauflage aus der Aufnahme (1). Verstellung Kippschutz (wenn vorhanden) Verletzungsgefahr VORSICHT Für D200 30°: Ein Kippschutz sollte immer installiert und abgesenkt sein. Die Höhe der Kippschutz wird wie folgt in 7 Positionen eingestellt (Bereich 120 mm: Schritte von 20 mm): 1. -
Página 73: Mounting Or Removing The Push Bar (D200 30°)
Halten Sie Ihre Finger, Kleidungsstücke fern vom Verstellmechanismus. Bei dem Modell D200 30° lässt sich die Rückenlehne bis auf einen Winkel von maximal 30° nach hinten kippen (4 verschiedene Positionen in 10°-Schritten). Stellen Sie sicher, dass der Patient in dem Stuhl sitzt, wenn der Begleiter die Rückenlehne nach hinten kippt, und dass der Rollstuhl... -
Página 74: Höhe Des Schiebegriffes (Nicht Für D200 Split )
So bauen Sie die Schiebestange ab: 1. Lösen Sie die Sterngriff Ⓐ am rechten Handgriff. 2. Entfernen Sie die Aufhängung Ⓒ vom rechten Handgriff Ⓓ. Höhe des Schiebegriffes (nicht für D200 Split Die Schiebegriffe können über eine Strecke von 60 mm stufenlos eingestellt werden: 1. -
Página 75: Bewegen An Steigungen
D200, D200 30° 2023-02 Inhalt Achten Sie bei Bergauf- oder -abfahrten darauf, dass alle vier Räder Bodenkontakt haben. Fahren Sie auf Gefällen so langsam wie möglich. Bleiben Sie auf öffentlichen Straßen immer auf der Straße. Achten Sie darauf, wenn die Straße Löcher oder Lücken aufweist, die zum Einschluss der Räder führen können. - Página 76 D200, D200 30° 2023-02 Inhalt Ein geübter Fahrer kann Stufen und Bordsteine problemlos allein hinunterfahren: 1. Verlagern Sie das Gewicht auf die Hinterräder, um die Vorderräder zu entlasten. 2. Fahren Sie den Bordstein hinunter. Auch höhere Bordsteine können mit einem Helfer vorwärts überwunden werden: 1.
- Página 77 D200, D200 30° 2023-02 Inhalt 3.9.4 Überwinden von Treppen Verletzungsgefahr WARNUNG Treppen sollten immer mit zwei Helfern überwunden werden. Auch eine Treppe kann mit einem Rollstuhl überwunden werden, wenn die folgenden Regeln beachtet werden: 1. Ein Helfer kippt den Rollstuhl etwas nach hinten.
-
Página 78: Wartung
Sitz, Rückenlehne, Armpolster, Wadenpolster und Kopfstütze (falls vorhanden): Kein übermäßiger Verschleiß (wie Eindellungen, Beschädigungen oder Risse) Bremsen: Unbeschädigt und funktionsfähig Für D200 30°: Rückenneigungssystem : Unbeschädigt und funktionsfähig (Verriegelung, Belastung, keine Verformung oder Verschleiß) Wenden Sie sich wegen etwaiger Reparaturen oder Ersatzteile an Ihren Fachhändler. -
Página 79: Störungsbeseitigung
D200, D200 30° 2023-02 Inhalt Wischen Sie alle festen Teile des Rollstuhls mit einem feuchten (nicht durchnässten) Tuch ab. Benutzen Sie ggf. eine milde Seife, die für Lacke und Kunststoffe geeignet ist. Die Polsterung kann mit lauwarmem Wasser und einer milden Seife gereinigt werden. Verwenden Sie keine scheuernden Reinigungsmittel. -
Página 80: Technische Daten
D200 8,5 kg D200 30° 10 kg Gewichte von Teilen, die demontierbar oder Fußauflagen: 1,50 kg; Armlehnen: 1,20 kg (D200) oder 2 kg abnehmbar sind (D200 30°); Hinterräder: 4,40 kg Statische Stabilität, bergab 16° (in der Standardkonfiguration) Statische Stabilität, bergauf D200 12°... - Página 81 D200, D200 30° 2023-02 Inhalt Durchmesser der PU-Hinterräder 22" 24" Reifendruck, Hinterräder (Antriebsräder) max. 3,5 bar Durchmesser der PU-Lenkräder 200 mm Reifendruck, Lenkräder max. 2,5 bar Material Rahmen Aluminium Material Polsterung Nylon Temperaturbereich für Lagerung und 5 °C +41 °C Nutzung Luftfeuchtigkeitsbereich für Lagerung und...
- Página 83 Ajuste el antivuelco (cuando esté incluido) ..........10 Inclinación del respaldo (D200 30°) ............11 Montaje o desmontaje de la barra de empuje (D200 30°) ......11 Altura de las empuñaduras (no para D200 Split) ........12 Traslado a la silla de ruedas y desde esta ..........12 Conducción de la silla de ruedas ..............
-
Página 84: Introducción
Para garantizar su seguridad y prolongar la vida útil de su producto, cuídelo bien y asegúrese de realizar revisiones y mantenimientos de manera regular. Este manual refleja los desarrollos más recientes del producto. Vermeiren se reserva el derecho a implementar cambios en este tipo de producto sin que ello suponga obligación alguna de adaptar o cambiar productos similares previamente entregados. -
Página 85: Su Producto
15. Palanca de inclinación del respaldo 16. Barra de empuje Accesorios La D200 cuenta con los siguientes accesorios: Cinturón pélvico anterior (B20) Dispositivo antivuelcos (B78) La D200 30° cuenta con los siguientes accesorios: Frenos de tambor (B74) -
Página 86: Antes De Su Uso
Esto puede hacer que se active la alarma de la tienda. En caso de que se produzca un incidente grave con su producto, notifique a Vermeiren o a su distribuidor especializado, así como a la autoridad competente de su país. -
Página 87: Transporte
Riesgo de lesiones AVISO Para D200 30° : NO utilizar la silla de ruedas como asiento en un vehículo; ver siguiente símbolo. La silla de ruedas ha superado con éxito la prueba de choque de la norma ISO 7176-19: 2008 como tal, ha sido diseñado y probado para usarlo solo como silla de cara al frente en un... - Página 88 D200, D200 30° 2023-02 Contenido Figura 2 Figura 1 7. Monte las correas de sujeción frontal de acuerdo a las instrucciones del fabricante del sistema de la correa en el lugar indicado (figura 3). Este lugar está marcado en la silla de ruedas con un símbolo (figura 4).
-
Página 89: Plegado / Desplegado
1. Pliegue las paletas o retire los reposapiés (véase § 3.1). 2. Sujete el asiento por la parte delantera y trasera y tire de él hacia arriba. 2.5.3 Plegado / Despliegue del respaldo (D200 Split Riesgo de lesiones: compruebe que el respaldo está bien fijado antes de ADVERTENCIA usarlo. -
Página 90: Montaje De Las Ruedas Traseras
D200, D200 30° 2023-02 Contenido 2.5.4 Montaje de las ruedas traseras 1. Sujete la rueda trasera y presione el botón (1). 2. Mantenga el botón presionado y monte el eje de las ruedas traseras hasta el tope. 3. Suelte el botón. -
Página 91: Utilizar La Silla De Ruedas
D200, D200 30° 2023-02 Contenido Utilizar la silla de ruedas Riesgo de lesiones AVISO Leer antes los capítulos anteriores e informarse sobre el uso previsto. NO utilizar la silla de ruedas si no se han leído detenidamente y entendido completamente todas las instrucciones. -
Página 92: Nl 3.3 Montaje Y Desmontaje De Los Reposabrazos
Ajuste el antivuelco (cuando esté incluido) Riesgo de lesiones PRECAUCIÓN En el modelo D200 30°: Las ruedas anti-vuelco siempre deben instalarse y bajarse . Ajuste la altura del antivuelco de la siguiente manera en siete posiciones (distancia de 120 mm, a intervalos de 20 mm): 1. -
Página 93: Inclinación Del Respaldo (D200 30°)
No meta los dedos o la ropa entre los mecanismos de ajuste. En el modelo D200 30° es posible ajustar el respaldo hacia atrás con una inclinación máxima de 30° (4 posiciones diferentes a intervalos de 10°). Asegúrese de que el paciente está sentado en la silla cuando el ayudante tenga que realizar el ajuste del respaldo, y que la silla de ruedas no se vuelque. -
Página 94: Altura De Las Empuñaduras (No Para D200 Split)
Para retirar la barra de empuje: 1. Afloje el pomo de estrella Ⓐ de la empuñadura derecha. 2. Retire el gancho Ⓒ de la empuñadura derecha Ⓓ. Altura de las empuñaduras (no para D200 Split Las empuñaduras se pueden ajustar a intervalos 60 mm: 1. -
Página 95: Conducir La Silla De Ruedas
D200, D200 30° 2023-02 Contenido NO conducir en pendientes o sobre obstáculos, escalones o bordillos que excedan las dimensiones que se detallan en el apartado 5. Cuando se detenga en una pendiente (no muy inclinada), utilizar los frenos. -
Página 96: Franqueo De Peldaños Y Bordillos
D200, D200 30° 2023-02 Contenido 3.9.3 Franqueo de peldaños y bordillos Riesgo de lesiones ADVERTENCIA Si no tiene suficiente experiencia con su silla de ruedas, pida ayuda a un acompañante. Bajar peldaños y bordillos Se pueden bajar bordillos pequeños desplazándose hacia delante. Asegúrese de que los reposapiés no tocan el suelo. -
Página 97: Desplazamientos Por Escaleras
D200, D200 30° 2023-02 Contenido Los usuarios experimentados pueden franquear bordillos sin ayuda: 1. Acérquese hasta el bordillo. 2. Asegúrese de que el reposapiés no toca el bordillo. 3. Inclínese hacia atrás de forma que mantenga el equilibrio sobre las ruedas traseras. -
Página 98: Mantenimiento
Frenos: Sin deterioro y en buen estado de funcionamiento. Para D200 30°: Sistema de inclinación del respaldo: Sin daños y funcionando bien (fijación, carga, sin deformaciones ni desgaste) Póngase en contacto con el distribuidor especializado para posibles reparaciones o sustitución de piezas. -
Página 99: Desinfección
D200, D200 30° 2023-02 Contenido 4.2.2 Limpieza Riesgo de daños por humedad PRECAUCIÓN No utilizar nunca una manguera o un limpiador a alta presión para limpiar la silla de ruedas. Limpiar todas las piezas rígidas de la silla de ruedas con un paño húmedo (no empapado). -
Página 100: Especificaciones Técnicas
8,5 kg D200 30° 10 kg Peso de las partes que pueden Reposapiés: 1,5 kg; Reposabrazos: 1,2 kg (D200) o 2 kg (D200 desmontarse o quitarse. 30°); Ruedas traseras: 4,4 kg Estabilidad estática en pendientes 16° (con la configuración estándar) descendentes Estabilidad estática en pendientes... - Página 101 D200, D200 30° 2023-02 Contenido Ubicación horizontal del eje (deflexión) 37mm Radio de giro mínimo 1500 mm Diámetro de ruedas traseras PUR 22" 24" Presión de los neumáticos, ruedas traseras Máx. 3,5 bar (de tracción) Diámetro de las ruedas de dirección PUR 200 mm Presión de los neumáticos, ruedas de...
- Página 103 Montaż i demontaż podłokietników ..............9 Regulacja zabezpieczenia przed przewróceniem (kiedy zapewniony) ..10 Nachylenia oparcia (D200 30°) ..............10 Montaż i demontaż uchwytu poprzecznego (D200 30°) ......11 Wysokość uchwytów do pchania (nie dla D200 ) ........12 Split Wsiadanie i zsiadanie z wózka inwalidzkiego ..........
-
Página 104: Wstęp
Zaprojektowano go i wyprodukowano zgodnie z wysokimi standardami jakości, jakich przestrzega Vermeiren. Dziękujemy za zaufanie firmie Vermeiren i jej produktom. Niniejsza instrukcja pomoże właścicielowi w eksploatacji wózka inwalidzkiego i korzystaniu z jego opcji. Prosimy o uważne przeczytanie instrukcji obsługi. Pozwoli ona na zapoznanie się z działaniem, możliwościami i ograniczeniami wózka. -
Página 105: Twój Produkt
Tylko w D200 30°: 15. Dźwignia do nachylenia oparcia 16. Uchwyt poprzeczny Akcesoria Dla modelu D200 dostępne są następujące akcesoria: Pas stabilizujący miednicę od przodu (B20) Zabezpieczenie przed przewróceniem (B78) Dla modelu D200 dostępne są następujące akcesoria: Hamulce bębnowe (B74) -
Página 106: Przed Użyciem
Może to spowodować uruchomienie alarmu w sklepie. W przypadku wystąpienia poważnego incydentu z udziałem produktu, należy powiadomić firmę Vermeiren lub specjalistycznego sprzedawcę, jak również właściwe władze w swoim kraju. Symbole na wózku inwalidzkim Maksymalna masa użytkownika w kg... -
Página 107: Transport
D200) Ryzyko obrażeń OSTRZEŻENIE Na D200 30° : NIE używać wózka inwalidzkiego jako siedzenia w pojeździe, patrz kolejny symbol. Wózek przeszedł test zderzeniowy wg normy ISO 7176-19: 2008 i jako taki został zaprojektowany i przetestowany do użycia wyłącznie przodem do kierunku jazdy w pojazdach silnikowych. - Página 108 D200, D200 30° 2023-02 Content Rysunek 2 Rysunek 1 7. W pierwszej kolejności zamontuj pasy mocujące z przodu wózka zgodnie z instrukcją producenta systemu mocującego we wskazane miejsce (Rysunek 3). Miejsce jest zaznaczone na wózku inwalidzkim z symbolem (Rysunek 4).
-
Página 109: Składanie / Rozkładanie
2.5.2 Składanie wózka inwalidzkiego Złóż płyty podnóżek lub wymontuj podnóżek (patrz § 3.1). 2. Chwyć siedzenie za przód i oparcie, a następnie pociągnij w górę. 2.5.3 Składanie / Rozkładanie oparcie (D200 Split Ryzyko urazu — należy upewnić się, że przed użyciem oparcie jest OSTRZEŻENIE... -
Página 110: Montaż Kół Tylnich
D200, D200 30° 2023-02 Content 2.5.4 Montaż kół tylnich 1. Chwyć tylne koło i naciśnij przycisk . 2. Przytrzymując wciśnięty przycisk, nałóż oś tylnego koła aż do zablokowania. 3. Zwolnij przycisk. 4. Sprawdź, czy koło jest bezpiecznie zamocowane. 2.5.5 Zdejmowanie kół... -
Página 111: Używanie Wózka
D200, D200 30° 2023-02 Content Używanie wózka Ryzyko obrażeń OSTRZEŻENIE Zacząć od przeczytania poprzednich rozdziałów i zaznajomienia się z przewidzianym zastosowaniem. NIE używać wózka, dopóki wszystkie instrukcje nie zostaną przeczytane i zrozumiane. W razie wątpliwości i pytań prosimy o kontakt z lokalnym wyspecjalizowanym sprzedawcą, opiekunem lub doradcą... -
Página 112: Regulacja Zabezpieczenia Przed Przewróceniem (Kiedy Zapewniony)
(1). Regulacja zabezpieczenia przed przewróceniem (kiedy zapewniony) Ryzyko obrażeń PRZESTROGA Dla D200 30°: Antytipping powinien być zawsze zainstalowany I obniżony. Regulacja wysokości zabezpieczenie przed przewróceniem jedno z 7 położeń (zakres 120 mm: skokowo co 20 mm): 1. -
Página 113: Montaż I Demontaż Uchwytu Poprzecznego (D200 30°)
Nie należy wkładać palców, odzież z dala od mechanizmu mocowania. W modelu D200 30° możliwa jest regulacja pochylenia oparcia o maksymalny kąt 30° (4 różnych ustawień co 10°). Nalezy upewnić się, że pacjent siedzi w wózku podczas regulacji oparcia, oraz że wózek się... -
Página 114: Wysokość Uchwytów Do Pchania
D200, D200 30° 2023-02 Content Wysokość uchwytów do pchania (nie dla D200 Split Uchwyty do pchania mogą być regulowane bezstopniowo w zakresie 60mm: 1. Poluźnij śrubę (1) . 2. Ruszając w górę lub w dół ustaw uchwyty na pożądanej wysokości. -
Página 115: Poruszanie Się Po Powierzchniach Pochyłych
D200, D200 30° 2023-02 Content Unikać kamieni i innych obiektów, które mogą zablokować koła. Upewnić się, że płyty podnóżka nie dotykają podłoża podczas pokonywania przeszkody. Nie korzystać z wózka inwalidzkiego w windzie. Jeżeli to możliwe, zapinać pas bezpieczeństwa. - Página 116 D200, D200 30° 2023-02 Content Wyższe krawężniki można pokonać, poruszając się w przód z pomocą opiekuna. Poproś opiekuna, aby nieznacznie odchylił wózek inwalidzki do tyłu. Pokonuj krawężniki, poruszając się na tylnich kołach. Ponownie oprzyj wózek na wszystkich czterech kołach. Doświadczony użytkownik może samodzielnie pokonywać wyższe krawężniki. Najłatwiej tego dokonać, poruszając się...
- Página 117 D200, D200 30° 2023-02 Content 3.9.4 Pokonywanie schodów Ryzyko obrażeń OSTRZEŻENIE Zawsze pokonuj schody z pomocą 2 opiekunów. Schody można pokonywać na wózku inwalidzkim, przestrzegając następujących zasad: 1. Jeden z opiekunów musi nieznacznie odchylić wózek w tył. 2. Drugi opiekun łapie za przód ramy wózka.
-
Página 118: Konserwacja
(punkty wgnieceń, uszkodzenia lub rozerwania). Hamulce: Nieuszkodzone i sprawne. Dla D200 30°: Regulacja kata oparcia: Nieuszkodzone i poprawnie funkcjonujące (blokowanie, obciążenie, bez deformacji lub oznak zużycia) Skontaktować się ze specjalistycznym dystrybutorem pod kątem ewentualnych napraw lub wymiany. -
Página 119: Rozwiązywania Problemów
D200, D200 30° 2023-02 Content 4.2.2 Czyszczenie Ryzyko uszkodzenia przez wilgoć. UWAGA Do czyszczenia wózka inwalidzkiego nie wolno nigdy stosować węża ani myjki ciśnieniowej. Wytrzeć wszystkie sztywne części wózka wilgotną szmatką (nie wykręconą). W razie konieczności użyć łagodnego mydła, odpowiedniego do lakierów i materiałów syntetycznych. -
Página 120: Parametry Techniczne
D200 8,5 kg D200 30° 10 kg Waga części, które można zdemontować Podnóżki: 1,50 kg; Podłokietniki: 1,20 kg (D200) lub 2 kg (D200 lub zdjąć. 30°); Tylne koła: 4,40 kg Stabilność statyczna przy pochyłości 16° (w konfiguracji standardowej) Stabilność statyczna pod górę... - Página 121 D200, D200 30° 2023-02 Content Pozycja osi w poziomie (odchył) 37mm Minimalny promień skrętu 1500 mm Średnica kół tylnych PU 22" 24" Ciśnienie w oponach, koła tylne Maksymalnie 3,5 bara (napędowe) Średnica kół skrętnych PU 200 mm Ciśnienie w oponach, koła skrętne Maksymalnie 2,5 bara Materiał...
- Página 123 Montáž a demontáž loketních opěrek ............10 Nastavení zařízení proti překlopení (pokud je k dispozici) ......10 Naklonění zádové opěrky (D200 30°) ............11 Montáž a demontáž tlačné tyče (D200 30°) ..........11 Výška rukojetí (ne pro D200 ) ..............12 Split Přesun pacienta do a z invalidního vozíku ..........
-
Página 124: Předmluva
Tento invalidní vozík byl vyroben pečlivými pracovníky s kvalifikací. Navíc byl navržen a vyroben podle vysokých standardů kvality, nad nimiž dohlíží společnost Vermeiren. Děkujeme za Vaši důvěru ve výrobky společnosti Vermeiren. Tento návod slouží k tomu, aby vám pomáhal s použitím tohoto invalidního vozíku a jeho provozních možností. Řádně si jej přečtěte;... -
Página 125: Tento Výrobek
Pouze pro D200 30°: 15. Páčka pro naklonění zádové opěrky 16. Tlačná tyč Příslušenství Pro D200 jsou dostupná následující příslušenství: Bezpečnostní pás (B20) Kolečko proti překlopení (B78) Pro D200 30° jsou dostupná následující příslušenství: Bubnové brzdy (B74) -
Página 126: Před Použitím
Berte na vědomí, že vaše invalidní vozík může v závislosti na použitém nastavení ovlivňovat některé typy systémů proti krádeži. To může zapříčinit spuštění alarmu v obchodu. V případě, že došlo k závažnému incidentu s vaším výrobkem, informujte společnost Vermeiren nebo svého specializovaného prodejce a příslušný úřad ve vaší zemi. -
Página 127: Přeprava
2.4.2 Použití invalidního vozíku jako sedadla v motorovém vozidle (pouze D200) Riziko zranění VAROVÁNÍ Pro D200 30°: Invalidní vozík NIKDY nepoužívejte jako sedadlo ve vozidle, viz následující symbol. Invalidní vozík prošel crash testy podle ISO 7176-19: 2008 a jako takový byl navržen a testován pro použití... - Página 128 D200, D200 30° 2023-02 Před použitím Obrázek 2 Obrázek 1 7. Zapněte přední bezpečnostní popruhy na vyznačeném místě podle pokynů výrobce pásového systému (obrázek 3). Toto místo je na invalidním vozíku označeno symbolem (obrázek 4). 8. Popojeďte invalidním vozíkem dozadu, dokud se přední popruhy nevypnou.
-
Página 129: Složení A Rozložení
1. Složte stupačky nebo demontujte podnožky (viz kapitola 3.1). 2. Uchopte sedadlo za přední a zadní část a vytáhněte jej. 2.5.3 Sklopení / zvednutí zádové opěrky (D200 Split Nebezpečí poranění - Před použitím vozíku se ujistěte, že je zádová opěrka VAROVÁNÍ... -
Página 130: Montáž Zadních Kol
D200, D200 30° 2023-02 Před použitím 2.5.4 Montáž zadních kol 1. Uchopte zadní kolo a zmáčkněte tlačítko . 2. Držte tlačítko stisknuté a nasaďte zadní kolo na osu, dokud se nezastaví. 3. Povolte tlačítko. 4. zkontrolujte bezpečné uchycení kola. 2.5.5 Sejmutí kol 1. -
Página 131: Použití Invalidního Vozíku
D200, D200 30° 2023-02 Použití invalidního vozíku Použití invalidního vozíku VAROVÁNÍ Riziko zranění Nejprve si přečtěte předchozí kapitoly a seznamte se se zamýšleným použitím. Invalidní vozík NIKDY nepoužívejte, dokud si nepřečtete a plně neporozumíte všem pokynům. V případě pochybností či dotazů bez obav požádejte svého místního odborného prodejce, poskytovatele péče nebo technického poradce, aby vám pomohl. -
Página 132: Montáž A Demontáž Loketních Opěrek
Nastavení zařízení proti překlopení (pokud je k dispozici) Riziko zranění POZOR Pro D200 30°: Zařízení proti převrácení by mělo být vždy nainstalováno a spuštěno . Výšku zařízení proti překlopení lze nastavit ve 7 polohách (rozsah 120 mm: kroky 20 mm): 1. -
Página 133: Naklonění Zádové Opěrky (D200 30°)
Riziko zranění Neumisťujte prsty a oblečení do oblasti mechanismu nastavení. U modelu D200 30° je možné sklopit zádovou opěrku dozadu s maximálním úhlem naklonění 30° (4 možné polohy: kroky po 10°). Když asistent provádí nastavení zádové opěrky, ujistěte se, že pacient sedí... -
Página 134: Výška Rukojetí (Ne Pro D200 Split )
Postup sejmutí tlačné tyče: 1. Uvolněte hvězdicový šroub Ⓐ na pravém madlu. 2. Sejměte hák Ⓒ z pravého madla Ⓓ. Výška rukojetí (ne pro D200 Split Rukojeti lze plynule nastavovat až do délky 60 mm: 1. Uvolněte šroub (1) . -
Página 135: Pohyb Ve Svahu
D200, D200 30° 2023-02 Použití invalidního vozíku Během jízdy dolů ze svahu dbejte na to, aby se všechna čtyři kola dotýkala země. Na svazích jezděte co nejpomaleji. Při jízdě po veřejných komunikacích zůstávejte vždy na chodníku. Dávejte pozor, zda na silnici nejsou díry nebo spáry, které by mohly způsobit skřípnutí kol. - Página 136 D200, D200 30° 2023-02 Použití invalidního vozíku Vyšší obrubníky můžete překonat popředu s pomocí asistenta: 1. Požádejte asistenta, aby invalidní vozík naklonil mírně dozadu. 2. Sjeďte z obrubníku po zadních kolech. 3. Postavte invalidní vozík zpět na čtyři kola. Zkušený uživatel může vyšší obrubníky překonávat sám. Nejlépe to jde pozadu.
-
Página 137: Údržba
(např. promáčknutá místa, poškození nebo roztržení). Brzdy: Nepoškozené a funkční. Pro D200 30°: Systému nastavení zádové opěrky: Nepoškozený a dobře fungující (uzamknutí, zátěž, žádná deformace nebo opotřebení) Pro případné opravy či výměny částí se obraťte na svého odborného prodejce. -
Página 138: Řešení Problémů
D200, D200 30° 2023-02 Údržba Čalounění lze vyčistit vlažnou vodou a jemným mýdlem. K čištění nepoužívejte abrazivní čisticí prostředky. 4.2.3 Dezinfekce Riziko poškození UPOZORNĚNÍ Dezinfekci mohou provádět pouze kvalifikované osoby. Poraďte se se svým prodejcem. Řešení problémů I když tento invalidní vozík používáte správně, může se vyskytnout technický problém. V takovém případě... -
Página 139: Technické Údaje
D200 8,5 kg D200 30° 10 kg Hmotnosti dílů, které lze demontovat či Podnožky: 1,50 kg; Loketní opěrky: 1,20 kg (D200) nebo 2 kg odebrat (D200 30°); Zadní kola: 4,40 kg Statická stabilita z kopce 16° (ve standardní konfiguraci) Statická stabilita do kopce D200 12°... - Página 140 D200, D200 30° 2023-02 Technické údaje Tlak pneumatik, řídicí kola Max. 2,5 bar Materiál rámu Hliník Materiál čalounění Nylon Teplota skladování a používání + 5 °C + 41 °C Vlhkost při skladování a používání 30 % 70 % Právo na technické změny vyhrazeno. Tolerované odchylky ± 15 mm / 1,5 kg / 1,5°...
-
Página 143: Service Registration Form
Service registration form Service registration form This product (name): …………………………………….. was inspected (I), serviced (S), repaired (R) or disinfected (D): By (stamp): By (stamp): By (stamp): Kind of work: I / S / R / D Kind of work: I / S / R / D Kind of work: I / S / R / D Date: Date:... - Página 144 Vermeiren GROUP Vermeirenplein 1 / 15 2920 Kalmthout website: www.vermeiren.com...