Tabla de contenido
Publicidad
Idiomas disponibles
Idiomas disponibles
Enlaces rápidos
EvenCareG
Dear EvenCare G2 Owner
Dear EvenCare G2 Owner,
Thank you for choosing the EvenCare G2 Blood Glucose Monitoring
System to help you in monitoring your diabetes. We designed the
EvenCare G2 Blood Glucose Monitoring System to be accurate and
easy to use. The added convenience of the voice feature can be used
as a verbal aid for using the meter and hearing test results by visually
impaired users. This manual contains all of the information needed to
use and to maintain your new blood glucose meter.
Please read it carefully before use.
If you need assistance, please call Medline's Technical Service
Center at 1-866-274-2131 Monday through Friday between 8:00 a.m.
and 5:00 p.m.(Central Time). Contact your Healthcare Provider at all
other times.
1
Publicidad
Capítulos
Tabla de contenido
Solución de problemas

Manuales relacionados para Medline EvenCare G2

Resumen de contenidos para Medline EvenCare G2
- Página 1 EvenCareG Dear EvenCare G2 Owner Dear EvenCare G2 Owner, Thank you for choosing the EvenCare G2 Blood Glucose Monitoring System to help you in monitoring your diabetes. We designed the EvenCare G2 Blood Glucose Monitoring System to be accurate and easy to use.
-
Página 2: Intended Use
It is not intended for the diagnosis or screening of diabetes or for neonatal use. IMPORTANT: • Alternate Site Testing (AST) with the EvenCare G2 Blood Glucose Monitoring System can be used only during steady-state blood glucose conditions. • Dehydration – Severe dehydration may lead to inaccurate blood glucose test results. -
Página 3: Tabla De Contenido
EvenCareG Table of Contents Table of Contents Understanding Your New Blood Glucose System The EvenCareG2 Meter Meter Display Screen The EvenCareG2 Test Strip EvenCareG2 Glucose Control Solution (Recommended) Setting Up Your New System The Set Up Screen Setting the Clock Setting the Alarms Voice and Beeper Function Language Selection... - Página 4 EvenCareG Table of Contents Storage and Precautions Solving Problems Product Warranty Specifications...
-
Página 5: Understanding Your New Blood Glucose System
EvenCareG Understanding Your New Blood Glucose System Understanding Your New Blood Glucose System The EvenCare G2 Blood Glucose Monitoring System contains the following items if it arrives as a meter only system: • EvenCareG2 Meter • User’s Guide • Carrying Case •... -
Página 6: The Evencareg2 Meter
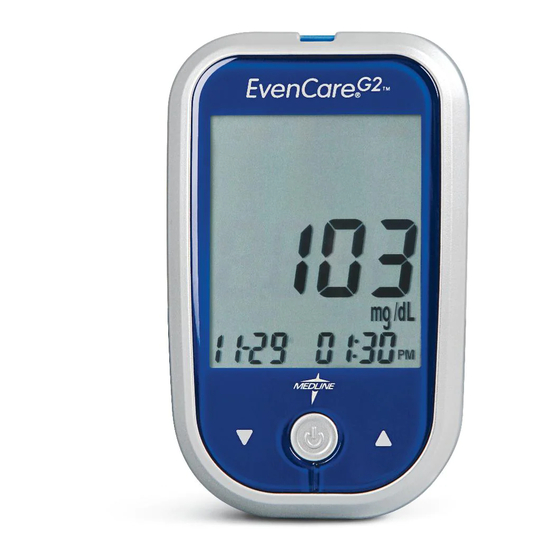
EvenCareG Understanding Your New Blood Glucose System The EvenCareG2 Meter Test Strip Port Insert test strip (see page 34) to turn on the meter. Meter Display Shows your blood glucose test re- sults, memory values, averages, and other messages. Enter ( ) and LM buttons Press and hold Enter ( ) for 2... - Página 7 EvenCareG Understanding Your New Blood Glucose System Battery Compartment Holds two AAA batteries Data Port This function is not yet available.
-
Página 8: Meter Display Screen
EvenCareG Understanding Your New Blood Glucose System Meter Display Screen BATTERY CABLE Appears when batteries need to Indicates the meter is in data be changed (see page 42). transfer mode to PC* *This function is not available yet. Will appear on the display screen after the last recorded test result if less then 300 readings are stored. - Página 9 EvenCareG Understanding Your New Blood Glucose System BEEPER Set sound volume (see page 18). TEMPERATURE Appears when it is either too hot or too cold to test (outside the ranges of 50˚F~104˚F). CLOCK Indicates the meter is ready to set up time and date (see page 13). VOICE Indicates the voice feature is on (see page 18).
-
Página 10: The Evencareg2 Test Strip
Apply blood or control strip port on the meter. solution here. The EvenCare G2 Test Strips are glucose specific, biosensor-based test strips that require very little blood sample to quickly test glucose in fresh capillary whole blood. The test results are plasma-calibrated for... -
Página 11: Evencareg2 Glucose Control Solution (Recommended)
Run the control test to make sure the test strips and the meter are working together properly, to practice testing procedure, and when using a new lot of EvenCare G2 Blood Glucose Test Strips. -
Página 12: Setting Up Your New System
Setting Up Your New System Setting Up Your New System The Setup Screen The Setup Screen of the EvenCare G2 Meter lets you take advantage of the advance functions of this meter. Simply use buttons to navigate to the desired function icon, and press the Enter ( ) button to enter the function when the icon is flashing. -
Página 13: Setting The Clock
Setting the Clock mmol/dL You will need: √ Your EvenCare G2 Meter NOTE If date and time on the EvenCare G2 Meter has not been set, test or control result will not be stored in memory. code Step 1: mo /dL... - Página 14 EvenCareG Setting Up Your New System mo /dL mo /dL mg /dL Step 4 - Set the Month: The current month will flash. If the voice function mg/dL mg/dL code mg /dL is on, the meter will say, “Set Month.” press ▲or▼...
- Página 15 ▲or▼ to select the correct minutes. Press Enter ( ) to confirm your choice and finish setting the clock. NOTE: • Anytime during set up, inserting a EvenCare G2 Test Strip will mo /dL mo /dL mg/dL begin testing. Any changes made so far are stored.
-
Página 16: Setting The Alarms
EvenCareG Setting Up Your New System Setting the Alarms You can set up to three alarms on the EvenCare G2 Meter. You must set the clock before you can set the alarms. When an alarm sounds, mg/dL mg/dL mg /dL mg /dL the meter will turn on, and a melody will sound for 30 seconds. - Página 17 • Alarm settings will not be erased when changing batteries. Begin testing by inserting a EvenCare G2 Blood Glucose Test Strip (see page 30, Testing Your Blood Glucose), or press and hold Enter ( to turn off the meter, or see the next section on how to set up the voice...
- Página 18 EvenCareG Setting Up Your New System...
- Página 19 EvenCareG Setting Up Your New System...
-
Página 20: Voice Function Table
EvenCareG Voice Function Table Voice Function Table The voice function can be used as an aid for you to hear the test results and use the meter. The following table lists WHEN the meter will speak and WHAT the meter will say. Testing blood and control solutions (see page 25 , Control Solution Test- ing, and page 30, Testing your blood glucose) WHEN the meter will speak…... - Página 21 EvenCareG Voice Function Table WHEN the meter will speak… WHAT the meter will say… “Temperature is out of range” Temperature is out of range (be- tween 50˚F~104˚F). Melody will sound. When the meter is turned off. Test Strip is inserted and press ▲ or ▼ (CTL showing next to the test strip icon) .
-
Página 22: Language Selection
EvenCareG Voice Function Table Setting Meter Functions via the Setup Screen (see page 12, setting up your new system) Pressing Enter ( ) to enter setup screen (after the meter has been turned on) ▲ ▲ Memory Exit Function Language Recall Mode Selection... - Página 23 EvenCareG Voice Function Table WHEN the meter will speak… WHAT the meter will say… “Set Minutes” During date and time setup, setting up the Minutes “The date and time is (year) After finishing setting up date (month) (date) (hour) (minutes)” and time “Set Alarm (number)”...
- Página 24 EvenCareG Voice Function Table Other warning messages (see page 44, Solving Problems) WHEN the meter will speak… WHAT the meter will say… “Please set date and time” Meter date and time has not been set “Error 1 Meter Failure” Meter failure “Error 3 used test strip”...
-
Página 25: Control Solution Testing
Control Solution Testing The purpose of the control solution testing is to make sure the Even- Care G2 Meter and the EvenCare G2 Test Strip are working properly. You should perform control solution testing when: • Using the meter for the first time •... - Página 26 EvenCareG Control Solution Testing mo /dL mo /dL IMPORTANT: code • Check the expiration date printed on the test strip bottle and its package. Do not use expired test strips. • Use each test strip immediately after removing it from the bottle. •...
- Página 27 EvenCareG Control Solution Testing Step 4: Squeeze a drop of control solution onto a clean, dry, non- absorbent surface. Do not apply control solution to the test strip directly from the bottle. Replace the bottle cap on the Control Solu on Suitable for Self-tes ng control solution bottle immediately after use.
- Página 28 EvenCareG Control Solution Testing Step 8: Removed the used test strip. The meter will automatically turn off. Discard the used test strip. IMPORTANT: Do not reuse test strips. Follow steps 3 through 8 to do High control solution testing and com- pare the result with the High range printed on the test strip bottle.
-
Página 29: Control Solution Trouble Shooting
Possible Causes What you can do….. • Make sure you are using • Wrong brand of Control EvenCare G2 Control Solution. Solution being used • Make sure the testing environ- • Control solution not at room ment is between 50˚F to 104˚F. -
Página 30: Testing Your Blood Glucose
You will need: √ Your EvenCare G2 Meter √ A new EvenCare G2 Blood Glucose Test Strip √ Lancing device with a clean, unused lancet (or safety lancets) √ Clear cap for Alternate Site Testing (AST) on palm and forearm Before you begin, make sure: •... - Página 31 EvenCareG Testing Your Blood Glucose NOTE: • For fingertip testing, use the opaque adjustable cap. • For alternate site testing on palm and forearm, use the clear adjustable cap. Step 3: Adjust the puncture setting on the adjustable cap for the puncture depth level (1 is the lightest and 5 is the deepest).
-
Página 32: Important Information On Alternate Site Testing (Ast)
EvenCareG Testing Your Blood Glucose Important Information on Alternate Site Testing (AST) The EvenCare G2 Blood Glucose Monitoring System can test for blood glucose from areas other then your fingertip such as palm and forearm (alternate site testing, or AST). - Página 33 EvenCareG Testing Your Blood Glucose NOTE: • Rubbing forearm until warm before lancing will help minimize the difference with fingertip test results. The palm (at the base of the thumb) does not require rubbing before testing. • If results from alternate site testing do not agree with how you feel, use fingertip testing instead.
-
Página 34: Performing Blood Glucose Test
EvenCareG Testing Your Blood Glucose Performing a Blood Glucose Test Step 1: Take out an EvenCare G2 Test Strip from the test strip bottle and close the bottle immediately. Insert the test strip to turn on the meter. mo /dL IMPORTANT: •... - Página 35 EvenCareG Testing Your Blood Glucose For Fingertip Testing: Hold the lancing device (use the opaque adjustable cap or safety lancet) against the side of your fingertip and press the release button to create a puncture. TIP: • Gently massage your hand and finger toward the puncture site to form a drop of blood.
- Página 36 EvenCareG Testing Your Blood Glucose For Testing on Palm and Forearm: Hold the lancing device (use the clear adjustable cap) against the test site (base of palm or forearm). Avoid a test site that has veins, moles, excessive hair, or bone. ¡ı...
- Página 37 EvenCareG Testing Your Blood Glucose Step 4: Gently bring the test strip and touch the drop of blood at a slight angle. The test strip acts like a straw to pull the blood in. Keep the test strip in the blood drop until the meter beeps to indicate the test strip has enough blood to test.
-
Página 38: Understanding Your Blood Glucose Test Results
EvenCareG Understanding Your Blood Glucose Test Results Understanding Your Blood Glucose Test Results Blood glucose values will vary depending on food intake, medication, health, stress, and exercise. The ideal range for adults with and without diabetes should be • 70 to 100 mg/dL before meals, and •... -
Página 39: Viewing Your Meter's Memory
EvenCareG Viewing Your Meter’s Memory Viewing Your Meter’s Memory Your EvenCare G2 Meter automatically stores up to 300 test and control mg/dL results with date and time. The meter also provides 7, 14, and 30 day averaging to help track your blood glucose trend. You must set up the date and time on your meter properly to use the memory and day averaging function, see Setting Up Your New System on page 12. - Página 40 EvenCareG Viewing Your Meter’s Memory code code code code END will appear on the display screen after the last recorded test result if less then 300 readings are stored. You can press ▼ to go back viewing from the oldest to the most recent readings. mol/dL mmol/dL mol/dL...
- Página 41 EvenCareG Viewing Your Meter’s Memory NOTE: • Control testing results are flagged by ctl on the bottom left corner of the display screen in addition to MEM. • When the meter memory is blank, the display screen will show nil. •...
-
Página 42: Caring For The Meter
EvenCareG Caring for the Meter Caring for the Meter Caring for your EvenCare G2 Meter is easy. Follow these simple guidelines to keep your meter working properly. Changing the Battery Batteries need to be changed when the icon appears on the meter display. - Página 43 EvenCareG Table of Contents...
- Página 44 EvenCareG Table of Contents...
-
Página 45: Cleaning The Meter
• Do not take the meter apart as doing so will void the warranty. If there are technical problems or questions, please call Medline’s Technical Service Center at 1-866-274-2131 Monday through Friday between 8:00 a.m. and 5:00 p.m.(Central Time). Contact your... -
Página 46: Solving Problems
Solving Problems mmol/dL mol/dL mmol/dL mol/dL mg /dL This section details the significant display screen messages and error codes you will encounter when using your EvenCare G2 meter and EvenCare G2 test strips. code mg /dL mg /dL mg /dL What... - Página 47 EvenCareG Table of Contents Solving Problems mg /dL “Low Batteries Change the battery ac- Battery” are low cording to page 42, What What the Changing the Battery. What itWhat Should You See meter says MeansYou Do Move the meter into an “Tempera- Temperature area that is between...
- Página 48 code EvenCareG Solving Problems Table of Contents mmol/dL mol/dL mmol/dL mol/dL mg /dL There are no • Check if the date and time on your meter is Applicable memorized set up. See Setting Up results in the Your New System on meter mg /dL page 12.
-
Página 49: Product Warranty
Table of Contents Product Warranty Product Warranty The EvenCare G2 Blood Glucose Meter is warranted to be free of defects in workmanship and materials for a period of five (5) years from the date of purchase. Medline’s liability for warranty claims is... - Página 50 EvenCareG Specifications Table of Contents Specifications Test Strips: EvenCare G2 Blood Glucose Test Strips Test Range: 20 - 600 mg/dL Calibration: Plasma Test Time: 6 Seconds Sample Size: Larger than 1uL Hematocrit Range: 30-55% Display Type: Large LCD screen Memory:...
- Página 51 Estimado Propietario de EvenCare G2, Test Strips at 39˚F ~ 86˚F Gracias por elegir el Sistema de Monitoreo de Glucemia EvenCare G2 para ayudarle en el control de su diabetes. Hemos diseñado el For additional information, refer to the EvenCare G2 Test Strip insert.
-
Página 52: Uso Previsto
Estimado Propietario EvenCare G2 Table of Contents Uso Previsto El Sistema de Monitoreo de Glucemia EvenCare G2 está diseñado para la medición cuantitativa de glucemia en muestras de sangre en- tera capilar fresca tomadas de yema de los dedos, el antebrazo o la palma. - Página 53 EvenCareG EvenCareG Table of Contents Índice Índice Entendiendo Su Nuevo Sistema de Glucemia El Medidor EvenCareG2 6 Pantalla de Medidor 8 Tira reactiva EvenCareG2 10 Solución de Control de Glucosa EvenCareG2 (recomendado) Configuración de su Nuevo Sistema La Pantalla de Configuración Ajuste del Reloj Ajuste de Alarmas Función Voz y Beeper...
- Página 54 EvenCareG Índice Table of Contents Almacenamiento y Precauciones Solución de Problemas Garantía del Producto Especificaciones...
-
Página 55: Entendiendo Su Nuevo Sistema De Glucemia
EvenCareG Table of Contents Entendiendo Su Nuevo Sistema de Glucemia Entendiendo Su Nuevo Sistema de Glucemia El Sistema de Monitoreo de Glucemia EvenCare G2 contiene los siguientes elementos: • Medidor EvenCareG2 • Guía del Usuario • Funda de transporte • Libro de registro... -
Página 56: El Medidor Evencareg2
EvenCareG Entendiento los Resultados de su Prueba de Glucemia Table of Contents El Medidor EvenCareG2 Puerto de tira reactiva Inserte la tira reactiva (ver página 82) para encender el medidor. Pantalla del Medidor Muestra los resultados de su prueba de glucemia, valores de memoria, promedios, y otros mensajes. - Página 57 EvenCareG Entendiento los Resultados de su Prueba de Glucemia Table of Contents Compartimiento de Batería Contiene dos baterías AAA Puerto de Datos Esta función no está actualmente disponible.
-
Página 58: Pantalla De Medidor
EvenCareG Entendiento los Resultados de su Prueba de Glucemia Table of Contents Pantalla de Medidor CABLE BATERÍA Indica que el medidor está en modo Aparece cuando las baterías de transferencia de datos a PC * necesitan ser cambiadas * Esta función no está disponible todavía. (ver página 90). -
Página 59: Gota De Sangre Y Flecha
EvenCareG Entendiento los Resultados de su Prueba de Glucemia Table of Contents ZUMBADOR Configuración del volumen de sonido (ver página 66). TEMPERATURA Aparece cuando está demasiado caliente o demasiado frío para prueba (fuera de los rangos de 50˚F ~ 104˚F). RELOJ Indica que el medidor está... -
Página 60: La Tira Reactiva De Glucemia Evencareg2
Las tiras reactivas EvenCare G2 son tiras de prueba específicas de glu- cosa, basadas en biosensor que requieren muy pequeña muestra de san- gre para probar rápidamente la glucosa en sangre entera capilar fresca. -
Página 61: Solución De Control De Glucosa Evencareg2 (Recomendado)
Si no la tienen, por favor contacte con nosotros al 1-866-274-2131 entre las 8:00 am y 5:00 pm (hora del centro), de lunes a viernes. La Solución de Control de Glucosa EvenCare G2 es la solución de con- centración de glucosa estándar requerida para realizar una Prueba de Solución de Control de Glucosa (Véase Ensayo de Solución de Con-... -
Página 62: Configuración De Su Nuevo Sistema La Pantalla De Configuración
Configuración de su Nuevo Sistema La Pantalla de Configuración La Pantalla de Configuración del medidor EvenCare G2 le permite aprovechar funciones avanzadas de este medidor. Sólo tiene que utilizar los botones ▲o▼ para navegar hasta el icono de la función deseada y pulsar el botón Intro ( ) para entrar en la función cuando el... -
Página 63: Ajuste Del Reloj
Ajuste del Reloj mmol/dL Necesitará: √ Su Medidor EvenCare G2 NOTA Si la fecha y la hora en el medidor EvenCare G2 no se ha establecido, el resultado de prueba o control no se almacenará en la memoria. code Paso 1:... - Página 64 EvenCareG Configuración de su Nuevo Sistema Table of Contents mo /dL mo /dL mg /dL Paso 4 - Configurar el mes: El mes actual parpadeará. Si la función de voz mg/dL mg/dL code mg /dL está activada, el medidor dirá: "Ajuste mes". pre- sione ▲o▼...
- Página 65 Después de configurar fecha y hora, el medidor anunciará la fecha y hora si la característica de voz está activada. Comenzar la prueba mediante la inserción de una Tira reactiva de glucemia EvenCare G2 (vea página 78, Probando su glucemia), o mantenga pulsada la tecla Intro ( ) para apagar el medidor, o vea la siguiente sección sobre cómo configurar la función de...
-
Página 66: Configurando Las Alarmas
EvenCareG Configuración de su Nuevo Sistema Table of Contents Configurando las Alarmas Puede configurar hasta tres alarmas en el medidor EvenCare G2. Debe ajustar el reloj antes de poder ajustar las alarmas. Cuando suena mg/dL mg/dL mg /dL mg /dL una alarma, el medidor se enciende, y una melodía sonará... - Página 67 • Los ajustes de alarma no se borran al cambiar las baterías. Comenzar la prueba mediante la inserción de una tira reactiva de glucemia EvenCare G2 (ver página 78, Probando su Glucemia), o mantenga pulsada la tecla Intro ( ) para apagar el medidor, o cosulte la siguiente sección sobre cómo configurar la función de voz de su...
- Página 68 EvenCareG Configuración de su Nuevo Sistema Table of Contents...
- Página 69 EvenCareG Table of Contents Configuración de su Nuevo Sistema...
-
Página 70: Tabla De Funciones De Voz
EvenCareG Tabla de Función de Voz Table of Contents Tabla de Función de voz La función de voz se puede utilizar como una ayuda para que usted pueda escuchar los resultados de las pruebas y usar del medidor. En la tabla siguiente se lista CUANDO el medidor hablará... - Página 71 EvenCareG Table of Contents Tabla de Función de Voz CUANDO el medidor hablará… LO QUE el medidor dirá... "La temperatura está fuera de La temperatura está fuera de rango" rango (entre 50 ˚F ~ 104 ˚F). Cuando el medidor está Sonará...
- Página 72 EvenCareG Tabla de Función de Voz Table of Contents Ajuste de las Funciones del Medidor a través de la Pantalla de Configuración (Consulte la página 60, configuración de su nuevo sistema) Pulsar Intro ( ) para entrar en la pantalla de configuración (después de que el medidor ha sido encendido) ▲...
- Página 73 EvenCareG Table of Contents Tabla de Función de Voz CUANDO el medidor hablará... QUÉ dirá el medidor ... Durante la configuración de "Configurar Minutos" fecha y hora, configuración de minutos Después de terminar la "La fecha y la hora es (año) (mes) Configurar de fecha y hora (fecha) (hora) (minutos) "...
- Página 74 EvenCareG Tabla de Función de Voz Table of Contents Otros mensajes de advertencia (consulte la página 92, Resolución de Problemas) CUANDO el medidor hablará ... LO QUE el medidor dirá... "Por favor, configure fecha y hora" "Error 1 Fallo de Medidor" "Error 3 Tiras reactiva usada"...
-
Página 75: Prueba De Solución De Control
• Los resultados de la prueba de glucemia no reflejan cómo se siente • Desea practicar el procedimiento de prueba IMPORTANTE: • Utilice sólo soluciones de control de glucosa EvenCare G2 de con las tiras reactivas EvenCare G2. Otras marcas de solución de control producirán resultados inexactos. -
Página 76: Importante
EvenCareG Prueba de Solución de Control Table of Contents mo /dL mo /dL IMPORTANTE: • Verifique la fecha de caducidad impresa en el frasco de tiras reactivas code y su paquete. No utilice las tiras reactivas caducadas. • Use cada tira reactiva inmediatamente después de sacarla de la botella. •... - Página 77 EvenCareG Table of Contents Prueba de Solución de Control Paso 4: Exprima una gota de solución de control en una superficie limpia, seco, absorbente. No aplique solución de control a la tira reactiva directamente de la botella. Vuelva a colocar la tapa de la botella en la botella de solución de control in- Control Solu on Suitable for Self-tes ng...
- Página 78 EvenCareG Prueba de Solución de Control Table of Contents Paso 8: Retirada la tira reactiva usada. El medidor se apagará automática- mente.Deseche la tira reactiva usada. IMPORTANTE: No vuelva a usar las tiras reactivas. Siga los pasos del 3 al 8 para hacer las pruebas de control de solución Alta y comparar el resultado con el rango Alto impreso en el envase de tiras reactivas.
-
Página 79: Solución De Problemas De Solución De Control
• Si el problema persiste, por favor • Mal funcionamiento del Medidor llame al Centro de Servicio Téc- nico Medline al 1-866-274-2131 De lunes a viernes entre las 8:00 am y 5:00 pm (Hora Centro). Co- muníquese con su Proveedor de Antención de Salud en cualquier... -
Página 80: Cómo Preparar Su Dispositivo De Punción
Necesitará: √ Su Medidor EvenCare G2 √ Una nueva Tira Reactiva de Glucemia EvenCare G2 √ Dispositivo de punción con una lanceta limpia, sin uso (o lancetas de seguridad) √ Tapa transparente para Prueba de Sitio Alterno (AST) en palma y antebrazo Antes de empezar, asegúrese de:... - Página 81 EvenCareG Table of Contents Probando su Glucemia NOTE: • Para la prueba de yema de los dedos, use la tapa ajustable opaca. • Para pruebas en sitios alternos en palma y antebrazo, use la tapa ajustable transparente Paso 3: Ajuste la configuración de punción en la tapa ajustable para el nivel de profundidad de punción (1 es el más ligero y 5 es el más profundo).
-
Página 82: Información Importante Sobre Pruebas En Sitios Alternos (Ast)
Table of Contents Información Importante sobre Pruebas en Sitios Alternos (AST) El Sistema de Monitoreo de glucemia EvenCare G2 puede hacer pruebas de glucosa desde áreas distintas a la yema de los dedos como la palma y el antebrazo (Pruebas en sitios alter- nos, o AST). - Página 83 EvenCareG Table of Contents Probando su Glucemia NOTA: • Frotar el antebrazo hasta que se caliente antes de punción ayudará a minimizar la diferencia con los resultados del examen de yema del dedos. La palma (en la base del pulgar) no requiere ser frotada antes de la prueba.
-
Página 84: Realización De Una Prueba De Glucemia
Probando su Glucemia Table of Contents Realización de una prueba de glucemia Paso 1: Saque una Tira Reactiva EvenCare G2 del frasco de tiras reactivas y cierre el frasco inmediatamente. Inserte la tira reactiva para mo /dL encender el medidor. - Página 85 EvenCareG Table of Contents Probando su Glucemia Para la prueba de yema del dedo: Mantenga el dispositivo de punción (use la tapa opaca ajustable o lanceta de seguridad) contra el lado de la yema del dedo y presione el botón de liberación para crear una punción. CONSEJO: •...
- Página 86 EvenCareG Probando su Glucemia Table of Contents Para las pruebas de Palma y Antebrazo: Mantenga el dispositivo de punción (use la tapa ajustable clara) contra el sitio de prueba (base de palma o antebrazo). Evitar un sitio de prueba que tenga venas, lunares, pelo ¡ı...
- Página 87 EvenCareG Table of Contents Probando su Glucemia Paso 4: Pase suavemente la tira reactiva y toque la gota de sangre en un ligero ángulo. La tira reactiva actúa como una paja para extraer la sangre. Mantenga la tira reactiva en la gota de sangre hasta que el medidor emita un pitido para indicar que la la tira reactiva tiene suficiente sangre para la prueba.
-
Página 88: Entendiendo Los Resultados De Su Prueba De Glucemia
EvenCareG Entendiendo los Resultados de su Prueba de Glucemia Table of Contents Entendiendo los Resultados de su Prueba de Glucemia los valores de glucemia pueden variar dependiendo de la ingesta de ali- mentos, medicamentos, salud, estrés y ejercicio. El rango ideal para adultos con y sin diabetes debe ser de 1: •... -
Página 89: Viendo La Memoria De Su Medidor
Table of Contents Viendo la Memoria de su Medidor Viendo la Memoria de su Medidor Su medidor EvenCare G2 almacena automáticamente hasta 300 mg/dL resultados de pruebas y control con fecha y hora. El medidor también dispone de promedios de 7, 14 y 30 días para ayudar a un seguimiento de su tendencia de glucemia. - Página 90 EvenCareG Viendo la Memoria de su Medidor Table of Contents code code code code END aparecerá en la pantalla después del resultado de la última prueba registrada si se almacenan menos de 300 lecturas. Puede presionar ▼ para volver viendo desde la más antigua a las lecturas mol/dL mmol/dL mol/dL...
- Página 91 EvenCareG Table of Contents Viendo la Memoria de su Medidor NOTA: • Los resultados de las pruebas de control se marcan por ctl en la esquina inferior izquierda de la pantalla, además de MEM. • Cuando la memoria del medidor está en blanco, la pantalla mostrará nil. •...
-
Página 92: Cuidado Del Medidor
Viendo la Memoria de su Medidor Table of Contents Cuidado del Medidor El cuidado de su medidor EvenCare G2 es fácil. Siga estas simples directrices para mantener su medidor funcionando correctamente. Cambio de Batería Las baterías deben ser cambiadas cuando el icono aparece en la pantalla del medidor. -
Página 93: Limpieza Del Medidor
• No despiece el medidor ya que al hacerlo, se anulará la garantía. Si hay problemas técnicos o preguntas, por favor llame al Centro de Servicio Técnico Medline al 1-866-274-2131 de lunes a viernes entre las 8:00 am y 5:00 pm (Hora del Centro). Póngase en contacto... -
Página 94: Solución De Problemas
/dL Esta sección detalla los mensajes de la pantalla y códigos de error importantes que se encuentran al utilizar su medidor EvenCare G2 y tiras reactivas EvenCare G2 . code Lo que ve Lo que el Lo que Qué... - Página 95 EvenCareG Table of Contents Solución de Problemas Lo que ve Lo que el Lo que Qué debe hacer mg /dL medidor dice significa "Baja Baterías Cambiar la batería de Bateria" están bajas acuerdo a la página 90. Cambio de la Batería. Mueva el medidor a un "Temper- Resultado...
- Página 96 code EvenCareG Solución de Problemas Table of Contents Lo que ve Lo que el Lo que Qué debe hacer medidor dice significa mmol/dL mol/dL mmol/dL mol/dL mg /dL No es No hay • Compruebe si la fecha y hora en su medidor están Aplicable resultados configuradas.
-
Página 97: Garantía Del Producto
El medidor de glucemia EvenCare G2 está garantizado libre de defectos de fabricación y materiales por un período de cinco (5) años a partir de la fecha de compra. La responsabilidad de Medline para reclamaciones de garantía está limitada a la reparación o reemplazo, y en ningún caso Medline será... -
Página 98: Especificaciones
EvenCareG Especificaciones Table of Contents Especificaciones Tiras Reactivas: Tiras reactivas de glucemia EvenCare G2 Rango de Prueba: 20 - 600 mg/dL Calibración: Plasma Tiempo de Prueba: 6 segundos Tamaño de muestra: Mayor que 1uL Rango de Hematocrito: 30-55% Tipo de Pantalla:...