Tabla de contenido
Publicidad
Idiomas disponibles
Idiomas disponibles
Enlaces rápidos
Publicidad
Capítulos
Tabla de contenido
Solución de problemas

Manuales relacionados para Ikegami IPD-Q01


Resumen de contenidos para Ikegami IPD-Q01
- Página 1 INSTRUCTION MANUAL (SETUP INSTRUCTIONS) NETWORK CAMERA MODEL IPD-Q01 OUTDOOR USE WARNING WARNING — TO PREVENT FIRE OR ELECTRIC SHOCK, DO NOT EXPOSE THIS APPLIANCE TO RAIN OR MOISTURE. Ikegami Tsushinki Co., Ltd.
- Página 2 The exclamation point within an equilateral triangle is intended to alert the user to the presence of important operating and maintenance (servicing) instructions in the literature accompanying the appliance. NOTE: This equipment has been tested and found to comply with the limits for a Class A digital device, pursuant to Part 15 of the FCC Rules.
-
Página 3: Handling Precautions
Introduction Thank you very much for your wise choice of this product. Be sure to carefully read this manual before use in order to fully understand the product’s functions and to keep the product at full capacity. Handling precautions Handling precautions Be very careful to keep the product from impacts and vibrations. -
Página 4: Tabla De Contenido
Contents Page Introduction Handling precautions Checking the supplies Contents 1. Outline ........................E-1 2. Features ........................E-1 3. Names of parts and their functions ................E-2 4. Basic connections Connecting the LAN cable ................4-1. Direct connection with a PC ................E-4 4-2. -
Página 5: Outline
1. Outline This surveillance color network camera is equipped with 1/3-inch CCD (Charge Coupled De- vice) and compatible with PoE (Power over Ethernet) backed by the network-connectable web server function. The built-in JPEG2000 image compression format can deliver high-quality video in a scalable way. -
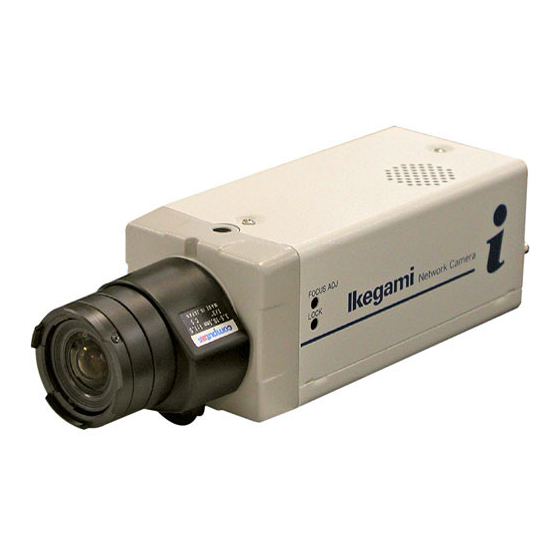
Página 6: Names Of Parts And Their Functions
3. Names of parts and their functions ③ ④ ② ① ⑥ ⑤ ⑦ ⑧ ⑩ ⑨ ⑪ ⑫ ⑬ ⑭ ⑮ ⑯... - Página 7 Lens mount (CS) ① Used to mount the lens. Various types of CS mount lenses can be applied. Auto iris connector ② Used to connect an auto iris lens. Lens selector switch ③ Used to select between VIDEO iris and DC iris according to the type of an auto iris lens. Iris level adjusting knob ④...
-
Página 8: Basic Connections
4. Basic connections Connecting the LAN cable 4-1. Direct connection with a PC Use a Category 5 or higher LAN cable (cross cable). Example (IPD-Q01) IPD-Q01 IP IP address : 192.168.1.100 Subnet mask : 255.255.255.0 User name : [admin] Password :... -
Página 9: Connecting To The Alarm Terminals
5. Applied connections Connecting to the alarm terminals 5-1. Connecting to the alarm terminals Make sure in advance that the camera power is not turned on. * Typical connections +24V 10KΩ Open collector Alarm Max DC24V 50mA No-voltage contact External unit’s alarm input * Alarm action : If an alarm signal comes in, the alarm message is e-mailed to a designated ad- dress. -
Página 10: Setting Up A Pc Setting Internet Explorer
6. Setting up a PC Setting Internet Explorer Before connecting a PC to the camera, modify the PC’s IP address and IE (Internet Ex- plorer) settings. 6-1. Setting the IP address To get the PC interactive with the camera, first set the PC’s IP address to the camera’s IP address. - Página 11 (3) Click on “Network Connections”. (4) Right-click on “Local Area Connection” and click on “Properties”. (5) Getting the “Internet Protocol (TCP/IP)” properties displayed Click on “Internet Protocol (TCP/IP)” first and then on “Properties”.
- Página 12 (6) Click on “Use the following IP address” and enter the address. * To return to the original IP address after setting up the camera, preferably note down the current IP address. - Set the IP address at “192.168.1.○” (not 100 for the ○blank). - Set the subnet mask at “255.255.255.0”.
-
Página 13: Setting Internet Explorer
6-2. Setting Internet Explorer On a WindowsXP SP2 machine, open “Internet Options” first and then “Advanced”. Check- mark on “Allow active content to run in files on My Computer”. * If this check mark is not placed, locally saved image data cannot be played back. The security-related message bar is displayed instead onscreen. -
Página 14: Turning On The Power
7. Turning on the power This camera has no power switch. About 10 seconds after the power is turned on, the camera gets started and the LED indicators start flashing. When a PC (Windows XP SP1) is hooked up with the camera for the first time, the camera gets started in about 30 seconds. 8. -
Página 15: Important
* Making other settings * Maintenance * Troubleshooting * Glossary URL http://www.ikegami.co.jp/en/products/security/network/index.html * Simplified set-up tool This tool helps change the network camera/encoder’s IP address in a simple way. To change the IP address on multiple units, this is very convenient. -
Página 16: Troubleshooting
10. Troubleshooting Before asking for servicing, check the following points. Problem Check points Ref. page No power supplied * Is the power cable plugged in tightly? * Is the LAN cable tightly connected with the camera in the case of PoE power supply? Failure to interact * Is the IP address as specified? E-6, E-10... -
Página 17: Specifications
11. Specifications (1) Pickup device: 1/3-inch IT-CCD Effective pixels 768(H) x 494(V), approx. 380,000 pixels Color filter Color difference line sequential system (2) Scanning system: 2:1 interlaced NTSC system (3) Vertical frequency: 59.94 Hz (4) Horizontal frequency: 15.734 kHz (5) Sync system: Internal sync, crystal lock (6) Video output: VBS 1.0 Vp-p/75Ω... -
Página 18: Appearance View
(29) Protocol: TCP/IP, SMTP, POP3, DHCP, HTTP, NTP (30) Monitoring: Internet Explorer 6.0 (31) Alarm terminal: Input : No-voltage contact (Over 100 ms), Output : Open collector (max. 24 V, 50 mA) (32) Supply power: AC 24 V±10%, 50/60 Hz / DC 12 V (10.5-15 V) PoE (IEEE 802.3af) (33) Power consumption: Approx. -
Página 19: Warranty And After-Sales Service
Keep this card in a safe place. • Please consult Ikegami Electronics (U.S.A.), Inc. or your dealer for full warranty information. Your dealer will repair or replace free of charge within the warranty period according to the warranty coverage. -
Página 20: Instrucciones Para Eliminar Equipos Eléctricos Y Electrónicos De Una Casa Privada
Instrucciones para eliminar equipos eléctricos y electrónicos de una casa privada Eliminación de equipos eléctricos y electrónicos usados (Normas aplicables en la Unión Europea y en otros países europeos con diferentes sistemas de recogida) Este símbolo en el producto, o en los documentos relacionados, indica que este producto no deberá... -
Página 21: Introducción
Introducción Muchísimas gracias por haber elegido sabiamente este producto. Asegúrese de leer cuidadosamente este manual antes de utilizar el producto para entender perfectamente las funciones del producto y mantenerlo en óptimas condiciones de funcionamiento. Precauciones de manejo Precauciones de manejo Tenga cuidado para no exponer el producto a golpes y vibraciones. - Página 22 Índice Page Introducción Precauciones de manejo Comprobación de los suministros Índice 1. Nociones generales ....................S-1 2. Características ......................S-1 3. Nombres y funciones de las partes ................S-2 4. Conexiones básicas Conexión del cable LAN ................4-1. Conexión directa con un PC ................S-4 4-2.
-
Página 23: Nociones Generales
1. Nociones generales Esta cámara en color para redes de vigilancia está equipada con un CCD (dispositivo de carga acoplada) de unos 8,5 mm, es compatible con PoE (alimentación por Ethernet) y cuenta con el apoyo de la función de servidor de Web conectable a red. El formato de compresión de imagen JPEG2000 incorporado puede ofrecer vídeo de alta calidad de forma escalabe. -
Página 24: Nombres Y Funciones De Las Partes
3. Nombres y funciones de las partes ③ ④ ② ① ⑥ ⑤ ⑦ ⑧ ⑩ ⑨ ⑪ ⑫ ⑬ ⑭ ⑮ ⑯... - Página 25 ① Montura de objetivo (CS) Se utiliza para montar el objetivo. Se pueden utilizar varios objetivos de montura CS. ② Conector de iris automático Se utiliza para conectar un objetivo de iris automático. ③ Conmutador selector de objetivo Se utiliza para seleccionar entre iris VIDEO e iris DC según el tipo del objetivo de iris automático. ④...
-
Página 26: Conexiones Básicas
4. Conexiones básicas Conexión del cable LAN 4-1. Conexión directa con un PC Utilice un cable LAN de categoría 5 o superior (cable cruzado). Ejemplo (IPD-Q01) IPD-Q01 IP Dirección IP : 192.168.1.100 Máscara de red secundaria : 255.255.255.0 Nombre de usuario :[admin]... -
Página 27: Conexiones Aplicadas
5. Conexiones aplicadas Conexión a los terminales de alarma 5-1. Conexión a los terminales de alarma Asegúrese de antemano que la alimentación de la cámara esté desconectada. * Conexiones típicas +24V 10KΩ Colector abierto Alarma CC 24 V, 50 mA máximo Contacto sin tensión Entrada de alarma de unidad externa... -
Página 28: Configuración De La Dirección Ip
6. Configuración de un PC Configuración de Internet Explorer Antes de conectar un PC a la cámara, modifique la dirección IP del PC y la configuración de IE (Internet Explorer). 6-1 Configuración de la dirección IP Para que el PC funcione de forma interactiva con la cámara, ponga primero la dirección IP del PC en la dirección IP de la cámara. - Página 29 (3) Haga clic en “Network Connections”. (4) Haga clic con el botón derecho en “Local Area Connection” y haga clic en “Properties”. (5) Visualización de las propiedades “Internet Protocol (TCP/IP)” Haga clic primero en “Internet Protocol (TCP/IP)” y luego en “Properties”.
- Página 30 (6) Haga clic en “Use the following IP address” y luego introduzca la dirección. * Para volver a la dirección IP original después de preparar la cámara, anote preferiblemente la dirección IP actual.vv - Configure la dirección IP en "192.168.1.○" (no 100 para el espacio en blanco○). - Configure la máscara de red secundaria en "255.255.255.0".
- Página 31 6-2. Configuración de Internet Explorer En un ordenador con WindowsXP SP2, abra primero "Internet Options" y luego "Ad- vanced". Ponga una marca de verificación en "Allow active content to run in files on My Computer". * Si no se pone la marca de verificación no se podrán reproducir los datos de imagen guardados localmente.
-
Página 32: Conexión De La Alimentación
7. Conexión de la alimentación Esta cámara no tiene interruptor de alimentación. Unos 10 segundos después de conectarse la alimentación, la cámara empieza a funcionar y los indicadores LED empiezan a parpadear. Cuando se conecta un PC (Windows XP SP1) a la cámara por primera vez, la cámara empieza a funcionar en unos 30 segundos. -
Página 33: Configuración De La Cámara
* Mantenimiento * Solución de problemas * Glosario URL http://www.ikegami.co.jp/en/products/security/network/index.html * Herramienta de configuración simplificada Esta herramienta ayuda a cambiar la dirección IP de la cámara/codificador de red de una forma sencilla. Para cambiar la dirección IP en múltiples unidades, esto resulta muy conveniente. -
Página 34: Solución De Problemas
10. Solución de problemas Compruebe los puntos siguientes antes de solicitar el servicio de reparaciones. Página de Problema Puntos de comprobación referencia No se suministra * ¿Está bien conectado el cable de alimentación? alimentación. * ¿Está el cable LAN bien conectado a la cámara en el caso de emplear la alimentación PoE? Fallo en el * ¿Es la dirección IP la especificada? -
Página 35: Especificaciones
11. Especificaciones (1) Dispositivo lector: IT-CCD de 8,5 mm Píxeles efectivos : 768(H) x 494(V), 380.000 píxeles aproximadamente Filtro de color Sistema secuencial de línea de diferentes colores (2) Sistema de exploración: Sistema NTSC entrelazado de 2:1 (3) Frecuencia vertical: 59,94 Hz (4) Frecuencia horizontal: 15,734 Hz... -
Página 36: Vista De La Apariencia
(26) Función de Alarma y prealarma (tiempo especificado) grabación de imagen: (27) Función de envío de alarma Suministrada (compatible con POP antes de SMTP/SMTP-AUTH) por correo electrónico: (28) Interfaz física: Ethernet (10Base-T/100Base-TX) (29) Protocolo: TCP/IP, SMTP, POP3, DHCP, HTTP, NTP (30) Monitoreo: Internet Explorer 6.0 (31) Terminal de alarma:... -
Página 37: Garantía Y Servicio Postventa
Este producto va acompañado de una garantía. Lea y rellene la tarjeta de garantía que le ha entregado su concesionario. Guarde esta tarjeta en un lugar seguro. • Consulte a Ikegami Electronics (U.S.A.) Inc. o a su concesionario para obtener información completa acerca de la garantía. Su concesionario hará gratis las reparaciones o reemplazos que necesite su aparato siempre que la garantía esté... - Página 38 37 Brook Avenue, Maywood, New Jersey 07607, U.S.A. Phone: (201) 368-9171, FAX 201-569-1626 Ikegami Electronics (Europe) GmbH Ikegami Strasse 1, 41460 Neuss 1, F.R. Germany TEL. 02131-123-0/FAX 02131-102820 Ikegami Electronics (Europe) GmbH U.K. Branch Unit E1 Cologne Court Brooklands Close, Windmill Road Sunbury-on-Thames Middlesex TW16 7EB, UK TEL.