Tabla de contenido
Publicidad
Idiomas disponibles
Idiomas disponibles
Enlaces rápidos
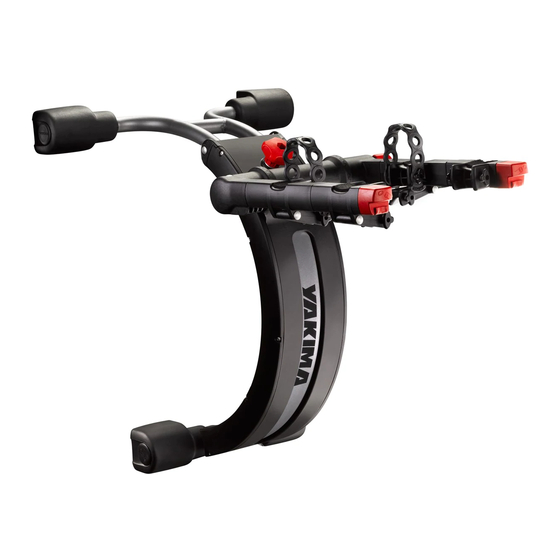
BIKE WHEEL STRAP (1X)
TRUNK SECURITY STRAP (1X)
SOLD SEPARATELY:
IMPORTANT WARNING
IT IS CRITICAL THAT ALL YAKIMA RACKS AND ACCESSORIES BE PROPERLY AND SECURELY ATTACHED TO YOUR VEHICLE. IMPROPER
ATTACHMENT COULD RESULT IN AN AUTOMOBILE ACCIDENT, AND COULD CAUSE SERIOUS BODILY INJURY OR DEATH TO YOU OR TO
OTHERS. YOU ARE RESPONSIBLE FOR SECURING THE RACKS AND ACCESSORIES TO YOUR CAR, CHECKING THE ATTACHMENTS PRIOR
TO USE, AND PERIODICALLY INSPECTING THE PRODUCTS FOR ADJUSTMENT, WEAR, AND DAMAGE. THEREFORE, YOU MUST READ
AND UNDERSTAND ALL OF THE INSTRUCTIONS AND CAUTIONS SUPPLIED WITH YOUR YAKIMA PRODUCT PRIOR TO INSTALLATION
OR USE. IF YOU DO NOT UNDERSTAND ALL OF THE INSTRUCTIONS AND CAUTIONS, OR IF YOU HAVE NO MECHANICAL EXPERIENCE
AND ARE NOT THOROUGHLY FAMILIAR WITH THE INSTALLATION PROCEDURES, YOU SHOULD HAVE THE PRODUCT INSTALLED BY A
PROFESSIONAL INSTALLER.
1033501E-1/21
QuickBack 2/3
YAKIMA 9ft
Security cable
(YAKIMA PART
NUMBER 8007233)
QUICKBACK (1X)
GLASS HATCH ADAPTER (2X)
(For glass or plastic
hatch, or trunk edge.)
Before driving away, read
cautions and warnings at the
end of this instruction.
Part #1033501 Rev. E
Publicidad
Tabla de contenido

Manuales relacionados para Yakima QuickBack 2


Resumen de contenidos para Yakima QuickBack 2
- Página 1 IMPORTANT WARNING IT IS CRITICAL THAT ALL YAKIMA RACKS AND ACCESSORIES BE PROPERLY AND SECURELY ATTACHED TO YOUR VEHICLE. IMPROPER ATTACHMENT COULD RESULT IN AN AUTOMOBILE ACCIDENT, AND COULD CAUSE SERIOUS BODILY INJURY OR DEATH TO YOU OR TO OTHERS.
- Página 2 Prepare QuickBack for installation. Extend sliding arms. Loosen center knob. Install trunk security strap. Open trunk or hatch. Insert anchor end of trunk security strap through opening between trunk or hatch and the vehicle. Be sure strap is between the hinges Thread strap end of trunk security strap of trunk or hatch.
- Página 3 Attach top hooks. Straps should be routed over the frame. Adjust both straps by pulling on free ends of straps toward top hooks, or by pressing the release buttons on the buckles. Note: Leave straps slightly loose. Straps Attach both top strap hooks (labeled TOP) around top edge will be fully tightened in a later step.
- Página 4 BEFORE CLOSING THE HATCH… the pads must be free from contact between hatch door and vehicle’s frame. Straps should be parallel with the top buckles. While supporting the carrier with CLOSE THE HATCH. your body, attach the new straps to Pull firmly on the your carrier’s top buckles.
- Página 5 Raise support arm. Loosen side knob. Extend support arms. Tighten knob. Note: Placement will vary depending on vehicle. Attach lower hooks, and side hooks. Attach both bottom strap hooks (labeled Adjust straps as necessary to attach side strap hooks BOTTOM) to the to the bottom edge of the (labeled SIDE) to upper side edge of trunk, hatch, rear trunk, hatch lid, or rear door, the tie down hooks door, or above, below, or next to the tail lights.
- Página 6 CAUSE STRAPS TO DEVELOP SLACK. To improve stability attach wheel strap. Now that you’ve installed your Yakima QuickBack take a moment to enjoy the beverage of your choice. Use the built in bottle openers to crack Attach frames of bikes together along with open a cold one! front wheel of bike closest to the vehicle.
-
Página 7: Load Limits
Lock up your bikes (Yakima 9ft Security Cable Yakima part number 8007233 sold separately). Insert the slider pin into the lock and lock it. Thread security cable around QuickBack frame and insert through loop. VERIFY THAT THE PIN IS Thread the cable through each SECURE BY PULLING ON bike wheel, and all bike frames. -
Página 8: Important Guidelines
REMOVE ACCESSORY BEFORE ENTERING AN Monday through Friday, AUTOMATIC CAR WASH. 7:00 AM to 5:00 PM, PST this product is covered by yaKIMa’s “love It till you leave It” limited lifetime Warranty to obtain a copy of this warranty, go online to www.yakima.com or email us at... - Página 9 AVeRTISSeMeNT IMPORTANT: IL EST IMPÉRATIF QUE LES PORTE-BAGAGES ET LES ACCESSOIRES YAKIMA SOIENT CORRECTEMENT ET SOLIDEMENT FIXÉS AU VÉHICULE. UN MONTAGE MAL RÉALISÉ POURRAIT PROVOQUER UN ACCIDENT D’AUTOMOBILE, QUI POURRAIT ENTRAÎNER DES BLESSURES GRAVES OU MÊME LA MORT, À VOUS OU À D’AUTRES PERSONNES. VOUS ÊTES RESPONSABLE DE L’INSTALLATION DU PORTE-BAGAGES ET DES ACCESSOIRES SUR VOTRE VÉHICULE, D’EN VÉRIFIER LA SOLIDITÉ...
- Página 10 Préparer le porte-vélo. Allonger les bras coulissants. Desserrer le bouton central. Installer la sangle de sécurité. Ouvrir le coffre ou le hayon. Enfiler les ancrages de la sangle dans l’ouverture entre le couvercle du coffre ou le hayon et le véhicule. S’assurer que la sangle se trouve entre les charnières.
- Página 11 Mettre en place les crochets supérieurs. Les sangles doivent passer par-dessus le cadre. Régler les deux sangles en tirant sur leur brin libre ou en appuyant sur le bouton des boucles. Remarque : laisser un peu de jeu aux sangles ; Accrocher les deux crochets des sangles supérieures (marqués TOP) au on les tendra complètement plus tard.
- Página 12 AVANT DE REFERMER BIEN LE HAYON... S’assurer que les butées ne sont pas coincées entre le hayon et le châssis du véhicule. Les sangles doivent être parallèles, et de la largeur de leurs boucles. Tout en retenant le porte-vélo avec le ferMer le HayON.tirer corps, fixer les nouvelles sangles aux fermement sur les sangles...
- Página 13 Relever les bras. Relever les bras. Resserrer le bouton latéral. Desserrer le bouton latéral. Mettre en place les crochets inférieurs. Remarque : la position variera selon le véhicule. Mettre en place les crochets latéraux. Accrocher les deux crochets des sangles Accrocher les deux crochets des sangles latérales (marqués inférieures (marqués BOTTOM) au rebord inférieur SIDE) au rebord latéral supérieur du coffre, du hayon ou de la...
- Página 14 Mettre en place la sangle de roue Maintenant que vous avez installé pour améliorer la stabilité. votre porte-vélo QuickBack de Yakima, prenez un moment pour apprécier la boisson de votre choix. Profitez du décapsuleur Attacher ensemble les cadres des vélos, incorporé...
- Página 15 Verrouiller les vélos (le câble de verrouillage Yakima de 2,7 m (article Yakima n° 8007233) est vendu à part). Enfiler la pointe dans la serrure et la verrouiller. Enfiler le câble dans le cadre du porte-vélo puis dans sa propre boucle.
-
Página 16: Conseils Importants
7h et 17h, heure du Pacifique. Ce produit est couvert par la garantie limitée « tant que durera notre histoire d’amour » yaKIMa. pour se procurer une copie de cette garantie, aller en ligne à www.yakima.com ou nous envoyer un courriel à... - Página 17 AVISO IMPORTANTe ES FUNDAMENTAL QUE TODOS LOS BASTIDORES Y ACCESORIOS YAKIMA ESTÉN FIJADOS DE MANERA CORRECTA Y SEGURA AL VEHÍCULO. UNA INSTALACIÓN DEFICIENTE PODRÍA CAUSAR UN ACCIDENTE AUTOMOVILÍSTICO Y PROVOCAR HERIDAS GRAVES O LA MUERTE A USTED O A TERCEROS. USTED ES RESPONSABLE DE LA FIJACIÓN SEGURA DE LOS BASTIDORES Y ACCESORIOS AL VEHÍCULO.
- Página 18 Preparación del QuickBack para la instalación. Extienda los brazos ajustables. Afloje la perilla del centro. Instalación de la correa de seguridad del baúl. Abra el baúl o la portezuela. Pase el extremo de anclaje de la correa de seguridad del baúl a través de la abertura que queda entre el baúl o la portezuela y la estructura del...
- Página 19 Fijación de los ganchos superiores. Las correas deben pasar por encima del armazón. Ajuste ambas correas tirando del extremo libre de las correas hacia los ganchos superiores, o presionando los botones de las hebillas. Fije los ganchos superiores de ambas correas (identificados Nota: Deje las correas un poco flojas.
- Página 20 ANTES DE CERRAR LA PORTEZUELA... CORRECTO las almohadillas protectoras no deben estar en contacto con la portezuela ni con la estructura del vehículo. Las correas deben quedar paralelas a las hebillas superiores. Mientras sostiene el portabicicletas con su cierre la cuerpo, sujete las correas del adaptador a POrteZuela.
- Página 21 Extensión de los brazos de soporte. Extienda los brazos de soporte. Apriete la perilla. Afloje la perilla lateral. Nota: La posición variará según el vehículo. Fijación de los ganchos inferiores. Fijación de los ganchos laterales. Fije los ganchos laterales de ambas correas (identificados Fije los ganchos inferiores de ambas correas como SIDE) al borde lateral superior del baúl, de la portezuela, (identificados como BOTTOM) al borde inferior...
- Página 22 AFLOJEN. Para mejorar la estabilidad, ate la correa de rueda. Ahora que ya instaló el QuickBack de Yakima, tómese un momento para gozar su trago preferido. ¡Utilice el destapador de botellas incorporado para Ate los cuadros de bicicletas juntos con la rueda delantera de la que está...
-
Página 23: Límites De Carga
Trabado de las bicicletas (Cable de seguridad 9FT de Yakima, p/n 8007233, vendido por separado). Inserte la clavija en el orificio de cierre y trábelo. Enhebre el cable de seguridad alrededor del armazón del QuickBack y páselo por el lazo de dicho cable. -
Página 24: Pautas Importantes
“mientras dure el romance” de yakima. para obtener una copia de esta garantía, visítenos en www.yakima.com, envíenos un correo electrónico a yakwarranty@yakima. com o llámenos al (888) 925-4621. ¡ c O N S e R V e...