Num'axes CANICOM 800 Manual De Instrucciones
Ocultar thumbs
Ver también para CANICOM 800:
- Manual de instrucciones (84 páginas) ,
- Manual de instrucciones (100 páginas) ,
- Manual de instrucciones (77 páginas)
Tabla de contenido
Publicidad
Idiomas disponibles
Idiomas disponibles
Enlaces rápidos
Publicidad
Capítulos
Tabla de contenido

Manuales relacionados para Num'axes CANICOM 800


Resumen de contenidos para Num'axes CANICOM 800
- Página 1 Guide d’utilisation Fr - 3 User’s guide Gb - 19 Manual de instrucciones Es - 35 Gebrauchsanleitung D - 51 Manuale d’uso It - 69 All manuals and user guides at all-guides.com CANICOM 800-1500 INDICE CO8:CANICOM 800-1500 29/02/08 6:26 Page 1...
- Página 2 CANICOM 800 – CANICOM 1500 satisfont à toutes les dispositions de la Directive N° 1999/5/CE du 07/04/99 du Conseil Européen comply to all dispositions of the European Council Directives below N° 1999/5/CE...
- Página 3 Ces appareils répondent à la norme européenne ETSI EN 300 220. Nous vous remercions d’avoir choisi un appareil de la gamme NUM’AXES. Avant d’utiliser le CANICOM 800 ou le CANICOM 1500, lire attentivement les explications de ce guide que vous conserverez pour toute référence ultérieure.
-
Página 4: Tabla De Contenido
Usure/remplacement de la ou des pile(s) de la télécommande ........11 Usure/remplacement de la pile du ou des collier(s) récepteur(s) ........12 Changement des électrodes ....................13 Vérification de votre CANICOM 800/CANICOM 1500 ............13 Pour obtenir les meilleures performances ............... 13 Ajustement du collier ......................14 L’initiation au collier d’éducation .................. -
Página 5: Composition Du Canicom 1500
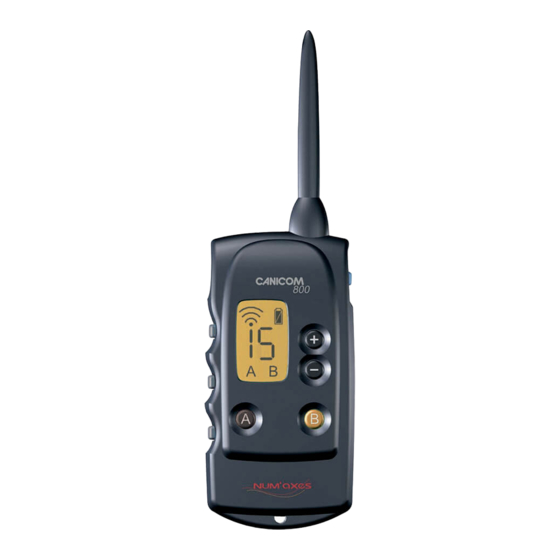
- 1 ou 2 collier(s) CANICOM équipé(s) d’électrodes courtes - 1 ou 2 pile(s) lithium 3 Volts CR2 pour le(s) collier(s) - 1 télécommande CANICOM 800 équipée d’une pile lithium 3 Volts CR2 - 1 lampe néon test - 1 ou 2 jeu(x) d’électrodes longues... - Página 6 : de 1 à 15 Indicateur de sélection du Indicateur de sélection du collier 1, 2, 3 ou 4 collier A ou B Ecran LCD télécommande CANICOM 800 - Fig. 4 Ecran LCD télécommande CANICOM 1500 - Fig. 5...
-
Página 7: Première Mise En Service
- Revissez modérément les 4 vis. Fig. 6 Polarité « - » de la pile Polarité « + » de la pile All manuals and user guides at all-guides.com CANICOM 800-1500 INDICE CO8:CANICOM 800-1500 29/02/08 6:26 Page 7 Joint d’étanchéité... -
Página 8: Important
IMPORTANT : avant de débuter le codage (première mise en service du collier ou recodage), assurez-vous qu’aucune autre personne proche de vous n’utilise son CANICOM 800/CANICOM 1500 ou tout autre produit de la gamme NUM’AXES. Votre collier pourrait enregistrer le code de cette télécommande voisine. - Página 9 All manuals and user guides at all-guides.com Attention, si vous possédez plusieurs colliers, vous devez les recoder l’un après l’autre. Pour recoder le collier « A » ou « 1 » à sangle noire : CANICOM 800-1500 INDICE CO8:CANICOM 800-1500 29/02/08 6:26 Page 9 1.
-
Página 10: Utilisation De La Télécommande
Pour sélectionner le chien sur lequel vous voulez agir, procédez de la façon suivante : Pour le CANICOM 800 : appui bref sur la touche A ou B de la télécommande (la lettre A ou B apparaît en bas de l’écran LCD). -
Página 11: Usure/Remplacement De La Ou Des Pile(S) De La Télécommande
En cas d’usure de la ou des pile(s), les performances (portée radio) de la télécommande se trouvent diminuées. Ne tardez pas à les remplacer ! Pour pouvoir contrôler les piles, mettez en service votre télécommande CANICOM 800/CANICOM 1500 et observez le témoin d’usure des piles affiché sur l’écran LCD. Les divers symboles de cet indicateur ont les significations suivantes : La pile est en bon état. -
Página 12: Usure/Remplacement De La Pile Du Ou Des Collier(S) Récepteur(S)
Fr - 12 Remplacez la ou les pile(s) usagée(s) par de nouvelles piles de même type : - une pile lithium 3V CR2 pour la télécommande CANICOM 800 - deux piles alkalines LR06 pour la télécommande CANICOM 1500 NUM’AXES vous recommande d’utiliser des piles du même modèle et de la même marque que celles qui vous ont été... -
Página 13: Vérification De Votre Canicom 800/Canicom 1500
électrodes longues fournies avec les accessoires. Un serrage modéré à la main sans outil est suffisant (ne pas utiliser de clé). Vous pouvez à tout moment vérifier le bon fonctionnement de votre ensemble CANICOM 800/CANICOM 1500 de la façon suivante : - Avant d’effectuer cette opération, assurez-vous que votre collier est en position «... -
Página 14: L'iNitiation Au Collier D'éDucation
All manuals and user guides at all-guides.com • Ne brûlez pas les étapes pour un dressage positif et serein : - Choisissez un terrain familier où votre chien a l’habitude de travailler. CANICOM 800-1500 INDICE CO8:CANICOM 800-1500 29/02/08 6:26 Page 14 - Déterminez le niveau de stimulation à... -
Página 15: Précautions D'eMploi
- Ne laissez jamais de piles usagées dans l’appareil (télécommande et collier récepteur) : elles peuvent Entretien fuir et endommager votre CANICOM 800 / CANICOM 1500. - Ne laissez pas votre ensemble CANICOM à la portée des enfants. Ne le considérez pas comme un jouet pour vos enfants ou vous-même. -
Página 16: Caractéristiques Techniques
NUM’AXES afin qu’il soit réparé et testé. Ne retournez pas votre produit à votre distributeur. Retournez-le à l’adresse suivante : NUM’AXES - ZAC des Aulnaies - 745 rue de la Bergeresse - BP 30157 - 45161 OLIVET CEDEX. CANICOM 800-1500 INDICE CO8:CANICOM 800-1500 29/02/08 6:26 Page 16 Pour toutes réparations, le service après-vente NUM’AXES a impérativement besoin :... -
Página 17: Autonomie Du Collier Canicom
1. La garantie sera assurée uniquement si la preuve d’achat (facture ou ticket de caisse) est présentée All manuals and user guides at all-guides.com sans rature à NUM’AXES. 2. Cette garantie ne couvre aucun des points suivants : CANICOM 800-1500 INDICE CO8:CANICOM 800-1500 29/02/08 6:26 Page 17... -
Página 18: Accessoires
Pour plus d’informations sur les lieux de collecte des équipements usagés, vous pouvez contacter votre mairie, le service des traitements de déchets ménagers ou nous retourner le produit. All manuals and user guides at all-guides.com CANICOM 800-1500 INDICE CO8:CANICOM 800-1500 29/02/08 6:26 Page 18 745 rue de la Bergeresse –... - Página 19 CANICOM 800 or CANICOM 1500. These devices emit some static magnetic fields (a magnet is located in the remote control) (Frequency = 869 Mhz, at = 250 Mw for CANICOM 800 and 500 Mw for CANICOM 1500). All manuals and user guides at all-guides.com The devices comply with the European Standard ETSI EN 300 220.
- Página 20 Checking/replacing battery(ies) of remote control ............27 Checking/replacing battery of receiver collar(s) .............. 28 Changing the contact points ....................28 How to check that your CANICOM 800/CANICOM 1500 is functioning properly ..... 29 Getting the best results ...................... 29 Fitting the collar ......................... 29 Starting out with the training collar ..................
-
Página 21: Contents Of The Product Canicom 1500
Contents of the product CANICOM 800 - 1 or 2 CANICOM collar(s) fitted with short contact points - 1 remote control CANICOM 800 fitted with 1 lithium 3 Volts CR2 battery - 1 or 2 lithium 3 Volts CR2 battery(ies) for the collar(s) - Página 22 Dog A Selection key dog 2 located black collar Dog 1 yellow collar black collar CANICOM 800 remote control - Diagram 2 CANICOM 1500 remote control - Diagram 3 Indicator of Battery level Indicator of Battery level radio indicator radio...
-
Página 23: First Use From New
- Screw up the 4 screws with care (do not overtighten them). Diagram 6 Polarity « - » of the battery Polarity « + » of the battery All manuals and user guides at all-guides.com CANICOM 800-1500 INDICE CO8:CANICOM 800-1500 29/02/08 6:26 Page 23 Seal N Activate/deactivate the remote control Remote control is supplied with battery(ies) fitted. - Página 24 IMPORTANT : before beginning the coding (first use of the receiver or re-coding), make sure no other person is using his CANICOM 800/CANICOM 1500 or other products from the NUM'AXES range close by. Your receiver could accidentally record the code of his remote control. If that occurs, re-code the remote control with the receiver collar.
-
Página 25: How To Use The Remote Control
Receiver collar can be re-coded indefinitely, either with the same remote control, or with a new CANICOM remote control. Ref. Re-coding procedure. The CANICOM 800 remote control is designed to operate with 1 or 2 receiver collar(s). The CANICOM 1500 remote control is designed to operate with 1, 2, 3 or 4 receiver collar(s). - Página 26 CANICOM 1500 To select the dog you want to train on the remote control: For CANICOM 800: Press the A or B key in order to select the collar (the letter A or B will appear on the LCD screen).
-
Página 27: Checking/Replacing Battery(Ies) Of Remote Control
29/02/08 6:26 Page 27 To check the condition of the battery(ies), turn “on” the remote control CANICOM 800/CANICOM 1500 and look at the battery level indicator on the LCD screen. The symbols which appear indicate the following: Battery fully charged. -
Página 28: Checking/Replacing Battery Of Receiver Collar(S)
Checking/replacing battery of receiver collar(s) WARNING All manuals and user guides at all-guides.com Make sure the polarity is correct CANICOM 800-1500 INDICE CO8:CANICOM 800-1500 29/02/08 6:26 Page 28 To check the condition of the receiver collar battery, observe the On/Off indicator located on the front of the receiver collar: - Battery fully charged: flashes slow green. -
Página 29: How To Check That Your Canicom 800/Canicom 1500 Is Functioning Properly
- Select the receiver collar you want to test on the remote control: For CANICOM 800 : Press the A or B key in order to select the collar (the letter A or B will appear on the LCD screen). -
Página 30: Starting Out With The Training Collar
Should be typically used for training at a location that is familiar to the dog (at the beginning). As the stimulation is continuous, use the lowest intensity and take advantage of the length of the CANICOM 800-1500 INDICE CO8:CANICOM 800-1500 29/02/08... -
Página 31: Maintenance
- In order to maintain water tightness, we recommend the replacement of the seal located in the receiver collar every year. Should your CANICOM 800 / CANICOM 1500 stop working or develop a fault, first read this user’s guide over, then check the batteries (see § Checking/replacing battery of remote control and § Checking replacing battery of receiver collar) and replace them if necessary and retry. -
Página 32: Technical Specifications
Dimensions : H x L x D. 108 mm x 55 mm x 24 mm 132 mm x 62 mm x 31 mm 38 mm x 68 mm x 43 mm CANICOM 800-1500 INDICE CO8:CANICOM 800-1500 29/02/08 6:26 Page 32... -
Página 33: Guarantee Conditions
6. The information contained in this guide may be subject to amendment without prior notice. All manuals and user guides at all-guides.com 7. Photos and drawings are not contractual. Collection and recycling of your device at the end of its life CANICOM 800-1500 INDICE CO8:CANICOM 800-1500 29/02/08 6:26 Page 33 You can purchase spare parts (batteries, straps, additional collar…) from your supplier at any time. - Página 34 Gb - 34 All manuals and user guides at all-guides.com CANICOM 800-1500 INDICE CO8:CANICOM 800-1500 29/02/08 6:26 Page 34 www.numaxes.com internationalsales@numaxes.com...
- Página 35 Estos aparatos se ajustan a la normativa europea ETSI EN 300 220. Todo nuestro agradecimiento por haber eligido un aparato de la gama NUM’AXES. Para obtener de él un rendimiento máximo, lea atentamente, antes de usar al CANICOM 800/CANICOM 1500, las instrucciones de este manual que conservará para cualquiera consulta posterior.
- Página 36 Desgaste/sustitución de la(s) pila(s) del mando a distancia..........43 Desgaste/sustitución de la pila del (de los) collar(es)receptor(es) ........44 Cambio de los electrodos..................... 45 Verificación de su CANICOM 800/CANICOM 1500 .............. 45 Para obtener los mejores resultados.................. 45 Ajuste del collar........................46 Iniciación al collar de adiestramiento .................
-
Página 37: Composición Del Canicom 1500
- 1 o 2 collar(es) receptor(es) CANICOM equipado(s) con electrodos cortos - 1 o 2 pila(s) de litio 3 Volts CR2 para el(los) collar(es) - 1 mando CANICOM 800 equipado con una pila de litio 3 Volts CR2 - 1 lámpara de prueba - 1 o 2 juego(s) de electrodos largos Composición del CANICOM 1500... - Página 38 1 receptor con radio negra correa negra Mando a distancia canicom 800 - Fig. 2 Mando a distancia canicom 1500 - Fig. 3 Indicador Indicador de de emisión radio carga Indicador...
-
Página 39: Primera Puesta En Servicio
Encendido/Apagado . Se apagan las indicaciones sobre la pantalla LCD. Para preservar la duración de la pila, es conveniente cuando no use el CANICOM 800/CANICOM 1500 ponerlo fuera de servicio. N Puesta en/fuera de servicio del o de los collar(es) receptor(es) Un imán situado en el mando permite poner en servicio o fuera de servicio el collar receptor CANICOM. -
Página 40: Importante
IMPORTANTE : Antes de empezar con la codificación (primera o posteriores) se debe tener en cuenta que ninguna otra persona cercana está utilizando un CANICOM 800/CANICOM 1500 o cualquier otro producto de la gama NUM’AXES. Su collar receptor podría registrar el código de ése mando vecino. - Página 41 2. Seleccionar el collar que desean recodificar, procediendo de la manera siguiente : Para el CANICOM 800 : Apoyo breve sobre el botón A o B elegido (la letra A o B aparece abajo de la pantalla LCD).
-
Página 42: Utilización Del Mando A Distancia
CANICOM 1500 Para seleccionar el perro con el que desean controlar : - Para el CANICOM 800 : apoyo breve sobre el botón A o B (la letra A o B aparece abajo de la pantalla LCD) - Para el CANICOM 1500 : apoyo breve sobre el botón 1, 2, 3 o 4 (la cifra 1, 2, 3 o 4 aparece abajo... -
Página 43: Desgaste/Sustitución De La(S) Pila(S) Del Mando A Distancia
En caso de desgaste de la(s) pila(s), las prestaciones (alcance radio) del mando disminuirán. Sustituir la(s) pila(s)! Para comprobar las pilas, poner en servicio su mando CANICOM 800/CANICOM 1500 y controlar el indicador de nivel de carga de la pila sobre la pantalla LCD. Los diferentes símbolos en dicho indicador tienen los siguientes significados : Pila en buen estado. -
Página 44: Desgaste/Sustitución De La Pila Del (De Los) Collar(Es)Receptor(Es)
Es - 44 Sustituir la(s) pila(s) gastada(s) por una(s) pila(s) nueva(s) de mismo tipo : - una pila de litio 3V CR2 para el mando CANICOM 800 - dos pilas LR06 para el mando CANICOM 1500 NUM’AXES recomienda la utilización de pilas de modelo y marca idénticos que las que están proporcionadas con su equipo de educación canina. -
Página 45: Verificación De Su Canicom 800/Canicom 1500
800 y 1500 metros para el CANICOM 1500 (estas distancias pueden variar según el entorno y la configuración del terreno donde se encuentre). Las prestaciones de su CANICOM 800/CANICOM 1500 serán óptimas si respetan las siguientes recomendaciones : - Para un alcance correcto de las ondas, debe sostener su mando de manera que la antena esté al descubierto. -
Página 46: Iniciación Al Collar De Adiestramiento
- Escoja un terreno que su perro esté acostumbrado a frecuentar. - Determine el nivel de estímulo desde el cual su perro reacciona empezando por el nivel de intensidad más bajo y aumente paulatinamente. CANICOM 800-1500 INDICE CO8:CANICOM 800-1500 29/02/08 6:26 Page 46 - Es preciso elegir el momento propicio para presionar el botón : exactamente cuando el perro... -
Página 47: Precauciones De Uso
CANICOM 800 / CANICOM 1500. - Si se prevé no usar el CANICOM 800 / CANICOM 1500 durante un período prolongado del orden de 3 meses (fin de temporada de caza), se recomienda retirar la pila del mando a distancia y del collar All manuals and user guides at all-guides.com... -
Página 48: Características Técnicas
- la fecha de compra (factura o ticket de compra) Si olvida usted uno de estos elementos, el Servicio Post Venta le facturará el arreglo. All manuals and user guides at all-guides.com CANICOM 800-1500 INDICE CO8:CANICOM 800-1500 29/02/08 6:26 Page 48... -
Página 49: Autonomía Del Collar Receptor Canicom
DISTRIBUIDOR o a NUM’AXES All manuals and user guides at all-guides.com - el deterioro del producto resultante de: - la negligencia o error del usuario (por ejemplo: mordeduras, roturas, fisuras, etc.), CANICOM 800-1500 INDICE CO8:CANICOM 800-1500 29/02/08 6:26 Page 49 - una utilización contraria a las instrucciones o no prevista... -
Página 50: Reciclaje De Aparatos Electrónicos Al Final De Su Vida
Adoptando este comportamiento, hará un gesto con el medio ambiente, contribuyendo así a la preservación de los recursos naturales y a la protección de la salud humana. All manuals and user guides at all-guides.com CANICOM 800-1500 INDICE CO8:CANICOM 800-1500 29/02/08 6:26 Page 50 www.numaxes.com... - Página 51 Wir danken Ihnen, dass Sie sich für ein Gerät aus der NUM’AXES Produktreihe entschieden haben. Sie sollten vor dem Gebrauch von CANICOM 800 oder CANICOM 1500 die Anweisungen dieser Anleitung sorgfältig durchlesen und diese zur Konsultation bei später auftretenden Fragen aufbewahren.
- Página 52 D - 52 Innhaltsverzeichnis: Lieferumfang des CANICOM 800 ..................53 Lieferumfang des CANICOM 1500 ..................53 Vorstellung des Gerätes....................... 53 Erste Inbetriebnahme ......................55 Bedienung des Handsenders....................57 Zustand/Auswechseln der Batterie(n) des Handsenders ..........60 Zustand/Auswechseln der Batterie des/der Empfänger-Halsbandes(¨er) ...... 61 Auswechseln der Kontakte ....................
-
Página 53: Lieferumfang Des Canicom 1500
Lieferumfang des CANICOM 800 - Ein oder zwei CANICOM-Halsband/Halsbänder, mit Kurzen Kontakten - Ein oder zwei 3V Lithium-Batterie(n) CR2 für das/die CANICOM-Halsband/Halsbänder - Einen Handsender CANICOM 800, mit einer Batterie 3V CR2 - 1 Testlampe - 1 oder 2 Paar langer Kontakte... - Página 54 Hunde A + (neue) Kodierung Wahltaste Halsbandes Gelbes Halsband Schwarzes Halsband Hunde 1 + (neue) Kodierung Schwarzes Halsband CANICOM 800 - Handsender - Abb. 2 CANICOM 1500 - Handsender - Abb. 3 Funksendeanzeige Batteriestands- anzeige Batteriestands- Funksendeanzeige anzeige Anzeige der...
-
Página 55: Erste Inbetriebnahme
- Drehen Sie die vier Schrauben fest. Polarität « - » der Batterie Polarität « + » der Batterie Abb. 6 All manuals and user guides at all-guides.com CANICOM 800-1500 INDICE CO8:CANICOM 800-1500 29/02/08 6:26 Page 55 Dichtung N Ein- und Ausschalten des Handsenders Beim Kauf des Gerätes befindet sich die Batterie bereits im Handsender. - Página 56 Zusätzliche Empfänger-Halsbänder erhalten Sie später auf Wunsch. WICHTIG: Bitte vergewissern Sie sich vor der Frequenzabstimmung (erste Inbetriebnahme des Empfänger-Halsbandes oder neue Abstimmung), dass sich kein CANICOM 800 / CANICOM 1500 oder kein anderes NUM’AXES Gerät in Ihrer Umgebung in Betrieb befindet. Es könnte ansonsten zur Kodierung Ihres Empfänger-Halsbandes mit der fremden Komponente kommen.
-
Página 57: Bedienung Des Handsenders
- Hund 1 (schwarzes Halsband), 2 (gelbes Halsband), 3 (oranges Halsband) oder 4 (blaues Halsband) für das CANICOM 1500 Um den Hund, auf welchem Sie einwirken wollen, auszuwählen: Für das CANICOM 800: A oder B-Taste kurz drücken (der Buchstabe A oder B erscheint unter dem Bildschirm). - Página 58 Kontakten am Empfänger-Halsband abgegeben, um Ihren Hund aus der Entfernung vor etwas warnen. Die Sendeanzeige erscheint auf dem LCD-Bildschirm des Handsenders; das CANICOM 800-1500 INDICE CO8:CANICOM 800-1500 Leuchtzeichen des Empfänger-Halsbandes ändert sich von grünen Blinken auf rotes Dauerleuchten,...
- Página 59 Hundes. O Aufteilung der Ströme Das CANICOM 800/1500 verfügt über 15/18 Stromstufen, die Sie über die +/- Tasten wählen können. Die Aufteilung der Ströme ist nicht linear sondern logarythmisch. Die Stufe 1-6 steigen nur sehr langsam an. Ab der Stufe 7 steigen die Stufen deutlich stärker an.
-
Página 60: Zustand/Auswechseln Der Batterie(N) Des Handsenders
- Lösen Sie die Schraube auf der Rückseite des Handsenders und nehmen Sie den Batteriedeckel ab. - Entfernen Sie die leere(n) Batterie(n). Für CANICOM 800: Legen Sie die neue Batterie (3V Lithium CR2) ein, entsprechend der aufgedruckten Polarität. Für CANICOM 1500: Legen Sie die neuen Batterie (LR06) ein, entsprechend der aufgedruckten Polarität. -
Página 61: Zustand/Auswechseln Der Batterie Des/Der Empfänger-Halsbandes(¨eR)
Ziehen Sie die Kontakte nur handfest an, da Sie sonst die Aufnahme auf der Platine beschädigen könnten (Benutzen Sie keinen Schraubenschlüssel). So können Sie die Funktion Ihres CANICOM 800 / CANICOM1500 Trainings-Systems überprüfen: - Versichern Sie sich, dass das Empfänger-Halsband “ausgeschaltet” ist. -
Página 62: So Erzielen Sie Die Besten Ergebnisse
- Wählen Sie auf dem Handsender das Empfänger-Halsband aus, das Sie testen möchten, beim kurzem Drücken auf die entsprechende Taste: Für das CANICOM 800: Taste A = Halsband mit schwarzem Halsgurt – Taste B = Halsband mit gelbem Halsgurt Für das CANICOM 1500: Taste 1 = Halsband mit schwarzem Halsgurt – Taste 2 = Halsband mit gelbem Halsgurt –... -
Página 63: Die Gewöhnung An Das Halsband Zur Hundeerziehung
All manuals and user guides at all-guides.com - Wählen Sie anfangs eine vertraute Umgebung, in der sich Ihr Hund auskennt. - Beginnen Sie immer mit dem geringst möglichen Stromimpuls und achten Sie auf die Reaktion CANICOM 800-1500 INDICE CO8:CANICOM 800-1500 29/02/08 6:26 Page 63 Ihres Hundes. -
Página 64: Vorsichtsmaßnahmen
6:26 Page 64 Pflege und Ihr CANICOM 800 / CANICOM 1500 beschädigen. - Sie sollten das Gerät von Kindern fernhalten. Verwenden Sie es nicht als Spielzeug für Ihre Kinder oder Sie selbst. - Benutzen Sie zur Reinigung keine Lösungsmittel oder Benzin. Waschen Sie das Halsband regelmäßig Beim Nicht-Funktionieren Ihres Gerätes... - Página 65 Reset : Verbinden Sie die beiden Batteriepole mit einem metallischen Gegenstand Je nach der Fehlfunktion werden Sie beratet, das Produkt zurückzuschicken, so das es repariert und Abb. 11 getestet wird. CANICOM 800-1500 INDICE CO8:CANICOM 800-1500 29/02/08 6:26 Page 65 Der Kundendienst braucht unbedingt für alle Reparaturen:...
-
Página 66: Technische Merkmale
Autonomie des CANICOM – Halsbandes: All manuals and user guides at all-guides.com Batterieanzeige Anzeige auf dem Display Anzeige auf dem Display Anzeigelampe Impulsstufen CANICOM 800-1500 INDICE CO8:CANICOM 800-1500 29/02/08 6:26 Page 66 Betriebstemperatur Zwischen – 20°C und +40°C Zwischen – 20°C und +40°C Zwischen –... -
Página 67: Garantiebedingungen
All manuals and user guides at all-guides.com 7. Die Photos und Zeichnungen können von den Produkten abweichen. Sammeln und Recycling der Geräte am Ende ihres Lebens CANICOM 800-1500 INDICE CO8:CANICOM 800-1500 29/02/08 6:26 Page 67 Sie können jederzeit die Zubehöre (Batterie, Gurt, zusatz Halsband…) bei Ihrem Vertreiber erwerben. - Página 68 D - 68 All manuals and user guides at all-guides.com CANICOM 800-1500 INDICE CO8:CANICOM 800-1500 29/02/08 6:26 Page 68 www.numaxes.com internationalsales@numaxes.com...
- Página 69 Questo apparecchio emette campi magnetici statici (il magnete è situato all’ interno del telecomando) e onde elettromagnetiche ad alta frequenza (frequenza = 869 Mhz, potenza d’emissione Max = 250 mW per CANICOM 800 e 500 mW per CANICOM 1500). All manuals and user guides at all-guides.com CANICOM 800 e CANICOM 1500 sono conformi alle normative Europee ETSI EN 300 220.
- Página 70 Sostituzione pila telecomando..................... 78 Pila collare ..........................78 Sostituzione pila collare ....................... 78 Sostituzione elettrodi......................78 Verifica del correto funzionamento CANICOM 800/CANICOM 1500 ........78 Per ottenere migliori prestazioni..................78 Posizionamento del collare....................79 Regole di base per utilizzare il collare d’addestramento........... 79 All manuals and user guides at all-guides.com...
-
Página 71: Presentazione Del Prodotto
CANICOM 800 - 1 o 2 collari CANICOM - 1 pila lithium CR2 da 3V per ogni collare - Telecomando CANICOM 800 completo di pila - Lampadina test - 1 coppia di elettrodi lunghi per ogni collare - Collarino porta telecomando... - Página 72 Magnete accensione e spegnimento collare Selezione collare Selezione collare spegnimento collare A Nero 2 Giallo Selezione collare 1 Nero Telecomando CANICOM 800 - Fig. 2 Telecomando CANICOM 1500 - Fig. 3 Indicatore Indicatore emissione radio carica Indicatore Indicatore della pila...
-
Página 73: Primo Utilizzo
- Riavvitate moderatamente le 4 viti. Fig. 6 Polarità - della pila Polarità + della pila All manuals and user guides at all-guides.com CANICOM 800-1500 INDICE CO8:CANICOM 800-1500 29/02/08 6:26 Page 73 Guarnizione a tenuta stagna N Accensione/spegnimento del telecomando e dei collari N.B.: Al momento dell’acquisto la pila è... -
Página 74: Codifica Telecomando/Collare
Ciascun telecomando ha un proprio codice radio. La codifica telecomando/collare può essere effettuata sia alla prima attivazione del CANICOM 800/CANICOM 1500, sia in occasione dell'aggiunta di collari supplementari, sia nel caso in cui dobbiate sostituire il telecomando o un collare. -
Página 75: Utilizzo Del Telecomando
Per scegliere il cane sul quale volete agire, procedete nel modo seguente: CANICOM 800: premere A o B (sul display del telecomando appare la selezione desiderata) CANICOM 1500: premere 1, 2, 3 o 4 (sul display del telecomando appare la selezione desiderata) - Página 76 O Tasti di regolazione del livello di stimolazione «+» e «- »: I tasti +/- permettono di regolare rapidamente il livello di stimolazione del collare, secondo necessità. Sul telecomando CANICOM 800 sono disponibili 15 livelli. Sul telecomando CANICOM 1500 sono disponibili 18 livelli.
-
Página 77: Pila Telecomando
Fig. 9 Fig. 10 Il telecomando CANICOM 800 ha 1 pila litio tipo CR2 da 3V Il telecomando CANICOM 1500 ha 2 pile stilo alcaline tipo AA da 1,5V LR06 NUM’AXES raccomanda di utilizzare pile dello stesso modello e della stessa marca, come quelle che trovate già... -
Página 78: Verifica Del Correto Funzionamento Canicom 800/Canicom 1500
Per ottenere le migliori prestazioni 4. Selezionate sul telecomando il collare da provare ( A o B per CANICOM 800/1, 2, 3 o 4 per CANICOM 1500). 5. Premete il tasto stimolazioni C o F del telecomando. La lampadina test si deve illuminare, indicando che il collare emette stimolazioni e quindi funziona correttamente. -
Página 79: Posizionamento Del Collare
All manuals and user guides at all-guides.com • Il cane deve avere almeno 6 mesi ad aver appreso i comandi base, come «seduto» o «terra». • Deve essere in buona salute, non avere problemi cardiaci, epilessia o disturbi comportamentali. CANICOM 800-1500 INDICE CO8:CANICOM 800-1500 29/02/08 6:26 Page 79 •... -
Página 80: Manutenzione
- Per la pulizia del vostro apparecchio utilizzate solo un panno morbido e una soluzione detergente All manuals and user guides at all-guides.com neutra, evitando assolutamente l’uso di diluenti o benzina. - Per preservare l’impermeabilità del collare, raccomandiamo di sostituire la guarnizione ogni anno. CANICOM 800-1500 INDICE CO8:CANICOM 800-1500 29/02/08 6:26 Page 80 Prima di affermare che il collare “non funziona”, assicuratevi che il problema riscontrato non sia dovuto ad... -
Página 81: Caratteristiche Tecniche
- 2 mesi in utilizzo intensivo : pari a 5 000 stimoliazioni di 2 secondi al massimo livello All manuals and user guides at all-guides.com Cinghia reg. da 20 a 50cm Se il ricevitore non viene utilizzato per un lungo periodo, si consiglia di spegnere il collare. CANICOM 800-1500 INDICE CO8:CANICOM 800-1500 29/02/08 6:26 Page 81 NUM’AXES e CANICOM Srl garantiscono il prodotto contro ogni difetto di fabbricazione per 2 anni dalla... -
Página 82: Accessori
I rivenditori e gli utilizzatori dei prodotti distribuiti da CANICOM Srl, possono contare su Raccolta e riciclaggio del vostro vecchio apparecchio un’interlocutore attento e disponibile, in grado di risolvere qualsiasi problema, con la serietà e la CANICOM 800-1500 INDICE CO8:CANICOM 800-1500 29/02/08 6:26 Page 82 professionalità... - Página 83 All manuals and user guides at all-guides.com CANICOM 800-1500 INDICE CO8:CANICOM 800-1500 29/02/08 6:26 Page 83 print : www.easyflyer.fr...
- Página 84 All manuals and user guides at all-guides.com CANICOM 800-1500 INDICE CO8:CANICOM 800-1500 29/02/08 6:26 Page 84 www.numaxes.com...