Tabla de contenido
Publicidad
Idiomas disponibles
Idiomas disponibles
Enlaces rápidos
1
2
Lieferumfang
2
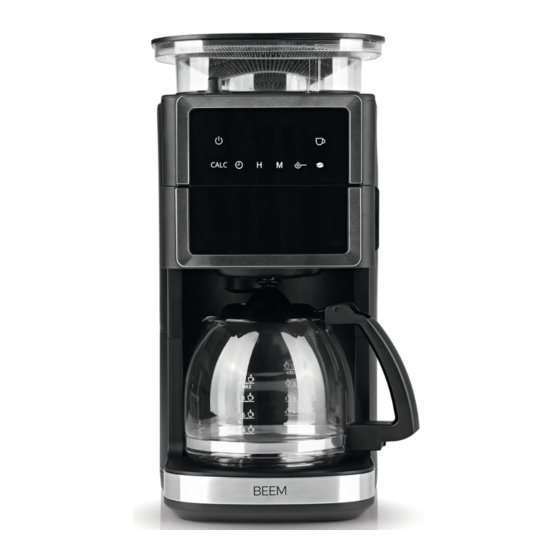
Auf einen Blick
3
Informationen zu Deiner Gebrauchsanleitung
3
Bestimmungsgemäßer Gebrauch
4
Sicherheitshinweise
7
Vor dem ersten Gebrauch
7
Gerät aufstellen und anschließen
8
Bedienung und Betrieb
8
Uhrzeit
8
Kaffeebohnen einfüllen
8
Mahlgrad einstellen
8
Wassertank füllen
9
Filter einsetzen
9
Tassenanzahl einstellen
9
Kaffeestärke einstellen
9
Aroma-Plus-Funktion
10
Warmhaltefunktion
10
Tropfstopp
10
Zubereitung
10
Kaffee mit Kaffeebohnen zubereiten
11
Kaffee mit Kaffeepulver zubereiten
11
Kaffeezubereitung mit Zeitvorwahl
12
Zeitvorwahl deaktivieren
12
Reinigung und Pfl ege
12
Mahlwerkschacht reinigen
13
Isolierkanne reinigen
13
Entkalken
14
Aufbewahrung
14
Fehlerbehebung
15
Gewährleistung und Haftungsbeschränkungen
16
Technische Daten
16
Entsorgung
02576_04233_04260_Inlay_DE-EN-FR-ES-IT_A5_V1.indb 1
02576_04233_04260_Inlay_DE-EN-FR-ES-IT_A5_V1.indb 1
DE
23.06.2021 08:24:15
23.06.2021 08:24:15
Publicidad
Tabla de contenido
Solución de problemas

Manuales relacionados para Beem 380401


Resumen de contenidos para Beem 380401
- Página 1 Lieferumfang Auf einen Blick Informationen zu Deiner Gebrauchsanleitung Bestimmungsgemäßer Gebrauch Sicherheitshinweise Vor dem ersten Gebrauch Gerät aufstellen und anschließen Bedienung und Betrieb Uhrzeit Kaffeebohnen einfüllen Mahlgrad einstellen Wassertank füllen Filter einsetzen Tassenanzahl einstellen Kaffeestärke einstellen Aroma-Plus-Funktion Warmhaltefunktion Tropfstopp Zubereitung Kaffee mit Kaffeebohnen zubereiten Kaffee mit Kaffeepulver zubereiten Kaffeezubereitung mit Zeitvorwahl Zeitvorwahl deaktivieren...
-
Página 2: Lieferumfang
Lieferumfang • Kaffeemaschine • je nach Version: Glaskanne und / oder Isolierkanne • Kaffeebohnenfach • Reinigungsbürste • Dosierlöffel • Filtereinsatz • Permanentfi lter • Gebrauchsanleitung Überprüfe den Lieferumfang auf Vollständigkeit und die Bestandteile auf Transportschäden. Verwende das Gerät bei Schäden nicht, sondern kontaktiere den Kundenservice. Entferne sämtliches Verpackungsmaterial sowie eventuell vorhandene Schutzfolien und Transportschutz. -
Página 3: Bestimmungsgemäßer Gebrauch
Du Dich für diese Kaffeemaschine entschieden hast. Solltest Du Fragen zum Gerät sowie zu Ersatz- / Zubehörteilen haben, kontaktiere den Kundenservice über unsere Website: www.beem.de Informationen zu Deiner Gebrauchsanleitung Lies vor dem ersten Gebrauch des Gerätes die Gebrauchsanleitung sorgfältig durch und be wahre sie zum späteren Nachlesen auf. -
Página 4: Sicherheitshinweise
Sicherheitshinweise WARNUNG: Alle Sicherheitshinweise, Anweisungen, Bebilderungen und technischen Daten, mit denen dieses Gerät versehen ist, beachten. Versäumnisse bei der Einhaltung der Sicherheitshinweise und Anweisungen können elektrischen Schlag, Brand und / oder Verletzungen verursachen. Dieses Gerät kann von Personen mit reduzierten physischen, sen- •... - Página 5 Kundenservice oder autorisierte Fachhändler ersetzt bzw. repariert werden, um Gefährdungen zu vermeiden. Unbedingt die Hinweise im Kapitel „Reinigung und Pfl ege“ • beachten. GEFAHR – Stromschlaggefahr • Das Gerät nur in geschlossenen Räumen verwenden. • Das Gerät nicht in Räumen mit hoher Luftfeuchtigkeit verwenden. •...
- Página 6 • Darauf achten, dass die Anschlussleitung keine Stolpergefahr darstellt. Die Anschlussleitung darf nicht von der Aufstellfl äche herab hängen, um ein Herunterreißen des Gerätes zu verhindern. WARNUNG – Brandgefahr • Das Gerät nicht zusammen mit anderen Verbrauchern (mit hoher Wattleistung) an eine Mehrfachsteckdose anschließen, um eine Überlastung und ggf.
-
Página 7: Vor Dem Ersten Gebrauch
Vor dem ersten Gebrauch 1. Wische das Gerät mit einem sauberen, feuchten Tuch ab. Spüle die Kaffeekanne (6) den Filtereinsatz und den Permanentfi lter sowie den Dosierlöffel mit etwas Spülmittel und klarem Wasser ab. 2. Stelle das Gerät auf und schließe es an (siehe Kapitel „Gerät aufstellen und anschließen“). 3. -
Página 8: Kaffeebohnen Einfüllen
Bedienung und Betrieb Uhrzeit Sobald der Netzstecker in eine Steckdose gesteckt wird, geht die Displaybeleuchtung an und die Zeitanzeige 12:00 blinkt auf. Die Uhr verfügt über ein 24-Stunden-Zeitformat. 1. Stelle die Stunden durch Berühren des Feldes H (21) ein. 2. Stelle die Minuten durch Berühren des Feldes M (19) ein. Die Uhrzeit bleibt so lange gespeichert, bis eine neue Uhrzeit eingestellt oder das Gerät vom Strom getrennt wurde. -
Página 9: Filter Einsetzen
Filter einsetzen 1. Öffne das Filterfach (5) . 2. Setze den Filtereinsatz in das Filterfach. 3. Lege den Permanentfi lter in den Filtereinsatz ein (Bild G). 4. Schließe das Filterfach wieder. Es muss einrasten. Tassenanzahl einstellen Bei der Zubereitung mit Kaffeebohnen muss die Tassenanzahl eingestellt werden. Berühre das Feld (14) so oft, bis auf dem Display die gewünschte Tassenanzahl (15) angezeigt wird. -
Página 10: Kaffee Mit Kaffeebohnen Zubereiten
Warmhaltefunktion Das Gerät verfügt über eine automatische Warmhaltefunktion. Die Warmhalteplatte bleibt nach jedem Brühvorgang für ca. 40 Minuten eingeschaltet. Soll die Warmhaltefunktion vorher beendet werden, berühre das Feld (26). Schalte die Warmhaltefunktion bei Verwendung mit Isolierkanne vor dem Start ab, indem Du das Feld (14) für ca. -
Página 11: Kaffee Mit Kaffeepulver Zubereiten
Soll der Brühvorgang vorzeitig abgebrochen werden, berühre das Feld . Die Anzeige blinkt nicht mehr und das Gerät ist im Standby-Modus. Nach Beendigung des Brühvorganges ertönen zwei Signaltöne und das Gerät schaltet automa- tisch die Warmhalteplatte an (siehe Kapitel „Bedienung und Betrieb“ – „Warmhaltefunktion“). Kaffee mit Kaffeepulver zubereiten 1. -
Página 12: Zeitvorwahl Deaktivieren
Zeitvorwahl deaktivieren Um die eingestellte Zeitvorwahl zu deaktivieren, berühre das Feld (23) für ca. 5 – 7 Sekun- den. Die Anzeige (22) erlischt und die Programmierung ist deaktiviert. Die voreingestellte Zeitvorwahl bleibt jedoch erhalten und kann jederzeit wieder aktiviert werden, bis eine neue Zeitvorwahl einprogrammiert oder das Gerät vom Strom getrennt wurde. - Página 13 Erste Anzeichen, dass eine Entkalkung notwendig ist, sind starke Dampfentwicklung und ver- langsamtes Brühen des Kaffees. Zur Entkalkung empfehlen wir das BEEM Premium Entkalker Konzentrat. Das effi ziente und lebensmittelsichere sowie umweltschonende BEEM Premium Entkalker Konzentrat ist im aus- gewählten Fachhandel, über unsere Homepage www.beem.de oder auf Anfrage bei unserem Kundenservice erhältlich.
-
Página 14: Fehlerbehebung
Entkalken mit dem BEEM Premium Entkalker Konzentrat 1. Befülle den Wassertank (10) bis zur 8-Tassen-Markierung mit einer Konzentrat-Wasser- Lösung von maximal 1:20 (Ein Teil Konzentrat und 20 Teile Wasser). 2. Berühre das Feld CALC (25), um das Gerät einzuschalten und den Entkalkungsvorgang zu starten. -
Página 15: Gewährleistung Und Haftungsbeschränkungen
Problem Mögliche Ursache Behebung Fülle nur die für die gewünschte Es befi ndet sich zu viel Wasser Tassenanzahl erforderliche im Wassertank (10). Wassermenge in den Wassertank. Der Kaffee ist zu dünn. Es befi ndet sich zu wenig Fülle die für die gewünschte Kaffee im Permanentfi... -
Página 16: Technische Daten
Technische Daten Artikelnummer: 02576 04233 04260 Version: Glaskanne Isolierkanne Glas- und Isolierkanne Modellnummer: 380401 380402 380403 Spannungsversorgung: 220 – 240 V ~ 50 – 60 Hz Leistung: 1000 W Kapazität Wassertank: 0,25 bis 1,25 Liter (2 – 10 Tassen) Kapazität Kaffeebohnenfach:... - Página 17 Items Supplied At A Glance Information About Your Operating Instructions Intended Use Safety Notices Before Initial Use Setting Up and Connecting the Device Handling and Operation Time Adding Coffee Beans Setting the Grinding Fineness Filling the Water Tank Inserting the Filter Setting the Number of Cups Setting the Coffee Strength “Added Flavour”...
-
Página 18: Items Supplied
Items Supplied • Coffee machine • Depending on version: Glass jug and / or thermal jug • Coffee bean compartment • Cleaning brush • Measuring spoon • Filter insert • Permanent fi lter • Operating instructions Check the items supplied for completeness and the components for transport damage. If you fi nd any damage, do not use the device but contact our customer service department. -
Página 19: Intended Use
We are delighted that you have chosen this coffee machine. If you have any questions about the device and about spare parts/accessories, contact the customer service department via our website: www.beem.de Information About Your Operating Instructions Before using the device for the fi rst time, please read through the operating instructions carefully and keep them for future reference. -
Página 20: Safety Notices
Safety Notices WARNING: Note all safety notices, instructions, illustrations and technical data provided with this device. Failure to follow the safety notices and instructions may result in electric shock, fi re and / or injuries. This device may be used by people with reduced physical, sensory •... - Página 21 by the manufacturer, customer service department or authorised distributors in order to avoid any hazards. It is essential to follow the instructions in the “Cleaning and Care” • chapter. DANGER – Danger of Electric Shock • Use the device only in closed rooms. •...
- Página 22 • Make sure that the connecting cable does not present a trip hazard. The connecting cable should not hang down from the surface on which the device is placed in order to prevent the device from being pulled down. WARNING – Danger of Fire •...
-
Página 23: Before Initial Use
Before Initial Use 1. Wipe the device with a clean, damp cloth. Rinse the coffee jug (6), the fi lter insert and the permanent fi lter and the measuring spoon with a little detergent and clear water. 2. Set up the device and connect it (see the “Setting Up and Connecting the Device” chapter). 3. -
Página 24: Handling And Operation
Handling and Operation Time As soon as the mains plug is plugged into a plug socket, the display lighting turns on and the time display 12:00 fl ashes. The clock has a 24-hour time format (AM / PM). 1. Set the hours by touching the fi eld H (21). 2. -
Página 25: Inserting The Filter
Inserting the Filter 1. Open the fi lter compartment (5) . 2. Place the fi lter insert into the fi lter compartment. 3. Insert the permanent fi lter into the fi lter insert (Picture G). 4. Close the fi lter compartment again. It must engage. Setting the Number of Cups The number of cups must be set when making coffee with coffee beans. -
Página 26: Keep-Warm Function
Keep-Warm Function The device has an automatic keep-warm function. The hotplate remains switched on for approx. 40 minutes after each brewing process. If the keep-warm function is to be ended before this, touch the fi eld (26). If you are using the thermal jug, switch off the keep-warm function before you start by touching the fi... -
Página 27: Making Coffee With A Preset Time
To end the brewing process prematurely, touch the fi eld . The indicator stops fl ashing and the device is in standby mode. At the end of the brewing process, you will hear two beeps and the device automatically switches on the hotplate (see the “Handling and Operation”... -
Página 28: Deactivating The Preset Time
Deactivating the Preset Time To deactivate the preset time, touch the fi eld (23) for approx. 5 – 7 seconds. The indicator (22) goes out and the programming is deactivated. However, the preset time is retained and can be reactivated at any time until a new preset time is programmed in or the device has been disconnected from the power supply. - Página 29 (at least every 4 weeks). We recommend that you do this using BEEM Premium Cleaning Tablets. They will remove the residues quickly and easily. In addition, the cleaning tablets are gentle on the material and guarantee food-safe and environmentally friendly cleaning - ensuring an authentic coffee fl...
-
Página 30: Troubleshooting
Descaling with the BEEM Premium Descaler Concentrate 1. Fill the water tank (10) up to the 8-cup marking with a concentrate/water solution of no more than 1:20 (one part concentrate to 20 parts water). 2. Touch the fi eld CALC (25) to switch on the device and start the descaling process. The indicator CALC (24) fl... -
Página 31: Warranty And Limitations Of Liability
Problem Possible cause Pour only the quantity of water There is too much water in the required for the number of cups water tank (10). you want into the water tank. The coffee is too weak. There is not enough coffee in the Pour in the quantity of coffee permanent fi... -
Página 32: Technical Data
02576 04233 04260 Version: Glass jug Thermal jug Glass and thermal jug Model number: 380401 380402 380403 Voltage supply: 220 – 240 V ~ 50 – 60 Hz Power: 1000 W Capacity of water tank: 0.25 to 1.25 litres (2 – 10 cups) - Página 33 Composition Aperçu général Informations sur votre mode d'emploi Utilisation conforme Consignes de sécurité Avant la première utilisation Mise en place et raccordement de l'appareil Manipulation et fonctionnement Heure Remplissage des grains de café Réglage de la fi nesse de mouture Remplissage du réservoir d'eau Mise en place du fi...
-
Página 34: Aperçu Général
Composition • Machine à café • selon la version : Cafetière en verre et/ou cafetière isotherme • Bac à grains de café • Brosse de nettoyage • Mesurette • Porte-fi ltre • Filtre permanent • Mode d’emploi Assurez-vous que l'ensemble livré est complet et que les composants ne présentent pas de dommages imputables au transport. -
Página 35: Utilisation Conforme
Félicitations pour l’acquisition de cette machine à café. Pour toute question concernant cet appareil et ses pièces de rechange et accessoires, veuillez contacter le service après-vente à partir de notre site Internet : www.beem.de Informations sur votre mode d'emploi Veuillez lire attentivement le mode d'emploi avant la première utilisation de l’appareil et conservez-le précieusement pour toute consultation ultérieure. -
Página 36: Consignes De Sécurité
Consignes de sécurité AVERTISSEMENT : prière d’observer l'intégralité des consignes de sécurité, des instructions, des illustrations et des caractéristiques techniques dont est doté cet appareil. Tout manquement aux consignes de sécurité et aux instructions données peut provoquer une décharge électrique, un incendie et/ ou des blessures. - Página 37 Ne procéder à aucune modifi cation sur l’appareil. Ne pas remplacer • le cordon de raccordement soi-même. Si l'appareil en soi ou son cordon de raccordement sont endommagés, c'est au fabricant, au service après-vente ou à un représentant agréé qu'il revient de les réparer ou remplacer afi...
- Página 38 • Ne pas plonger la main dans le bac à grains de café, ni non plus dans la chambre du broyeur. Ne rien y introduire quand l’appareil est en marche ! • Pour la propre sécurité de l’utilisateur, l'appareil et le cordon de raccordement doivent être contrôlés avant chaque mise en marche afi...
-
Página 39: Avant La Première Utilisation
Avant la première utilisation 1. Essuyez l'appareil avec un chiffon propre et humide. Rincez la cafetière (6), le porte-fi ltre et le fi ltre permanent, de même que la mesurette à l’eau claire avec un peu de produit vaisselle. 2. Installez et raccordez l’appareil (voir paragraphe « Mise en place et raccordement de l'appareil »). -
Página 40: Manipulation Et Fonctionnement
Manipulation et fonctionnement Heure Dès que la fi che est branchée sur une prise, l’écran s’allume et l’affi chage de l’heure 12:00 clignote. L’horloge est au format 24 heures. 1. Réglez les heures en effl eurant le champ H (21). 2. Réglez les minutes en effl eurant le champ M (19). L'heure reste enregistrée jusqu’à... - Página 41 Mise en place du fi ltre 1. Ouvrez le compartiment à fi ltre (5). 2. Placez le porte-fi ltre dans son le compartiment à fi ltre. 3. Logez le fi ltre permanent dans le porte-fi ltre (illustration G). 4. Refermez le compartiment à fi ltre. Assurez-vous de son bon enclenchement. Réglage du nombre de tasses Lors de la préparation avec des grains de café, le nombre de tasses doit être réglé.
-
Página 42: Fonction De Maintien Au Chaud
Fonction de maintien au chaud L'appareil est doté d'une fonction de maintien au chaud automatique. La plaque de maintien au chaud reste allumée pendant env. 40 minutes après chaque préparation du café. Si la fonction de maintien au chaud doit cesser plus tôt, effl eurez le champ (26). -
Página 43: Préparation Du Café Avec Du Café Moulu
3. Effl eurez le champ (26) pour enclencher le broyeur et lancer la préparation du café. L’affi chage (11) clignote à l’écran. Les grains fraîchement moulus sont transportés de la chambre du broyeur dans le fi ltre permanent pour leur infusion à l’eau chaude. Si la préparation du café... -
Página 44: Annulation De La Présélection De L'hEure De Mise En Marche
Dès qu’il est l’heure programmée, l’appareil se met en marche automatiquement. L’affi chage (11) clignote à l'écran. Une fois la minuterie programmée, vous pouvez encore modifi er les réglages pour la préparation de votre café. L’appareil prépare le café selon les réglages sauvegardés en dernier. - Página 45 Elles doivent donc être régulièrement nettoyées en profondeur (au moins toutes les 4 semaines). Nous recommandons à cet effet les pastilles de nettoyage premium BEEM qui éliminent ces résidus rapidement et simplement. À savoir que ces pastilles de nettoyage ménagent le matériel et assurent un nettoyage pour usage alimentaire respectueux de l'environnement –...
-
Página 46: Dépannage
Pour procéder au détartrage, nous vous recommandons le concentré anticalcaire premium de BEEM. Le concentré anticalcaire premium de BEEM est effi cace et d’usage alimentaire. Il est disponible auprès des revendeurs spécialisés, sur notre site web www.beem.de ou sur demande auprès de notre service après-vente. -
Página 47: Garantie Et Restrictions De Responsabilité
Problème Cause possible Solution Le fusible s’est déclenché Trop d’appareils sont branchés Réduisez le nombre d’appareils dans la boîte à fusibles. sur le même circuit électrique. sur le circuit électrique. De l’eau s'échappe de Il y a trop d'eau dans réservoir Ne remplissez pas trop le l'appareil. -
Página 48: Caractéristiques Techniques
Version : Cafetière en Cafetière Cafetière en verre et verre isotherme isotherme Numéro de modèle : 380401 380402 380403 Tension d'alimentation : 220 – 240 V ~ 50 – 60 Hz Puissance : 1000 W Contenance du réservoir de 0,25 à 1,25 litre (2 – 10 tasses) d’eau :... - Página 49 Volumen de suministro De un vistazo Información sobre el manual de instrucciones Uso previsto Indicaciones de seguridad Antes del primer uso Colocación y conexión del aparato Uso y funcionamiento Hora Llenado de granos de café Ajuste del grado de molienda Llenado del depósito de agua Colocación del fi...
-
Página 50: Volumen De Suministro
Volumen de suministro • Máquina de café • en función de la versión: jarra de cristal y / o termo • Compartimento de granos de café • Cepillo de limpieza • Cuchara dosifi cadora • Elemento fi ltrante • Filtro permanente •... -
Página 51: Uso Previsto
Nos alegramos de que se haya decidido por esta máquina de café. Si tiene alguna pregunta sobre el aparato o sobre piezas de repuesto o accesorios, póngase en contacto con el servicio de atención al cliente a través de nuestro sitio web: www.beem.de Información sobre el manual de instrucciones Antes de utilizar por primera vez el aparato, lea atentamente el manual de instrucciones y guárdelo en un lugar accesible para futuras consultas y para otros usuarios. -
Página 52: Indicaciones De Seguridad
Indicaciones de seguridad ADVERTENCIA: Observar todas las indicaciones de seguridad, las instrucciones, las imágenes y los datos técnicos de este aparato. El incumplimiento de las indicaciones de seguridad y las instrucciones puede ocasionar descargas eléctricas, incendios y lesiones. Este aparato puede ser utilizado por personas con capacidades •... - Página 53 No efectuar modifi caciones en el aparato. No reemplazar el cable • de conexión por cuenta propia. Si el aparato o su cable de conexión están dañados, deberán ser sustituidos o reparados por el fabricante, el servicio de atención al cliente o los distribuidores especializados con el fi...
- Página 54 • Por motivos de seguridad, es preciso comprobar que no haya daños en el aparato ni en el cable de conexión antes de cada puesta en marcha. Utilizar el aparato solo si está operativo. • Asegurarse de que no sea posible tropezarse con el cable de conexión. El cable de conexión no debe quedar colgando de la superfi...
-
Página 55: Antes Del Primer Uso
Antes del primer uso 1. Pase un paño limpio y húmedo por el aparato. Enjuague la jarra de café (6), el elemento fi ltrante y el fi ltro permanente, así como la cuchara dosifi cadora con un poco de detergente lavavajillas y agua clara. 2. -
Página 56: Uso Y Funcionamiento
Uso y funcionamiento Hora En cuanto se conecta el enchufe a una toma de corriente, se enciende la iluminación de la pantalla y parpadea la indicación de hora 12:00. El aparato dispone de un formato de 24 horas. 1. Ajuste las horas tocando el campo H (21). 2. -
Página 57: Colocación Del Fi Ltro
Colocación del fi ltro 1. Abra el compartimento del fi ltro (5). 2. Introduzca el cartucho del fi ltro en el compartimento del fi ltro. 3. Inserte el fi ltro permanente en el elemento fi ltrante (imagen G). 4. Vuelva a cerrar el compartimento del fi ltro. Este debe enclavarse. Ajuste de la cantidad de tazas Cuando se prepara el café... -
Página 58: Función De Conservación Del Calor
Función de conservación del calor El aparato dispone de una función automática de conservación del calor. La placa calentadora permanece encendida tras cada proceso de preparación del café durante aprox. 40 minutos. Si desea fi nalizar antes de tiempo la función de conservación del calor, toque el campo (26). -
Página 59: Preparación De Café Con Café Molido
3. Toque el campo (26), para encender el molinillo e iniciar el proceso de preparación del café. La indicación (11) parpadea en la pantalla. El café recién molido se transporta a través de la bandeja del molinillo al fi ltro permanente y, a continuación, se escalda con agua caliente. Si desea interrumpir antes el proceso de preparación del café, toque el campo . -
Página 60: Limpieza Y Cuidado
Cuando llegue la hora ajustada, el aparato se enciende automáticamente. En la pantalla parpadea la indicación (11). Después de haber ajustado el temporizador, puede seguir modifi cando los ajustes de su café. ¡El aparato prepara el café con los últimos ajustes guardados! Así que no ajuste el temporizador hasta que sepa que no quiere hacer más cambios en los ajustes. -
Página 61: Limpieza Del Termo
4. Deje que la solución de limpieza actúe durante unos minutos. 5. Vacíe la solución de limpieza y enjuague bien el termo varias veces. ¡Tener en cuenta! Las pastillas limpiadoras de BEEM no tienen un efecto descalcifi cador. Descalcifi cación Los depósitos de cal no solo afectan a la calidad del café... -
Página 62: Almacenamiento
Para la descalcifi cación recomendamos el concentrado descalcifi cador prémium de BEEM. El concentrado descalcifi cador prémium de BEEM es efi caz y seguro para los alimentos, además de respetuoso con el medioambiente, y puede adquirirse en comercios especializados, en nuestro sitio web www.beem.de o solicitándolo a través de nuestro servicio de atención al cliente. -
Página 63: Garantía Y Limitaciones De Responsabilidad
Problema Posible causa Solución Hay demasiada agua en el No llene el depósito de agua en Sale agua del aparato. depósito de agua (10). exceso. La protección antigoteo está Limpie el elemento fi ltrante con El café tarda mucho en atascada. -
Página 64: Datos Técnicos
02576 04233 04260 Versión: Jarra de cristal Termo Jarra de cristal y termo Número de modelo: 380401 380402 380403 Suministro de tensión: 220 – 240 V ~ 50 – 60 Hz Potencia: 1000 W Capacidad del depósito de de 0,25 a 1,25 litros (2 – 10 tazas) - Página 65 Contenuto della confezione Panoramica Informazioni sulle istruzioni per l’uso Destinazione d’uso Indicazioni di sicurezza Prima del primo utilizzo Installazione e collegamento dell’apparecchio Uso e funzionamento Riempimento con chicchi di caffè Impostazione del grado di macinazione Riempimento del serbatoio dell’acqua Inserimento del fi ltro Impostazione del numero di tazze Impostazione dell’intensità...
-
Página 66: Contenuto Della Confezione
Contenuto della confezione • Macchina da caffè • A seconda della versione: bricco in vetro e/o bricco termico • Vano dei chicchi di caffè • Spazzola di pulizia • Cucchiaio dosatore • Inserto per fi ltro • Filtro permanente • Istruzioni per l’uso Controllare che la fornitura sia completa e che i componenti non abbiano subito danni durante il trasporto. - Página 67 Per domande sull’apparecchio e su ricambi/accessori, contattare il servizio di assistenza clienti tramite il nostro sito web: www.beem.de Informazioni sulle istruzioni per l’uso Prima di utilizzare l’apparecchio per la prima volta, leggere attentamente le istruzioni per l’uso e conservarle per future consultazioni.
-
Página 68: Indicazioni Di Sicurezza
Indicazioni di sicurezza AVVERTENZA: rispettare tutte le indicazioni di sicurezza, le istruzioni, le illustrazioni e i dati tecnici di cui è provvisto l’apparecchio. La mancata osservanza delle avvertenze di sicurezza e delle istruzioni può causare scosse elettriche, incendi e/o lesioni. L’apparecchio può... - Página 69 Non apportare modifi che all’apparecchio. Non sostituire • autonomamente il cavo di collegamento. L’apparecchio o il cavo di collegamento dell’apparecchio eventualmente danneggiati devono essere sostituiti o riparati dal produttore, dal servizio di assistenza clienti oppure da un laboratorio specializzato autorizzato, per evitare i rischi.
- Página 70 • Tenere lontano dal vano dei chicchi di caffè e da quello del macinacaffè capi d’abbigliamento, fazzoletti, sciarpe, gioielli, cravatte e capelli lunghi. • Quando l’apparecchio è in funzione non inserire le mani o oggetti nel vano dei chicchi di caffè e in quello del macinacaffè! •...
-
Página 71: Prima Del Primo Utilizzo
Prima del primo utilizzo 1. Pulire l’apparecchio con un panno umido e pulito. Pulire il bricco del caffè (6), l’inserto per fi ltro, il fi ltro permanente e il cucchiaio dosatore con del detersivo e acqua pulita. 2. Installare e collegare l’apparecchio (vedere capitolo “Installazione e collegamento dell’apparecchio”). -
Página 72: Uso E Funzionamento
Uso e funzionamento Quando la spina viene infi lata in una presa di corrente, l’illuminazione del display si accende e l’indicazione dell’orario 12:00 lampeggia. L’ora è in formato 24 ore. 1. Impostare le ore toccando il campo H (21). 2. Impostare i minuti toccando il campo M (19). L’ora rimane memorizzata fi... -
Página 73: Inserimento Del Fi Ltro
Inserimento del fi ltro 1. Aprire il vano del fi ltro (5). 2. Inserire l'inserto per fi ltro nel vano del fi ltro. 3. Inserire il fi ltro permanente nell’inserto per fi ltro (Figura G). 4. Richiudere il vano del fi ltro. Deve bloccarsi in posizione. Impostazione del numero di tazze Nella preparazione con chicchi di caffè... -
Página 74: Preparazione
Funzione di mantenimento in caldo L’apparecchio dispone di una funzione automatica di mantenimento in caldo. La piastra di mantenimento in caldo rimane accesa per ca. 40 minuti dopo ogni infusione. Se la funzione di mantenimento in caldo deve essere terminata prima, toccare il campo (26). -
Página 75: Preparazione Del Caffè In Polvere
3. Premere il campo (26) per accendere il macinacaffè e avviare l’infusione. L’indicazione (11) lampeggia sul display. Il caffè appena macinato viene trasportato attraverso il vano del macinacaffè fi no al fi ltro permanente e in seguito vi viene versata sopra l’acqua bollente. Per interrompere prima l’infusione, toccare il campo . -
Página 76: Pulizia E Cura
Dopo aver impostato il timer è ancora possibile eseguire delle modifi che alle impostazioni per il caffè. L’apparecchio avvia l’infusione del caffè con le impostazioni salvate per ultime! Pertanto, impostare il timer solo una volta che si sa di non voler apportare più modifi che alle impostazioni. -
Página 77: Rimozione Del Calcare
(almeno ogni 4 settimane). A tale scopo consigliamo di utilizzare le pastiglie per la pulizia BEEM Premium che rimuovono i residui in modo semplice e veloce. Inoltre, le pastiglie per la pulizia sono delicate sui materiali e garantiscono una pulizia sicura per gli alimenti e rispettosa dell’ambiente, in modo da preservare... -
Página 78: Risoluzione Dei Problemi
Per la rimozione del calcare, raccomandiamo di usare l’anticalcare concentrato Premium BEEM. L’anticalcare concentrato Premium BEEM effi cace e sicuro per gli alimenti, nonché ecocompatibile, è disponibile presso i rivenditori specializzati, sul nostro sito www.beem.de o, su richiesta, tramite il nostro servizio clienti. -
Página 79: Garanzia E Limitazioni Di Responsabilità
Problema Possibile causa Soluzione Dall’apparecchio C’è troppa acqua nel serbatoio Non riempire eccessivamente il fuoriesce acqua. dell’acqua (10). serbatoio dell’acqua! La protezione antigoccia è Pulire l’inserto per fi ltro con Il caffè scende troppo otturata. protezione antigoccia. lentamente nel bricco Rimuovere il calcare del caffè. -
Página 80: Dati Tecnici
02576 04233 04260 Versione: Bricco in vetro Bricco termico Bricco in vetro e bricco termico Codice modello: 380401 380402 380403 Alimentazione: 220-240 V ~ 50-60 Hz Potenza: 1000 W Capacità del serbatoio da 0,25 a 1,25 litri (2-10 tazze) dell'acqua: Capacità...