Sunrise Medical Zippie IRIS Manual De Instrucciones Y Garantía Para El Usuario
Ocultar thumbs
Ver también para Zippie IRIS:
- Manual de instrucciones (141 páginas) ,
- Manual de instrucciones (190 páginas)
Tabla de contenido
Publicidad
Idiomas disponibles
Idiomas disponibles
Enlaces rápidos
Zippie
®
J WITH TRANSIT OPTION
J WITHOUT TRANSIT OPTION
Supplier:
This manual must be given to the rider of this wheelchair.
Rider:
Before using this wheelchair read this entire manual and
save for future reference.
Zippie
®
J CON OPCIÓN DE TRÁNSITO
J SIN OPCIÓN DE TRÁNSITO
Distribuidor:
Este manual debe ser entregado al pasajero de esta silla de ruedas.
Pasajero:
Antes de usar esta silla de ruedas, lea este manual en su totalidad y
guárdelo para futura referencia.
Zippie
®
J AVEC OPTION TRANSIT
J SANS OPTION TRANSIT
Revendeur :
ce manuel doit être remis à l'utilisateur du fauteuil roulant
Utilisateur :
Avant d'utiliser votre fauteuil, lisez attentivement ce manuel dans son
intégralité et conservez-le pour pouvoir vous y référer ultérieurement.
Zippie
®
J MIT TRANSITOPTION
J OHNE TRANSITOPTION
Fachhändler:
Dieses Handbuch muss dem Benutzer des Rollstuhls ausgehändigt werden.
Benutzer:
Vor dem Gebrauch des Rollstuhls lesen Sie bitte das gesamte Handbuch,
und bewahren Sie es für zukünftigen Bedarf auf.
Zippie
®
J CON OPZIONE PER IL TRANSITO
J SENZA OPZIONE PER IL TRANSITO
Fornitore:
Il presente manuale va consegnato all'utente della carrozzina.
Utente:
Prima di usare la carrozzina, leggere il presente manuale per intero e con-
servarlo per riferimento futuro.
User
Instruction
Manual &
Warranty
Manual de
Instrucciones
y Garantía
para el
Usuario
Manuel
d'utilisation
et garantie
Benutzer-
anweisungen
und Garantie
Manuale
dell'utente e
garanzia
Publicidad
Capítulos
Tabla de contenido
Solución de problemas

Manuales relacionados para Sunrise Medical Zippie IRIS


Resumen de contenidos para Sunrise Medical Zippie IRIS
- Página 1 Zippie User ® J WITH TRANSIT OPTION Instruction J WITHOUT TRANSIT OPTION Manual & Supplier: This manual must be given to the rider of this wheelchair. Warranty Rider: Before using this wheelchair read this entire manual and save for future reference. Zippie Manual de ®...
-
Página 2: Introduction
Please feel free to write or call us at the address and telephone number below: SUNRISE MEDICAL Customer Service Department 7477 East Dry Creek Parkway... -
Página 3: Tabla De Contenido
I I . T a b l e o f C o n t e n t s E n g l i s h II. TABLE OF CONTENTS I. INTRODUCTION ................II. TABLE OF CONTENTS ............... III. YOUR CHAIR AND ITS PARTS............IV. - Página 4 I I . T a b l e o f C o n t e n t s E n g l i s h G.Positioning Belts................H.Power Drive................. I. Push Handles ................J. Quick-Release Axles..............K.Rear Axles................... L. Rear Wheel Locks ................. M.Modified Seat Systems ..............
-
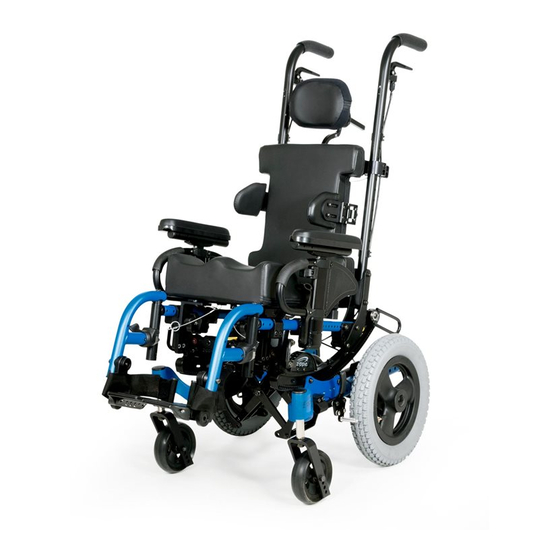
Página 5: Your Chair And Its Parts
I I I . Y o u r C h a i r a n d I t s P a r t s E n g l i s h III. YOUR CHAIR AND ITS PARTS ZIPPIE IRIS 1. Backpost 11. Carriage 2. -
Página 6: Notice- Read Before Use
I V . N o t i c e – R e a d B e f o r e U s e E n g l i s h IV. NOTICE– READ BEFORE USE A. CHOOSE THE RIGHT CHAIR & SAFETY OPTIONS Sunrise provides a choice of many wheelchair styles to meet the needs of the wheelchair rider. -
Página 7: General Warnings
V. GENERAL WARNINGS A. WEIGHT LIMIT NEVER exceed the weight limit of 150 pounds for the Zippie IRIS, for combined weight of rider and items carried. If you do exceed the limit, damage to your chair, a fall, tip-over or loss of control may occur and cause severe injury to the rider or others. -
Página 8: Changes & Adjustments
V . G e n e r a l W a r n i n g s E n g l i s h F. CHANGES & ADJUSTMENTS 1. If you modify or adjust this chair, it may increase the risk of a tip-over UNLESS you make other changes as well. -
Página 9: Motor Vehicle Safety
V . G e n e r a l W a r n i n g s E n g l i s h J. MOTOR VEHICLE SAFETY As indicated on the front cover of this user manual, identify whether your chair has been manufactured with the Transit Option installed. -
Página 10: Warnings: Falls & Tip-Overs
V I . W a r n i n g s : F a l l s & T i p - O v e r s E n g l i s h VI. WARNINGS: FALLS & TIP-OVERS A. CENTER OF GRAVITY The point where this chair will tip forward, back, or to the side depends on its center of gravity and stability. -
Página 11: D.OBstacles
V I . W a r n i n g s : F a l l s & T i p - O v e r s E n g l i s h D. OBSTACLES Obstacles and road hazards (such as potholes and broken pavement) can damage your chair and may cause a fall, tip-over or loss of control. -
Página 12: Moving Backward
V I . W a r n i n g s : F a l l s & T i p - O v e r s E n g l i s h F. MOVING BACKWARD Use extra care when you move your chair backward. Your chair is most stable when you propel yourself forward. -
Página 13: H.TRansfers
V I . W a r n i n g s : F a l l s & T i p - O v e r s E n g l i s h H. TRANSFER It is dangerous to transfer on your own. It requires good balance and agility. Be aware that there is a point during every transfer when the wheelchair seat is not below you. -
Página 14: Warnings: For Safe Use (Attendants)
• Never push or propel the chair with the seat tilted in a forward position. • Never add chair accessories that are not specifically designed for Zippie IRIS. • Never exceed a tilted position that aligns the backrest parallel to the ground. -
Página 15: Descending Stairs
V I I . W a r n i n g s : F o r S a f e U s e ( A t t e n d a n t s ) E n g l i s h 5. -
Página 16: Warnings: Components & Options
V I I I . W a r n i n g s : C o m p o n e n t s & O p t i o n s E n g l i s h VIII. WARNINGS: COMPONENTS & OPTIONS A. -
Página 17: Footrests
V I I I . W a r n i n g s : C o m p o n e n t s & O p t i o n s E n g l i s h E. FOOTRESTS Footrests will not bear the weight of this chair 1. -
Página 18: H.POwer Drive
V I I I . W a r n i n g s : C o m p o n e n t s & O p t i o n s E n g l i s h H. POWER DRIVE Do not install a power drive on any Zippie wheelchair. -
Página 19: M.MOdified Seat Systems
• Before using this system as a seat in a motor vehicle, you should read and comply with all instructions for use provided by both Sunrise Medical and the seating manufacturer as well as the instructions for use of any other component or acces- sory manufacturer. -
Página 20: Set-Up And Adjustment
I X . S e t - U p & A d j u s t m e n t E n g l i s h IX. SET-UP & ADJUSTMENT NOTE– Setting the wheelchair on a table or on a flat surface, such as a workbench, helps make these procedures easier. -
Página 21: D.ARticulating Legrest (Optional)
I X . S e t - U p & A d j u s t m e n t E n g l i s h 3. Height Adjustment a. Loosen and remove the retaining bolt (G) in the footrest mounting bracket. b. -
Página 22: Caster/Forks Assembly
I X . S e t - U p & A d j u s t m e n t E n g l i s h F. CASTER/FORKS ASSEMBLY 1. Installation a. Remove dust cover (A) from caster housing. Pry dust cover off using a back and forth motion. -
Página 23: H.HEight-Adjustable Armrests (Optional)
I X . S e t - U p & A d j u s t m e n t E n g l i s h H. HEIGHT-ADJUSTABLE ARMREST (OPTIONAL) 1. Installation a. Slide the outer armpost (1) down into the receiver (2) mounted to the wheelchair frame. -
Página 24: Anti-Tip Tubes- Rear
I X . S e t - U p & A d j u s t m e n t E n g l i s h J. ANTI-TIP TUBES- REAR Anti-tip tubes are recommended for all wheelchairs. NOTE– Use a torque setting of 96 in.-lbs. when setting-up anti-tip tubes. 1. -
Página 25: Tilt-In-Space Mechanism
The tilt-in-space mechanism is installed by Sunrise. Two cable/trigger mechanisms positive- ly lock the chair in place from -5º to 60º depending on the set-up. The Zippie IRIS has the capability to provide from 0º to 5º of forward tilt. DO NOT ATTEMPT TO MAKE THIS ADJUST- MENT. -
Página 26: N.STroller Handle Extension
I X . S e t - U p & A d j u s t m e n t E n g l i s h 4. Flip-Down Back Function a. To fold the back down, pull-up the back release pins (A) and push the backrest forward. b. -
Página 27: Q.FRame Width
I X . S e t - U p & A d j u s t m e n t E n g l i s h Q. FRAME WIDTH The frame of the IRIS is built to accommodate growth from 10" to 18" wide using the three strut tube assemblies. -
Página 28: U.CArriage
U. CARRIAGE The carriage of the Zippie IRIS can be adjusted to preset the range of tilt from –5° to 50° from 0° to 55° or from 5° to 60°. IMPORTANT NOTE– Do not attempt to make this adjustment. This adjustment must be done by an authorized supplier only. -
Página 29: Wheel Locks
NOTE– Use a torque setting of 180 in.-lbs. when tightening bottom roller nuts (K). V. WHEEL LOCKS Zippie IRIS wheelchairs are standard with wheel locks. Wheel locks are installed at Sunrise. Adjustment a. Loosen the screws (F). Do not attempt to remove one screw at a time. -
Página 30: Attendant Wheel Lock Installation
I X . S e t - U p & A d j u s t m e n t E n g l i s h Hub Lock Assembly and hold in place over 3/4" nut. Place 1/4" spacer (item 21) between the Lower Hub Lock Assembly plate and the Hub Lock Axle Plate Adapter, aligning holes. -
Página 31: Battery Tray
The (2) strut tubes supplied with the battery tray kit create one unique wheelchair width. Please contact Sunrise Medical to acquire strut tubes for other wheelchair widths. 1. Loosen and remove the bolts (A) from both ends of the two battery tray strut tube mounts (G) 2. -
Página 32: B.HOw To Add The Battery Tray Kit
X . B a t t e r y T r a y E n g l i s h B. HOW TO ADD THE BATTERY TRAY KIT 1. Loosen and remove the bolts (A) from the rear strut tube. The existing rear strut tube will not be used in the battery tray setup. - Página 33 X . B a t t e r y T r a y E n g l i s h Battery Tray Figure A Rear strut Center strut Roller Assembly Rear axle plate Front caster bracket Battery Tray Figure B 101510 Rev.
-
Página 34: Troubleshooting
X I . T r o u b l e s h o o t i n g E n g l i s h XI. TROUBLESHOOTING You will need to adjust your chair from time to time for best performance (especially if you alter the original settings). -
Página 35: Maintenance
X I I . M a i n t e n a n c e E n g l i s h XII. MAINTENANCE A. INTRODUCTION 1. Proper maintenance will improve performance and extend the useful life of your chair. 2. -
Página 36: Maintenance Tips
X I I . M a i n t e n a n c e E n g l i s h C. MAINTENANCE TIPS 1. Axles & Axle Sleeves: Check axles and axle sleeves every six months to make sure they are tight. Loose sleeves will damage the axle plate and will affect performance. -
Página 37: Sunrise Limited Warranty
X I I I . S u n r i s e L i m i t e d W a r r a n t y E n g l i s h XIII. SUNRISE LIMITED WARRANTY A. FOR LIFETIME Sunrise warrants the frame of this wheelchair against defects in materials and workmanship for the life of the original purchaser. -
Página 38: Español
Por favor, tómese la libertad de escribirnos o llamarnos al domicilio y teléfono que aparecen abajo: Sunrise Medical Departamento de Servicios al Cliente 7477 East Dry Creek Parkway... -
Página 39: Índice
I I . Í n d i c e E s p a ñ o l II. ÍNDICE I. INTRODUCCIÓN ................II. ÍNDICE ..................III. SU SILLA Y SUS PARTES ..............IV. AVISO - LEA ESTO ANTES DE USAR LA SILLA ........A.Seleccione la Mejor Silla y las Opciones de Seguridad ...... - Página 40 I I . Í n d i c e E s p a ñ o l G.Cinturones de Posicionamiento ............H.Motor Eléctrico ................I. Asideros para Empujar..............J. Ejes de Liberación Rápida.............. K.Ejes Traseros................L. Seguros de las Ruedas Traseras............M.Sistemas de Asiento Modificados ............
-
Página 41: Su Silla Y Sus Partes
I I I . S u S i l l a y S u s P a r t e s E s p a ñ o l III. SU SILLA Y SUS PARTES ZIPPIE IRIS 1. Poste posterior 11. Chasis 2. -
Página 42: Aviso - Lea Esto Antes De Usar La Silla
I V . A v i s o – L e a E s t o A n t e s d e U s a r l a S i l l a E s p a ñ o l IV. -
Página 43: Advertencias Generales
A. LÍMITE DE PESO ADVERTENCIA NUNCA sobrepase el límite de peso de 68 Kg. (150 libras) para la Zippie IRIS, del peso combinado del pasajero y los objetos cargados. Si sobrepasa el límite, puede ocurrir daño a su silla, una caída, volcadura o pérdida del control y provo- car lesiones severas al pasajero o a otras personas. -
Página 44: Cambios Y Ajustes
V . A d v e r t e n c i a s G e n e r a l e s E s p a ñ o l F. CAMBIOS Y AJUSTES ADVERTENCIA 1. Si modifica o ajusta esta silla, puede aumentar el riesgo de una volcadura A MENOS QUE también efectúe otros cambios. -
Página 45: Seguridad Del Vehículo De Motor
V . A d v e r t e n c i a s G e n e r a l e s E s p a ñ o l J. SEGURIDAD DEL VEHÍCULO DE MOTOR Tal como se indica en la portada de este manual del pasajero, vea si su silla fue fabricada con la Opción de Tránsito instalada. -
Página 46: Advertencias: Caídas Y Volcaduras
V I . A d v e r t e n c i a s : C a í d a s y V o l c a d u r a s E s p a ñ o l VI. -
Página 47: D.OBstáculos
V I . A d v e r t e n c i a s : C a í d a s y V o l c a d u r a s E s p a ñ o l D. -
Página 48: Moviéndose Hacia Atrás
V I . A d v e r t e n c i a s : C a í d a s y V o l c a d u r a s E s p a ñ o l F. -
Página 49: H.CAmbios
V I . A d v e r t e n c i a s : C a í d a s y V o l c a d u r a s E s p a ñ o l H. -
Página 50: Advertencias: Para Un Uso Seguro (Ayudantes)
• Nunca empuje o impulse la silla con el asiento inclinado hacia delante. • Nunca añada a la silla accesorios que no estén diseñados específicamente para la Zippie IRIS. • Nunca exceda una posición inclinada que alinee el respaldo de manera paralela con el piso. -
Página 51: D.SUbiendo Escaleras
V I I . A d v e r t e n c i a s : P a r a u n U s o S e g u r o ( A y u d a n t e s ) E s p a ñ... -
Página 52: Advertencias: Componentes Y Opciones
V I I I . A d v e r t e n c i a s : C o m o n e n t e s y O p c i o n e s E s p a ñ o l VIII. -
Página 53: Reposapiés
V I I I . A d v e r t e n c i a s : C o m o n e n t e s y O p c i o n e s E s p a ñ o l E. -
Página 54: H.MOtor Eléctrico
V I I I . A d v e r t e n c i a s : C o m o n e n t e s y O p c i o n e s E s p a ñ o l H. -
Página 55: M.SIstemas De Asiento Modificados
• Antes de usar este sistema como asiento en un vehículo de motor, debe leer y cumplir todas las instrucciones de uso proporcionadas tanto por Sunrise Medical como por el fabricante del asiento, así como las instrucciones del fabricante de cualquier otro componente o accesorio. -
Página 56: Preparación Y Ajustes
I X . P r e p a r a c i ó n y A j u s t e E s p a ñ o l IX. PREPARACIÓN Y AJUSTE NOTA – Para hacer estos procedimientos más fácilmente, coloque la silla de ruedas sobre una mesa o superficie plana, como una mesa de trabajo. -
Página 57: D.REposapiernas Articulado (Opcional)
I X . P r e p a r a c i ó n y A j u s t e E s p a ñ o l 3. Ajuste de la Altura a. Afloje y remueva el perno de retención (G) de la abrazadera de montaje del repos- apiés. -
Página 58: Conjunto Rueda Pivotante Horquillas
I X . P r e p a r a c i ó n y A j u s t e E s p a ñ o l F. CONJUNTO RUEDA PIVOTANTE / HORQUILLA 1. Instalación a. Quite el guardapolvo (A) del alojamiento de la rueda pivotante. Quítelo con un movimiento hacia delante y atrás. -
Página 59: H.REposabrazos De Altura Ajustable (Opcionales)
I X . P r e p a r a c i ó n y A j u s t e E s p a ñ o l H. REPOSABRAZOS DE ALTURA AJUSTABLE (OPCIONAL) 1. Instalación a. Deslice hacia abajo el poste (1) en el receptáculo (2) montado en el bastidor de la silla de ruedas. -
Página 60: Tubos Contra Volcaduras - Parte Trasera
I X . P r e p a r a c i ó n y A j u s t e E s p a ñ o l J. TUBOS CONTRA VOLCADURAS - PARTE TRASERA Se recomiendan los tubos contra volcaduras para todas las sillas de ruedas. NOTA –... -
Página 61: Mecanismo De Inclinación
I X . P r e p a r a c i ó n y A j u s t e E s p a ñ o l L. MECANISMO DE INCLINACIÓN El mecanismo de inclinación es instalado por Sunrise. Dos mecanismos de cable / activador aseguran a la silla en su lugar desde –5°... -
Página 62: Extensión Del Asidero Estilo Carriola (Opcional)
I X . P r e p a r a c i ó n y A j u s t e E s p a ñ o l 4. Función Abatible del Respaldo a. Para abatir el respaldo, tire de los pasadores de liberación del respaldo (A) hacia arri- ba y empuje el respaldo hacia delante. -
Página 63: Q.ANchura Del Bastidor
I X . P r e p a r a c i ó n y A j u s t e E s p a ñ o l Q. ANCHURA DEL BASTIDOR El bastidor de la IRIS está construido para ajustarse al crecimiento de 25.4 a 45.7 cm (10 a 18 pulg.) de anchura usando los conjuntos de tres puntales de tubo. -
Página 64: U.CHasis
U. CHASIS El chasis de la Zippie IRIS se puede ajustar a un rango predeterminado de inclinación que va desde 5° hasta 50°, de 0° hasta 55° o de 5° a 60°. - Página 65 I X . P r e p a r a c i ó n y A j u s t e E s p a ñ o l 3. Ajuste del Rodamiento Superior Herramientas recomendadas: (1) llave abierta de _ pulg. y (1) llave abierta de 9/16 pulg. NOTA IMPORTANTE –...
-
Página 66: Seguros De Las Ruedas
I X . P r e p a r a c i ó n y A j u s t e E s p a ñ o l V. SEGUROS DE LAS RUEDAS Los seguros de las ruedas vienen como equipo estándar en las sillas de ruedas IRIS de Zippie. -
Página 67: Revisión
I X . P r e p a r a c i ó n y A j u s t e E s p a ñ o l 5. Instale los conjuntos de seguro remoto izquierdo y derecho (pieza 4) en las placas deslizables usando los bloques espaciadores del seguro de rueda del ayudante (pieza 3), los tornillos M6 x 60 (pieza 6), arandelas de seguridad (pieza 5) y las tuercas de ajuste del seguro de la rueda (pieza 9). -
Página 68: Bandeja De La Batería
NOTA – Los dos puntales de tubo (2) incluidos con el juego de bandeja de batería crean una anchura única de silla de ruedas. Contacte a Sunrise Medical para adquirir puntales de tubo para anchuras diferentes de silla de ruedas. -
Página 69: Para Añadir El Conjunto De Bandeja De La Batería
X . B a n d e j a d e l a B a t e r í a E s p a ñ o l B. PARA AÑADIR EL CONJUNTO DE BANDEJA DE LA BATERÍA 1. Afloje y retire los pernos (A) del puntal de tubo trasero. El puntal de tubo trasero actual no será... - Página 70 X . B a n d e j a d e l a B a t e r í a E s p a ñ o l Bandeja de la batería Figura A Puntal trasero Puntal central Conjunto de rodamientos Placa del eje trasero Abrazadera de la...
-
Página 71: Guía De Detección Y Solución De Problemas
X I . G u í a d e D e t e c c i ó n y S o l u c i ó n d e P r o b l e m a s E s p a ñ o l XI. -
Página 72: Mantenimiento
X I I . M a n t e n i m i e n t o E s p a ñ o l XII. MANTENIMIENTO A. INTRODUCCIÓN 1. El mantenimiento apropiado mejorará el rendimiento y extenderá la vida útil de su silla. -
Página 73: Consejos De Mantenimiento
X I I . M a n t e n i m i e n t o E s p a ñ o l C. CONSEJOS DE MANTENIMIENTO 1. Ejes y Mangas de los Ejes: Revise los ejes y sus mangas cada seis meses para asegurarse que estén firmes. Las mangas sueltas pueden dañar la placa del eje y afectar el desempeño. -
Página 74: Garantía Limitada De Sunrise
X I I I . G a r a n t í a L i m i t a d a d e S u n r i s e E s p a ñ o l XIII. GARANTÍA LIMITADA DE SUNRISE A. -
Página 75: Français
N’hésitez pas à nous écrire à l’adresse suivante ou à nous appeler au numéro indiqué ci-dessous : SUNRISE MEDICAL S.A.S. 13, RUE DE LA PAINGUETTERIE F-37390 CHANCEAUX SUR CHOISILLE TÉL : +33 (0)2 47 55 44 00... -
Página 76: Sommaire
I I . S o m m a i r e F r a n ç a i s II. SOMMAIRE I. INTRODUCTION ................II. SOMMAIRE..................III. VOTRE FAUTEUIL ET SES COMPOSANTS ..........IV. AVIS – À LIRE AVANT UTILISATION ..........A.Choisir le bon fauteuil et la bonne option sécurité...... - Página 77 I I . S o m m a i r e F r a n ç a i s F. Pneus ..................G.Ceinture de sécurité ..............H.Bloc d’entraînement ..............I. Poignées de poussée..............J. Axes à déverrouillage rapide ............K.Axes arrière................. L.
-
Página 78: Votre Fauteuil Et Ses Composants
I I I . V o t r e F a u t e u i l e t S e s C o m p o s a n t s F r a n ç a i s III. VOTRE FAUTEUIL ET SES COMPOSANTS ZIPPIE IRIS 1. Montant du dossier 11. Chariot 2. -
Página 79: Avis - À Lire Avant Utilisation
I V . A v i s – À L i r e A v a n t U t i l i s a t i o n F r a n ç a i s IV. AVIS – À LIRE AVANT UTILISATION A. -
Página 80: Avertissements D'ORdre Général
A. CHARGE MAXIMALE AVERTISSEMENT NE dépassez JAMAIS la charge maximale de 68 kg pour le fauteuil Zippie IRIS, pour le poids cumulé de l’utilisateur et des éléments transportés à bord du fau- teuil. Si vous ne respectez pas cette limite, vous risquez de tomber, de basculer ou de perdre le contrôle de votre fauteuil, ce qui pourrait entraîner de graves... -
Página 81: Liste De Contrôle
V . A v e r t i s s e m e n t s d ’ O r d r e G é n é r a l F r a n ç a i s E. LISTE DE CONTRÔLE AVERTISSEMENT Avant d’utiliser votre fauteuil : 1. -
Página 82: H.TErrain
V . A v e r t i s s e m e n t s d ’ O r d r e G é n é r a l F r a n ç a i s H. TERRAIN AVERTISSEMENT 1. -
Página 83: K.BEsoin D'aIde
V . A v e r t i s s e m e n t s d ’ O r d r e G é n é r a l F r a n ç a i s K. BESOIN D’AIDE AVERTISSEMENT Utilisateur Veillez à... -
Página 84: Avertissements : Chutes Et Basculements
V I . A v e r t i s s e m e n t s : C h u t e s e t B a s c u l e m e n t s F r a n ç a i s VI. -
Página 85: D.OBstacles
V I . A v e r t i s s e m e n t s : C h u t e s e t B a s c u l e m e n t s F r a n ç a i s D. -
Página 86: Reculer
V I . A v e r t i s s e m e n t s : C h u t e s e t B a s c u l e m e n t s F r a n ç a i s F. -
Página 87: H.MOnter Et Descendre De Votre Fauteuil
V I . A v e r t i s s e m e n t s : C h u t e s e t B a s c u l e m e n t s F r a n ç a i s H. -
Página 88: Escaliers
V I . A v e r t i s s e m e n t s : C h u t e s e t B a s c u l e m e n t s F r a n ç a i s J. -
Página 89: Avertissements : Pour Une Utilisation En Toute Sécurité
• Ne poussez jamais le fauteuil si le siège est incliné vers l’avant. • ’ajoutez jamais d’accessoires qui ne sont pas spécifiquement prévus pour le fauteuil Zippie IRIS. • N’inclinez jamais le fauteuil au point que le dossier se trouve parallèle au sol. -
Página 90: D.MOnter Des Escaliers
V I I . Ave r t i s s e m e n t s : Po u r u n e Ut i l i s a t i o n e n To u t e S é c u r i t é F r a n ç... -
Página 91: Avertissements : Composants Et Options
V I I I . A v e r t i s s e m e n t s : C o m p o s a n t s e t O p t i o n s F r a n ç a i s VIII. -
Página 92: Repose-Pieds
V I I I . A v e r t i s s e m e n t s : C o m p o s a n t s e t O p t i o n s F r a n ç a i s E. -
Página 93: H.BLoc D'eNtraînement
V I I I . A v e r t i s s e m e n t s : C o m p o s a n t s e t O p t i o n s F r a n ç a i s H. -
Página 94: Freins D'iMmobilisation
V I I I . A v e r t i s s e m e n t s : C o m p o s a n t s e t O p t i o n s F r a n ç a i s L. -
Página 95: Reglage Et Montage
I X . R é g l a g e e t M o n t a g e F r a n ç a i s IX. RÉGLAGE ET MONTAGE NOTE – Les procédures de montage et de réglage décrites ci-après sont plus faciles à effectuer en posant le fauteuil sur une table ou une surface plane, comme par exemple un établi. -
Página 96: D.REpose-Jambes Articulé (En Option)
I X . R é g l a g e e t M o n t a g e F r a n ç a i s 3. Réglage de la hauteur a. Desserrez et enlevez les boulons (G) du support de fixation du repose-pieds. b. -
Página 97: Ensemble Fourche/Roue Avant
I X . R é g l a g e e t M o n t a g e F r a n ç a i s F. ENSEMBLE FOURCHE/ROUE AVANT 1. Installation a. Retirez le cache-poussière (A) du support de fourche en faisant levier vers l’avant et l’arrière. -
Página 98: H.ACcoudoir À Hauteur Réglable (En Option)
I X . R é g l a g e e t M o n t a g e F r a n ç a i s H. ACCOUDOIR A HAUTEUR REGLABLE (EN OPTION) 1. Installation a. Faites glisser le montant extérieur (1) dans le tube de logement (2) monté sur le châssis du fauteuil. -
Página 99: Montants Des Roulettes Anti-Bascule - Arrière
I X . R é g l a g e e t M o n t a g e F r a n ç a i s J. MONTAGE DES ROULETTES ANTI-BASCULE - ARRIERE Il est recommandé de monter des roulettes anti-bascule sur tous les fauteuils roulants. NOTE–... -
Página 100: Assiste Basculante
-5º à 60º, selon le réglage sélectionné. Le Zippie IRIS peut être incliné vers l’avant de 0º à 5º. N’ESSAYEZ PAS D’EF- FECTUER CETTE OPÉRATION VOUS-MÊME. Seul un revendeur agréé doit effectuer ce réglage. -
Página 101: N.EXtension De La Poignée Poussette
I X . R é g l a g e e t M o n t a g e F r a n ç a i s 4. Rabattage du dossier a. Pour rabattre complètement le dossier, tirez sur les goupilles de déverrouillage arrière (A) et couchez le dossier vers l’avant. -
Página 102: Q.LArgeur Du Châssis
I X . R é g l a g e e t M o n t a g e F r a n ç a i s Q. LARGEUR DU CHASSIS Le châssis du fauteuil IRIS peut passer d’une largeur de 25,4 à 45,7 cm tout using en utilisant les trois ensembles de tubes cylindriques. -
Página 103: U.CHariot
à la matrice du bon de commande. U. CHARIOT Le chariot du fauteuil Zippie IRIS peut se régler dans une fourchette prédéfinie d’inclinai- son, notamment de –5° à 50°, de 0° à 55° ou de 5° à 60°. -
Página 104: Freins D'iMmobilisation
NOTE– Pour le serrage des écrous des galets inférieurs (K), le serrage dynamométrique sera de 180 in.-lbs. V. FREINS D’IMMOBILISATION Les fauteuils Zippie IRIS sont dotés de freins d’immobilisation. Ces freins sont montés en usine Réglage a. Desserrez les vis (F). N’essayez pas d’enlever une vis à la fois. -
Página 105: W.INstallation Du Dispositif De Blocage De Hoyeu
I X . R é g l a g e e t M o n t a g e F r a n ç a i s W. INSTALLATION DU DISPOSITIF DE BLOCAGE DE MOYEU 1. Enlevez la roue et l’essieu du fauteuil. 2. -
Página 106: Contrôle
I X . R é g l a g e e t M o n t a g e F r a n ç a i s 6. Remettez les roues et glissez les ensembles de blocage commandés à distance vers l’arrière jusqu’à... -
Página 107: Supports Pour Batterie
Les deux (2) tubes cylindriques accompagnant le kit de support pour batterie permet- tent d’obtenir une largeur de fauteuil unique. Si vous souhaitez obtenir d’autres largeurs pour votre fauteuil, veuillez contacter Sunrise Medical pour vous procurer les tubes cylindriques appropriés. -
Página 108: B.INstallation Du Kit De Support Pour Batterie
X . S u p p o r t s P o u r B a t t e r i e F r a n ç a i s B. INSTALLATTION DU KIT DE SUPPORT POUR BATTERIE 1. Desserrez et retirez les boulons (A) du tube cylindrique arrière. Le tube cylindrique arrière existant ne sera pas utilisé... - Página 109 X . S u p p o r t s P o u r B a t t e r i e F r a n ç a i s Supports pour batterie Figure A Tube cylindruque arrière Tube cylindrique centrale Ensemble du galet Joue d’essieu arrière...
-
Página 110: Dépannage
X I . D é p a n n a g e F r a n ç a i s XI. DÉPANNAGE Vous devez régulièrement faire contrôler et éventuellement faire régler votre fauteuil pour lui assurer un fonctionnement optimal (surtout si vous avez modifié les réglages originaux). Le tableau ci-dessous indique des solutions pour régler toute éventuelle anomalie. -
Página 111: Entretien
X I I . E n t r e t i e n e F r a n ç a i s XII. ENTRETIENE A. INTRODUCTION 1. Un bon entretien améliorera la performance et prolongera la durée de vie de votre fauteuil. -
Página 112: Conseils D'ENtretien
X I I . E n t r e t i e n e F r a n ç a i s C. CONSEILS D’ENTRETIEN 1. Axes et manchons : Vérifiez le serrage des axes et manchons tous les six mois. Des manchons desserrés sont susceptibles d’endommager la joue d’essieu et d’empêcher une bonne performance de votre fauteuil. -
Página 113: Garantie Limitée De Sunrise
1. Obtenir notre accord, pendant la période de validité de la garantie, avant de renvoyer ou de faire réparer les pièces couvertes par la garantie. 2. Renvoyer le fauteuil ou la/les pièce(s), en port pré-payé à Sunrise Medical S.A.S. – 13 rue de la Painguetterie – F-37390 Chanceaux sur Choisille 3. -
Página 114: Deutsch
über den Service, den Sie von Ihrem Fachhändler erhalten, erfahren. Schreiben Sie uns an die unten stehende Adresse, oder rufen Sie uns unter der unten angegebenen Telefonnummer an: SUNRISE MEDICAL AG SUNRISE MEDICAL GMBH & CO. KG LÜCKHALDE 14 KAHLBACHRING 3074 MURI 69254 MALSCH/HEIDELBERG TEL. -
Página 115: Inhaltsverzeichnis
I I . I n h a l t s v e r z e i c h n i s D e u t s c h II. INHALTSVERZEICHNIS I. EINFÜHRUNG ................. II. INHALTSVERZEICHNIS ..............III. DER STUHL UND SEINE TEILE............IV. - Página 116 X. Installation der Feststellbremse für den Begleiter ......Y. Überprüfung ................XI. BATTERIEHALTERUNG ..............A.Einstellung der Rollstuhlbreite ............B.Anbau des Batteriehalterungs-kits ..........C. Anbau der Komponenten der Batteriehalterung......... XI. FEHLERSUCHE ................XII. WARTUNG ..................XIII. BESCHRÄNKTE GARANTIE VON SUNRISE MEDICAL ......101510 Rev. A...
-
Página 117: Der Stuhl Und Seine Teile
I I I . D e r S t u h l u n d S e i n e T e i l e D e u t s c h III. DER STUHL UND SEINE TEILE ZIPPIE IRIS Rücken 11. Wippe Armauflage höhenverstellbar... -
Página 118: Achtung - Vor Der Inbetriebnahme Lesen
I V . A c h t u n g – V o r d e r I n b e t r i e b n a h m e L e s e n D e u t s c h IV. -
Página 119: Allgemeine Warnungen
A. HÖCHSTLAST WARNUNG Benutzer plus mitgeführte Gegenstände dürfen bei der Zippie IRIS die Höchstlast von 68 kg NIEMALS überschreiten. Das Überschreiten der Höchstlast kann zu Schäden am Stuhl, zu Fallen oder Kippen, Verlust der Kontrolle und zu schweren Verletzungen des Benutzers und anderer Personen führen. -
Página 120: Änderungen Und Einstellungen
WENN NICHT zusätzlich entsprechende weitere Änderungen vorgenommen werden. 2. Wenden Sie sich an Ihren von Sunrise Medical zugelassenen Fachhändler, BEVOR Sie Änderungen oder Einstellungen an diesem Stuhl ausführen. 3. Wir empfehlen die Verwendung von Antikippstützen , bis Sie sich an den Stuhl gewöhnt haben und sicher sind, dass Sie kein Kippen riskieren. -
Página 121: Sicherheit In Einem Kraftfahrzeug
V . A l l g e m e i n e W a r n u n g e n D e u t s c h 2. Aufgrund Ihrer tiefen Sitzstellung werden Sie möglicherweise nur schwer von Kfz- Fahrern bemerkt. -
Página 122: Warnungen: Fallen Und Kippen
Lassen Sie sich von ihrem Arzt, dem Pflegepersonal oder Therapeuten beraten, welche Achs- und Vorderradposition für Sie am besten geeignet ist. b. Lassen Sie sich von Ihrem von Sunrise Medical zugelassenen Fachhändler beraten, BEVOR Sie diesen Stuhl modifizieren oder einstellen. Denken Sie daran, dass eventuell weitere Änderungen vorgenommen werden müssen, um den Schwerpunkt zu korrigieren. -
Página 123: D.HIndernisse
V I . W a r n u n g e n : F a l l e n u n d K i p p e n D e u t s c h D. HINDERNISSE WARNUNG Hindernisse und Gefahrenstellen (wie Schlaglöcher und beschädigte Bürgersteige) können den Stuhl beschädigen und ein Fallen, Kippen oder den Verlust der Kontrolle verursachen. -
Página 124: Rückwärtsfahren
V I . W a r n u n g e n : F a l l e n u n d K i p p e n D e u t s c h F. RÜCKWÄRTSFAHREN WARNUNG Seien Sie beim Rückwärtsfahren besonders vorsichtig. Der Stuhl ist beim Vorwärtsfahren am stabilsten. -
Página 125: H.EIn- Und Aussteigen
V I . W a r n u n g e n : F a l l e n u n d K i p p e n D e u t s c h H. EIN- UND AUSSTEIGEN (TRANSFERIEREN) WARNUNG Es ist gefährlich, alleine zu transferieren. -
Página 126: Warnungen: Zum Sicheren Gebrauch (Helfer)
• Der Stuhl darf nicht geschoben oder gerollt werden, wenn sich der Sitz in der nach vorn geneigten Position befindet. • Keine Zubehörteile anbringen, die nicht spezifisch für den Zippie IRIS entworfen sind. • Der Stuhl darf nicht weiter gekippt/geneigt werden als bis die Rückenlehne parallel zum Boden steht. -
Página 127: D.AUfstieg Über Eine Treppe
, bevor Sie ihn benützen. 3. Lassen Sie mindestens einmal im Jahr eine komplette Inspektion, eine Sicherheitsüberprüfung und einen Service von einem von Sunrise Medical zugelasse- nen Fachhändler an Ihrem Stuhl durchführen. Die Missachtung dieser Warnungen kann zu Schäden am Stuhl, zum Fallen, Kippen oder Verlust der Kontrolle und zu schweren Verletzungen des Benutzers und anderer Personen führen. -
Página 128: G.TRansit In Einem Kraftfahrzeug
V I I . W a r n u n g e n : Z u m S i c h e r e n G e b r a u c h ( H e l f e r ) D e u t s c h G. -
Página 129: Warnungen: Komponenten Und Optionen
In den meisten Fällen können Antikippstützen helfen zu verhindern, dass der Stuhl nach hinten kippt. 1. Sunrise Medical empfiehlt, dass Antikippstützen verwendet werden: a. AUSSER wenn Sie als Fahrer dieses Stuhls versiert sind und sicher sein können, dass Sie kein Kippen riskieren. -
Página 130: Fußstützen
V I I I . W a r n u n g e n : K o m p o n e n t e n u n d O p t i o n e n D e u t s c h E. -
Página 131: H.ELektromotor
V I I I . W a r n u n g e n : K o m p o n e n t e n u n d O p t i o n e n D e u t s c h H. -
Página 132: Hinterradfeststellbremsen
M. MODIFIZIERTE SITZSYSTEME WARNUNG Die Verwendung eines anderen als einem von Sunrise Medical genehmigten Sitzsystems kann den Schwerpunkt dieses Stuhls verlagern. Dadurch kann der Stuhl kippen. 1. Ändern Sie das Sitzsystem Ihres Stuhles nicht, OHNE dies vorher mit Ihrem von Sunrise Medical zugelassenen Fachhändler zu besprechen. -
Página 133: Montage Und Einstellung
I X . M o n t a g e u n d E i n s t e l l u n g e n D e u t s c h IX. MONTAGE UND EINSTELLUNGEN ACHTUNG – Diese Arbeiten sind leichter ausführbar, wenn der Rollstuhl auf einem Tisch oder einer ebenen Fläche wie z.B. -
Página 134: D.HOchstellbare Fußstützen Mit Längenausgleich (Alr) (Optional)
I X . M o n t a g e u n d E i n s t e l l u n g e n D e u t s c h 3. Höheneinstellung a. Lösen und entfernen Sie die Befestigungsschrauben (G) aus dem Halterungsrohr der Fussplatte. -
Página 135: Vorderradgabel
I X . M o n t a g e u n d E i n s t e l l u n g e n D e u t s c h F. VORDERRADGABEL 1. Montage a. Entfernen Sie die Staubkappe (A) des Vorderradlagergehäuses. b. -
Página 136: H.HÖhenverstellbare Seitenlehne/Armauflage (Optional)
I X . M o n t a g e u n d E i n s t e l l u n g e n D e u t s c h H. HÖHENVERSTELLBARE SEITENLEHNE/ARMAUFLAGE 1. Montage a. Schieben Sie die äußere Armlehnenschiene (1) nach unten in die Aufnahme (2), die am Rollstuhlrahmen montiert ist. -
Página 137: Antikippstützen - Hinten
I X . M o n t a g e u n d E i n s t e l l u n g e n D e u t s c h J. ANTIKIPPSTÜTZEN - HINTEN Sunrise Medical empfiehlt Antikippstützen für alle Rollstühle. HINWEIS– Für die Montage von Antikippstützen verwenden Sie eine Torque-Einstellung von 96 in.-lbs. 1. Antikippstützen in die Aufnahmerohre montieren a. -
Página 138: Kipp-/Neigebereich (Tilt-In-Space)
/Hebelmechanismen lassen den Stuhl je nach Einstellung in einem Winkel von -5º bis 60º einrasten. Der Zippie IRIS kann von 0º bis 5º nach vorne geneigt werden. FÜHREN SIE DIESE EINSTELLUNG NICHT SELBST AUS. Sie muss von einem von Sunrise Medical zugelasse- nen Fachhändler durchgeführt werden. -
Página 139: N.STossgriff-Verlängerungen
I X . M o n t a g e u n d E i n s t e l l u n g e n D e u t s c h 4. Klappfunktion der Rückenlehne a. Um die Rückenlehne herunterzuklappen, ziehen Sie die Verschluss-Stifte (A) hoch, und klappen Sie die Lehne nach vorn. -
Página 140: Q.RAhmenbreite
I X . M o n t a g e u n d E i n s t e l l u n g e n D e u t s c h Q. RAHMENBREITE Der Rahmen des IRIS ist ausgelegt, um mit Hilfe der drei Strebenrohre eine Breitenzunahme von 25,4 cm bis 45,7 cm (10 bis 18 Zoll) zu ermöglichen. -
Página 141: U.WIppe
Matrix in der Bestellanleitung über die korrekte Einstellung. U. WIPPE Die Wippe des Zippie IRIS kann so eingestellt werden, dass ein Neigungsbereich von –5° bis 50°, von 0° bis 55° oder von 5° bis 60° erreicht wird. WICHTIGER HINWEIS – Versuchen Sie nicht, diese Einstellungen selbst auszuführen. Diese Einstellung darf nur von einem Sunrise Medical zugelassenen Fachhändler vorgenommen werden. - Página 142 I X . M o n t a g e u n d E i n s t e l l u n g e n D e u t s c h 3. Einstellung der oberen Rolle Empfohlenes Werkzeug: 1/4" Gabelschlüssel und 9/16" Gabelschlüssel. WICHTIGER HINWEIS –...
-
Página 143: Feststellbremsen
I X . M o n t a g e u n d E i n s t e l l u n g e n D e u t s c h V. FESTSTELLBREMSEN Für Zippie IRIS Rollstühle gehören Feststellbremsen zur Standardausführung. Die Feststellbremsen werden von Sunrise installiert. Einstellung a. -
Página 144: Überprüfung
Stuhl richtig bereitgestellt wurde. 2. Lesen Sie die Anleitung zur Fehlersuche. 3. Wenn das Problem weiterhin besteht, wenden Sie sich an Ihren von Sunrise Medical zugelassenen Fachhändler. Wenn Sie danach immer noch Probleme haben, wenden Sie sich an den Sunrise Medical Kundendienst. Einzelheiten darüber, wie Sie Ihren von Sunrise Medical zugelassenen Fachhändler oder den Sunrise Kundendienst kontak-... -
Página 145: Batteriehalterung
HINWEIS – Die beiden mit dem Batteriehalterungs-Kit gelieferten Strebenrohre erzeugen eine bes- timmte Rollstuhlbreite. Bitte wenden Sie sich an Sunrise Medical, um Strebenrohre für andere Rollstuhlbreiten zu erhalten. 1. Lösen und entfernen Sie die Bolzen (A) von beiden Enden der beiden Strebenrohrhalterungen (G) der Batteriehalterung. -
Página 146: B.ANbau Des Batteriehalterungs-Kits
X . B a t t e r i e h a l t e r u n g D e u t s c h B. ANBAU DES BATTERIEHALTERUNGS-KITS 1. Lösen und entfernen Sie die Bolzen (A) vom hinteren Strebenrohr. Das vorhandene hintere Strebenrohr wird bei der Anordnung mit der Batteriehalterung nicht verwen- det. - Página 147 X . B a t t e r i e h a l t e r u n g D e u t s c h BATTERIEHALTERUNG Abbildung A Hintere Strebe Mittlere Strebe Wippe Radhalteplatte Vorderradhalterung BATTERIEHALTERUNG Abbildung B 101510 Rev. A...
-
Página 148: Fehlersuche
X I . F e h l e r s u c h e D e u t s c h XI. FEHLERSUCHE Sie müssen Ihren Stuhl gelegentlich einstellen (besonders, wenn die Originaleinstellungen geändert wurden), damit er seine beste Leistung erbringt. Diese Auflistung bietet Ihnen eine erste Lösung, dann eine zweite und eine dritte, wenn nötig. -
Página 149: Wartung
2. Wenn Sie ein Problem feststellen, stellen Sie sicher, dass der Stuhl vor der nächsten Benutzung repariert wird. 3. Lassen Sie mindestens einmal im Jahr von einem von Sunrise Medical zugelassenen Fachhändler eine komplette Inspektion, eine Sicherheitsprüfung und einen Service ausführen. - Página 150 2. Bevor Sie den Stuhl wieder benutzen, vergewissern Sie sich, dass er richtig funktion- iert. Überprüfen und warten Sie alle Posten auf der „Wartungsliste“. 3. Wenn Sie den Stuhl länger als drei Monate nicht benutzen, lassen Sie ihn vor dem Gebrauch von einem von Sunrise Medical zugelassenen Fachhändler überprüfen. 101510 Rev. A...
-
Página 151: Beschränkte Garantie Von Sunrise Medical
1. Verlangen Sie während der Gültigkeitsdauer dieser Garantie unsere Zustimmung, bevor Sie von der Garantie betroffene Teile zurückschicken oder reparieren lassen. 2. Schicken Sie Rollstuhlteile, mit bezahltem Porto an die Sunrise Medical AG, Lückhalde 14, 3074 Muri 3. Sie übernehmen die Kosten für die Reparaturarbeiten oder für das Abmontieren und Montieren der Teile. -
Página 152: Italiano
I. INTRODUZIONE SUNRISE MEDICAL È A DISPOSIZIONE Grazie per avere scelto una carrozzina Zippie. Sunrise Medical sarà lieta di ricevere domande o commenti sul presente manuale, sulla sicurezza e sull’affidabilità della carrozzina e sul servizio ricevuto dal fornitore. Per contattare Sunrise Medical, usare l’indirizzo e il numero... -
Página 153: Sommario
I I . S o m m a r i o I t a l i a n o II. SOMMARIO I. INTRODUZIONE ................II. SOMMARIO ..................III. LA CARROZZINA E LE SUE PARTI ............IV. ATTENZIONE: LEGGERE PRIMA DELL’USO ........... A.Scelta della carrozzina e delle opzioni di sicurezza...... - Página 154 I I . S o m m a r i o I t a l i a n o G.Cinture di posizionamento (facoltativi)..........H.Dispositivo di trazione servoassistita ..........I. Maniglie di spinta ................ J. Perni ad estrazione rapida ............. K.Assi posteriori ................L.
-
Página 155: La Carrozzina E Le Sue Parti
I I I . L a C a r r o z z i n a e l e s u e P a r t i I t a l i a n o III. LA CARROZZINA E LE SUE PARTI ZIPPIE IRIS 1. Tubo dello schienale 11. Carrello 2. -
Página 156: Attenzione: Leggere Prima Dell'USo
IV. ATTENZIONE: LEGGERE PRIMA DELL’USO A. SCELTA DELLA CARROZZINA E DELLE OPZIONI PER LA SICUREZZA Sunrise Medical offre un’ampia gamma di carrozzine diverse per soddisfare le esigenze dei vari utenti. La scelta definitiva del tipo di carrozzina, delle opzioni e delle regolazioni spet- ta esclusivamente all’utente e all’assistente sanitario. -
Página 157: Avvisi Generali
NON eccedere la portata massima (uguale alla somma del peso dell’utente e delle cose trasportate) di 68 kg per la carrozzina Zippie IRIS. Se si supera questo lim- ite, si rischia di danneggiare la carrozzina, di cadere, di ribaltarsi o di perdere il controllo della carrozzina e causare lesioni gravi a se stessi o altri. -
Página 158: Modifiche E Regolazioni
V . A v v i s i G e n e r a l i I t a l i a n o F. MODIFICHE E REGOLAZIONI AVVERTENZA 1. Se si modifica o si regola la carrozzina, è necessario apportare anche altre modifiche per evitare il rischio di ribaltamento. -
Página 159: Sicurezza Per L'uTilizzo Su Veicoli A Motore
V . A v v i s i G e n e r a l i I t a l i a n o J. SICUREZZA PER L’UTILIZZO SU VEICOLI A MOTORE In base a quanto indicato sulla copertina frontale del presente manuale, determinare se la carrozzina è... -
Página 160: Avvisi: Cadute E Ribaltamenti
V I . A v v i s i : C a d u t e e R i b a l t a m e n t i I t a l i a n o VI. AVVISI: CADUTE E RIBALTAMENTI A. -
Página 161: D.OStacoli
V I . A v v i s i : C a d u t e e R i b a l t a m e n t i I t a l i a n o D. OSTACOLI AVVERTENZA Gli ostacoli o i pericoli stradali (per esempio le buche o i marciapiedi rotti) pos- sono danneggiare la carrozzina e causare la caduta dell’utente o il ribaltamento o la perdita di controllo della carrozzina. -
Página 162: Spostamento All'iNdietro
V I . A v v i s i : C a d u t e e R i b a l t a m e n t i I t a l i a n o F. SPOSTAMENTO ALL’INDIETRO AVVERTENZA Prestare particolare attenzione quando si sposta la carrozzina all’indietro. -
Página 163: H.TRasferimenti
V I . A v v i s i : C a d u t e e R i b a l t a m e n t i I t a l i a n o H. TRASFERIMENTI AVVERTENZA È... -
Página 164: Avvisi: Misure Di Sicurezza Per Gli Accompagnatori
• Non spingere la carrozzina con il sedile inclinato in avanti. • Non aggiungere accessori che non sono stati specificamente ideati per la carrozzina Zippie IRIS. • Non inclinare lo schienale in modo tale che sia parallelo al terreno. B. DISCESA DA UN MARCIAPIEDE O DA UN GRADINO AVVERTENZA Per aiutare l’utente a scendere da un marciapiede o un gradino all’INDIETRO,... -
Página 165: D.SAlita Sulle Scale
V I I . Av v i s i : Mi s u re d i Si c u re z z a ( p e r g l i a c c o m p a g n a t o r i ) I t a l i a n o D. -
Página 166: Avvisi: Parti E Opzioni
Le ruotine antiribaltamento possono impedire il ribaltamento all’indietro della carrozzina nella maggior parte delle situazioni normali. 1. Sunrise Medical consiglia l’uso delle ruotine antiribaltamento nei casi riportati qui di seguito. a. Quando non si ha dimestichezza con la carrozzina e si rischia di ribaltarsi. -
Página 167: Appoggiapiedi
V I I I . A v v i s i : P a r t i e O p z i o n i I t a l i a n o E. APPOGGIAPIEDI AVVERTENZA Gli appoggiapiedi non sono in grado di supportare il peso della carrozzina. 1. -
Página 168: H.DIspositivo Di Trazione Servoassistita
V I I I . A v v i s i : P a r t i e O p z i o n i I t a l i a n o H. DISPOSITIVO DI TRAZIONE SERVOASSISTITA AVVERTENZA Non installare un dispositivo di trazione servoassistita sulle carrozzine Zippie o si possono verificare le situazioni descritte qui di seguito: 1. -
Página 169: Freni Posteriori
• Prima di usare il sistema come sedile in un veicolo a motore, è necessario leggere e attenersi a tutte le istruzioni per l’uso fornite sia da Sunrise Medical che dal produttore del sedile, nonché alle istruzioni per l’uso fornite dal produttore di qualsiasi altro componente o accessorio. -
Página 170: Assetto E Regolazione
I X . A s s e t t o e R e g o l a z i o n e I t a l i a n o IX. ASSETTO E REGOLAZIONE NOTA – si consiglia di regolare la carrozzina su un tavolo o su una superficie piatta, per esempio un banco da lavoro. -
Página 171: D.PEdane Elevabili Estensibili (Facoltative)
I X . A s s e t t o e R e g o l a z i o n e I t a l i a n o 3. Regolazione dell’altezza a. Allentare e rimuovere il bullone di fermo (G) della staffa di montaggio dell’appog- giapiedi. -
Página 172: Gruppi Delle Forcelle Delle Ruotine Anteriori
I X . A s s e t t o e R e g o l a z i o n e I t a l i a n o F. GRUPPI DELLE FORCELLE DELLE RUOTINE ANTERIORI 1. Installazione a. Rimuovere il copripolvere (A) dalla sede del cuscinetto della ruotina anteriore solle- vandolo facendo leva su entrambi i lati. -
Página 173: H.BRaccioli Ad Altezza Regolabile (Facoltativi)
I X . A s s e t t o e R e g o l a z i o n e I t a l i a n o H. BRACCIOLI AD ALTEZZA REGOLABILE (OPZIONALI) 1. Installazione a. Inserire l’asta esterna del bracciolo (1) nella sede (2) montata sul telaio della car- rozzina. -
Página 174: Ruotine Antiribaltamento Posteriori
I X . A s s e t t o e R e g o l a z i o n e I t a l i a n o J. RUOTINE ANTIRIBALTAMENTO POSTERIORI L’uso delle ruotine antiribaltamento è consigliato per tutte le carrozzine. NOTA–... -
Página 175: Meccanismo Di Basculamento
-5º e 60º a seconda del- l’assetto. La carrozzina Zippie IRIS può essere inclinata in avanti di un angolo compreso tra 0º e 5º. NON APPORTARE QUESTA REGOLAZIONE PERSONALMENTE. Rivolgersi a un fornitore autorizzato. -
Página 176: N.PRolunga Del Maniglione
O. SCHIENALE RECLINABILE Il meccanismo di reclinazione a doppia levetta è installato da Sunrise Medical. 1. Reclinazione e sollevamento dello schienale a. Premere contemporaneamente entrambe le levette (D). Se si rilasciano le levette, lo schienale si blocca in posizione entro un angolo di 45°. -
Página 177: Q.LArghezza Del Telaio
I X . A s s e t t o e R e g o l a z i o n e I t a l i a n o Q. LARGHEZZA DEL TELAIO La carrozzina IRIS è stato ideata per consentire l’allargamento del telaio da 10” a 18” (25,4 cm a 45,7 cm) mediante l’uso dei tre gruppi di barre delle traverse. -
Página 178: U.CArrello
U. CARRELLO È possibile regolare il carrello della carrozzina Zippie IRIS per predefinire l’ampiezza di bas- culamento da –5° a 50°, da 0° a 55° o da 5° a 60°. NOTA IMPORTANTE – non apportare questa regolazione personalmente. Rivolgersi a un fornitore autorizzato. - Página 179 I X . A s s e t t o e R e g o l a z i o n e I t a l i a n o 3. Regolazione dei rulli superiori Di seguito sono riportati gli strumenti consigliati: una chiave fissa doppia da _” (6 mm) e una chiave fissa doppia da 9/16”...
-
Página 180: Freni
I X . A s s e t t o e R e g o l a z i o n e I t a l i a n o V. FRENI Sulle carrozzine Zippie IRIS i freni sono standard e installati da Sunrise Medical. Regolazione a. Allentare le viti (F). Non cercare di rimuovere una vite alla volta. -
Página 181: Collaudo
3. Se il problema persiste, contattare il fornitore autorizzato. Se, dopo essersi rivolti al for- nitore autorizzato, il problema persiste, contattare il servizio di assistenza alla clientela di Sunrise Medical. Leggere la pagina introduttiva per informazioni su come contattare il fornitore autorizzato o il servizio di assistenza alla clientela di Sunrise Medical. -
Página 182: Supporto Della Batteria
(2) fornite con il kit di supporto della batteria determinano una car- rozzina di larghezza unica. Chi desiderasse acquistare barre di traverse per carrozzine di altre larghezze, può contattare Sunrise Medical. 1. Allentare e rimuovere i bulloni (A) da entrambe le estremità dei due gruppi di barre delle traverse del supporto della batteria (G). -
Página 183: B.AGgiunta Del Kit Di Supporto Della Batteria
4. Installare il montante del telaio della base (il montante standard, non il montante del supporto della batteria) nella posizione appropriata (per la corretta dimensione e posizione del montante posteriore, consultare Sunrise Medical); stringere tutti i bul- loni del montante (A). - Página 184 X . S u p p o r t o d e l l a B a t t e r i a I t a l i a n o Supporto per la batteria Illustrazione A Traversa posteriore Traversa centrale Gruppo dei rulli Piastra dell’asse posteriore...
-
Página 185: Risoluzione Dei Problemi
X I . R i s o l u z i o n e d e i P r o b l e m i I t a l i a n o XI. RISOLUZIONE DEI PROBLEMI Di tanto in tanto è necessario regolare la carrozzina per garantirne le prestazioni ottimali (soprattutto se si modificano le impostazioni originali). -
Página 186: Manutenzione
X I I . M a n u t e n z i o n e I t a l i a n o XII. MANUTENZIONE A. INTRODUZIONE 1. Una manutenzione corretta consente di migliorare le prestazioni e prolungare la dura- ta della carrozzina. -
Página 187: Consigli Per La Manutenzione
X I I . M a n u t e n z i o n e I t a l i a n o C. CONSIGLI PER LA MANUTENZIONE 1. Assi e rispettivi manicotti: Controllare la tensione degli assi e dei rispettivi manicotti ogni sei mesi. Se i manicotti degli assi sono allentati, la piastra degli assi subisce dei danni e le prestazioni della car- rozzina ne risentono. -
Página 188: Garanzia
I t a l i a n o XIII. GARANZIA A. GARANZIA A VITA Sunrise Medical garantisce che il telaio della carrozzina saranno privi di difetti di materiale e fabbricazione per la durata della vita dell’acquirente originale. La durata prevista del telaio è cinque anni. - Página 192 Sunrise Medical Srl Sunrise Medical Sunrise Medical GmbH Via Riva 20, Montale 13 Rue de la Painguetterie Industriegebiet 29100 Piacenza (PC) 37390 Chanceaux-sur-Choisille D-69254 Malsch/Heidelberg ITALY FRANCE GERMANY 39-0523-5731-11 33-2-47-55-44-00 49-7253-980-460 © 2006 Sunrise Medical Inc. 7.06 101510 Rev. A...